ULINE H-8651 Air Purifier 335 Sq. Ft.

PARTS

- Front Panel
- Filter Support Frame (2) – Secures carbon and HEPA filters in place.
- Carbon Filter (2) – Captures larger initial particles and odors.
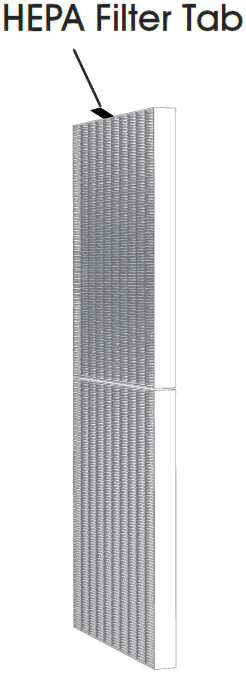
- HEPA Filter (2) – Captures 99.97% of particles 0.3 microns or larger, allowing only filtered air back into the environment.
- Control Panel – LED display and push-button controls for easy operation.
- Dust Sensor and Access Door – Continually monitors particulates in air.
- Power Cord – Convenient 6′ cord.
SAFETY
- Children under age 12 or anyone with reduced physical, sensory or mental capabilities need to be supervised when installing, operating, cleaning or maintaining the unit.
- Children should not play with the appliance, its parts or packaging material.
- Place away from curtains, draperies, tablecloths and other fabrics, since they may be drawn into product, damage motor and/or cause a fire. No part (the unit, power cord, plug, packaging, etc.) should be placed near furnaces, fireplaces, stoves or other high temperature heat sources. Do not use in a window or on any uneven or unstable surfaces.
- Keep unit, power supply, power cord and plug away from water. Do not use on wet surfaces.
- Do not use in bathtub, shower or where it may fall into bathtub, laundry, swimming pool or other water container. Do not use outdoors or expose to weather.
- Do not run cord under carpeting, cover cord with throw rugs, runners or similar coverings or route under furniture or appliances. Keep away from traffic areas to prevent tripping hazard. Cord should not hang over edges of counters where it can be crimped or closed in doors. Place near an easily accessible outlet so it can be unplugged quickly in the event of an emergency.
- Do not operate with a solid state speed device, such as a dimmer control switch, as this could possibly result in a circuit overload, fire or electric shock.
- Do not use unit if it has been dropped or damaged.
- Do not use if it has a damaged power cord or plug.
- To avoid risk of electrical shock, do not attempt to repair or replace parts. Only original replacement parts may be used. If power cord is damaged, it must be replaced by manufacturer, its service agent or qualified service personnel.
- Observe risk of fire. The unit may be equipped with a detachable power supply or a cord/plug with a safety device such as a fuse. Use only power cord and plug provided.
- Before plugging power cord into outlet, ensure all information on rating label, including voltage, is compatible with outlet’s power supply.
- Never use cord as a handle or otherwise yank, strain or stretch power cord.
- While unit is plugged in, do not insert or allow foreign objects to enter any opening possibly causing risk of electric shock, fire or damage to unit.
- A loose fit between wall outlet and plug may cause overheating and distortion of the plug. Discontinue use of product in this outlet. Contact a qualified electrician to replace loose or worn outlets.
- Unit has a polarized plug (one blade wider than the other) to reduce risk of electrical shock. Plug is intended to fit in a polarized outlet only one way. Do not attempt to defeat this safety feature.
- Before moving, repositioning, servicing, cleaning and when not in use, turn off power and unplug.
- To disconnect from outlet, grasp and pull only the plug. Also, power off and unplug if unit will be left unattended for an extended period of time or during electrical storms.
- Clean regularly, only as described in these instructions.
- Prior to cleaning, turn off power and unplug.
- Do not use gasoline, thinners, solvents, ammonia or other chemicals for cleaning. Refer to cleaning instructions in the Maintenance section on page 5.
- Do not open housing while unit is plugged in.
CONTROL PANEL
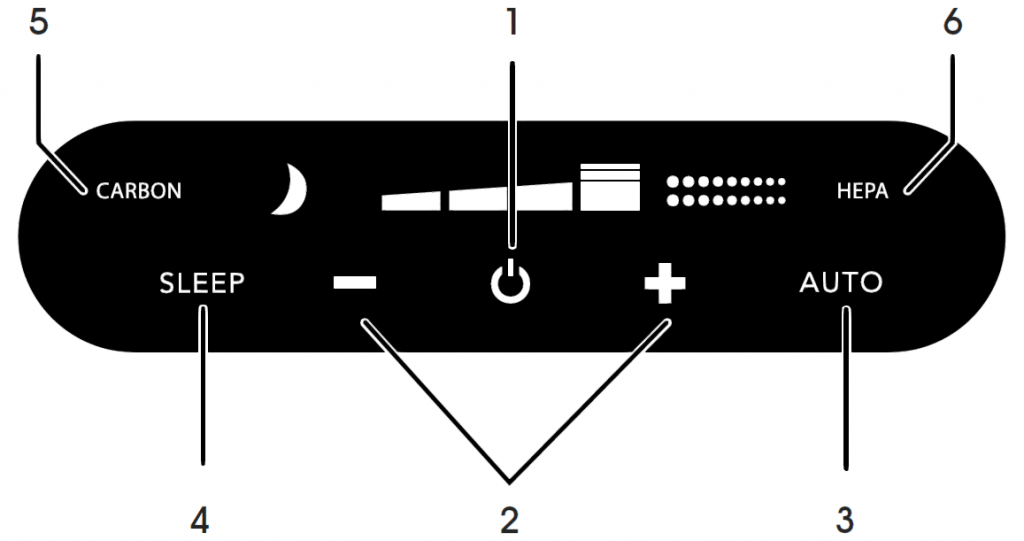
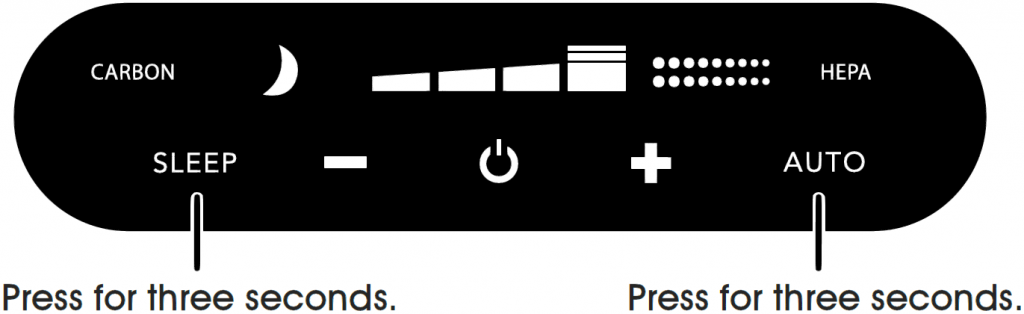
- Power – To turn on or off, press the power button.
- Fan Speed – Four fan speed settings: select Low, Medium, High or Quick Clean.
- Automatic Dust Sensing Mode – Advanced technology reads amount of particles in air and adjusts fan speed accordingly.
- Sleep Mode Setting – Senses no light or low light conditions and automatically adjusts to low speed.
- Carbon Filter Replacement – Indicator light shows when to change carbon filters. H-8652 replacement carbon filter can be purchased.
- HEPA Filter Replacement – Indicator light shows when to change HEPA filters. H-8653 replacement HEPA filter can be purchased.
OPERATION
AUTOMATIC LIGHT DIMMING
After a short period of time, control panel illumination will dim to not interfere with room lighting. Ideal for darker rooms. Press any button to re-illuminate panel.
FAN SPEED
Choose one of four fan speed settings, press “+” to increase speed. Press “–” to lower speed. LED display will indicate selected speed.
NOTE: Dust and allergens are most airborne when people and pets are active in room. For best results, set unit on a higher speed setting during these times for high demand cleaning and circulation. Set to a lower setting for quieter operation when activity is reduced.
QUICK CLEAN SPEED
A high-speed filtration setting can be used to rapidly filter air when airborne particle levels are high. Press ” +” until the Quick Clean icon displays. There will immediately be a dramatic increase in airflow that will enable maximum air filtration. Due to increased sound levels, use of this mode is recommended only as conditions require. Low, medium and high speed settings are designed for day-to-day use.
AUTOMATIC DUST SENSING MODE
This feature monitors the air quality of the room to detect the presence of particles and then adjusts the fan speed to improve air quality to optimum conditions.Press the automatic dust sensing mode button to engage this feature. The screen will display the animated Automatic Dust Sensing icon , to indicate when this feature is active. The dust sensor will continuously monitor the amount of airborne particles in the environment and adjust the fan speed between low, medium and high as needed to maintain optimum air quality. The quick clean speed is not utilized when automatic dust sensing mode is enabled. Please note that automatic dust sensing mode is overridden when sleep mode is engaged to ensure the unit is providing a consistent, low-noise level during nighttime sleep.
WHEN TO USE
This feature allows the unit to reduce energy usage when fewer airborne contaminants are present in the room. Because active people and pets tend to stir up airborne particles, the unit will tend to increase speed during peak periods of activity in the room until lower readings are obtained. This feature is ideal for rooms where activity fluctuates greatly based on time of day.
SLEEP MODE SETTING
This feature senses no light or low light conditions and automatically adjusts the unit to low speed. Press the Sleep Mode button to engage this feature. The Sleep Mode icon will display. Ideal for use in bedrooms. Higher and more powerful speeds may be used throughout the day with lower speeds and minimal noise preferred at night.
CARBON FILTER REPLACEMENT
Unit is equipped with a Carbon filter indicator light to show when it is recommended to change the carbon filters. Refer to Filter Replacement on page 4 for instructions. This feature is controlled by time of use. The light will illuminate after 4,000 hours of run time has accumulated.
HEPA FILTER REPLACEMENT
Unit is equipped with a HEPA filter indicator light to show recommended time to change the HEPA filters. Refer to Filter Replacement on page 4 for instructions. This feature is controlled by time of use. The light will illuminate after 9,000 hours of run time has accumulated. For best results, position front of unit (side with logo) towards center of room, leaving at least 6″ from walls or furniture on every side.

NOTE: For optimum airflow, air outlet should be clear of obstructions. Ensure curtains and other items are far enough away from unit to not be pulled into side inlets or interfere with airflow.
FILTER REPLACEMENT
HOW TO REPLACE FILTERS
- Unplug unit.
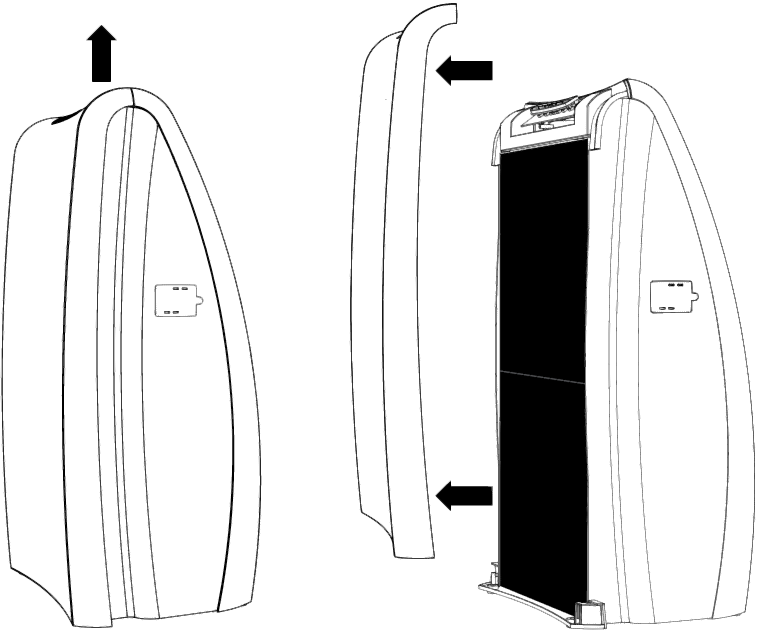
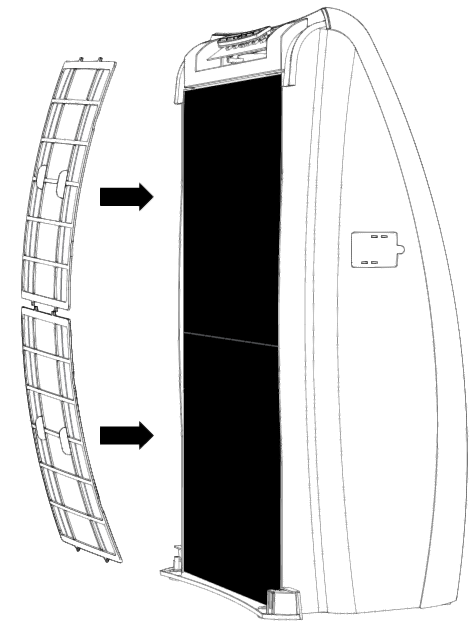
- Remove front panel by lifting up and away from unit.

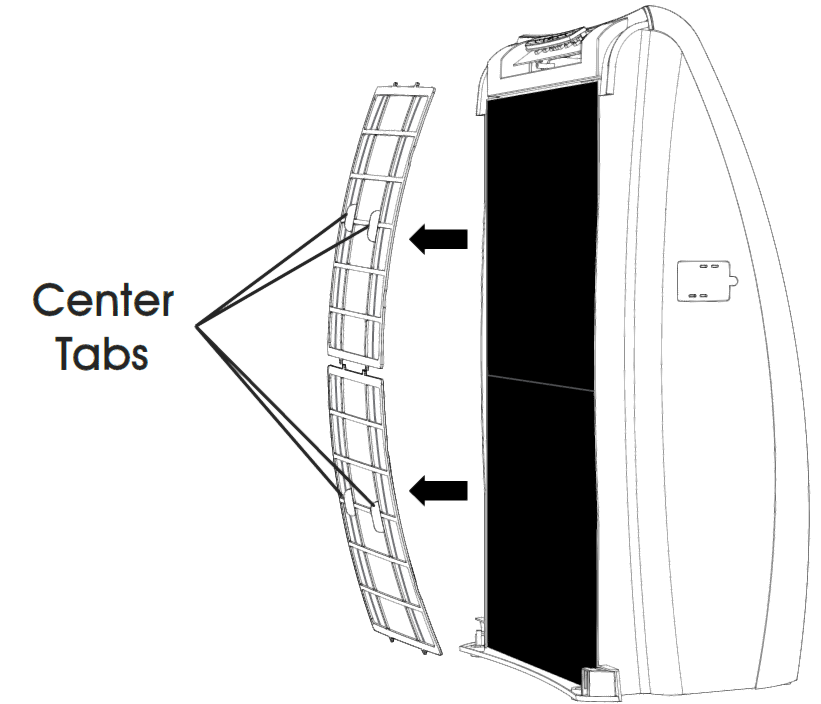
- Remove plastic support frame by pulling on the center tabs. Flex plastic support frame slightly to release tabs at the top and bottom.
- Remove and discard old filters. To remove carbon filter, take hold of filter at any place along perimeter and remove. Repeat on second filter. To remove HEPA filter, after carbon filters have been removed, take hold of tab (See Figure 5) and pull to release. Repeat on second filter. Place replacement filters in unit and gently press around perimeter of filter to ensure secure placement.
- Replace plastic support frame by securing bottom two tabs into bottom slots. Slightly flex plastic support frame to secure top two tabs into top slots.
- Replace front panel by positioning panel slightly above unit and aligning tabs of front panel with holes in unit. Gently press front panel down, sliding into tab slots and allowing magnets to securely lock front panel into place.
- To reset carbon filter notification, press and hold sleep button for three seconds. To reset the HEPA filter notification, press and hold auto button for three seconds. The light will turn off confirming indicator is reset.

STORAGE
Follow these steps to store unit:
- Unplug power cord and bundle loosely.
- Lift unit with both hands, using hand holds.
- Cover, or place back in carton, if available. This will prevent unit from accumulating dust over time.
- Store unit in a cool and dry location.
MAINTENANCE
CLEANING
Because large volumes of air pass through air purifier each day, it needs regular cleaning.
- Unplug unit before cleaning.
- Wipe down with a soft, damp cloth.
- Dust or vacuum interior and along sides. It is recommended to clean interior when filters are changed.
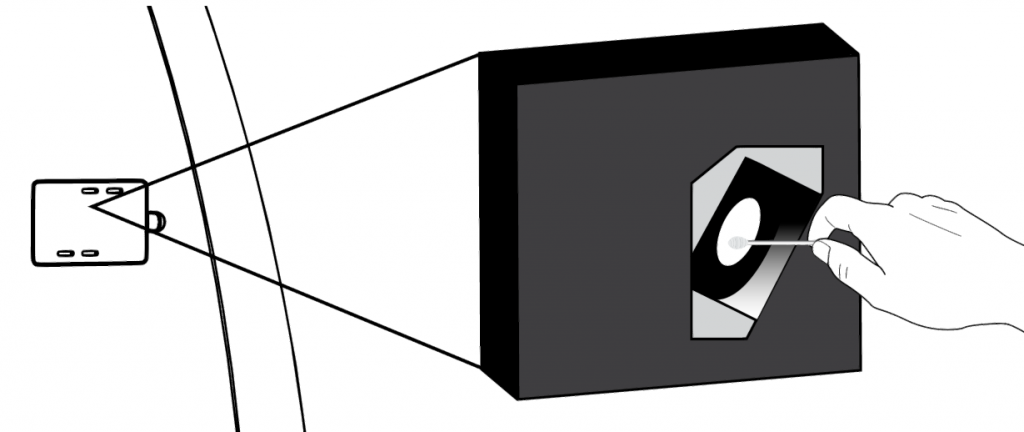
CLEANING THE DUST SENSOR
Clean dust sensor when replacing the carbon filters.
- Unplug unit before cleaning.
- Locate dust sensor access door on right side of unit.
- Open dust sensor access door.
- Gently wipe surface of dust sensor with a cotton swab.
- Once cleaned, close dust sensor access door.
OTHER MAINTENANCE
Motor is permanently lubricated so it needs no service. No other serviceable parts, other than filters, are contained within unit.
TROUBLESHOOTING
|
OPERATING ISSUE |
CAUSES |
RECOMMENDATIONS |
| Unit fails to power on. | Unit is not plugged in. | Plug power cord into electrical outlet. |
| Front panel may not be properly installed. | Remove and reinstall the front panel to ensure proper placement.Refer to Filter Replacement on page 4. | |
| Household circuit breaker / ground fault interrupter has tripped or blown a fuse. | Reset circuit breaker / ground fault interrupter, or replace fuse.For assistance, contact a licensed electrician. | |
| Unit is damaged or in need of repair. | Cease usage and unplug.Contact Uline Customer Service at 1-800-295-5510 for assistance. | |
| Airflow is weak or slow. | Unit set to a low speed setting.Debris build-up on filter.Airflow is blocked. | Adjust to a higher speed setting.Check and replace filters.Remove obstruction. |
| Sleep mode is not working. | There may be too much light in room. | Either manually turn unit to low speed for minimal sound or darken room. |
| Automatic dust sensing mode is not working. | Sleep Mode may be selected. | When in low light or no light, the unit will only operate at low speed. This will override automatic dust sensing mode.In regular light, the unit will return to automatic dust sensing mode operation.The dust sensor may need to be cleaned to accurately read dust levels. See Maintenance on page 5 for complete instructions. |
1-800-295-5510uline.com
![]()
[xyz-ips snippet=”download-snippet”]