![]()
H-9236, H-9248 20 x 40′ EVENT TENT
1-800-295-5510uline.com

TOOL NEEDED

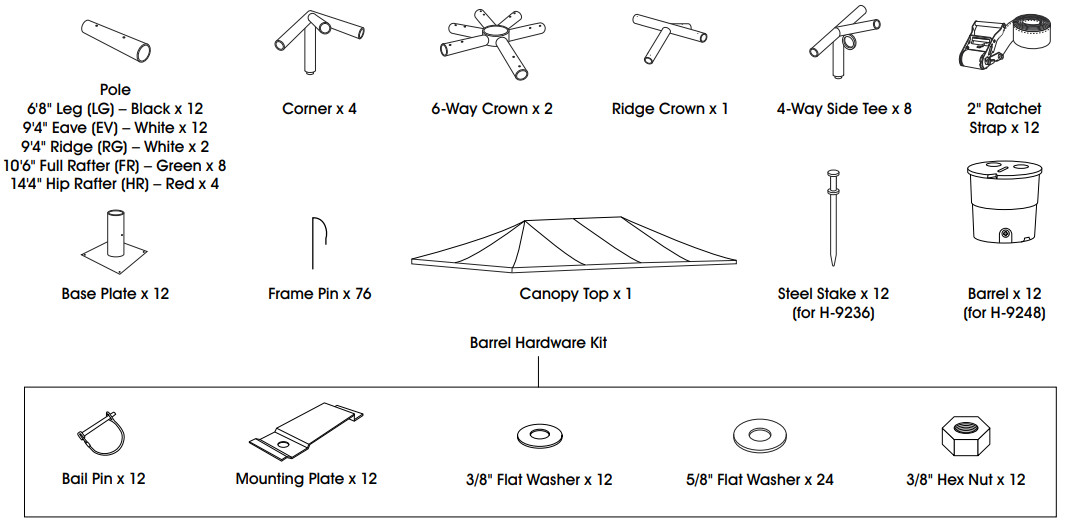
PARTS
SAFETY
 IMPORTANT! Please read carefully.
- Keep away from all flame and heat sources.
- Do not cook underneath or near the canopy.
- Do not store or use flammable liquids underneath or near the canopy.
- Do not ignite or store fireworks underneath or near the canopy.
- Do not use bleach to clean the cover.
- Do not dry clean cover.
- Do not wash the cover in the washing machine or dry in the dryer. Hand washes with mild soap and water only.
- Do not hang or suspend anything from the frame, grommets, or truss system of the unit.
- Do not allow rainwater, snow, or ice to accumulate on top of the cover.
- Remove rainwater, snow, and ice from canopy cover.
 NOTE: This is a temporary structure and is not recommended for use as a permanent structure.
ASSEMBLY
IMPORTANT! Before setting up the tent, contact Diggers Hotline (8-1-1) or a local authority to verify that it is safe to set up tent in the desired location. Be aware of weather conditions, and always evacuate tent during periods of high winds or lightning.
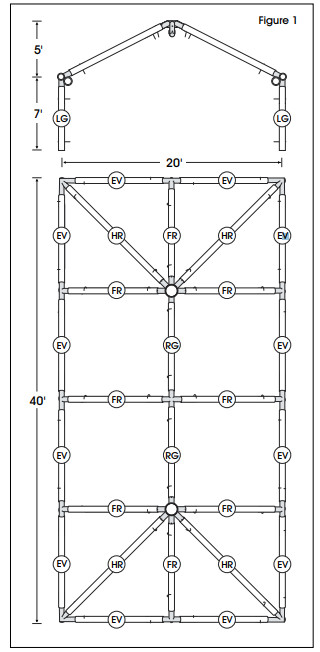
- Ensure all parts are present before assembly. Lay frame parts on the ground in approximate locations they will be when frame is assembled. (See Figure 1)

- Place frame pins in the 6-way crown.a. Each protrusion on the crown has two holes. The alignment hole is closer to the center; the placement hole is further down the protrusion. (See Figure 2)b. Place a pin in each alignment hole. Pin prevents rafter from moving too far onto 6-way crown. (See Figure 3)
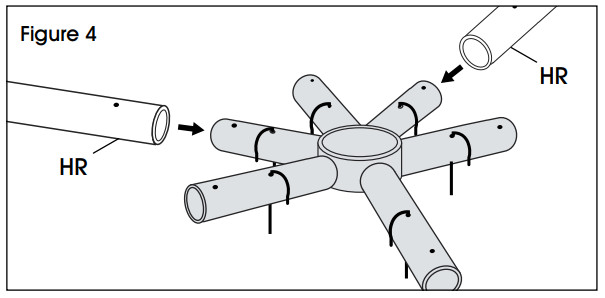
- Align two hip rafters (HR) with 6-way crown. (See Figure 4)ASSEMBLY CONTINUEDa. Slide hip rafters (HR) onto protrusion until they meet pin. (See Figure 5)b. Align placement hole in the crown with hole in rafter and insert pin. (See Figure 6)c. Remove alignment hole pins where hip rafters (HR) are attached to crown. (See Figure 7)
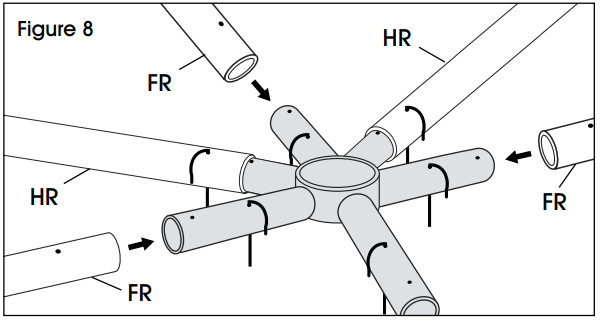
- Repeat steps 3b-3c to connect three full rafters (FR) to the 6-way crown. (See Figure 8)
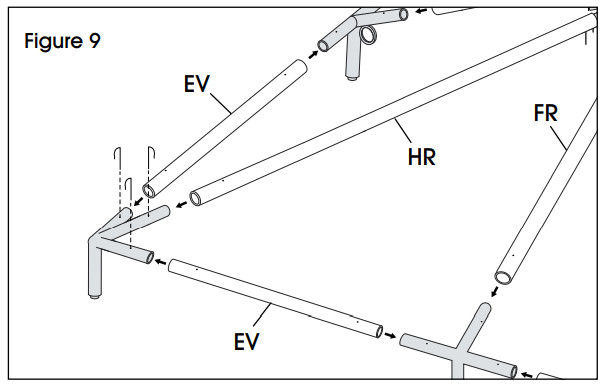
- Beginning at a corner fitting, attach eave poles (EV) to corner fittings and 4-way side tee fittings, working clockwise around the assembly to complete the first end bay. Attach to hip rafters (HR) and full rafters (FR). (See Figures 9-10)
- Repeat steps 2-5 to complete the second-end bay. (See Figure 11)ASSEMBLY CONTINUED
- Connect ridge crown and two full rafters (FR) to two 4-way side tees to create center frame. Secure with frame pins. (See Figure 12)
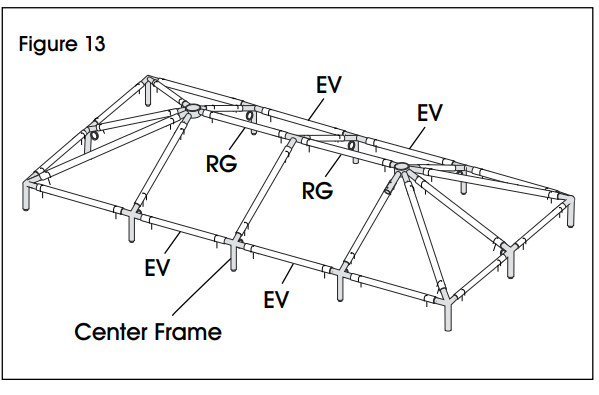
- Attach end bays to center frame with two ridge poles (RG) and four eave poles (EV). Secure with frame pins. (See Figure 13)
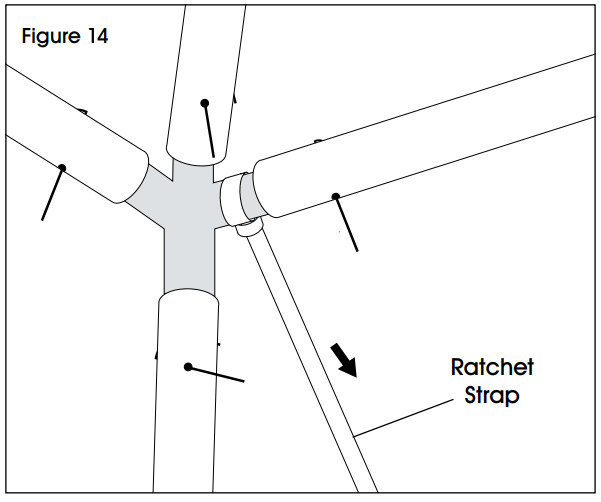
- Loop end of each ratchet strap to fitting at each leg location. (See Figure 14)
- Unroll the tent top. (See Figures 15-16) NOTE: It is recommended to place tent top on a drop cloth to protect from dirt and abrasions.
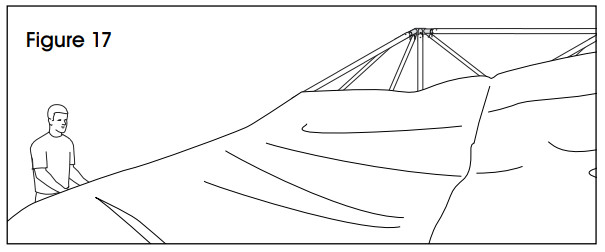
- Pull tent top over frame, lifting up on fabric to create air cushion under tent top. (See Figure 17)
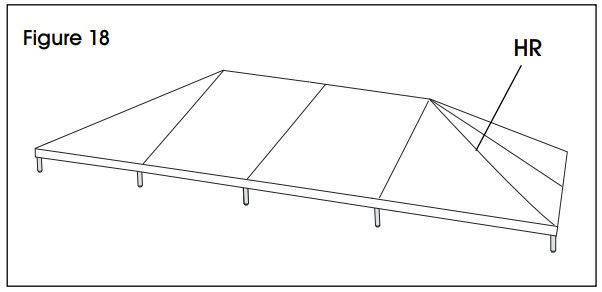
- Center tent top on frame by aligning the seams with hip rafters (HR). (See Figure 18)
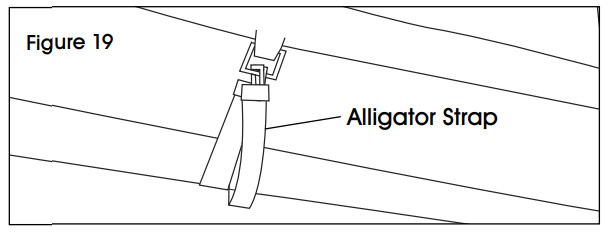
- Loosely fasten the alligator straps and attach to the canopy top at each side of the corners around eave poles (EV) to secure the tent top. (See Figure 19)
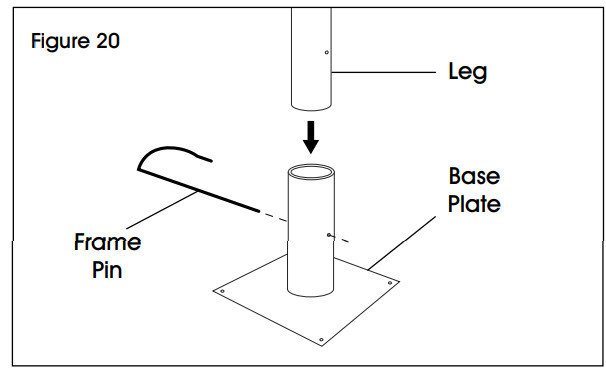
- Attach base plates to legs and secure with frame pin. (See Figure 20)
- Lift downwind side of the frame and keep all sides level. Attach leg poles to the lifted side. (See Figure 21) NOTE: Always lift the downwind side of tent first.
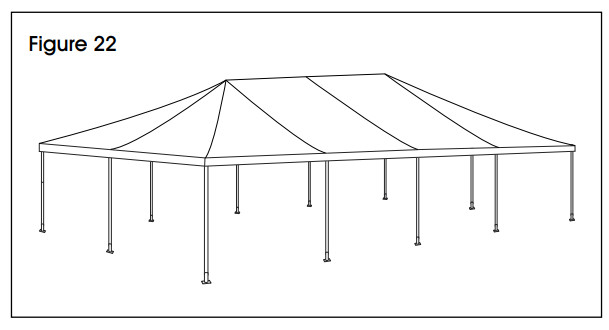
- Raise another side of the tent and attach remaining legs. (See Figure 22)
- Fasten the rest of the alligator straps around eave poles (EV) by tugging on the excess strap to keep the material taut and pulling the straps firmly. Slide excess strap through the metal slide on the alligator clip. (See Figure 23) CAUTION! Yanking on straps will cause undue wear and tear as well as wrinkling of tent top fabric.
 b. Place a pin in each alignment hole. Pin prevents rafter from moving too far onto 6-way crown. (See Figure 3)
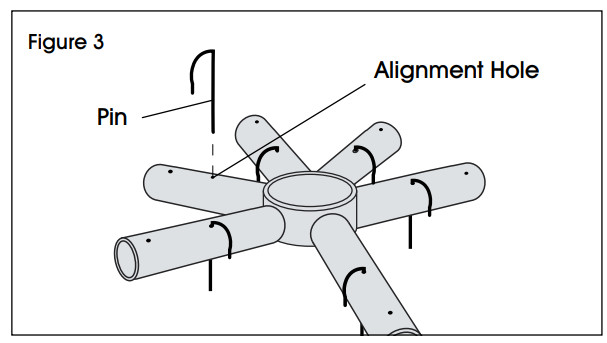
 ASSEMBLY CONTINUEDa. Slide hip rafters (HR) onto protrusion until they meet pin. (See Figure 5)
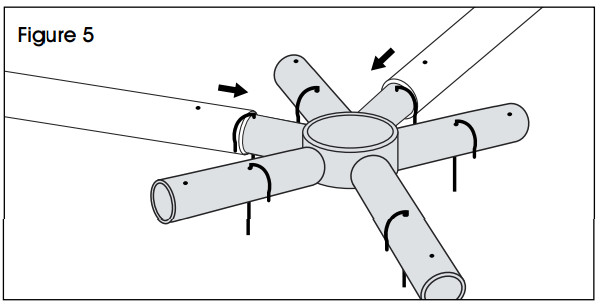 b. Align placement hole in the crown with hole in rafter and insert pin. (See Figure 6)
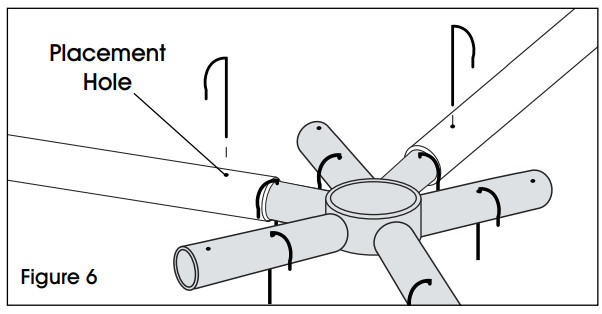 c. Remove alignment hole pins where hip rafters (HR) are attached to crown. (See Figure 7)
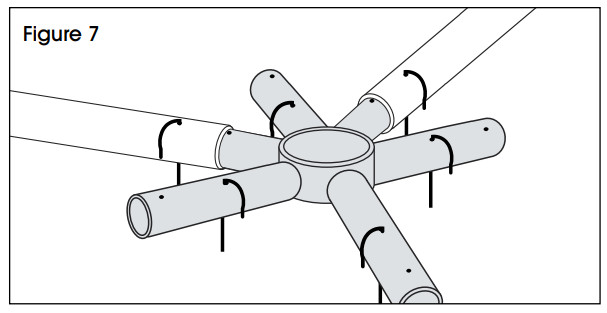

 ASSEMBLY CONTINUED
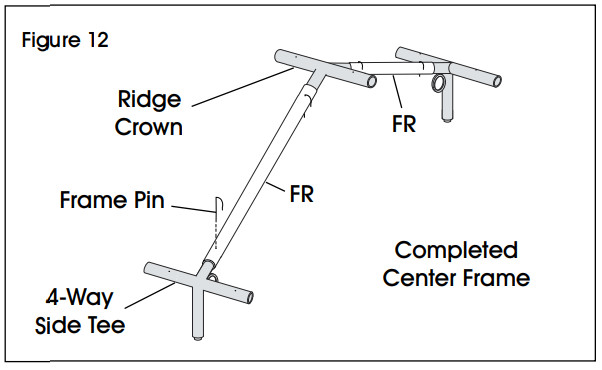


 CAUTION! Yanking on straps will cause undue wear and tear as well as wrinkling of tent top fabric.
IF USING STAKES (H-9236)
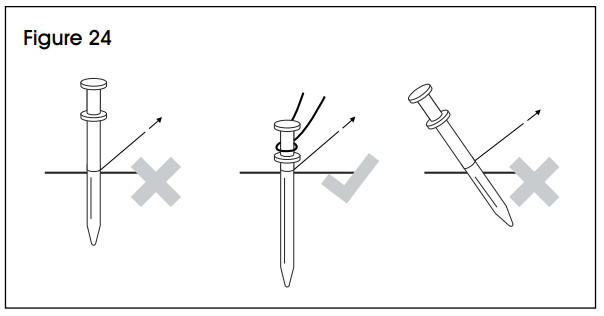
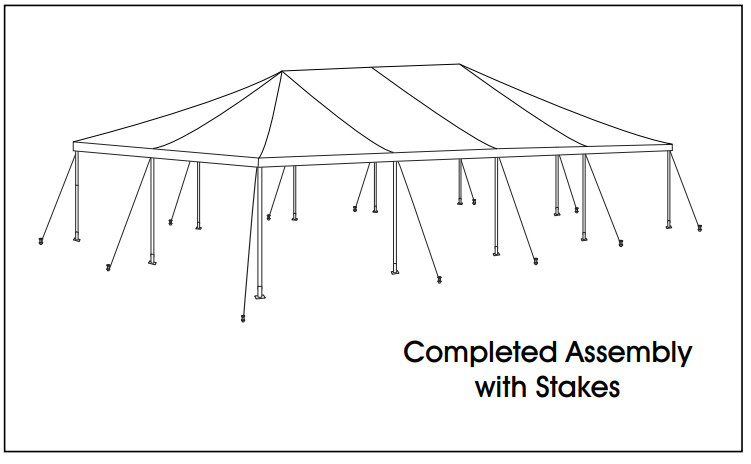
- Place stakes 5′ out from each leg. Drive stakes into the ground until 6″ or less of the stake shows. (See Figure 24)
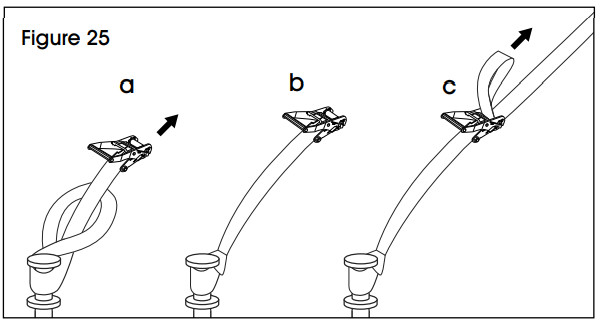
- Attach ratchet straps to the stakes loosely. (See Figure 25)a. Attach ratchet buckle with a loop strap to stakes by turning the 6″ loop at the end of the ratchet inside out and pulling strap through the loop.b. Pull slipknot tight over the stake.c. Take loop strap attached to the tent and pull it through reel bars slot of ratchet.NOTE: Keep ratchet buckle handle facing up at all times.
- Tighten ratchet straps by holding straps and pulling all slack through ratchet reel. Pull all slack through ratchet reel, holding strap with one hand and cranking ratchet handle with the other.
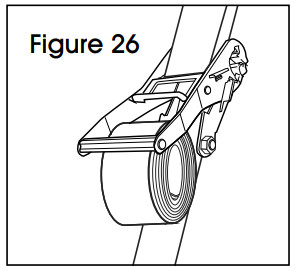
- Roll excess ratchet straps and secure them into the ratchet buckle. (See Figure 26)
IF USING BARRELS (H-9248)
- Turn the barrel upside down to connect the mounting plate. (See Figure 27)a. Put a 5/8″ washer (1) over the nut and bolt.b. Place the mounting plate (2) over the washer.c. Place another 5/8″ washer (3) followed by a 3/8″ washer (4).d. Place and tighten the 3/8″ nut (5).e. Flip the barrel right-side-up and insert the base plate (6) through the hole in the plate.
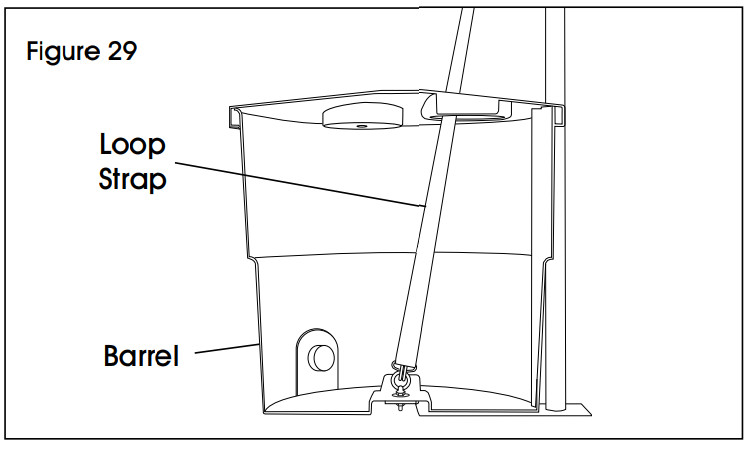
- Place a pole over the base plate that has been inserted into the plate. Put bail pin (7) through the pole and base plate to secure. (See Figure 28) NOTE: Attach the strap at bottom of the barrel before filling the barrel with water. (See Figure 29)
- To connect the strap to an eye bolt at the bottom of the barrel, pull the looped strap through the eye bolt. Take the other end of strap and pull it all the way through the loop. Pull long end tight to secure the strap to the eye bolt. (See Figure 30)
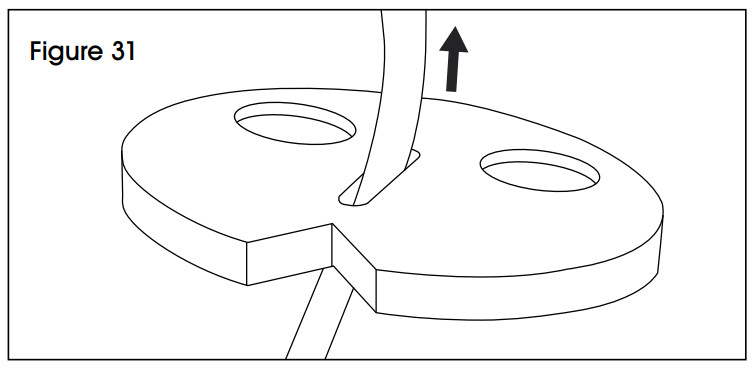
- Pull the strap through the cover slit. (See Figure 31)
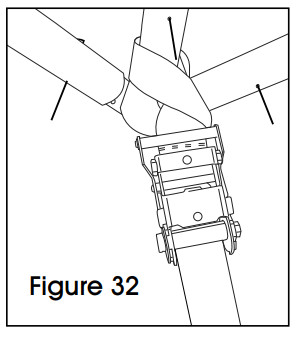
- Connect the opposite end of the strap to the fitting at the top of the pole, not around the tent frame poles. This forms a strong triangle. (See Figure 32)
- Fill the barrel with water. NOTE: Keep ratchet buckle handle facing up at all times.
- After the barrel is full, tighten ratchet straps by pulling all slack through the ratchet reel, holding the strap with one hand while cranking the ratchet handle with the other.
- Roll excess ratchet straps and secure them into the ratchet buckle. (See Figure 33)
 a. Put a 5/8″ washer (1) over the nut and bolt.b. Place the mounting plate (2) over the washer.c. Place another 5/8″ washer (3) followed by a 3/8″ washer (4).d. Place and tighten the 3/8″ nut (5).e. Flip the barrel right-side-up and insert the base plate (6) through the hole in the plate.


TAKING DOWN TENT
![]() Three Person Takedown Recommended
Three Person Takedown Recommended
- Loosen ratchet strap assemblies and remove straps from stakes or barrels. NOTE: If using barrels, drain them. Lift every leg and remove pin from the barrel, setting legs on the ground not back on the barrel. Move the barrels away from the tent to make room for lowering the tent.
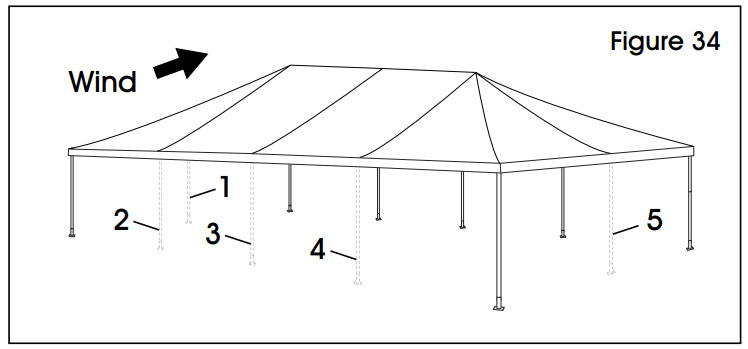
- Remove three center legs on long side and two adjacent side legs. (See Figure 34)
- Unfasten all alligator straps except the two at each corner (one at each side of corner). (See Figure 35)
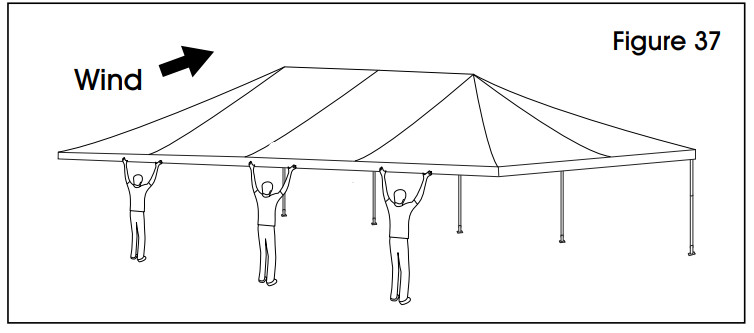
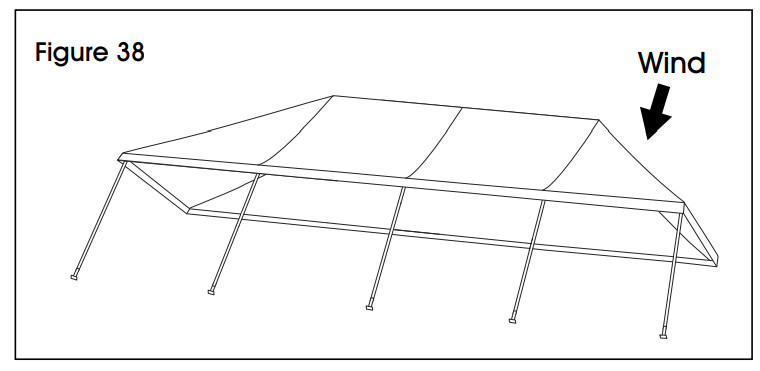
- Start with upwind side. Have another person remove two corner legs from one side and carefully set the tent frame on the ground. (See Figures 36-38)
- Remove remaining legs. (See Figure 39)
- Unfasten the remaining straps until all are completely disconnected.
- Remove the tent top from the frame.
- Fold and roll the tent top pieces as tightly as possible. Use a fanfold or a z-fold for best results. NOTE: For longevity of the tent, do not stand or walk on top of the tent top. It is recommended to dry and wipe the tent top fabric clean before folding for storage.
- Disassemble all corner, side tee, and center crown fittings by removing pins and sliding tubing off fittings. Work from the perimeter of the frame inward.
- Remove all stakes. If using barrels, empty water for storage.


![]()
1-800-295-5510uline.com
[xyz-ips snippet=”download-snippet”]