
ULINE Mail Sorter Workstation

TOOLS NEEDED
TABLE PARTS
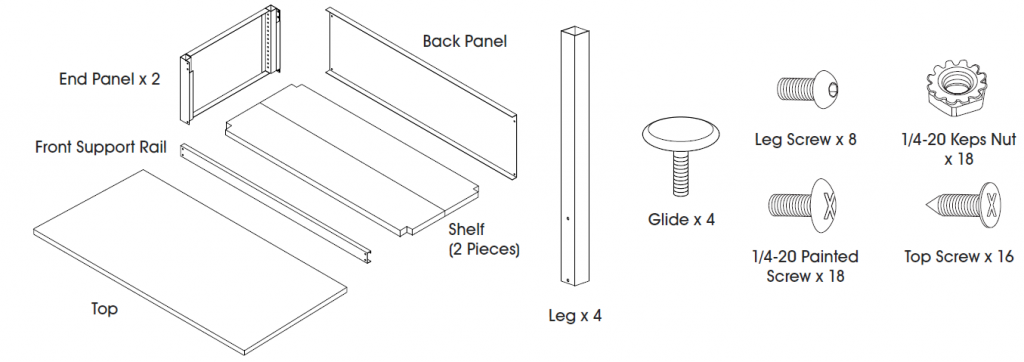
TABLE ASSEMBLY
- Unpack carton(s) and identify all parts.
- Place table top upside down (screw holes up) on a smooth, non-marring surface.

- Assemble back panel, two end panels and front support rail. It is easiest to do this with these parts upside down on the tabletop. (See Figure 1)
- Bolt together back panel and two end panels with four painted screws and keps nuts (two on each side).
- Bolt together front support rail with open flange facing inside with angled side against top using four painted screws and keps nuts (two on each side).
- Line up frame with tabletop so that the ten holes in the end and back panel flanges line up with the ten pre-drilled holes in the top. Insert the sheet metal screws through the holes and tighten into the top.NOTE: Additional top screws are self-tapping and can be installed without pre-drilling.
- Using a hammer or rubber mallet, pound the glide insert into the leg, and screw the leg glide into the glide insert. (See Figure 2)
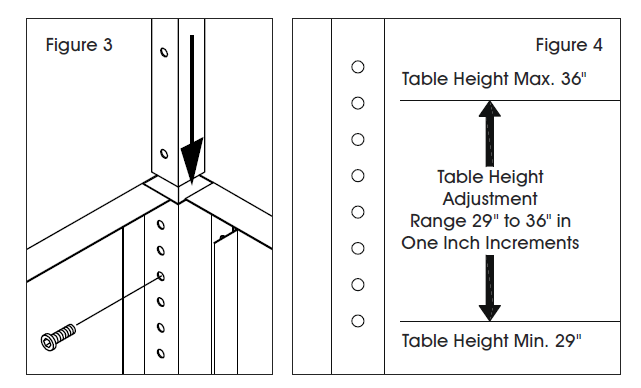
- Place legs into the leg sleeves at the corners of the table. (See Figure 3)NOTE: Each leg has two threaded holes at the upper end; legs should be inserted so that the holes line up with the adjustment holes in the leg socket.NOTE: Table height can be adjusted between 29″ and 36″ in one inch increments. (See Figure 4)
- Using two screws fasten the leg in place (Allen wrench provided). (See Figure 3)
- Once all four legs have been assembled in place, carefully set table upright. Adjust leveling glides as needed to level out table.


SHELF INSTALLATION
- Carefully put the two half-shelves in place, first one, then the other. They should now be next to each other, resting on the flanges at the bottom of the back and side panels.NOTE: Side with notched corners should be placed towards outside of table.
- Insert four painted screws. Each one will go through the hole at the bottom of the table leg frame and the front corner of one of the half-shelves. Secure them with the keps nuts provided. (See Figure 5)
- Connect the two half-shelves from underneath through the bottom flanges using three painted screws and three keps nuts. (See Figure 5)

50 SLOT SORTER PARTS
50 SLOT SORTER ASSEMBLY
- Unpack carton and identify all parts. Peel off protective film from face side of all flat steel parts.
- Position the two outside end panels (flange side up) and the two back panels (tab side up) as shown on a smooth, non-marring surface. Bottom back panel has wire cutouts on bottom. (See Figure 6)
- Lift up one side of the bottom back panel and insert tabs through the lower slots in the adjacent end panel. Repeat with other side. Then do the same with top back panel. The lower edge of the top back panel will slightly overlap the upper edge of the lower back panel. (See Figure 6)
- Place each of the inside end panels inside the outside end panels, loop side up. The offset lip fits under the flange on the outer edge of the outside end panel. (See Figure 7)NOTE: The flange on the inside end panel with the two holes should be facing down.
- Take the six pieces of double-faced tape and peel off the backing on one side of the tape; then apply two to the bottom of each outside end panel and two to the back panel. (See Figure 7)
- With the assistance of another person, each lifting from an end panel, swing the end panels up 90 degrees from the back panels and set the unit upright. (See Figure 8)
- To install shelves, begin with the bottom shelf (1″ front flange and no divider slots). Position the shelf so its tabs (on side flanges only) lock into the bottom rows of loops on the inside end panels and its back flange is held by the tabs on the back panel, and set it gently into place. Repeat this same procedure with the four shelves with slots in them. (See Figure 9)
- To install dividers, insert a divider through each slot. Dividers slide down through slots in all shelves until they rest on the bottom shelf. (See Figure 10)NOTE: The end of each divider with the two holes should be facing up.
- When all the dividers are in place, pull each one forward to lock into position. Insert the plastic buttons into the holes behind the dividers on the top and bottom shelves with divider slots. (See Figure 11)
- Repeat steps seven through nine to create the second tier of pockets in the sorter. Start by installing the top shelf of the first tier, which has no divider slots and a 1″ front flange; this also acts as the bottom shelf for the second tier.
- Position the top shelf (1″ front flange and no divider slots) over the top row of tabs on the back panel and with its tabs through the loops on the inside end panel, and set it carefully in place.
- Remove backing from double-faced tape previously attached to bottom of sorter. Lower sorter onto table and set in place. Tape will prevent sorter from moving on table. (See Figure 11a)


50 SLOT SORTER WITH RISER PARTS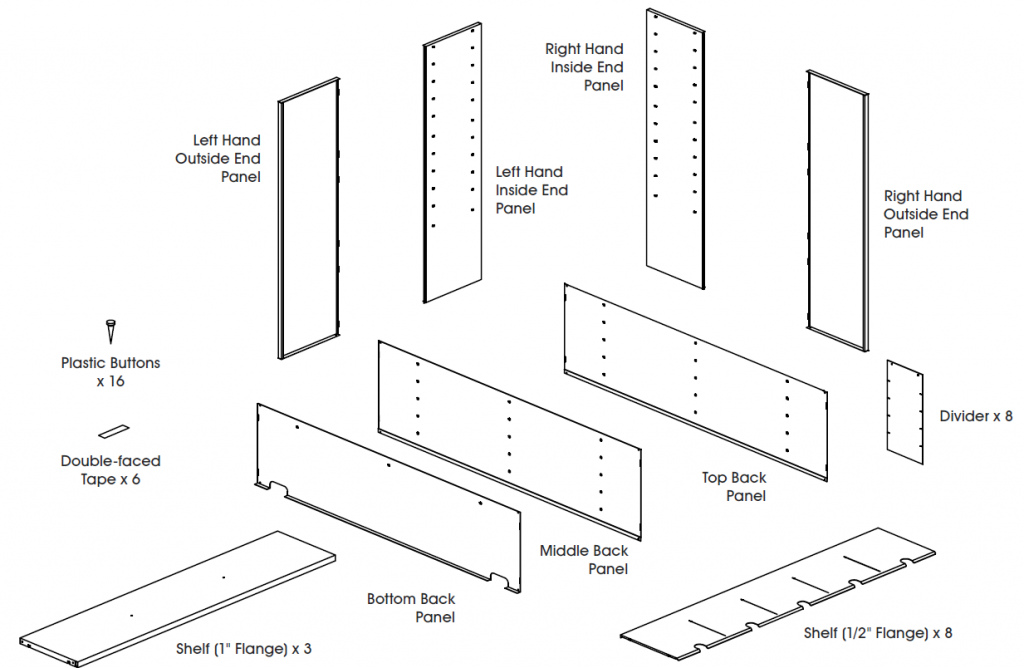
50 SLOT SORTER WITH RISER ASSEMBLY
- Unpack carton and identify all parts. Peel off protective film from face side of all flat steel parts.
- Position the two outside end panels (flange side up) and the three back panels (tab side up) as shown on a smooth, non-marring surface. Bottom back panel has wire cutouts on bottom; top back panel has a 45-degree flange on the back. (See Figure 12)
- Lift up one side of the bottom back panel and insert tabs through the lower slots in the adjacent end panel. Repeat with other side. Then do the same with the middle and top back panels. The lower edge of the middle back panel will slightly overlap the upper edge of the lower back panel; and the lower edge of the top back panel will slightly overlap the upper edge of the middle back panel. (See Figure 12)
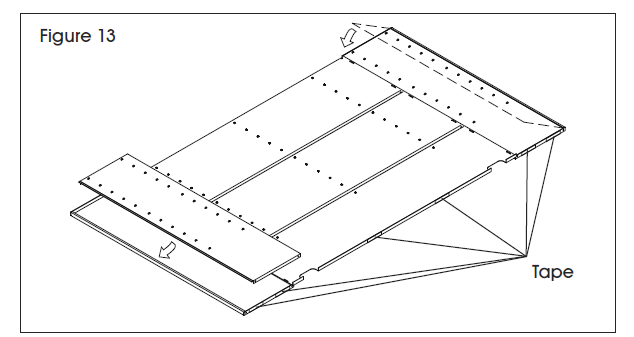
- Place each of the inside end panels inside the outside end panels, loop side up. The offset lip fits under the flange on the outer edge of the outside end panel. (See Figure 13)NOTE: The flange on the inside end panel with the two holes should be facing down.
- Take the six pieces of double-faced tape and peel off the backing on one side of tape; then apply two to the bottom of each outside end panel and two to the back panel. (See Figure 13)
- With the assistance of another person, each lifting from an end panel, swing the end panels up 90 degrees from the back panels, and set the unit upright. (See Figure 14)
- To install shelves, begin with the bottom shelf (1″ front flange and no divider slots). Position the shelf so its tabs (on side flanges only) lock into the bottom rows of loops on the inside end panels, and its back flange is held by the tabs on the back panel, and set it gently into place. Repeat this same procedure with the four shelves with slots in them. (See Figure 15)
- To install dividers, insert a divider through each slot. Dividers slide down through slots in all shelves until they rest on the bottom shelf. (See Figure 16)NOTE: The end of each divider with the two holes should be facing up.
- When all the dividers are in place, pull each one forward to lock into position. Insert the plastic buttons into the holes behind the dividers on the top and bottom shelves with divider slots. (See Figure 17)
- Repeat steps seven through nine to create the second tier of pockets in the sorter. Start by installing the top shelf of the first tier, which has no divider slots and a 1″ front flange; this also acts as the bottom shelf for the second tier.
- Position the top shelf (1″ front flange and no divider slots) over the top row of tabs on the back panel and with its tabs through the loops on the inside end panel, and set it carefully in place.
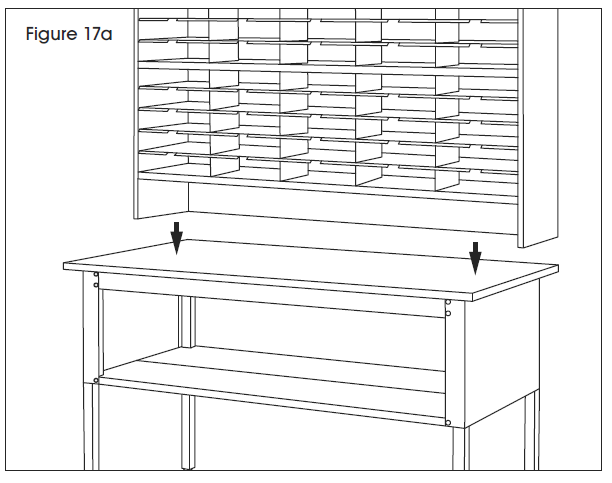
- Remove backing from double-faced tape previously attached to bottom of sorter. Lower sorter onto table and set in place. Tape will prevent sorter from moving on table. (See Figure 17a)


References
[xyz-ips snippet=”download-snippet”]