
ULINE Manual Kraft Tape Dispenser

 IMPORTANT!
Read this manual thoroughly and familiarize yourself with ALL controls and operating features. Keep this manual for future reference and maintenance.
Unpacking: Check the machine for damage. If damage is found, return to Uline.
TECHNICAL DATADimensions of machine:14 x 11 x 8¾”Weight of machine: 20½ lbs.
TAPEPlain, one-layer reinforcedtwo-layer reinforced.
PAPER FEATURESLength: min. 4″, max. 43¼”Width: min. 3/4″, max. 4″Maximum roll diameter: 77⁄8″
GENERAL INFORMATION
BEFORE USING THE MACHINEFollow all safety and operating instructions contained in this manual. Check local and state codes.This tape dispenser is for use with gummed tape ONLY. Uline accepts no responsibility for damage due to improper use.
IF USING OPTIONAL TOP HEATER
![]() WARNING! Burn Danger – Unplug the top heater and allow it to cool down before performing any cleaning, maintenance or repair.
WARNING! Burn Danger – Unplug the top heater and allow it to cool down before performing any cleaning, maintenance or repair.
Keep the machine clean, dry and in good operating condition. DO NOT place or operate machine in damp or humid environments.
SETUP INSTRUCTIONS
INSTALL WATER RESERVOIR
Before using the dispenser: Remove water reservoir from inside of machine.
- Remove brush from assembly and wash with soap and water. Rinse thoroughly and insert back into water reservoir. (See Figure 1)
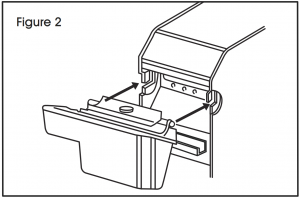
- With the feed lever straight up, take the reservoir in your left hand and insert the pivot shaft into the slots on the sides of the dispenser. Move shaft up to the top of the slots. (See Figure 2)
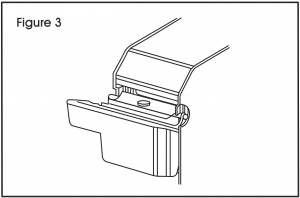
- Slide reservoir down so bottom fits over tab on dispenser. (See Figure 3)

INSTALL WATER BOTTLE HOLDER
- Remove plastic brackets from inside unit.
- Install longer bracket in front slots. Insert in top slot first and snap into place.
- Repeat with shorter bracket in rear slot.
FILL WATER BOTTLE
- Remove bottle from brackets and turn over so filler opening faces up. (See Figure 4)
- Press in ball bearing and fill bottle with clean water. Turn bottle over and place filler opening over desired water level peg in the water reservoir.
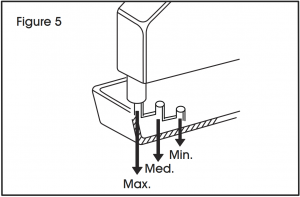
- Adjust reservoir level: To maintain the optimum moisture level for the type of tape you are using, place the water bottle filler opening over one of the three water level pegs in the water reservoir. (See Figure 5)

INSTALL UPPER PLATE GUIDE
With top cover open, slide the upper paper guide under the white wheel.
![]() NOTE: Flange should face up and toward tape compartment. (See Figure 6)
NOTE: Flange should face up and toward tape compartment. (See Figure 6)
INSTALL WEIGHT AND COVER PLATE
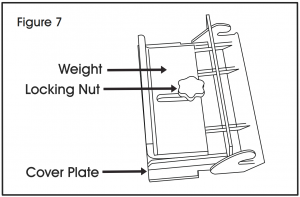
- Attach weight to cover plate with locking nut. Slide weight back for lighter paper tapes (60/70 grade). Slide weight forward for heavier paper tapes (70+ grade). (See Figure 7)
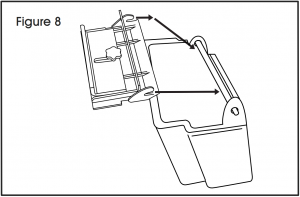
- Take the cover plate/weight assembly and slide the notches over the pivot shaft on the water reservoir. (See Figure 8)
LOAD TAPE ROLL
- Adjust roll guide plates to fit tape width. (See Figure 9)
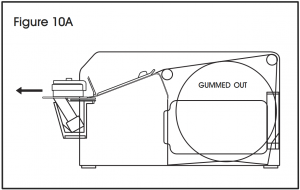
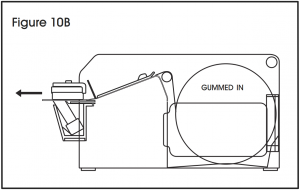
- Reposition the roller for gummed in or gummed out tapes.
- Insert tape roll between guide plates and over roller so tape is positioned gummed side down. Feed the tape under the upper paper guide and white wheel. (See Figures 10A & 10B)

OPERATION
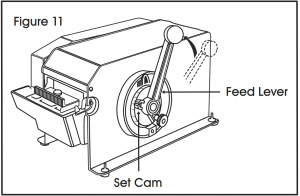
- Pull feed lever forward until the lever cam points to the desired tape length on the BLACK scale.NOTE: Pull the lever with even pressure – Do not yank it. (See Figure 11)
- Release the lever to automatically cut the tape – Do not push the lever back.NOTE: To cut very short lengths (4-8″), you may have to push the lever back gently.
- To preset a second tape length: (for ‘H’ closings, different box sizes, etc.): Loosen the clamping nut and set the lever cam to point to the desired length on the RED scale. NOTE: When using two lengths, the longer length should be set on the RED scale.
MAINTENANCE AND CARE
![]() CAUTION: Only trained personnel should be allowed to operate or service this machine.
CAUTION: Only trained personnel should be allowed to operate or service this machine.
WEEKLY MAINTENANCEWash the moistening brush with soap and warm water. Rinse thoroughly with water.
MONTHLY MAINTENANCE
- Lubricate the cutting blades with a drop of oil.
- Wash the rubber wheel with water. Do not grease or oil the wheel. Access the wheel by removing the upper paper guide.
- Clean the water reservoir with soap and water. Rinse thoroughly.

1-800-295-5510www.uline.com
[xyz-ips snippet=”download-snippet”]