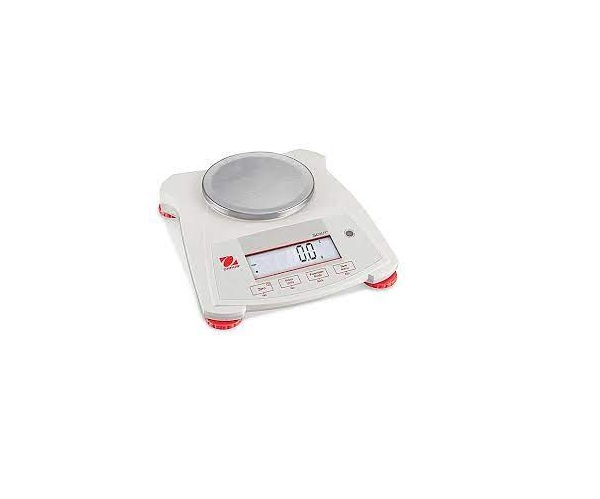
ULINE Ohaus Scout Balance Scale Instruction Manual
OVERVIEW OF CONTROLS
CONTROL PANEL
CONTROL FUNCTIONS
| BUTTON | 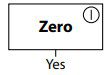 |

|
 |
 |
| PRIMARY FUNCTION
(Short Press*) |
ZERO/ON
Turns on balance. If balance is on, sets zero. |
PRINT
Sends the current value to the selected COM ports if AUTOPRINT is set to off. |
FUNCTION
Initiates an application mode. |
TARE
Enter/clear a tare value. |
| SECONDARY FUNCTION
(Long Press**) |
ZERO/OFF
Turns off balance. |
UNITS
Changes the weighing unit. |
MODE
Allows changing the application mode. |
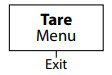
MENU
Enter the user menu. |
| MENU FUNCTION
(Short Press*) |
YES
Accepts the current setting on the display. |
NO
Advances to the next menu or menu item. Rejects the current setting on the display and advances to the next available setting. |
BACK
Moves back to previous menu. |
EXIT
Exits the user menu. Aborts the calibration in progress. |
*Press less than one second.**Press and hold for more than two seconds.DISPLAY
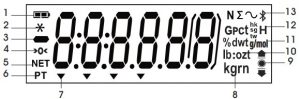
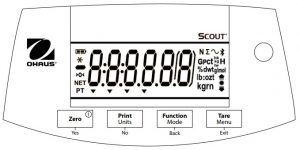
DISPLAY SYMBOLS
| # | DESCRIPTION |
| 1 | Battery Charge Symbol |
| 2 | Stable Weight Symbol |
| 3 | Negative Symbol |
| 4 | Center of Zero Symbol |
| 5 | NET Symbol |
| 6 | Preset Tare, Tare Symbols |
| 7 | Pointer Symbols |
| 8 | Kilogram, Grain Symbols |
| 9 | Check Weighing Symbols |
| 10 | Pound, Ounce, Pound:Ounce Symbols |
| 11 | Percent, dwt, g/mol symbols |
| 12 | Gravity, Pieces, t hk, t sg, t tw, Hold Symbols |
| 13 | Newton, Totalization, Dynamic, Bluetooth Symbols |
![]() NOTE: Some symbols might not be available, depending on model.
NOTE: Some symbols might not be available, depending on model.
SAFETY
- Verify that local AC power supply is within input voltage range printed on AC adapter’s data label.
- Only connect AC adapter to a compatible grounded electrical outlet.
- Do not position scale where difficult to disconnect AC adapter from power receptacle.
- Make sure that power cord does not pose a potential obstacle or tripping hazard.
- For indoor use. Operate only in dry locations.
- Operate only under ambient conditions specified in these instructions.
- Do not operate in hazardous or unstable environments.
- Do not drop weight onto pan.
- Only use approved accessories and peripherals.
- Disconnect power before cleaning or servicing.
- Service should be performed only by authorized personnel.
SETUP
RELEASING THE TRANSPORTATION LOCK
- Release the red transportation lock on the sub platform of the balance by turning the red pointer 90° counterclockwise. (See Figure 1).


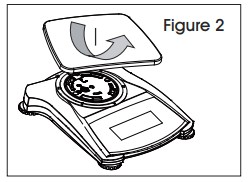
INSTALLING THE PLATFORM
- Balances with a rectangular platform are placed into the sub platform as shown and rotated counterclockwise until locked. (See Figure 2)
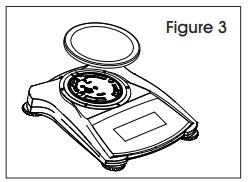
- Round platforms are placed straight down on sub platform. (See Figure 3).
SELECTING THE LOCATION
- For best performance, the balance should be used in a clean, stable environment.
- Do not use the balance in environments with excessive drafts, with rapid temperature changes, near magnetic fields or near equipment that generates magnetic fields or vibrations.
LEVELING
- The scale has an illuminated level indicator as a reminder that the balance should be leveled for accurate weighing. There is a level bubble in a small round window on the front of the balance. To level the balance, adjust the feet at each corner until the bubble is centered in the circle. (See Figure 4)
- Be sure the balance is level each time its location is changed.

BATTERY
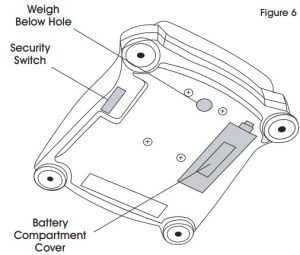
- Install four AA batteries with polarity as shown in the battery compartment. (See Figure 6)
CONNECTING POWERAC ADAPTER
- AC power is used to power the scale when battery power is not needed.
- Connect AC adapter (supplied) to the AC adapter input jack at the rear of the balance. Then, connect the AC plug to an electrical outlet. (See Figure 5)

SECURITY SLOT
- A security slot is provided at the rear of the balance, allowing the balance to be secured by an optional cable and lock accessory. (See Figure 5)
OPERATION
TURNING THE BALANCE ON / OFF
- To turn the balance on, press and hold the ZERO button for one second. The balance performs a display test, momentarily displays the software version and then enters the active weighing mode.
- To turn the balance off, press and hold the ZERO button until OFF is displayed.
CHANGE UNIT OF MEASURE
- Press and hold the PRINT/UNITS button until the desired weighing unit appears.NOTE: Units of measure must be enabled. To enable units of measure, see Unit Menu under Menu Settings.
CALIBRATION
When the scale is operated for the first time, and when it is moved to a new location, a calibration is recommended to ensure accurate weighing results.
CALIBRATION WEIGHTS
Before performing the calibration, be sure to have the appropriate calibration weights.
CALIBRATION VALUES
| ULINE MODEL NO. | H-7293 | H-5848 | H-5849 | H-5850 | H-7294 | H-5851 | H-5852 | H-5853 | H-5854 | H-5855 |
| Span Calibration Mass (g) | 0, 200 | 0, 200 | 0, 400 | 0, 600 | 0, 2,000 | 0, 400 | 0, 600 | 0, 2,000 | 0, 6,000 | 0, 8,000 |
| Linearity Calibration Mass (g) | 0, 100,
200 |
0, 100,
200 |
0, 200,
400 |
0, 300,
600 |
0, 1,000,
2,000 |
0, 200,
400 |
0, 300,
600 |
0, 1,000,
2,000 |
0, 3,000,
6,000 |
0, 4,000,
8,000 |
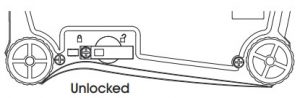
SECURITY SWITCHEnsure the security switch is set to the unlocked position. (See Figure 7)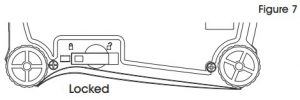
 SPAN CALIBRATION (SINGLE POINT)Span calibration uses two calibration points: zero and a specified calibration weight.
- Remove all weight from the platform.
- Press and hold MENU until MENU is displayed. When the button is released, the display will show C.A.L If no APW exists, the balance will display Put.10, proceed to step 5.
- Press YES to accept. SPAN will then be shown.
- Press YES to begin the span calibration. –C– will be displayed while zero reading is stored.
- Next, the display shows the calibration weight value (press NO to toggle value). Place the specifiedcalibration mass on the pan. –C– will be displayed while the reading is stored.
- The display will show donE if the calibration was successful. The balance returns to the previous application mode and is ready for use.
LINEARITY CALIBRATION (MULTI-POINT)Linearity calibration uses three calibration points: zero, mid-scale and full scale.
- Remove all weight from platform.
- Press and hold MENU until MENU is displayed. When the button is released, the display will show C.A.L.
- Press YES to accept. SPAN will then be shown.
- Press NO until LIn is shown.
- Press YES to begin the linearity calibration. –C– will be displayed while zero reading is stored.
- Next, the display shows the calibration weight value (press NO until the mid-scale value is shown). Place the specified calibration mass on the pan. –C– will be displayed while the reading is stored.
- Next, the display shows the calibration weight value (press NO until the full-scale value is shown). Place the specified calibration mass on the pan. –C– will be displayed while the reading is stored.
- The display will show donE if the calibration was successful. The balance returns to the previous application mode and is ready for use.
ZEROIf there is a minor weight displayed without anything on the platform, press the ZERO button to clear the display. Zero indicator will be shown on the display.TAREWhen weighing an item that is in a container, taring stores the container weight to memory so only the item weight is displayed.To store the tare weight into memory and set the display to zero:
- Place an empty container on the platform.
- Press the TARE button. The NET indicator will be displayed on the bottom of the display.
- The container’s weight is then stored in the scale’s memory and 0 is displayed.
- Add pieces to the container. As the pieces are added, their net weight will be displayed.
- Removing the container from the platform will cause the scale to display the container’s negative number. Pressing the TARE button will readjust the scale to zero.
WEIGHINGThis mode is the factory default setting.
- If needed, press and hold MODE until WeIGH (weigh) is displayed.
- If required, place an empty container on the platform and press TARE.
- Add a sample to the platform or container. The display shows the weight of the sample.
COUNTINGThis mode counts large numbers of items based on the weight of a reference count.
- Place an empty container on the platform and press TARE (if needed).
- Press and hold MODE until Count is displayed. CLr.PwW (clear average piece weight, APW) will thendisplay. If no APW exists, the balance will display Put.10, proceed to step 5.
- Press NO to use the stored APW. Proceed to step 7.
- Press YES to establish an APW.
- The balance will then display the stored sample size, i.e. Put 10. Press NO or BACK to toggle the choices(5, 10, 20, 50 or 100).
- Put the indicated number of pieces on the platform then press YES to calculate the APW. The display shows the piece count.
- Add additional pieces until the desired count is reached.
- To clear the stored APW, press and hold MODE until Count is displayed. Press YES when Clr.pwW isdisplayed.NOTE: Press FUNCTION to view the current APW.
PERCENT WEIGHINGThis mode measures the weight of a sample as a percentage of a reference weight.
- If required, place an empty container on the platform and press TARE.
- Press and hold MODE until Percent is displayed. Clr.ref (clear reference) will then display. If no reference weight exists, the balance will display Put.ref, proceed to step 5.
- Press NO to use the stored reference weight and proceed to step 6.
- Press YES to establish a new reference. Balance will now display Put.ref.
- Add the desired reference material to the platform or container. Press YES to store the reference weight. The display shows 100%.
- Replace the reference material with the sample material. The display shows the percentage of the sample compared to reference weight.
- To clear the stored reference, press and hold MODE until PERCNT is displayed. Press YES when Clr.ref is displayed.NOTE: Press FUNCTION to view the current reference weight.
CHECK WEIGHINGUse this mode to compare the weight of items to a target weight range. The balance supports positive, negative and zero check weighing.
- Press and hold MODE until CHeCk (check) is displayed. CLr.ref (clear check limits) will then display. If no limits exist, the balance will display SEt.Lo, proceed to step 4.
- Press NO to use the stored check limits and proceed to step 6.
- Press YES to establish new check limits.
- The balance will then display Set.Lo. Press YES to view the low limit value. Press YES to accept or NO to edit the low limit value. The stored value then displays with the first digit highlighted Repeatedlypress NO until the desired number appears. Press YES to accept and highlight the next digit. Repeat until all the digits are correct. Press YES to accept the low limit value, Set. H will be displayed.
- Repeat the same procedure to accept or edit the high value.
- If required, place an empty container on the platform and press TARE.
- Place sample material on the platform or in the container. If the sample weight is under the target weight range, the under icon will light. If the sample is within the target weight range, the accept symbol will light. If the sample is over the target weight range, over icon will light.
NOTE: Press FUNCTION to view the low and high check limits.POSITIVE CHECKPositive check is used to determine when the material added to the balance is within the target range. In this case, the under and over limits must be positive values. (The over limit must be greater than the under limit.)
- Add material to the balance until it is within the accept range.
NEGATIVE CHECKNegative check is used to determine when the material removed from the balance is within the target range. In this case, the under and over limits are both negative values. (The under limit must be greater than the over limit.)
- Place the item to be weighed on the balance and press TARE.
- Remove a portion of the item until it is within the accept range.
ZERO CHECKZero check is used when comparing subsequent samples to an initial reference sample. In this case, the under limit must be a negative value and the over limit must be a positive value.
- Place the reference item on the balance and press TARE.
- Remove the reference sample and place the item to be compared on the balance to determine if it is within the accept range.
TOTALIZATION/ACCUMULATIONThis mode allows the user to store a series of weight measurements. Totalize mode has been initiated when the symbol is displayed and the current unit is displayed.![]() NOTE: Only positive numbers are totalized.
NOTE: Only positive numbers are totalized.
- Press and hold MODE until total (totalization) is displayed. CLr.tot will then be displayed.
- Press YES or NO key to clear the current totalized data or not. When a weight is added to the scale the value is displayed.
- If required, place an empty container on the pan and press TARE.
- Add the first item; its weight is displayed.
- Press FUNCTION to store the weight, the symbol will flash and the display will show the total weight.
- Press TARE (or remove the weight in previous operation) and add the next item. The balance will display its weight.
- Press FUNCTION to store its weight. The symbol will flash and the new total weight will be displayed.
- Repeat steps 47 for all of the items to be accumulated.
- To clear the stored total, press and hold MODE untiltotal is displayed. When Clr.tot is displayed, press YES.
DISPLAY HOLDThere are two modes for the Display Hold:
- Peak Hold: allows the user to capture and store the highest stable weight value (>=5d).
- Display Hold (default): allows the user to capture and store the first stable weight value (>=5d).
- Press and hold MODE until HoLd is displayed.
- If required, place an empty container on the pan and press TARE. Zero value will then display.
- Press FUNCTION to begin. rEAdY will be displayed.
- Place samples to be weighed on the platform.
- The stable value will be held on the display, and the hold icon H will blink.
CLEAR DISPLAY HOLDIf the platform is empty and a weight value was held on the display, a single short press of the FUNCTION key will clear the held value and show the new weight on the platform.
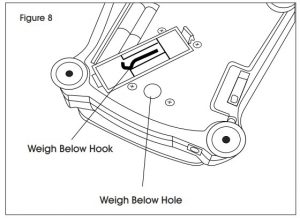
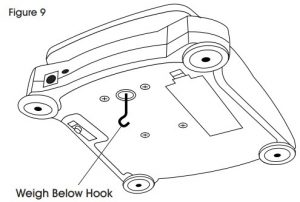
WEIGH BELOW HOOKThe balance includes a weigh below hook for weighing below the balance. The weigh below hook is attached to the underside of the battery compartment cover.![]() CAUTION! Before turning the balance over, remove the platform and platform support if present, and turn the transportation lock to the locked position to prevent damage.
CAUTION! Before turning the balance over, remove the platform and platform support if present, and turn the transportation lock to the locked position to prevent damage.
- Open the battery compartment cover and remove the weigh below hook. (See Figure 8)
- Attach the weigh below hook to the bottom of the scale through the weigh below hook hole. (See Figure 9)
- Position the balance in an elevated position using lab jacks or any other convenient method. Ensure the balance is level and that the transportation lock has been released.
- Turn on the scale. Use a string or wire to attach items to be weighed. (See Figure 10)

The user menu allows the customizing of balance settings.MENU NAVIGATION
| SUB-MENUS | C.a.l | S.e.t.u.p | M.o.d.e | U.n.i.t |
User Menu Items: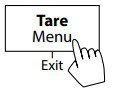 Long press –Enter Menu Long press –Enter Menu
Short press – Accept
Short press – Go to Next/Prev. Menu
Short press – Exit Menu |
Span | Reset | Reset | g kg ct N
oz ozt dwt lb lb:oz grn hkt* sgt* twt* t* tola/tical C End |
| Lin | Yes/No | Yes/no | ||
| Filter | Weighing | |||
| Low/Med/High | On/Off | |||
| AZT | Counting | |||
| 0.5/1/3/Off | On/Off | |||
| StableRange | Percent | |||
| 0.5/1/2/5 | On/Off | |||
| Backlight | Check | |||
| Off/On/Auto | On/Off | |||
| Auto Tare | Totalize | |||
| Off/On/On-acc | On/Off | |||
| Auto Off | Hold | |||
| Off/1/5/10 | Disp/Peak/off | |||
|
End |
End |
End |


* Only available in certain regions.USER MENU
CALIBRATION MENUEnter this menu to perform calibrations.
| SPAN | Perform |
| LINEARITY | Perform |
| END CALIBRATION | Exit Menu |
SPAN Initiates a span calibration procedure (zero and span).LIN Initiates a linearity calibration procedure (zero, mid-point and span).End Advance to the next menu or return to the top of the current menu.Setup MenuEnter this menu to set balance parameters. (Default settings are indicated in bold.)
| RESET | no, yes |
| FILTER | Low, Med, High |
| AUTO ZERO TRACKING | off, 0.5d, 1d, 3d |
| STABLE | 0.5d, 1d, 2d, 5d |
| BACKLIGHT | off, on, auto |
| AUTO TARE | off, on, on-acc |
| AUTO OFF | off, 1, 5, 10 |
| END SETUP | Exit menu |
rESEt Reset the setup menu to factory defaults.
- NO: Do not reset.
- YES: Reset.
FILtEr Set the amount of signal filtering.
- LOW: Less stability, faster stabilization time.
- MED: Normal stability and stabilization time.
- HI: Greater stability, slower stabilization time.
A2T Set the automatic zero tracking functionality.
- OFF = Disabled.
- 0.5d = The display will maintain zero until a change of 0.5 divisions per second has been exceeded.
- 1d = The display will maintain zero until a change of 1 divisions per second has been exceeded.
- 3d = The display will maintain zero until a change of 3 divisions per second has been exceeded.
StAbLE Set the amount the reading can vary while thestability symbol remains on.
- 0.5d = 0.5 balance division.
- 1d = 1 balance division.
- 2d = 2 balance division.
- 5d = 5 balance division.
LIGHT Sets backlight functionality.
- OFF = Always off.
- ON = Always on.
- AUTO = Turn on when a button is pressed or the displayed weight changes.NOTE: When connected with power pack, the backlight is always on.A.tArE Set the automatic tare functionality.
- OFF = Automatic Tare is disabled.
- ON = The first stable gross weight is tared.
- ON-ACC = Stable gross loads within the accept limits are tared (in Check weighing mode).
A.OFF Set the automatic shut off functionality.
- OFF = Disabled
- 1 = Powers off after 1 minute of no activity.
- 5 = Powers off after 5 minutes of no activity.
- 10 = Powers off after 10 minutes of no activity.
End Advance to the next menu or return to the top of the current menu.
MODE MENUThis menu activates modes so they will be available to use with the MODE button.
| RESET | no, yes |
| WEIGH | off, on |
| COUNT | off, on |
| PERCENT | off, on |
| CHECK | off, on |
| TOTALIZE | off, on |
| HOLD | Disp, Peak, Off |
| END MODE | exit menu |
rESET Reset the Mode menu to factory defaults.
- NO = Not reset.
- YES = Reset.
WEIGH Set the status.
- OFF = Disabled.
- ON = Enabled.
COUNt Set the status.
- OFF = Disabled.
- ON = Enabled.
PErCNt Set the status.
- OFF = Disabled.
- ON = Enabled.
CHECK Set the sub-mode.
- OFF = Disabled.
- ON = Enabled.
totAL Set the sub-mode.
- OFF = Disabled.
- ON = Enabled.
HoLd Set the sub-mode.
- OFF = Disabled.
PEAK HOLD = allows the user to capture and store the highest stable weight value (>=5d)DISPLAY HOLD = allows the user to capture and store the first stable weight value (>=5d)When the stable value is being held on the display, the “Hold” icon will blink and the displayed weight will not change.End Advance to the next menu or return to the top of the current menu.UNIT MENUThis menu activates units so they will be accessible with the UNITS button. The units in the menu must be turned on to be active. (Default settings are indicated in bold.)![]() NOTE: Available units vary by model and local regulations. The security switch must be in the unlocked position to turn units on and off.
NOTE: Available units vary by model and local regulations. The security switch must be in the unlocked position to turn units on and off.
| g | off, on | lb:oz | off, on |
| kg | off, on | grn | off, on |
| ct | off, on | hkt | off, on |
| N | off, on | sgt | off, on |
| oz | off, on | twt | off, on |
| ozt | off, on | t | off, tola, tical |
| dwt | off, on | C | off, on |
| lb | off, on | End Unit | exit menu |
CUSTOM UNIT (C)Use the custom unit to display weight in an alternative unit of measure. The custom unit is defined using a conversion factor based on gram unit, where the conversion factor is the number of custom units per gram expressed in scientific notation (Factor x 10n).FACTORSet the conversion factor (0.1 to 1.99) using the numeric keypad. The default setting is 1.0.EXPONENTSet the factor multiplier.-3 = divide the Factor by 1000 (1 x 10⁻³)-2 = divide the Factor by 100 (1 x 10⁻²)-1 = divide the Factor by 10 (1 x 10⁻¹)0 = multiply the Factor by 1 (1 x 100)1 = multiply the Factor by 10 (1 x 101)2 = multiply the Factor by 100 (1 x 10²)3 = multiply the Factor by 1000 (1 x 10³)
LEAST SIGNIFICANT DIGITSet the graduation.Settings of 0.5, 1, 2, 5, 10, 100 are available.![]() NOTE: Custom unit is locked at the off position when security switch is set to the locked position.Follow instructions below to enter the unit menu to set the custom unit.Press and hold MENU until MeNU is displayed. When the button is released, the display will show C.A.L.. Press NO through the succeeding menu items: C.A.L., SEtUP, ModE until Unit is displayed.
NOTE: Custom unit is locked at the off position when security switch is set to the locked position.Follow instructions below to enter the unit menu to set the custom unit.Press and hold MENU until MeNU is displayed. When the button is released, the display will show C.A.L.. Press NO through the succeeding menu items: C.A.L., SEtUP, ModE until Unit is displayed.
- When Unit is displayed, press YES.
- rESEt will be displayed. Press No, Unit g will be displayed.
- Press NO to toggle through active units until Unit c is displayed.
- Press YES, On c will be displayed, then press YES.
- FActor is displayed. Press YES to view the defaultFactor. Press YES to accept or NO to edit the “factor multiplier”. The stored value is then displayed withthe first digit highlighted . Repeatedly press NO until the desired number appears. Press YES to accept and highlight the next digit. Repeat until all the digits are correct. Press YES to accept the “Factor” value.
- EPt is displayed. Repeat the same procedure as in step 5 to accept or edit the “Exponent” value. Press YES to accept the “Exponent” value.
- LSd is displayed. Repeat the same procedure as in step 5 to accept or edit the “Least Significant Digit” value. Press the YES key to accept the graduation value, End is displayed.
- When End is displayed, press EXIT to exit to weighing mode.
MAINTENANCE
![]() CAUTION! Electric shock hazard. Disconnect equipment from the power supply before cleaning.
CAUTION! Electric shock hazard. Disconnect equipment from the power supply before cleaning.![]() CAUTION! Do not use solvents, chemicals, alcohol, ammonia or abrasives to clean the housing or control panel.
CAUTION! Do not use solvents, chemicals, alcohol, ammonia or abrasives to clean the housing or control panel.
- Clean the housing with a damp cloth and mild detergent, if necessary.
TROUBLESHOOTING
| OPERATING ISSUE | POSSIBLE CAUSE |
| Cannot turn on. | No power to balance. Bad power source. AC adapter or batteries. Faulty keypad. |
| Poor accuracy. | Improper calibration; Unstable environment. |
| Cannot calibrate. | Security switch in locked position. |
| Err 8.1 | Weight exceeds power on zero range. |
| Err 8.2 | Weight below power on zero range. |
| Err 8.3 | Overload (weight exceeds rated capacity). |
| Err 8.4 | Under load (platform removed). |
| Err 8.5 | Tare out of range. |
| Err 8.6 | Displayed value exceeds 999999 (possible in totalization mode). |
| rEf.Err | Parts counting or percentage error – sample weight <1d. Balance shows error then exits parts counting or goes to Clr. PU. |
| Lo.rEf | Percent Reference weight or APW is too low for accurate results. |
| C L E | Fail to do calibration. |
| USB.Err | Cannot find menu or application file in U-disk. |
If the troubleshooting section does not resolve your problem, contact Uline Customer Service at 1-800-295-5510.
[xyz-ips snippet=”download-snippet”]