ULINE Pegboard Installation Guide
SAFETY
- ALWAYS wear safety glasses when using any power tool.
- ALWAYS use hearing protection when using loud equipment.
- DO NOT sit, climb, hang or step on hooks or holders.
- DO NOT overload hooks or holders.
- DO NOT try to install pegboard panels by yourself. Use two people.
INFORMATION
SUGGESTED TOOLS
- 24″ Level
- Tape Measure
- Pencil
- Chalk Line
- Drill with Phillips Screwdriver Attachment
- Glue
SUPPLIES
#8 wood screws, 11/2″ to 2″, with anchors and 1/2″ tall spacers.
GENERAL
- Install over studs, plaster, furring strips or drywall.
- Snap chalk line at desired height on wall.NOTE: Screws may not always anchor into a stud.
- Mark all holes on wall before hanging pegboard.NOTE: If hanging multiple pegboards, mark ALL holes first.
INSTALLATION
INSTALLATION DIAGRAM
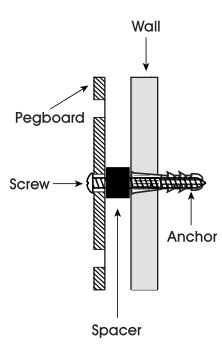
1. Screw2. Pegboard3. Spacer4. Wall5. Anchor
PREPARATION
- With someone holding the pegboard in place, mark all holes on wall according to Figure 1 below where screws will be inserted for hanging. (See Figure 1)
- Pre-drill holes in wall if using anchors.NOTE: Use a 3/16″ drill bit.
- Insert anchors into holes in wall.
- Following Figure 1 below, glue spacers to back of all pegboard holes through which screws will be inserted. Be careful to glue spacers over the same pegboard holes used to mark wall in step 1 or spacers and holes in wall will not line up correctly. (See Figure 1)
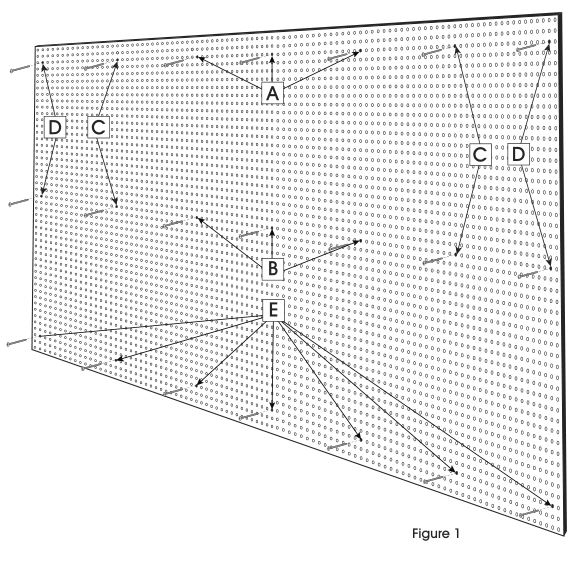
HANGING PEGBOARD (See Figure 1)
NOTE: Follow this order for best results. Do not fully tighten screws until all 21 are in place.
- Fasten 3 top screws (A).
- 3rd row from top, 33rd, 48th column from left, and 34th column from right.
- Fasten 3 center screws (B).
- 24th row from top, 33rd, 48th column from left, and 34th column from right.
- Fasten 4 inner side screws (C).
- 3rd row from top, 17th column from left and 18th column from right.
- 24th row from top, 17th column from left and 18th column from right.
- Fasten 4 outer side screws (D).
- 3rd row from the top, 2nd column from the left and 2nd column from the right.
- 24th row from the top, 2nd column from the left and 2nd column from the right.
- Fasten 7 bottom screws (E).
- 3rd row from the bottom, 2nd column from the left and 2nd column from the right.
- 3rd row from the bottom, 17th column from the left and 18th column from the right.
- 3rd row from the bottom, 33rd, 48th column from the left, and 34th column from right.
![]()
1-800-295-5510uline.com
References
[xyz-ips snippet=”download-snippet”]