


H-5644 RETRACTABLE CORD REEL - HEAVY DUTY, 40′
1-800-295-5510uline.com
TOOLS NEEDED


Power Drill 1/4″ Drill Bit 1/2″ Wrench
INSTALLATION
![]() NOTE: All three screws with washers must be used when installing mounting bracket. Eliminating one or more of the supplied hex head screws may cause bracket to detach, allowing reel to fall and causing damage, injury or death.
NOTE: All three screws with washers must be used when installing mounting bracket. Eliminating one or more of the supplied hex head screws may cause bracket to detach, allowing reel to fall and causing damage, injury or death.
WALL MOUNTING
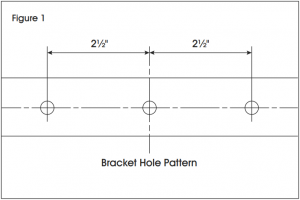
1. Pick the approximate location for the reel within 2½ feet of a 110-125V standard outlet.2. Locate wall stud to install mounting bracket. Place bracket against wall vertically, directly over center of the stud.3. Using bracket as a template, mark three screw locations with pencil. (See Figure 1)
4. Pre-drill three screw holes using a 1/4″ drill bit. Holes should be at least 2″ deep.
5. Install bracket with three provided hex head wood screws and washers using a 1/2″ wrench. Tighten all screws. (See Figure 2)

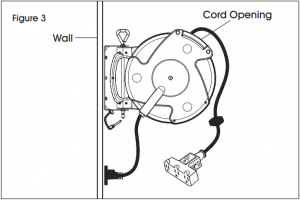
6. Install reel into bracket for smooth retraction.a. When the mounting height is less than 5 feet, the cord opening should face upward. (See Figure 3)
b. When the mounting height is more than 5 feet, the cord opening should face downward. (See Figure 4)7. Slide mounting pin through bracket and reel. (See Figure 4) WARNING: Slide locking pin through mounting pin for security. It will prevent mounting pin from sliding out of position. (See Figure 4)

CEILING MOUNTING
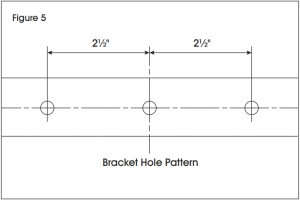
1. Pick approximate location for the reel within 2½ feet of a 110-125V standard outlet.2. Locate joist or beam to install mounting bracket. Place bracket directly over center of joist or beam.3. Using bracket as a template, mark three screw locations with pencil. (See Figure 5)
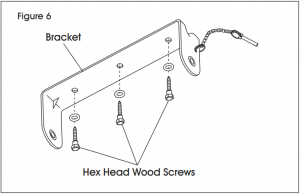
 4. Pre-drill three screw holes using a 1/4″ drill bit. Holes should be at least 2″ deep.5. Install bracket with three provided hex head wood screws and washers using a 1/2″ wrench or socket. Tighten all screws. (See Figure 6)
![]() NOTE: When ceiling mounting is to be against a steel beam, a professional installer should use minimum 1/4″ bolts with lock washers or locking nuts.
NOTE: When ceiling mounting is to be against a steel beam, a professional installer should use minimum 1/4″ bolts with lock washers or locking nuts.
6. Install reel into bracket by sliding mounting pin through bracket and reel. (See Figure 7)WARNING: Slide locking pin through mounting pin for security. It will prevent mounting pin from sliding out of position. (See Figure 7)

0521 IH-5644
[xyz-ips snippet=”download-snippet”]