Optical Smoke Alarm UBS1
![]()
USER MANUAL
UBS1 OPTICALSMOKE ALARM

![]()
![]()
1 Overview
Overview
This optical smoke alarm is a fire detection and alarm device which gives off an audible and visual warning when it detects the presence of smoke within a specially designed detection chamber. Optical smoke sensors are less prone to false alarms than ionisation sensors which have previously been more commonplace, whilst also being slightly more sensitive to slower, smouldering fires typically seen around electrical equipment and the fabrics used for furniture. They are ideal for living rooms, bedrooms, hallways and near kitchens (but not in kitchens).
During standby, the LED will flash every 32 seconds to indicate normal operation. When in alarm mode the LED flashes approximately once per second and the alarm enters into one of the alarm patterns described in the Alarm Signals section.
2 Product Specification
Product Specification
- Sensor Type:Optical (photoelectric)
- Battery Specification:• Voltage: DC 9V• Type: 1x PP3 alkaline
- Recommended:• Gold Peak GP1604S• Gold Peak GP1604A• Raymax 6F22• Raymax 6LR61
- Dimensions (HxDia): 35×89.5mm
- General Operating Temperature:0°C – 40°C
- Humidity Range: 0% to 93% RH
- Operating Current:• Standby: <15µA• Alarm: <25mA
- Alarm Volume: >85dBA at 3 metres
- Smoke Sensitivity: 0.099 – 0.144dB/m
- Silence Time: Approx. 8 minutes
- Certified to: EN 14604: 2005 / AC:2008
- Useable Lifespan: 10 years
- Disposal: Not for general waste; see local electronic waste disposal guidelines.
- Suitable for: BS 5839-6 Grade F2
3 Suitability
Suitability
UltraFire’s range of battery-powered fire detection and alarm devices are designed to meet BS 5839-6 Grade F2 requirements. These alarms are only intended for use in single household premises which are permitted to use battery-powered alarms.
Local Building Regulations, legislation, or other requirements may specify mains-powered alarms, in which case this product is not suitable.
Multi-household domestic premises and commercial premises usually require more advanced fire detection and alarm systems.
4 Silence Mode
Alarm Silence Mode
WARNING: Before silencing an active alarm you must ensure the environment is safe. Do not silence the alarm in the event of an actual fire, as this may prevent other occupants from evacuating.
When in alarm mode, pushing the test button will silence the unit for approximately 8 minutes. The red LED will flash as per the Status Indicators section to indicate that the alarm has been silenced. The alarm will automatically reset after approximately 8 minutes.
If after this period there are still signs of a potential fire then the alarm will sound again. The alarm silence mode can be repeated.
5 Alarm Signals
Alarm Signals
Test Alarm Pattern Smoke Detected Alarm Pattern

1. Chirp 3 times with red LED flash 1. Chirp 3 times with red LED flash

2. Pause 1.5s 2. Pause 1.5s
3. Chirp 3 times with red LED flash 3. Chirp 3 times with red LED flash

5. Repeat from the beginning 5. Repeat from the beginning
6 Status Indicators / Installation
Status Indicators
- During standby operation the red LED will flash once every 32 seconds.
- When the battery fails or a low battery is detected, the alarm will chirp once every 32 seconds in conjunction with the red LED flashing.
- When a fault is detected the alarm will chirp once every 32 seconds with LED flash.
- If the alarm has been silenced the red LED will flash once every 8 seconds for approximately 8 minutes.
Installation
Location
Smoke alarms are recommended for all rooms which are not regularly exposed to steam, fumes, dust or other contaminants.
Do Not Install in the Following Places:
- On walls, shelves, or cupboards
- Where the alarms are likely to be exposed to liquids
- At the very apex of pitched ceilings
- In the corner of the ceiling
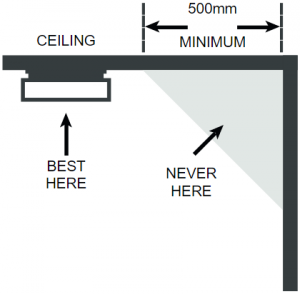
- Within 50cm of a wall, light fitting, or other obstruction
- In bathrooms and other rooms that will be exposed to steam
- Near appliances or areas where combustion occurs regularly
- In areas exposed to excess dirt, dust, gases, vapours, or humidity
- Where the ambient temperature regularly exceeds 0°C to 40°C range
7 Placement
Placement
UltraFire Smoke Alarms must be installed on the ceiling, at least 50cm from the nearest wall, light fitting, or other obstruction.
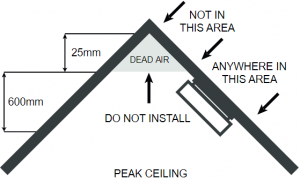
These alarms should be installed no more than 600mm vertically below the apex of a pitched ceiling. Where the depth from apex to eaves is 600mm or less the ceiling should be treated as flat.
At least one smoke alarm should be installed in each hallway or corridor and on each main landing of every staircase. In hallways or corridors exceeding 7.5m in length, no point in the hallway or corridor should exceed 7.5 from the nearest smoke alarm. For best protection install optical smoke alarms also in living rooms, dining rooms and bedrooms. This gives the earliest possible warning should a fire start in these rooms.
8 Installation Procedure
Installation Procedure
WARNING: The label on the alarm must not be removed as it shows important information about the product.
1. Check the desired installation position for wires, pipes or other obstructions that would be dangerous to drill into.

2. Hold the baseplate against the ceiling at the desired installation position.
3. Mark the installation holes with a pencil.
4. Drill the two installation holes as previously marked using a 5mm diameter drill bit.

5. Strike the two included plastic rawl plugs into the holes with a hammer.
6. Align the baseplate to the plastic rawl plugs and fix in place using the provided screws.
7. Fit the batteries into the alarm (please note the battery polarities).
8. Line the alarm up to the baseplate and turn the alarm head clockwise, until securely attached.
![]()
9. After mounting, test the alarm as described in the Maintenance section.
9 Maintenance
Maintenance
Testing
Test your alarms to ensure proper operation once per week by pressing the test button. If there is no sound output it means that the alarm is faulty, the batteries are flat, or that the installation procedure may not have been followed correctly. Please try replacing the batteries and reinstalling the alarm head. If the alarm still fails to react to the test button, please read the Troubleshooting section of this manual.
WARNING: The test button accurately tests the alarm’s components and functions. Do not expose the alarm to an open flame. You may contaminate and damage the sensor, preventing the alarm from providing adequate protection from real fires, and invalidate the warranty.
Repairing
Do not attempt to repair the alarm yourself; dismantling the alarm will affect your warranty. If the alarm is not operating properly, and it is still under warranty, contact the retailer who sold you the product or the manufacturer.
Cleaning
Do not paint smoke or heat alarms. Your alarms should be cleaned every month, using a vacuum cleaner fitted with the soft brush attachment.
WARNING: Do not attempt to remove the cover to clean inside. This will affect the warranty.
10 Maintenance
Maintenance
Battery Replacement
- Twist the alarm anti-clockwise to remove it from the baseplate.
- Remove the old battery.
- Connect and insert a new battery, ensuring correct polarity.
- Place the alarm back on the baseplate, twisting clockwise.
- Hold the test button until the test pattern sounds. This may take 5 – 10 seconds.
- See the Troubleshooting section if the alarm does not sound.
11 Troubleshooting
Troubleshooting
| Problem | Action |
| Alarm does not sound when tested. |
|
| Alarm chirps with the red LED flash about every 32 seconds. | Replace battery as described in the Maintenance section. Please note the battery polarities. |
| The alarm chirps about every 32 seconds, separate from the red LED flash. |
|
| Unwanted alarm sounds intermittently. |
|
12 Fire Safety Advice
Fire Safety Advice
Familiarise yourself with and follow the national and local regulations regarding selection and installation of the different kinds of smoke and heat alarms.
Plan Your Escape
If an alarm sounds but you did not push the test button and it is not a fault tone then it is likely a dangerous situation has developed in the property. To prepare for such occurrences, it is recommended that you develop escape plans for the premises and discuss them with all occupants. Regular practice of your emergency plans can be vital to a successful evacuation.
- Familiarise everyone with the alarm patterns of all alarm devices and explain what they represent.
- Identify all exits from each room and plan an escape route to the outside from each exit.
- Teach all occupants to carefully touch doors and to use alternate exit when the door is hot; instruct them not to open the door if the door is hot.
- Teach occupants to crawl along the floor, to stay below dangerous fumes and gases.
- Identify a safe meeting place for all occupants outside the building and make sure everyone is aware of it.
13 What to Do in Case of Fire
What to Do in Case of Fire
- Calmly leave the premises as quickly as possible. Follow your personalised Escape Plan if possible; otherwise:a. Carefully touch doors to ensure they are not hot before opening them.b. Use an alternate exit if necessary.c. Crawl along the floor to avoid smoke.d. Do not stop to collect anything.
- Meet at a pre-arranged meeting place outside the building if there are multiple occupants. Check if anyone is missing, but do not re-enter the premises.
- Call the fire service from outside the building; do not delay your escape to contact the emergency services.
- Do not go back inside a burning building for any reason. Wait for the fire service to arrive.
NOTE: These guidelines will assist you in the event of a fire; however, UltraFire cannot predict the exact situation of any home fire. Creating your own escape plan based on your specific premises and occupants is the best way to ensure safe evacuation. Follow fire safety guidance and legislation to reduce the chance that fires will start and prevent hazardous situations.
14 Warranty Information
Warranty Information
Safelincs warrants to the original purchaser that its enclosed UBS1 battery-powered alarm, under normal domestic use and service, will operate as described and be free from material and workmanship defects for a period of five years from the date of purchase.
Safelincs hereby warrants that during the warranty period, commencing from the date of purchase, Safelincs, at its discretion, agrees to repair or replace the unit free of charge. The warranty on any replacement alarm will last for the remainder of the period of the original warranty in respect of the alarm originally purchased that is from the date of original purchase and not from the date of receipt of the replacement product.
Safelincs reserves the right to offer an alternative product similar to that being replaced if the original model is no longer available or in stock. This warranty applies to the original retail purchaser from the date of original retail purchase and is not transferable. Proof of purchase is required.
This warranty does not cover damage resulting from accidents, misuse, abuse, disassembly, lack of reasonable care of the product, or applications not in accordance with the user manual. Consumables such as batteries are also not covered by this warranty. In no case shall Safelincs be liable for any incidental or consequential damages or any other warranty, express or implied.
The warranty does not apply to retail stores, service centres or any distributors or agents. Safelincs will not recognise any changes to this warranty by third parties. Except to the extent prohibited by applicable law, any implied warranty of fitness for a particular purpose is limited in duration for five years.
This warranty does not affect your statutory rights. Except for death or personal injury, Safelincs shall not be liable for any loss of use, damage, cost or expense relating to this product or for any indirect, or consequential loss, damages or costs incurred by you or any other user of this product.
Returning Your Alarm
Contact either the original retailer or UltraFire before attempting to return your alarm. Pack the alarm in a well-padded box, tape securely and affix an appropriate address label. Send the alarm either to the retailer you purchased from or to the manufacturer if still under warranty.
If the alarm is no longer under warranty, replace it immediately with a comparable product. If your current alarms are interlinked only replace with UltraFire alarms from the same model range to ensure compatibility and optimal performance.
16 Contact Information
![]()
![]() 33 West Street, Alford, LN13 9FX
33 West Street, Alford, LN13 9FX
![]() 0800 978 8262
0800 978 8262
© 2020 Safelincs All Rights Reserved
DOC 1238 Version 2.0
References
[xyz-ips snippet=”download-snippet”]