
![]()
![]()
![]()
SIP Trunking Service Configuration Guide
for COX Business
NDA-31319Issue 1.01
NEC Corporation of America reserves the right to change the specifications, functions, or features at any time without notice.
NEC Corporation of America has prepared this document for use by its employees and customers. The information contained herein is the property of NEC Corporation of America and shall not be reproduced without prior written approval of NEC Corporation of America.
UNIVERGE is a registered trademark of NEC Corporation. All other brand names and product names referenced in this document are trademarks or registered trademarks of their respective companies.
Copyright 2012NEC Corporation of America6535 N. State Highway 161Irving, TX 75039-2402Communications Technology Group
TABLE OF CONTENTS
Chapter 1 Configuring NEC SV8100 with COX Business SIP Trunking Service
Section 1 NEC SV8100 and COX Business Setup Guide …………… 1
1.1 This Guide and Related Documents ……………….. 11.2 COX Business Account …………………………………… 11.3 SV8100 System Software ………………………………….. 11.4 Requirements ……………………………………………………. 21.5 Limitations ……………………………………………………….. 2
Section 2 NEC PBX Configuration ……………………….. 3
2.1 Prerequisites ……………………………………………………… 32.1.1 SIP Trunking Information from COX Business …….. 32.1.2 NEC UNIVERGE SV8100 ……………………………………. 32.1.3 Installation Worksheet ……………………………………………. 3
Section 3 SV8100 Programming ………………………………………… 5
3.1 Trunk Type / Slot Configuration ………………………………….. 53.2 CD-CP00 Network Setup ……………………………………………… 93.3 IPLA/IPLB DSP Basic Setup ………………………………………. 103.4 SIP System Information Setup ……………………………………… 133.5 SIP Server Information Setup ……………………………………….. 143.6 SIP Authentication Information Setup ………………………….. 163.7 IP System Interconnection Setup …………………………………… 173.8 Calling Party Information (Trunk) …………………………………. 18
SIP Trunking Service Configuration Guide i
Issue 1.01 COX Business
3.9 Class of Service Options (Outgoing Call Service) …………………. 193.10 IP Trunk Calling Party Number Setup …………………………………. 203.11 IP Trunk (SIP) Calling Party Number Setup for Extensions .. 203.12 DID (TN to ext map) ……………………………………………….. 213.13 DTMF Configuration ………………………………………………… 223.14 ToS Setup ………………………………………………………… 233.15 SIP Trunk Basic Setup ……………………………………………… 24
Section 4 Initial Testing and Troubleshooting……………………………… 25
ii Table of Contents
LIST OF FIGURES AND TABLES
Table 1 Installation Worksheet……………………………………………. 4Figure 1 Blade Configuration……………………………………………… 5Figure 2 IPLA/IPLB Configuration……………………………………. 6Figure 3 IPLA/IPLB DSP Resource Selection …………………… 7Figure 4 IP Trunk Availability …………………………………………… 8Figure 5 CD-CP00 Network Setup ……………………………………. 9Figure 6 IPLA/IPLB DSP Basic Setup ……………………………… 10Table 2 Port Table ……………………………………………………….11Table 3 Router Forwarding (Gateway Table) …………………….. 12Figure 7 SIP System Information Setup ……………………………… 13Figure 8 SIP Server Information Setup ………………………………. 14Figure 9 SIP Authentication Information Setup ………………….. 16Figure 10 IP System Interconnection Setup ………………………….. 17Figure 11 Class of Service Options ……………………………………….. 19Figure 12 IP Trunk (H.323/SIP) Calling Party Number Setup for Trunks …… 20Figure 13 IP Trunk (SIP) Calling Party Number Setup for Extensions ………… 20Figure 14 Incoming Call Trunk Setup …………………………………… 21Figure 15 SIP Trunk Codec Setup ………………………………………….. 22Figure 16 ToS Setup …………………………………………………….. 23Figure 17 SIP Trunk Basic Setup …………………………………………. 24Table 4 Troubleshooting Guide ………………………………………….. 26
SIP Trunking Service Configuration Guide iii
Issue 1.01 COX Business
iv List of Figures and Tables
Configuring NEC SV8100 with COX Business SIP Trunking Service
This guide was created to assist knowledgeable vendors with configuring the NEC SV8100 Communication Server with COX Business’s SIP Trunking service. It provides sample entries for the required fields. The actual data is provided by COX Business when service is activated. Questions about software and hardware installation or other PBX configuration issues should be directed to NEC’s National Technical Assistance Center (NTAC).
For complete details on using SIP trunks with the SV8100, refer to the SV8100 Networking Manual.
For complete details on using DID features, refer to the DID feature in the SV8100 Features and Specifications Manual.
For details about related hardware, refer to the SV8100 System Hardware Manual.
These manuals can be downloaded from NEC’s National Technical Assistance Center (NTAC) web site. You must have a valid dealer ID to access the documents.
1.2 COX Business Account
Contact your COX Business representative.
1.3 SV8100 System Software
The SV8100 requires system software Version 6.02 or higher to use COX Business service.
SIP Trunking Service Configuration Guide 1
Issue 1.01 COX Business
1.4 Requirements
With the SV8100, a VoIP gateway daughter board is required in addition to licensing for IP (SIP) trunks.
A minimum of four IP (SIP) trunks are required due to the NEC Communications Server infrastructure setup.
The system software for the NEC Communications Server should be Version 6.02 or higher.
NEC recommends that the requirements and programming are completed with as much information as possible before scheduling an activation appointment with COX Business.
1.5 Limitations
The following limitations apply:![]() Some private IP network ranges conflict with SIP trunking service providers ranges. This can cause issues when connecting to the SIP trunking service provider. Private ranges reserved for the customer’s LAN are:
Some private IP network ranges conflict with SIP trunking service providers ranges. This can cause issues when connecting to the SIP trunking service provider. Private ranges reserved for the customer’s LAN are:
10.x.x.x192.168.0.x through 192.168.10.x
2 SIP Trunking Service Configuration Guide
COX Business Issue 1.01
SECTION 2 NEC PBX CONFIGURATION
This section provides information to NEC’s solution providers and NEC Associates for configuring an NEC UNIVERGE SV8100 to connect to a COX Business SIP Trunk service provider, utilizing a STATIC configuration.
2.1 Prerequisites
Before you configure the UNIVERGE SV8100, you must have the following information available.
2.1.1 SIP Trunking Information from COX Business
![]() Primary SIP Proxy Server IP Address
Primary SIP Proxy Server IP Address![]() Number Plan, if applicable for the Point-to-Point Connection
Number Plan, if applicable for the Point-to-Point Connection![]() Trunking DID(s)The DID(s) are forwarded to the Public WAN IP address(s), DNS or DNS SRV records of the PBX.
Trunking DID(s)The DID(s) are forwarded to the Public WAN IP address(s), DNS or DNS SRV records of the PBX.![]() SIP Registration – Authentication Username (User ID), and Password.
SIP Registration – Authentication Username (User ID), and Password.
2.1.2 NEC UNIVERGE SV8100
![]() SV8100 CPU firmware Version 6.02 or higher
SV8100 CPU firmware Version 6.02 or higher![]() IPLA/B (PZ-XX)
IPLA/B (PZ-XX)![]() SIP Trunking License (minimum of four licenses)
SIP Trunking License (minimum of four licenses)![]() Digital, IP and TDM Telephones
Digital, IP and TDM Telephones
2.1.3 Installation Worksheet
Use the worksheet to record the information needed for setting up the SIP Trunking service.
SIP Trunking Service Configuration Guide 3
Issue 1.01 COX Business
Table 1 Installation Worksheet
WAN Side:Internet Access Type and Speed:WAN IP Address:WAN Subnet Mask:WAN Gateway IP Address:
LAN Side:LAN IP Address for SIParator or EdgeMarc:LAN Subnet Mask:LAN IP Address for SV8100:VLAN ID:
PBX Information:Model:Firmware Version:Number of SIP Trunk Licenses:Add-on Software Applications:Number of Users:Number of Concurrent Calls:
Notes:
4 SIP Trunking Service Configuration Guide
COX Business Issue 1.01
SECTION 3 SV8100 PROGRAMMING
When using COX Business as your SIP trunking service provider, the following programs must be changed for SIP trunking service.
When using PCPro or WebPro for programming, enabling an option may be a checkbox option rather than entering a ‘1’ as in terminal programming.
3.1 Trunk Type / Slot Configuration
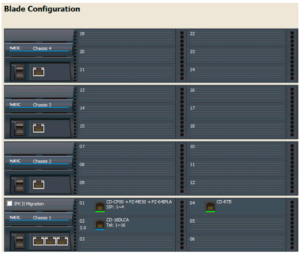
Figure 1 Blade Configuration
SIP Trunking Service Configuration Guide 5
Issue 1.01 COX Business

Figure 2 IPLA/IPLB Configuration
10-03-02: Blade Setup, for IPLA/IPLB (VoIPDB)Define the trunks to be used for SIP trunks as 1 (SIP).
6 SIP Trunking Service Configuration Guide
COX Business Issue 1.01

Figure 3 IPLA/IPLB DSP Resource Selection
10-19-01 : VOIP DSP Resource Selection
Specify the operating mode for the DSP resources (0=common use (extensionsand trunks), 1=IP extensions only, 2=SIP trunks only, 3=Networking, 4=NetLink,5=Blocked, 6=Common without Unicast, 7=Multicast Paging, 8=Unicast Paging).
SIP Trunking Service Configuration Guide 7
Issue 1.01 COX Business
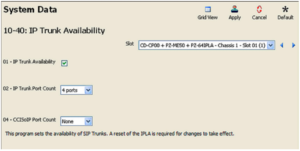
Figure 4 IP Trunk Availability
10-40-01 : IP Trunk Availability – IP Trunk AvailabilityTurn this option “on”.10-40-02 : IP Trunk Availability – IP Trunk Port CountSelect the number of trunks being used.
8 SIP Trunking Service Configuration Guide
COX Business Issue 1.01
3.2 CD-CP00 Network SetupValues shown are for example purposes only. Your actual IP values will be determined by your local LAN administrator.
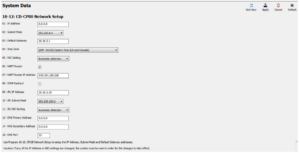
Figure 5 CD-CP00 Network Setup
10-12-01 : CD-CP00 Network Setup – IP AddressSet the LAN IP address for the system ethernet port to 0.0.0.010-12-02 : CD-CP00 Network Setup – Subnet MaskSet the subnet mask for the system ethernet port to be different than the subnet for the IPLA/IPLB blade.10-12-03 : CD-CP00 Network Setup – Default GatewaySet the default gateway for the IPLA/IPLB blade.If a router or firewall is placed between the SIP Trunk Provider and SV8100,you must also set the following programs:10-12-06 : CD-CP00 Network Setup – NAPT RouterTurn this program on if the SV8100 resides behind a NAT router.10-12-07 : CD-CP00 Network Setup – NAPT Router IP AddressSet the WAN IP address of the NAT router behind the SV8100.
SIP Trunking Service Configuration Guide 9
Issue 1.01 COX Business
10-12-09 : CD-CP00 Network Setup – IP AddressSelect the IP address for the VoIP connection (default: 172.16.0.10). A static IP address is required.
![]() IP address is required by the CD-CP00. Some private IP network ranges (ex: 192.168.0.0/ 16, 172.16.0.0/12) conflict with SIP Service Provider’s Network ranges which may cause issues when connecting SIP connect service. Private ranges reserved for the customer’s LAN are 10.x.x.x and 192.168.0.x through 192.168.10.x.
IP address is required by the CD-CP00. Some private IP network ranges (ex: 192.168.0.0/ 16, 172.16.0.0/12) conflict with SIP Service Provider’s Network ranges which may cause issues when connecting SIP connect service. Private ranges reserved for the customer’s LAN are 10.x.x.x and 192.168.0.x through 192.168.10.x.
The SV8100 must be reset in order for the change to take effect.
10-12-10 : CD-CP00 Network Setup – Subnet MaskSelect the Subnet Mask to be used by the VoIP server (default: 255.255.0.0).
3.3 IPLA/IPLB DSP Basic Setup
Values shown are for example purposes only. Your actual IP values will be determined by your local LAN administrator.
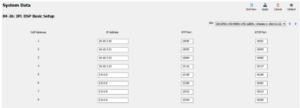
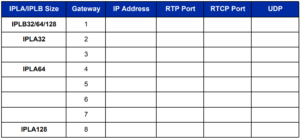
Figure 6 IPLA/IPLB DSP Basic Setup
Port Forwarding:The Router will require port forwarding rules to be configured.
Port 5060 must be forwarded to the address entered in Program 10-12-09.Port 5060 is not used for remote terminals – ports 5070 and 5080 are used instead. Port 5060 is only used for trunking so there are no issues with the possible fraudulent usage of unauthorized remote attempts to register remote terminals.
10 SIP Trunking Service Configuration Guide
COX Business Issue 1.01
The ports used in Programs 84-26-02 and 84-26-03 must be forwarded to the IP address entered in Program 84-26-01.
The RTP/RTCP ports are forwarded to avoid possible one-way conversation which might occur on inbound calls. When forwarding the ports, the range for each gateway must be set. The number of gateways to forward will depend on the size of the IPLA/B.
![]() Gateway 1 will require ports 10020-10051 forwarded.
Gateway 1 will require ports 10020-10051 forwarded.![]() Gateway 2 will require ports 10052-10083 forwarded.
Gateway 2 will require ports 10052-10083 forwarded.![]() Gateway 3 will require ports 10084-10115 forwarded.
Gateway 3 will require ports 10084-10115 forwarded.![]() Gateway 4 will require ports 10116-10147 forwarded.
Gateway 4 will require ports 10116-10147 forwarded.![]() Gateway 5 will require ports 10148-10179 forwarded.
Gateway 5 will require ports 10148-10179 forwarded.![]() Gateway 6 will require ports 10180-10211 forwarded.
Gateway 6 will require ports 10180-10211 forwarded.![]() Gateway 7 will require ports 10212-10243 forwarded.
Gateway 7 will require ports 10212-10243 forwarded.![]() Gateway 8 will require ports 10244-10275 forwarded.
Gateway 8 will require ports 10244-10275 forwarded.
Table 2 Port Table
Ports UDP TCP5060 Yes No10020 Yes No10021 Yes No10052 Yes No10053 Yes No10084 Yes No10085 Yes No10116 Yes No10117 Yes No
SIP Trunking Service Configuration Guide 11
Issue 1.01 COX Business
Table 3 Router Forwarding (Gateway Table)
Example: Router configuration shown from the NEC InRouter/4300T Router
udp;143.101.120.218/255.255.255.0-10020>10.10.3.20-10020udp;143.101.120.218/255.255.255.0-10021>10.10.3.20-10021udp;143.101.120.218/255.255.255.0-10052>10.10.3.21-10052udp;143.101.120.218/255.255.255.0-10053>10.10.3.21-10053udp;143.101.120.218/255.255.255.0-10084>10.10.3.22-10084udp;143.101.120.218/255.255.255.0-10085>10.10.3.22-10085udp;143.101.120.218/255.255.255.0-10116>10.10.3.23-10116udp;143.101.120.218/255.255.255.0-10117>10.10.3.23-10117udp;143.101.120.218/255.255.255.0-5060>10.10.3.10-5060
12 SIP Trunking Service Configuration Guide
COX Business Issue 1.01
3.4 SIP System Information Setup
Values shown are for example purposes only. Your actual values will be determined by your implementation team.
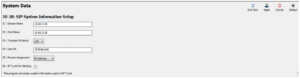
Figure 7 SIP System Information Setup
10-28-01 : SIP System Information Setup – Domain NameDefine the Domain name up to 64 characters. This information is specific to your market and is provided by your SIP Trunking Service Provider.
![]() When configuring Domain name, the SIP service provider will supply the Proxy/Domain in the following manner – “Host Name” . “Domain Name” . The characters are normally separated by “.” The characters after “.” will be in the Domain Name.
When configuring Domain name, the SIP service provider will supply the Proxy/Domain in the following manner – “Host Name” . “Domain Name” . The characters are normally separated by “.” The characters after “.” will be in the Domain Name.
![]() Cox does not use DNS or domain names, the static LAN IP address of the Cox E-SBC should be entered for the domain name field.
Cox does not use DNS or domain names, the static LAN IP address of the Cox E-SBC should be entered for the domain name field.
10-28-02 : SIP System Information Setup – Host NameDefine the Host name, up to 48 characters.
![]() When configuring Host name, the SIP service provider will supply the Proxy/Domain in the following manner – “Host Name” . “Domain Name” . The characters are normally separated by “.” The characters before “.” will be in the Domain Name.
When configuring Host name, the SIP service provider will supply the Proxy/Domain in the following manner – “Host Name” . “Domain Name” . The characters are normally separated by “.” The characters before “.” will be in the Domain Name.
![]() Cox does not use a host name, the static LAN IP address of the Cox E-SBC should be entered for the host name field.
Cox does not use a host name, the static LAN IP address of the Cox E-SBC should be entered for the host name field.
10-28-03 : SIP System Information Setup – Transport ProtocolDefine the Transport type. This option is always set to 0 (UDP).
10-28-04 : SIP System Information Setup – User IDThis information is provided by your SIP Trunking Service Provider.
Entries: 32 characters maximum (Default=No Entry).
![]() Typically the ten digit billing telephone number is used. This entry must be numeric as Program 10-23-04 does not allow text entry – only numeric.
Typically the ten digit billing telephone number is used. This entry must be numeric as Program 10-23-04 does not allow text entry – only numeric.
SIP Trunking Service Configuration Guide 13
Issue 1.01 COX Business
10-28-05 : SIP System Information Setup – Domain AssignmentDetermine the type of Domain Assignment. Set this entry to 1 (Domain Name).
10-28-06 : SIP System Information Setup – IP Trunk Port BindingSet this entry to 0 (Disable) to allow an incoming call to use the lowest port.
3.5 SIP Server Information Setup
Values shown are for example purposes only. Your actual values will be determined by your implementation team.
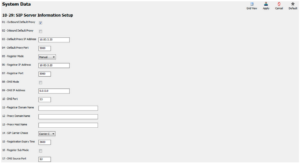
Figure 8 SIP Server Information Setup
10-29-01 : SIP Server Information Setup – Outbound Default ProxyEnable (1) the SIP Outbound Proxy.
![]() If entries are made in Program 10-29-xx for a SIP Server and the SIP Server is then removed or not used, the entries in Program 10-29-xx must be set back to their default settings. Even if 10-29-01 is set to .0. (off), the SV8100 will check the settings in the remaining 10-29 programs.
If entries are made in Program 10-29-xx for a SIP Server and the SIP Server is then removed or not used, the entries in Program 10-29-xx must be set back to their default settings. Even if 10-29-01 is set to .0. (off), the SV8100 will check the settings in the remaining 10-29 programs.
10-29-03 : SIP Server Information Setup – Default Proxy IP AddressDefine the SIP Trunk Service Provider Proxy IP Address. You may resolve the IP address of the Outbound Proxy by pinging the URL.
10-29-05 : SIP Server Information Setup – Registrar ModeSet the Registrar Mode to 1(manual) with SIP trunking.
14 SIP Trunking Service Configuration Guide
COX Business Issue 1.01
10-29-06 : SIP Server Information Setup – Registrar IP AddressInput the IP address of the SIP registrar (if given).
10-29-08 : SIP Server Information Setup – SIP Proxy Setup – DNS ModeSet the DNS Mode to 1, when the SIP carrier provides a domain name.
10-29-09 : SIP Server Information Setup – SIP Proxy Setup – DNS IP AddressThis information should be provided by your SIP service provider.
![]() The DNS IP Address should be any valid Domain Name Server either SIP provided orwithin your network.
The DNS IP Address should be any valid Domain Name Server either SIP provided orwithin your network.
10-29-11 : SIP Server Information Setup – SIP Proxy Setup – Registrar Domain NameDefine the Registrar Domain Name. This information should be provided by your SIP service provider (128 characters maximum).
10-29-12 : SIP Server Information Setup – Proxy Domain NameEnter the Domain name.
![]() When configuring the Domain name, the SIP service provider will supply the Proxy/ Domain in the following manner – “Host Name” . “Domain Name” . The characters are normally separated by “.” The characters after “.” will be in the Domain Name.
When configuring the Domain name, the SIP service provider will supply the Proxy/ Domain in the following manner – “Host Name” . “Domain Name” . The characters are normally separated by “.” The characters after “.” will be in the Domain Name.
10-29-13 : SIP Server Information Setup – Proxy Host NameEnter the Host name.
![]() When configuring Domain name the SIP service provider will supply the Proxy/Domain in the following manner – “Host Name” . “Domain Name” . The characters are normally separated by “.” The characters before “.” will be in the Host Name.
When configuring Domain name the SIP service provider will supply the Proxy/Domain in the following manner – “Host Name” . “Domain Name” . The characters are normally separated by “.” The characters before “.” will be in the Host Name.
10-29-14 : SIP Server Information Setup – SIP Carrier ChoiceSet the SIP Carrier Choice to 0 (Default).
10-29-15 : SIP Server Information Setup – Registration Expiry TimeIt is important to leave this automatic re-registration time to be 3600 seconds so that the COX Business network does not get flooded.
10-29-16 : SIP Server Information Setup – Register Sub ModeUnchecking the Register Sub Mode (setting it to “off”) will allow all trunk calls to be routed based on routing policies.
SIP Trunking Service Configuration Guide 15
Issue 1.01 COX Business
3.6 SIP Authentication Information SetupValues shown are for example purposes only. Your actual values will be determined by your implementation team.

Figure 9 SIP Authentication Information Setup
10-30-02 : SIP Authentication Information Setup – User NameDefine the authentication User Name provided by COX Business as defined in Program 10-28-04. This information is provided by your SIP Service Provider.
Entries: 48 characters maximum.
10-30-03 : SIP Authentication Information Setup – PasswordEnter the COX Business authentication password. This information is provided by your SIP Service Provider.
Entries: 48 characters maximum.
16 SIP Trunking Service Configuration Guide
COX Business Issue 1.01
3.7 IP System Interconnection SetupValues shown are for example purposes only. Your actual values will be determined by your implementation team.
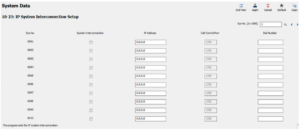
Figure 10 IP System Interconnection Setup
10-23-01 : System InterconnectionEnable interconnection to the SIP Server.
10-23-02 : IP AddressEnter the IP Address of the SIP Server.
10-23-04 : Dial NumberEnter the digits to be sent to the SIP Server on an outbound call.
SIP Trunking Service Configuration Guide 17
Issue 1.01 COX Business
3.8 Calling Party Information (Trunk)
Caller ID – In the Invite message there are two fields that can have caller ID. One field is the “SIP From Address” and the other field is “SIP Display Info”. If both of these fields are left blank the call will not complete.
Below is an example of a SIP Invite Message with outbound CID.From “2142622000”<sip:>
14-12-01 : SIP Register ID Setup for IP TrunksOn a per trunk basis, you can choose a SIP register ID of 0~31. If the ID is left to 0, the “SIP from Address” would not be assigned on a per trunk basis. If set to 1~31, it then looks at command 10-36-02 to populate the “SIP from Address” field.
14-12-02 : SIP Register ID Setup for IP TrunksThis is for SIP trunks to the provider for inbound purposes. If 10-28-06 (Trunk port Binding) is enabled, inbound calls map to the trunk. If you want to create a hunt group when trunk port binding is enabled, set multiple trunks to the same pilot and then define that number in 10-36.
10-36-02 : SIP Trunk Registration InformationPer registration ID 1~31 you can assign what will be populated in the “SIP from Address” field.
15-16-01 : SIP Register ID Setup for ExtensionsPer station you can choose a SIP register ID of 1~31. If left blank the “SIP from Address” would not be assigned on a per station basis. If assigned, it will look at Program 10-36-02 to populate the “SIP from Address” field. This takes priority over command 14-12-01.
10-28-04 : SIP System Information Setup – User IDThis is the default “Display Info” and “From Address” if either of these fields is blank what is assigned in this command will be inserted. This setting has the lowest priority and if any of the next commands are set they will be sent out instead of this command.
18 SIP Trunking Service Configuration Guide
COX Business Issue 1.01
3.9 Class of Service Options (Outgoing Call Service)Values shown are for example purposes only. Your actual values will be determined by your implementation team.
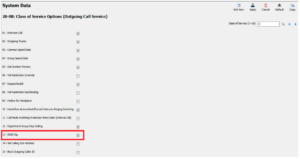
Figure 11 Class of Service Options
20-08-13 : Class of Service Options (Outgoing Call Service) – ISDN ClipThis needs to be turned ON per COS, if you are trying to send any information on a per station basis. If turned OFF, it will still send the trunk information if set.
20-09-02: Class of Service Options (Incoming Call Service) Caller ID DisplayThis needs to be turned ON per COS, if you want to receive caller ID.
SIP Trunking Service Configuration Guide 19
Issue 1.01 COX Business
3.10 IP Trunk Calling Party Number Setup
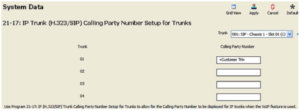
Figure 12 IP Trunk (H.323/SIP) Calling Party Number Setup for Trunks
21-17-01: Calling Party Number Setup for TrunksOn a per trunk basis this populates the “SIP Display Info” field. If a station has a setting in 21-19-01, it will override this field.
3.11 IP Trunk (SIP) Calling Party Number Setup for ExtensionsValues shown are for example purposes only. Your actual values will be determined by your implementation team.

Figure 13 IP Trunk (SIP) Calling Party Number Setup for Extensions
20 SIP Trunking Service Configuration Guide
COX Business Issue 1.01
21-19-01 : IP Trunk (SIP) Calling Party Number Setup for ExtensionsOn a per station basis this populates the “SIP Display Info” field.This setting has the highest priority.
This program is used to assign the Calling Party Number for each extension (Entries: 1~0, *, #). The assigned number is sent to the SIP Trunking Service Provider when the caller places an outgoing call. If the Calling Party Number is assigned by both Program 21-17 and 21-18/21-19, then the system uses the data in Program 21-18/21-19. Do not use Program 21-13 for SIP. This entry must be a 10-digit DID associated with the SIP Trunking Service Provider Account. DID numbers are provided by your SIP Trunking Service Provider Coordinator.
3.12 DID (TN to ext map)Values shown are for example purposes only. Your actual values will be determined by your implementation team.
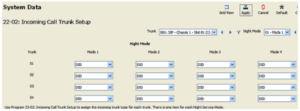
Figure 14 Incoming Call Trunk Setup
22-02-01 : Incoming Call Trunk SetupDefine the SIP trunks as type 3 (DID). In addition to the SIP trunk programming, refer to the DID feature in the SV8100 Features and Specifications Manual for additional DID programming (e.g., 14-05, 22-04, 22-09, 22-10, 22-11, 22-12, 22-13, 22-17, 34-01).
SIP Trunking Service Configuration Guide 21
Issue 1.01 COX Business
3.13 DTMF ConfigurationValues shown are for example purposes only. Your actual values will be determined by your implementation team.
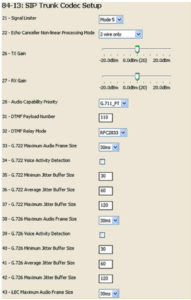
Figure 15 SIP Trunk Codec Setup
84-13-32 : SIP Trunk CODEC Information Basic Setup – DTMF Relay ModeSet the DTMF setup to 1 (RFC2833).
22 SIP Trunking Service Configuration Guide
COX Business Issue 1.01
3.14 ToS SetupValues shown are for example purposes only. Your actual values will be determined by your implementation team.
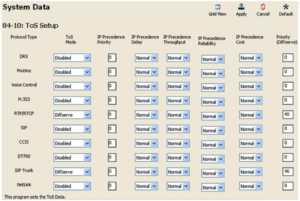
Figure 16 ToS Setup
84-10-01 : ToS Setup – ToS ModeFor the RTP/RTCP (Protocol type 5) and SIP Trunk (Protocol type 9), set the ToS Mode to “2” (Diffserv).
The SV8100 must be reset in order for the change to take effect.
84-10-07 : ToS Setup – Priority (Diffserv)For each of the following protocol types, set the following priorities:RTP/RTCP (Protocol type 5): Priority 40.SIP Trunk (Protocol type 9): Priority 46.
The SV8100 must be reset in order for the change to take effect.
SIP Trunking Service Configuration Guide 23
Issue 1.01 COX Business
3.15 SIP Trunk Basic SetupValues shown are for example purposes only. Your actual values will be determined by your implementation team.

Figure 17 SIP Trunk Basic Setup
84-14-11 : SIP Trunk Basic Setup – URL/To Header Setting InformationSet this program to Proxy Server Domain.
Changes within this program require the SV8100 be reset in order for the change to take effect.
24 SIP Trunking Service Configuration Guide
COX Business Issue 1.01
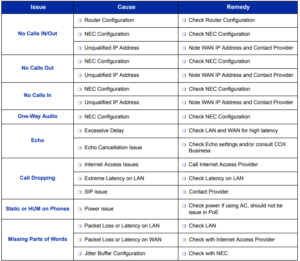
SECTION 4 INITIAL TESTING AND TROUBLESHOOTING
To confirm that the system is correctly set, perform the following tests:
![]() If you run into an issue with any of these tests, refer to Table 4 Troubleshooting Guide. Test an outgoing call to a local number. Check for ringback, 2-way audio and quality.
If you run into an issue with any of these tests, refer to Table 4 Troubleshooting Guide. Test an outgoing call to a local number. Check for ringback, 2-way audio and quality.
- Test an outgoing call to a long distance number. Check for ringback, 2-way audio and quality.
- Test an outgoing call to an international number. Check for ringback, 2-way audio and quality.
- Test a outgoing call lasting more than 15 minutes.
- Test multiple call concurrences on outgoing calls. Setup multiple calls to PSTN.
- Test an outgoing call to an Operator ‘0’.
- Test an outgoing call to directory assistance ‘411’.
- Test a 911 call.
 Identify to the operator that this is a TEST!8. Test an incoming call to an internal DID. Check for ringback, 2-way audio and quality.9. Test an incoming call to an auto-attendant. Check DTMF and audio quality.10. Test transferring calls off-site.11. Test an outgoing call to an auto-attendant and verify DTMF.SIP Trunking Service Configuration Guide 25
Issue 1.01 COX Business
Table 4 Troubleshooting Guide
26 SIP Trunking Service Configuration Guide
Univerge SV8100 SIP Trunking Service User Manual – Univerge SV8100 SIP Trunking Service User Manual –