
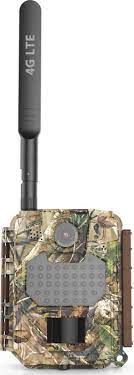
Uovision Compact LTE 4G 20MP Cloud
Declaration of Conformity to Directive 2014/53/EU
CE Caution: Hereby the manufacturer declares that this Uovision Compact LTE Wireless Trail Camera is in compliance with the essential requirements and other relevant provisions of Directive 2014/53/EU. A copy of the DOC, Declaration of Conformity to Directive 2014/53/EU, may be obtained thru the local distributor.
CAMERA INTRODUCTION
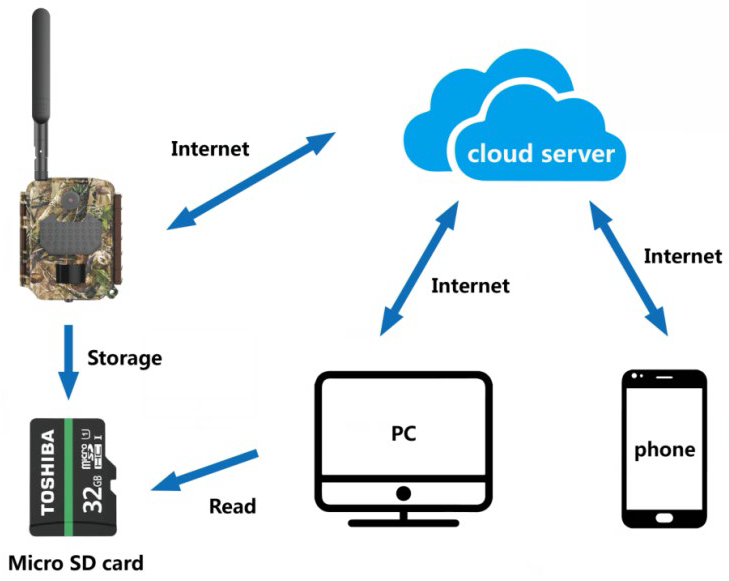
HOW THE CAMERA WORKS
Uovision Compact LTE Wireless Trail Camera is using high-speed 4G LTE connection thru the LinckEazi cloud platform. It has max 20MP resolution and max Full HD (1080P) video with audio. Camera is having small compact size and it is easy to use. User can review the photos and videos via LinckEazi Cloud platform. Setting changes are done also using cloud platform.
CAMERA OVERVIEW

- Switch
- Reset
- Micro SD slot
- Nano SIM slot
- 4G Antenna
- PIR & Power” LED
- “Network Status”
- MIC
- PIR detector
- Lens
- Flash
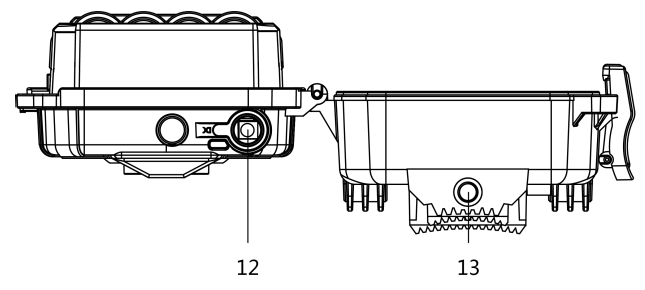
- 6V Power Port
- Tripod / Wall Mount Threads
| Button | Function description |
|
|
ON: Working mode (camera active) OFF: Power Off |
|
|
①:Press the RESET button and the camera
will take a manual photo and automatically send to the app (LinckEazi account needs opened first, and insert camera serial number & IMEI code to your own account) |
Sound information
Beeps 2 times: no SIM cardBeeps 3 times: no Micro SD cardBeeps 1 time: upgrade is completed
PREPARATION
INSTALLING BATTERIES
This camera can function on 8 AA alkaline batteries. Pay attention to the (+) or (-) molded into each sleeve to determine, if you insert the positive or negative end into the sleeve first. Negative battery terminal always contacts the spring. Note:
- Do not mix different types of batteries
- Do not mix the old and new batteries
- Recommend high-performance (1.5V) batteries, such as Alkaline or Lithium batteries
- Remove batteries when not in use to prevent leakage!
INSERTING MICRO SD CARD
Always ensure that the camera is turned OFF before inserting a Micro SD card. Insert a Micro SD card (up to 32G) into the Micro SD card slot with the label side facing upwards.
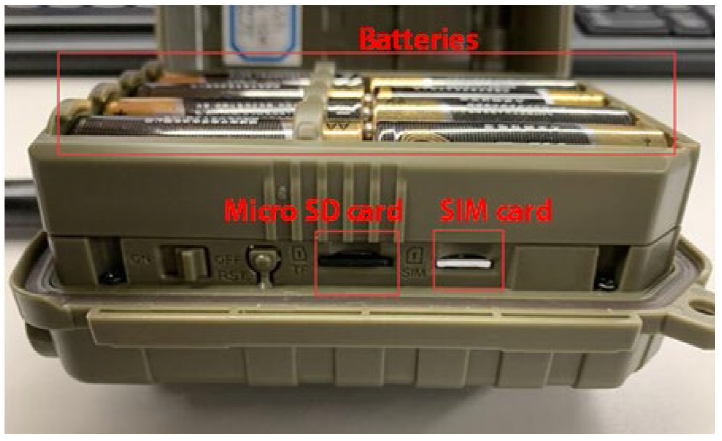
INSERT NANO SIM CARD
This product supports following NetworksFDD-LTE:B1/B3/B5/B7/B8/B20;TDD-LTE: B38/B40/B41;WCDMA: B1/B5/B8;GSM: 900/1800
- Be sure that PIN code of the SIM card is OFF
- Secure that SIM card has enough money
- SIM card should support high-speed 4G LTE data transmission and SMS text message receiving
SETTING CAM WITH WEB PORTAL OR APP
DOWNLOADING THE APP
Search “Linckeazi” in your Google Play Store or Apple Store. You can also scan below QR code and install the APK file to your smart phone:Accessing to LinckEazi Cloud Web Portal by computer: Open your web browser to: https://www.linckeazi.com
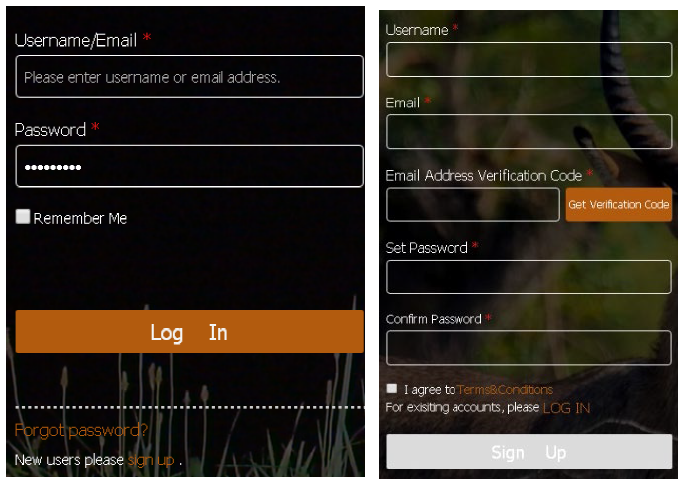
LOGIN
Open your browser and access the address: https://www.linckeazi.com If you already have an account just login in. If not, click ‘Sign up’ on the page to pop up the registration page. Please register your account with an email address, and fill out the necessary information.
Then, add the camera to your cloud account. Please click ‘Add Device’, a form will pop out and request basic information for your CAM.
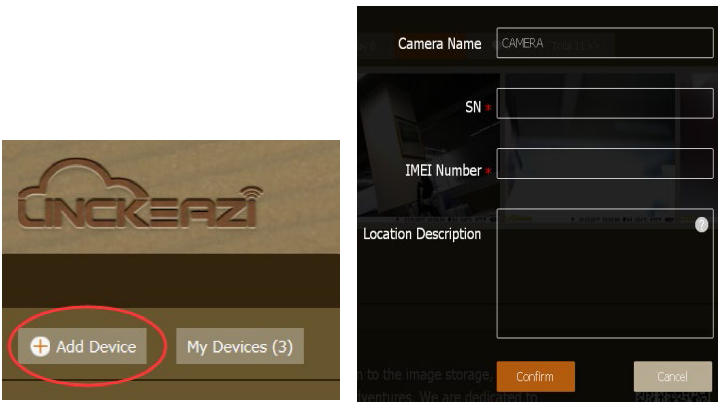
Name your CAM, and add location description if necessary. The Serial Number and IMEI code can be found inside your Camera.
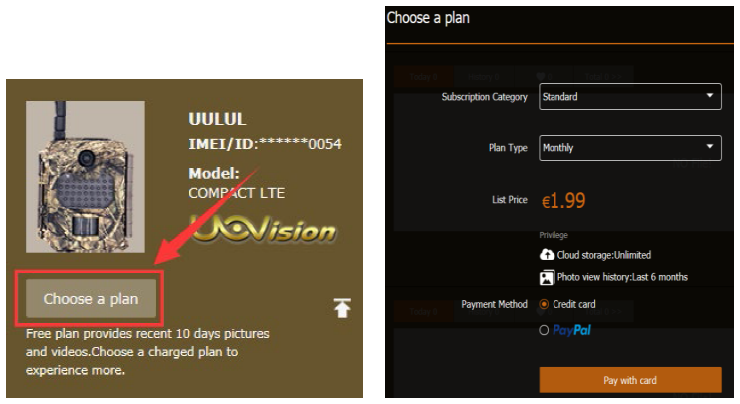
CHOOSE A PLAN
Click “Choose a plan” button to select the type of plan you’d like to add. Free plan provides recent 10 days pictures and videos.
SETTING CAM
The Camera can be set up conveniently with either website or APP.
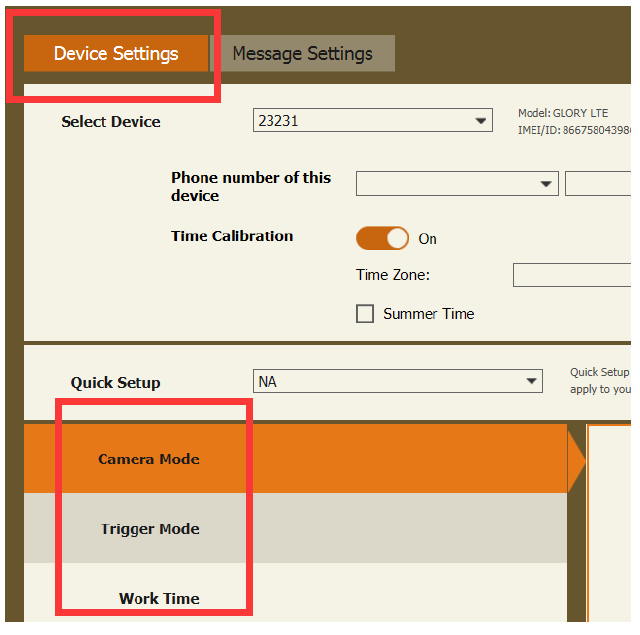
Please click ‘Apply to Device’ when you finish the settings.
SETTINGS
| CAMERA MODE | ||
|
Photo |
Photo Size | 3M/5M/8M/12M/16MP/20MP |
| Flash Power | Low/High | |
| Photo Burst | 1-10 | |
| Burst speed | Fast/ Slow | |
| Sending Option | 1-10 | |
| Shutter Speed | Normal/Fast | |
| Flash Power | Low/High | |
|
Video |
Video Size | WVGA/720P/1080P |
| Video Length | 5s-60s |
Photo Burst: It’s the taken number of pictures when a triggering. If photo burst is 3, it means the camera will take 3 pictures after one triggering. You also can choose which one of the pictures will be sent via Sending Option.Shutter Speed: Normal is suitable for most application scenarios.Fast can be used for reducing motion blur.
| TRIGGER MODE | ||
|
PIR Trigger |
PIR Sensitivity |
Auto/Low /High |
|
PIR Interval |
5s – 60min | |
| Time Lapse | 3Min-24Hour | |
| Both |
PIR Interval: It means how often the PIR sensor can be allowed to work. This prevents the card from filling up with too many redundant images.Time Lapse: When choose time lapse, camera takes photos or videos by time, not by triggering. It’s useful for continuously monitoring of an area.
| SYSTEM SETTINGS | |
| Work-Time | 4 Groups |
| Send Mode | Instant (0~99), 0 means infinity |
|
Remote Control |
Real Time/Delay 0.5H/1H/2H
/3H/4H/6H/12H/24H |
| Time Calibration | Off/On |
| Rename | Edit camera name |
| Over Write | Off/On |
| Location (aGPS) | On/Off |
Send Mode: Enable the instant transmission. 0-99 means the number of photos which is allowed to send out per day.Remote Control: You can remote control your camera via mobile phone or web-portal. Please note if you choose Real Time, the power consumption will be huge as the wireless module will keep awake. Delay 24H means the wireless module will automatically wake up after 24 hours. This means your command will be carried out after 24 hours.Work Time: The camera can work at a preset time and preset days. In the rest of the time the camera is not work. Work hour: 00:00-00:00 means 24 hours. If the settings is cross the day, for example: Start: 20:00 Stop: 10:00 means 00:00-10:00 am and 20:00-24:00 of the chosen day.
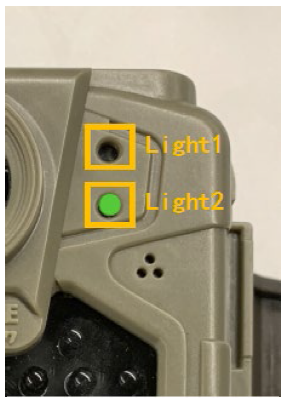
CAMERA LIGHTS

| Color | Flash slowly | Steady | Flash fast | |
| Light1 | Red | PIR is working | Low power | |
|
Light2 |
Green |
Searching for signal |
Good signal |
Sending pictures |
| Yellow-
green |
Weak
signal |
|||
| Red | No signal |
The camera goes to Active Mode when the two lights are off.
MANUAL PHOTO
You can manually take a picture and check if your APP has successfully received the photo.Press the “RST” button when the light 2 is green or yellow-green. Camera will shoot a picture at once and send to cloud platform. The cloud platform will receive the photo within 30 seconds if the camera has a good signal.
If light 2 become red after manually shooting, it means the picture did not send. We suggest checking this:
- Micro SD card’s capacity (max up to 32G)
- Check your SIM card (data speed, PIN code OFF)
STARTING THE CAMERA
STEP 1: Turn on the camera (ON button)
- Use the OFF/ON switch to turn on the camera;
STEP 2: The green “Network Status” light flashes – searching for signal
- The signal search can take a few minutes
STEP 3: The “Network Status” light will be steady which means the camera is registered online.
- Steady Green: Good signal
- Steady Yellow Green: Weak signal
- Steady Red: No signal
STEP 4: After the camera is registered online, there will be 60 seconds for the camera to prepare to enter into Active Mode.
- You can press “RST” button to manually shoot a picture. Then the “Network Status” light will flash quickly, it means the camera is sending the picture to cloud platform
STEP 5: The camera is ready for use when all lights are offIf the “Network Status” light turn to red during STEP 3 or STEP4, you should:
- Check if the SIM card has balance
- Check if the antenna is tightened
- Micro SD card’s capacity (max up to 32G)
- SIM PIN code is OFF
OTHER OPERATIONS
LOG FILE
If the manual sending will fail, there will be a log file generated on your Micro SD Card. You can send the Log file for trouble shooting to your local distributor.
TECHNICAL SPECIFICATIONS
APPENDIX Ⅰ:
| Image Quality | 3/5/8/12/16/20MP |
| Lens | F=1.85 FOV (Diagonal Field of View)=64° (FOV10m: 7.72meter) |
| PIR Detection Range (meter) | 16m |
| PIR angle | 54° @ 4meter |
| Video Quality | WVGA/720P/1080P with Audio |
| Trigger Time | 0.4s |
| Trigger Interval | 5s-60min |
| Time Lapse | 3min-24hours |
| Work Time | Up to Four operation settings |
| Photo Burst | 1–10 |
| SD Overwrite | Support |
| Flash range | 15m |
| Flash LED’s | 40pcs 940nm invisible LEDs |
| Network | LTE (real 4G network) |
|
Frequency Bands |
FDD-LTE: B1/B3/B5/B7/B8/B20 TDD-LTE: B38/B40/B41 WCDMA: B1/B5/B8
GSM: 900/1800 |
|
Wireless function |
Linckeazi cloud platform with remote control features; Send pictures to cloud platform. Support retrieving high quality pictures or video clips. |
| Location (aGPS) | Support |
| Power | 8*AA batteries (not included) Supports 6V external power |
| Other Interface | Micro SD card (Up to 32GB), Nano SIM |
| Operation/Stora ge Tem | -20 – +60°C / -25 -+60°C |
| Operation Humidity | 5% – 90% |
| WeatherProof Grade | IP66 |
| Mounting | Belt/Cable Lock/Threaded/Adjustable angle bracket |
| Size | 89mm×56mm×123mm |
| Weight | 287g (without batteries) |
APPENDIX Ⅱ: PARTS LIST
| Part Name | Quantity |
| Wireless Camera | 1 |
| 4G LTE Antenna | 1 |
| Mounting Belt | 1 |
| User Manual | 1 |
1 YEAR WARRANTY INFORMATION
This camera is warranted to be free from defects in material and workmanship for 1 year from the original date of purchase when purchased through an authorized dealer. Uovision Distributor will, at its option, repair or replace your camera with the same or comparable model, free of charge (shipping charges may apply) for a period of (1) one year from the original date of purchase in the event of a defect in materials or workmanship occurring with normal use. This warranty only extends to the original retail purchaser. Purchase receipt or other proof of date of original purchase is required before warranty performance. The warranty on any replacement product provided under this warranty shall be for the unexpired portion of the warranty period applicable to the original product. This warranty extends solely to failures due to defects in materials or workmanship occurring during normal use. It does not cover normal wear of the product.
This warranty is void if:the product housing has been removed, if the product’s label, logo or serial number have been removed, or if the product fails to function properly as a result of accident, misuse, abuse, neglect, mishandling, misapplication, non-compatible batteries, faulty installation, setup, adjustments, improper maintenance, alteration, maladjustment of controls, modification, power surges, service by anyone other than authorized Uovision Technical service center or acts beyond the manufacturer’s control.Should your product prove defective during this warranty period, please contact your local distributor prior to returning the defective unit. Please contact us if you have any questions or problem while using the camera or LinckEazi Cloud platform.Some problems may be solved easily with help from customer service.
![]()
References
[xyz-ips snippet=”download-snippet”]