
uPVC Window Step by Step Assembly Instructions
IMPORTANT NOTE TO THE INSTALLER
– This installation may be required to comply with local building regulations.Please leave these instructions with the householder after installation has been completed.
Before commencing any work, carefully check all parts to ensure they are complete and free from marks or scratches on all finished surfaces. Read through these instructions to familiarise yourself with the installation procedure. Make sure that you have all the necessary tools and any additional items required e.g. required that are not included in the packs.
All nominal dimensions are in mm. IF IN DOUBT, SEEK EXPERT ADVICE.
What will you need…
| Item | Description | Quantity |
| 1 | WINDOW FRAME ASSEMBLY | 1 |
| 2 | SILL | 1 |
| 3 | END CAP FOR SILL, RIGHT HAND | 1 |
| 4 | END CAP FOR SILL, LEFT HAND | 1 |
| 5 | SCREW, 4.3 X 40MM | 3 |
| 6 | VENT COVER | 1 |
| 7 | HANDLE | 1 |
| 8 | FIXING CLEATS (OPTIONAL) | 1 |
| 9 | FLAT PACKERS | 1 |
| 10 | FIXING SCREWS | 1 |
| 11 | WALL FIXINGS | 1 |
| 12 | SEALANT | 1 |
If an existing aperture is slightly larger than the available window frame size, extension profiles may be fitted to the window.
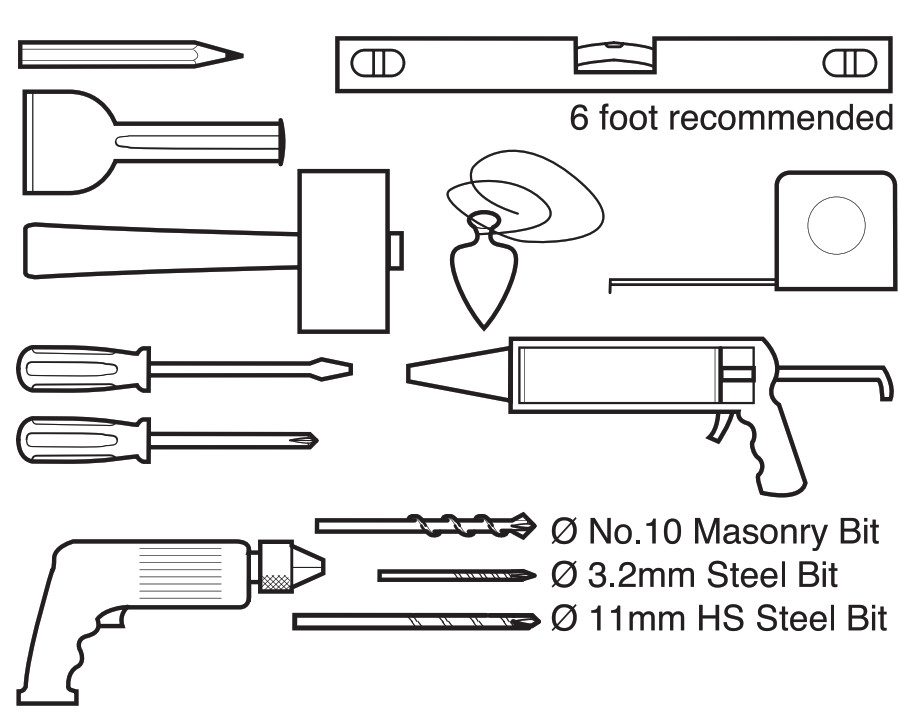
TOOLS REQUIRED
ASSEMBLY
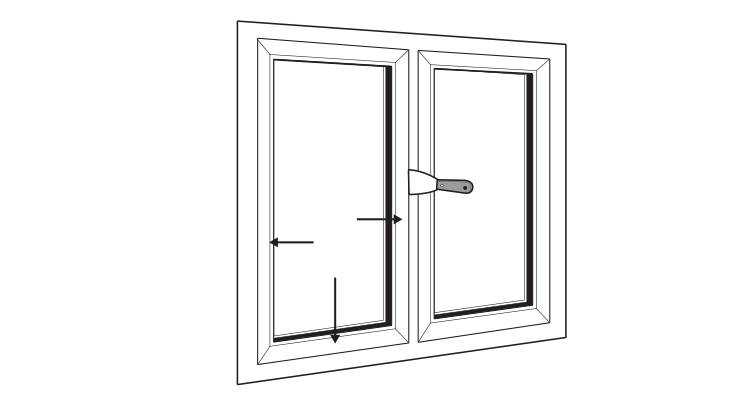
Before assembling the components it should be noted that the uPVC window always opens OUTWARDS. Two people may be required to lift the frame assembly into place.The following instructions include reference to fixings and fittings not include in the pack:
PREPARING THE OPENING
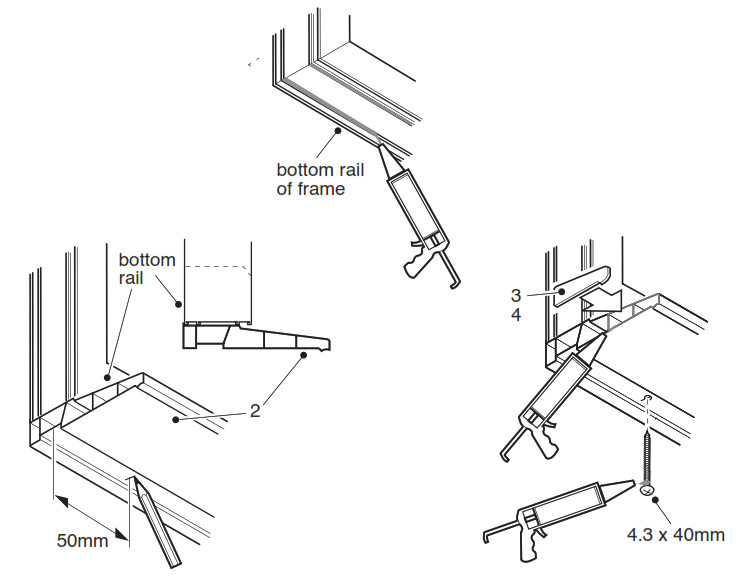
It is important that a suitable lintel is fitted above the opening.Apply a bead of an all-purpose silicone sealant along the inner raised edges on the bottom rail of the frame (taking care not to block the drainage holes) and position the sill onto the frame.Measure a distance of approximately 50mm from each end of the sill and mark with a pencil. Drill through the sill and the frame with a 3.2mm drill at the marked positions and fix with the 4.3 x 40mm screws.Coat the ends of the sill with silicone sealant and push the end caps into position.
To ensure that the window operates smoothly it is vital that the frame is installed correctly. The frame MUST be fitted plumb and square. Check with a spirit level of adequate length, by measuring the frame corner to corner diagonally to achieve an equal measurement, or by using a square. It is also recommended that the window is checked for bowing by using a long straight edge.
Ensure that the frame is not distorted when tightening the wall fixings by regularly measuring the window horizontally. Use packers as required to prevent bowing.It is recommended that during frame installation ALLaspects are double-checked prior to the final installation as the operation of the window and lock will be affected if the frame is fitted incorrectly.
INSTALLING THE PVCu FRAME
Generally, all four sides of the frame must be secured as follows:
• Corner fixings must be between 150mm & 200mm from an external corner• No fixings shall be less than 150mm from the centre line of a mullion or transom• Intermediate fixings shall be at centres no greater than 600mm• There should be a minimum of 2 fixings on each jamb
a) If you are installing without fixing cleats (not supplied), de-glaze the window, noting where the packers are placed when removing. If you are using fixing cleats for installation this step is not necessary.
b) Push the frame firmly into the aperture, ensuring an equal gap around all four sides.c) Place equally spaced flat packers (not supplied) all around the frame to ensure the window is level, square and plumb.
d) Once the window is in the correct position, secure the frame into the opening. When using fixing cleats, drill through the cleats into the wall. If these are not being used, drill through the frame into the wall. Fix the frame using suitable fittings applicable to the type of wall construction.
Things to note:
• Align the screw hole with bricks, these will not fix properly in a joint• Number of screws needed depends on the size of the window, the space between screws must not exceed 600mm• Take care not to distort the frame when tightening (check the frame width regularly to ensure that the frame is even)e) Please check the window is square, level and plumb.f) If you have de-glazed the window, re-glaze ensuring glass packers are replaced.
FINAL FITTINGS
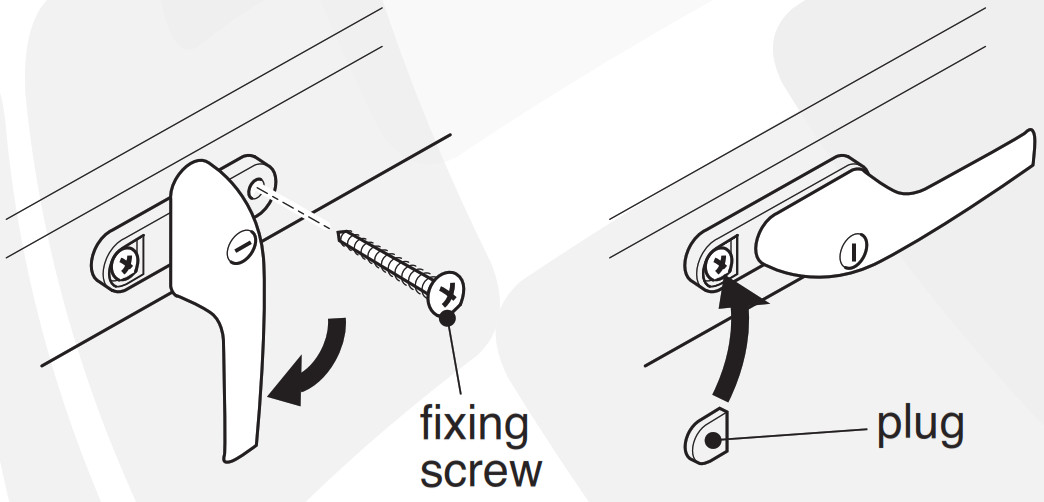
Fill any gaps between masonry and the frame; if the gaps are too wide, a proprietary expanded P.U. filler or foam rod may be used, prior to finishing with an all-purpose silicone sealant.Fix the inner vent control to the inside of the head.Fit the handle to the opening window.Insert the square bar into the lock on the inside of the opening window and line up the screw holes. Fix the open end of the base plate with a suitable fixing screw. Turn the handle to expose the second fixing hole. Insert the second fixing screw and tighten both screws before replacing the plug. Check the window operation.
CARE AND MAINTENANCE OF YOUR UPVC WINDOW
Cleaning and MaintenanceWhen installation has been completed, initial cleaning down should take place. Remove any mastic with white spirit and wash down with a mild detergent mix. The surfaces should be regularly cleaned with soap or mild detergent and water. After cleaning, surfaces should be washed down with clean water and dried. At suitable intervals during the service life of the window, any component parts should be lightly oiled.
GUARANTEE TERMS AND CONDITIONS
The Manufacturers’s policy is one of continuous development and improvement and accordingly, we reserve the right to alter specifications without prior notice.
To the best of our knowledge, this product was in perfect condition when it left our factory. You are recommended to examine it before installation and check the quality, the accuracy of the components, and quantity of the contents.
Customers should note that claims for damage to glass, finish, or shortages must be submitted to the vendor before installation or booking any tradesman. The manufacturer also reserves the right to disallow claims once the product has been installed. Failure to follow the recommendations set out in these instructions or to install in a manner not approved by the manufacturer may result in all or part of the product guarantee being null or void. This product is guaranteed by the manufacturer for a period of 10 years from the date of purchase and no other proposal or statement by any other party will supersede or complement this offer. Should any part of it become defective due to faulty manufacture or materials, it will be replaced free of charge (supply only, no fitting costs will be covered). Any parts supplied will have a guarantee term for the remaining period of the initial product guarantee stated previously. The product is not guaranteed against conditions of use or misuse. The 10-year guarantee is applicable to the frame, 2-year guarantee is applicable to the glass units and hardware. When measuring all aspects of the quality of glass, please follow the Glass and Glazing Federation Guidelines.
This guarantee does not cover glass breakage however caused, or any fault arising from incorrect installation. Any replacement parts supplied, including assemblies, or completed products, are for DIY installation and no claim can be accepted for any costs however incurred for the installation of the replacement items.
This guarantee is offered as an extra benefit and is in addition to and does not affect your statutory rights. Please retain your receipt as proof of purchase.
[xyz-ips snippet=”download-snippet”]