
Retain this manual for future reference.
 WARNING:FIRE OR EXPLOSION HAZARD
Failure to follow safety warnings exactly could result in serious injury, death, or property damage.
– Do not store or use gasoline or other flammable vapours and liquids in the vicinity of this or any other appliance.– WHAT TO DO IF YOU SMELL GAS
- Do not try to light any appliance.
- Do not touch any electrical switch; do not use any phone in your building.
- Leave the building immediately.
- Immediately call your gas supplier from a neighbor’s phone. Follow the gas supplier’s instructions.
- If you cannot reach your gas supplier, call the fire department.
– Installation and service must be performed by a qualified installer, service agency, or the gas supplier.
This appliance is only for use with the type of gas indicated on the rating plate. This appliance is not convertible for use with other gases.
Massachusetts installations (Warning): This product must be installed by a licensed plumber or gas fitter when installed within the Commonwealth of Massachusetts. Other Massachusetts code requirements: Flexible connector must not be longer than 36in., a shut off valve must be installed; only direct vent sealed combustion products are approved for bedrooms/bathrooms. A carbon monoxide detector is required in all rooms containing gas-fired direct vent appliances. The fireplace damper must be removed or welded in the open position prior to the installation of a fireplace insert.
Safety Precautions
FOR SAFE INSTALLATION AND OPERATION OF YOUR “URBANA” HEATER, PLEASE CAREFULLY READ THE FOLLOWING INFORMATION:
- All Urbana gas-fired appliances must be installed in accordance with their instructions. Carefully read all the instructions in this manual first. Consult the building authority having jurisdiction to determine the need for a permit prior to commencing the installation.
- WARNING: Failure to follow these instructions could cause a malfunction of the fireplace, which could result in death, serious bodily injury, and/or property damage.
- Failure to follow these instructions may also void your fire insurance and/or warranty.
- Installation and repair should be done by a qualified service person. The appliance should be inspected before the first use and, at least, annually by a qualified service person. More frequent cleaning may be required due to excessive lint from carpeting, bedding material, etc. It is imperative the control compartments, burners, and circulating air passageways of the appliance are kept clean.
- Due to high temperatures, the appliance should be located out of high traffic areas and away from furniture and draperies.
- Children and adults should be alerted to the hazards of high surface temperatures and should stay away to avoid burn or clothing ignition.
- Young children should be carefully supervised when in the same room as the appliance. Toddlers, young children, and others may be susceptible to accidental contact burns. A physical barrier is required if there is a risk for individuals in the house. To restrict access to a fireplace or stove install an adjustable safety gate to keep toddlers, young children, and other at-risk individuals out of the room and away from hot surfaces. Any safety screen, guard, or barrier removed for servicing an appliance must be replaced prior to operating the appliance.
- Clothing or other flammable materials should not be placed on or near the appliance.
- A barrier designed to reduce the risk of burns from the hot viewing glass is provided with this appliance and shall be installed for the protection of children and other at-risk individuals. If the barrier becomes damaged, the barrier shall be replaced with the manufacturer’s barrier for this appliance.
FOR YOUR SAFETY

- Installation and service must be performed by a qualified installer, service agency or gas supplier.
- This installation must conform to local codes or, in the absence of local codes, with the National Fuel Gas Code, ANSI Z223.1/NFPA 54, or the Natural Gas and Propane Installation Code, CSA B149.1.
- To prevent injury, do not allow anyone who is unfamiliar with the stove to operate it.
- To prevent injury, if the pilot or pilot and burners have gone out on their own, wait 5 minutes to air out before attempting to re-light the stove.
- Always keep the area around these appliances clear of combustible material, gasoline and other flammable liquids and vapours.
- These appliances should not be used as a drying rack for clothing or for hanging Christmas stockings/decorations.
- Due to the paint curing on the stove, a faint odor and slight smoking will likely be noticed when the stove is first used. Open a window until the smoking stops.
- Always connect this gas stove to a vent system and vent to the outside of the building envelope. Never vent to another room or inside the building. Make sure the specified vent pipe is used, properly sized and of adequate height to provide sufficient draft. Inspect the venting system annually for blockage and signs of deterioration.
- WARNING: Failure to position the parts in accordance with the diagrams in this booklet, or failure to use only parts specifically approved with this appliance, may result in property damage or personal injury.
- WARNING: Do not operate with the glass front removed, cracked, or broken. Replacement of the glass should be done by a licensed or qualified service person.
- Never use solid fuels such as wood, paper, cardboard, coal, or any flammable liquids, etc., in this appliance.
- Do not use this appliance if any part has been underwater. Immediately call a qualified service technician to inspect the appliance and to replace any part of the control system or any gas control which has been underwater.
- Do not abuse the glass by striking it or slamming the door shut. If the Urbana unit is pulled out of its installation, and the vent-air intake system is disconnected for any reason, ensure that the ventair intake pipes are reconnected and re-sealed in accordance with the instructions noted in Initial Installation – Direct Vent
DIRECT VENT ONLY: This type is identified by the suffix DV. This appliance draws all of its air for combustion from outside the dwelling, through a specially designed vent pipe system.This appliance has been tested and approved for installations from 0 feet to 4500 feet (1372 m) above sea level.In the USA: The appliance may be installed at higher altitudes. Please refer to your American Gas Association guidelines which state: the sea level rated input of Gas Designed Appliances installed at elevations above 2000 (610 m) feet is to be reduced 4% for each 1000 feet (305 m) above sea level. Refer also to local authorities or codes which have jurisdiction in your area regarding the de-rate guidelines.In Canada: When the appliance is installed at elevations above 4500 feet (1372 m), the certified high altitude rating shall be reduced at the rate of 4% for each additional 1000 feet (305 m).• This appliance has been tested by INTERTEK and found to comply with the established VENTED GAS FIREPLACE HEATER standards in CANADA and the USA as follows:
VENTED GAS FIREPLACE HEATER ( NATURAL GAS, PROPANE GAS)CERTIFIED TO: ANSI Z21.88 / CSA 2.33 VENTED GAS FIREPLACE HEATERSCSA 2.17 GAS FIRED APPLIANCES FOR HIGH ALTITUDES
This Urbana Fireplace:
- Has been certified for use with either natural gas or propane (see rating label).
- Is not for use with solid fuels.
- Is approved for a bedroom or bed sitting room. (IN CANADA: must be installed with a listed wall thermostat.IN USA: see current ANSI Z223.1 for installation instructions.)
- Must be installed in accordance with local codes. If none exist, use current installation code CAN/CGA B149.1 in Canada or ANSI Z223.1/NFPA 54 in the USA.
- Must be properly connected to an approved venting system and not connected to a chimney flue serving a separate solid-fuel burning appliance.
IMPORTANT NOTICE (Regarding first fire up): When the unit is turned on for the first time, it should be turned onto high for the first 4 hours. This will cure the paint, logs, gasket material, and other products used in the manufacturing process. It is advisable to open a window or door, as the unit will start to smoke and can irritate some people. After the unit has gone through the first burn, turn the unit off including the pilot, let the unit get cold then remove the glass door and clean it with a good gas fireplace glass cleaner, available at your local Urbana dealer.

We recommend that our gas hearth products be installed and serviced by professionals who are certified in the U.S. by the National Fireplace Institute (NFI) as NFI Gas Specialists.
CAUTION!Property Damage Hazard. Excessive heat can cause property damage. The appliance can stay lit for many hours. Turn off the appliance if it is not going to be attended to.
ATTENTION!Turn “off” the main gas supply of the appliance during installation or maintenance of the IFC.
WARNING!Fire Hazard. Can cause severe injury or death. The Transmitter causes the ignition of the appliance. The appliance can turn on suddenly. Keep away from the appliance burner when operating the remote system.
Remote Control Technical DataProflame 2 is a modular remote control system that directs the functions of the fireplace. The Proflame 2 remote transmitter is configured to control the on and off function of the main burner. The systems also allows your to modulate the thermostat, flame level, and accent light features.
System Description:1. Proflame 2 Transmitter2. Integrated Fireplace Controller (IFC) and a wiring harness to connect to the gas valve and stepper motor
Technical Data:Transmitter (Remote Control):Supply voltage: 4.5 V (three 1.5 V AAA batteries)Radio frequency: 315 MHz
Integrated Fireplace Controller (IFC):Supply voltage: AC IN – 120 V / 60 HzSpark voltage / frequency: >10kV / 1HzTop Lights: 120 V / 60 Hz / 850mA [total]AUX LED Light: 120 V / 60Hz / 200mA
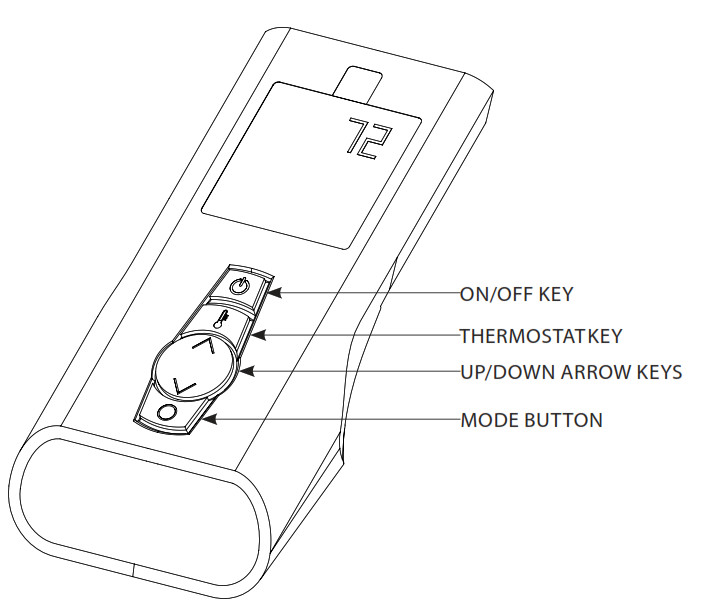
Remote Control
The Pro flame 2 uses a streamline design, remote control to allow the user to interact with the system. The simple button layout and LCD display offer a user-friendly experience. The MODE key is used to cycle through different features and the THERMOSTAT key is used to manage thermostatic functions. The transmitter is powered by three (3) AAA-type batteries.Note: Other remote transmitters may interfere with the system if you have another within the vicinity.
Operating Instructions
Remote Control Icons
![]()
Syncing Your Remote to the Fireplace
The remote should be synced to your fireplace by your installer during installation.You will also need to re-sync your remote after changing the batteries
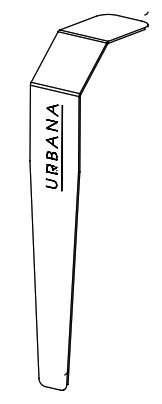
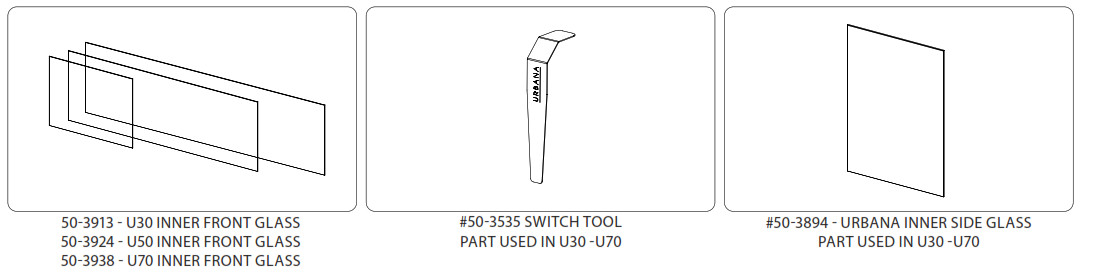
- Locate the tool you received with your fireplace.
- Each unit in the U-Series has a hidden switch panel located on the right-hand side of the front glass. Using a flashlight, locate the switch panel.

- Slip the tool in between the front glass and the cabinet of the fireplace.
- Use the Urbana tool to press on the middle switch; you will hear a series of 3 beeps.
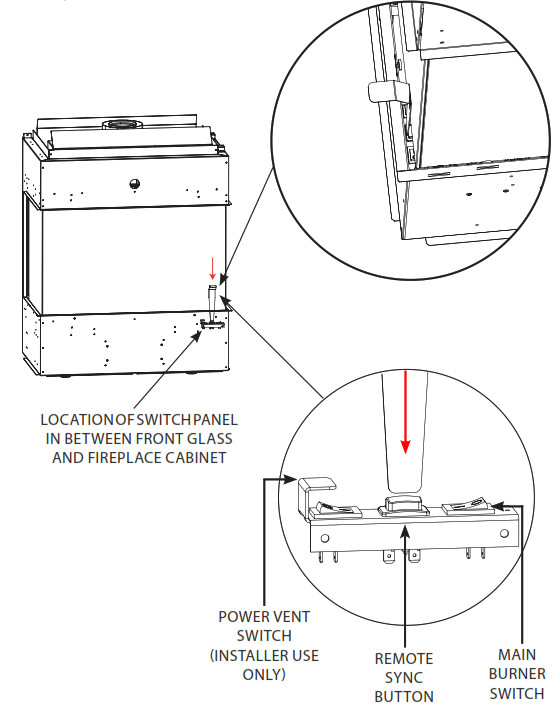
5. On hearing the 3 beeps, press the on/off key on your remote; you will hear 3 more beeps to acknowledge a successful remote syncing.6. Press the on/off button again to turn off the remote. The remote is now ready to use.
Temperature Unit Setting
Your remote can be set to either read °C or °F.To set your preferred unit:

Remote Control Keylock

This function will lock the remote keys to avoid unsupervised operation.To activate this function, press the MODE and UP keys at the same time and the a lock icon will appear.To de-activate this function, press the MODE and UP Keys at the same time.
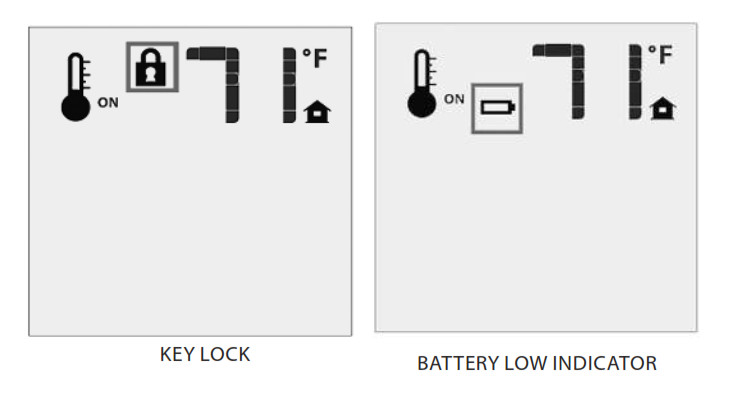
Low Battery Power Detection
The life span of the remote control batteries depends on various factors. Quality of the batteries used, the number of appliance ignitions, the number of thermostat set point changes to the room, etc.When the Transmitter batteries are low, a battery icon will appear on the LCD display of the Transmitter.
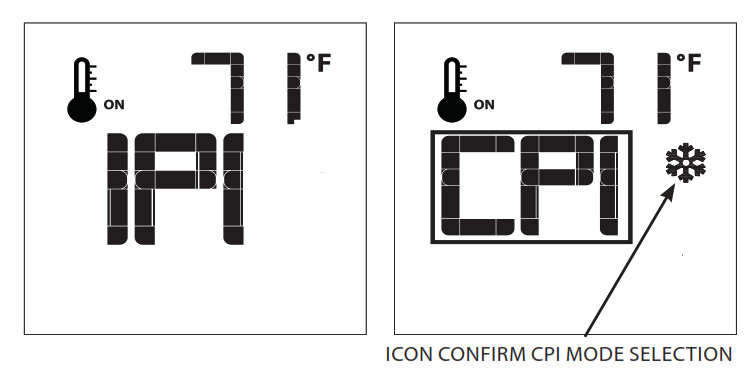
Pilot Light Modes
Your fireplace has a pilot light which ignites the main burner.The way in which your pilot light functions can be adjusted to your preference. The two different modes and their uses are listed below:IPI – Intermittent Pilot IgnitionIPI mode only turns on when required. The pilot light remains off until you press the power key on the remote. After a few seconds, the pilot light will ignite and remain lit during the your operation of the fireplace. This mode will use less gas, as it only uses gas when the fireplace is on.IPI mode is often used at the end of winter when you are no longer using the fireplace regularly.CPI – Continuous Pilot ModeCPI mode keeps the pilot light ignited for 7 days. Keeping the pilot ignited, allows the firebox to remain warm. This helps the fireplace establish a draft which can be useful for days with high wind and extreme cold. Keeping the fireplace warm and thereby dry; this also helps to reduce condensation build up on the glass.
Changing Pilot Light Mode

With the fireplace turned off, press the MODE key.The screen will now show the current pilot mode selected use the UP and DOWN arrow keys to cycle between IPI and CPI modes.Once the selection has been made, the fireplace will beep to acknowledge the changing of the mode.
Turning On Your Fireplace
Press the ON/OFF Key on the remote; the LCD display will show the room temperature.A single “beep” from the fireplace confirms reception of the command and both the pilot light (if the unit is not set to continuous pilot) and main burner will turn off.Note – if no beep is heard from the fireplace move closer to the unit and try again.
Smart Thermostat

The Smart Thermostat function adjusts the flame height in accordance to the difference between the set point temperature and the actual room temperatures. As the room temperature gets closer to the set point, the Smart Function will modulate the flame down.
Press the Thermostat Key until the word “SMART” appears to the right of the temperature bulb graphic.To adjust the set temperature, press the UP or DOWN arrow keys until the desired set temperature is displayed on the LCD screen of the remote.
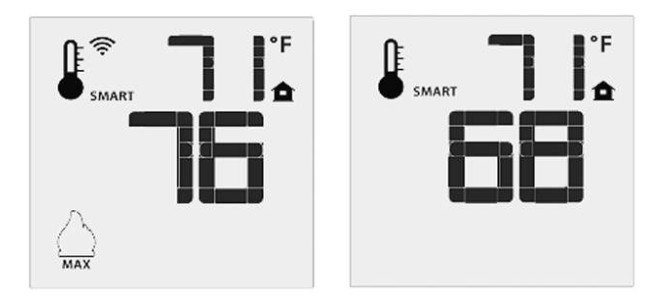
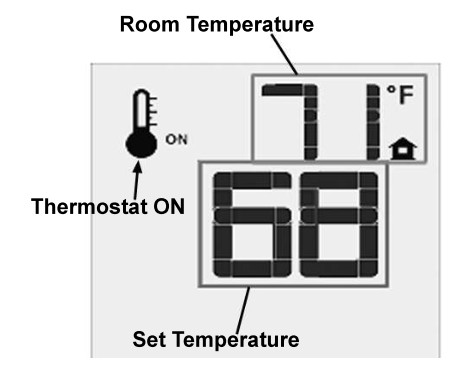
Room Thermostat (Remote Operation)
The remote can operate as a room thermostat. The thermostat can be set to a desired temperature to control the comfort level in a room.To activate this function:1. Press the Thermostat Key.2. The LCD display on the remote will change to show that the room thermostat is “ON” and the set temperature is now displayed.3. To adjust the set temperature, press the UP or DOWN arrow keys until the desired set temperature is displayed on the LCD screen of the remote.
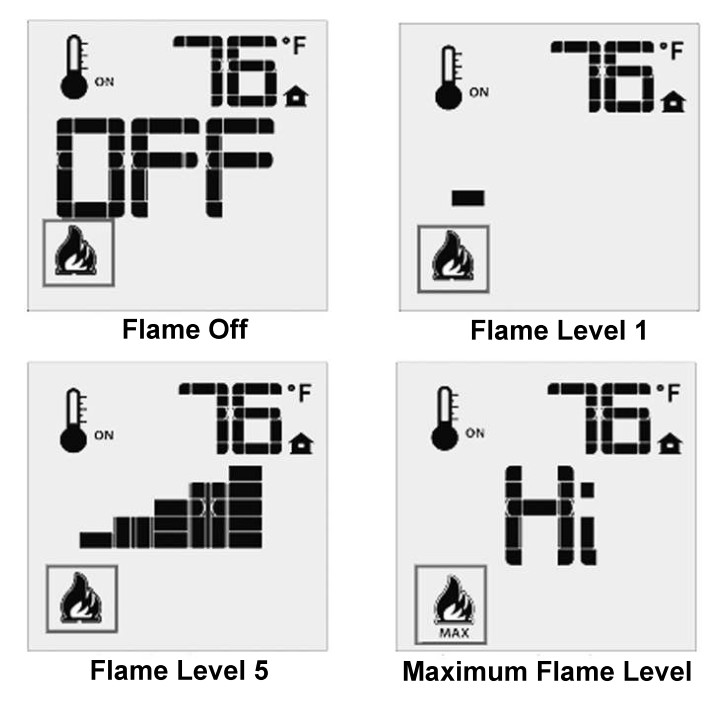
Flame Height Control
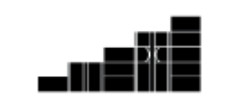
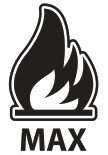
Your fireplace has 6 flame height settings. To control the height of the flame:1. Turn on your fireplace; the flame always starts on the maximum setting “HI”2. With your fireplace fully ignited, press the DOWN arrow key to set the desired height of your flame.
When lowering the flame height, you can turn off the fireplace with this method. The remote will read OFF when you have reached the lowest setting on the remote.When increasing the flame height, the remote will read “Hi” when the maximum flame height is reached.
Top Lights
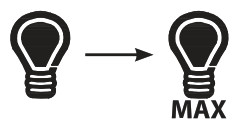
Your fireplace comes with top lights that illuminate the inside of the firebox. (All Urbana Series models come with top lights as a standard. )To turn on your top light:
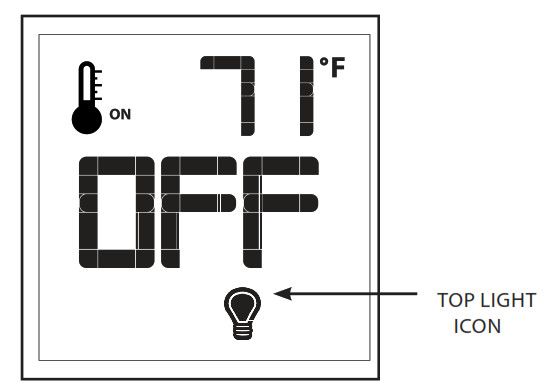
1. Turn on your fireplace.2. Press the MODE key until the light bulb icon is visible.3. You can control the brightness of your top light be pressing the UP and DOWN arrow keys to set your preferred brightness.
AUX Inputs – LED Lighting (Optional)

All models in the Urbana Series can be ordered with an optional LED kit. The LED kit will be controlled from your mobile device.However, you will need to tell your fireplace that you have an LED kit installed.To activate your LED light kit:1. Turn on your fireplace.2. Push the MODE key until the icon is displayed.3. Use the UP arrow key to turn on the AUX input.
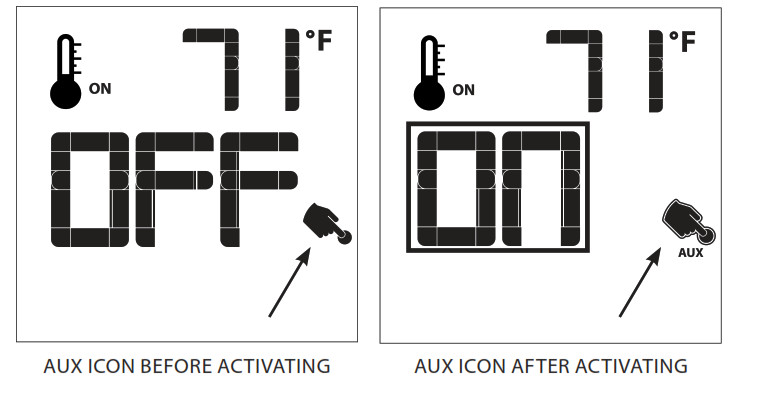
4. Your unit is now ready to receive commands from the lighting WIFI App.
Optional LED Lights
LED Light Setup
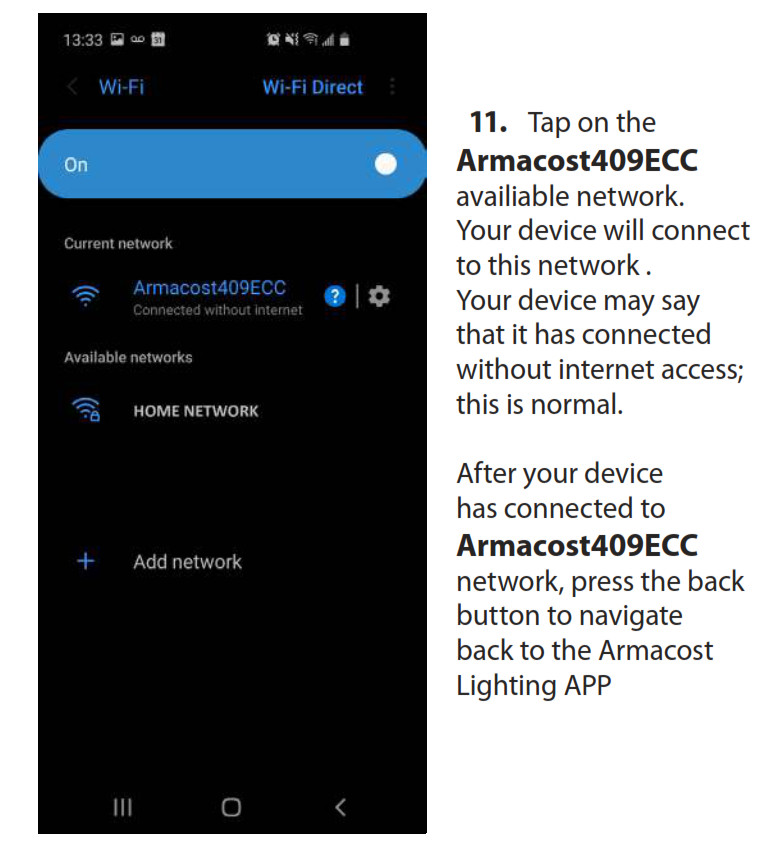
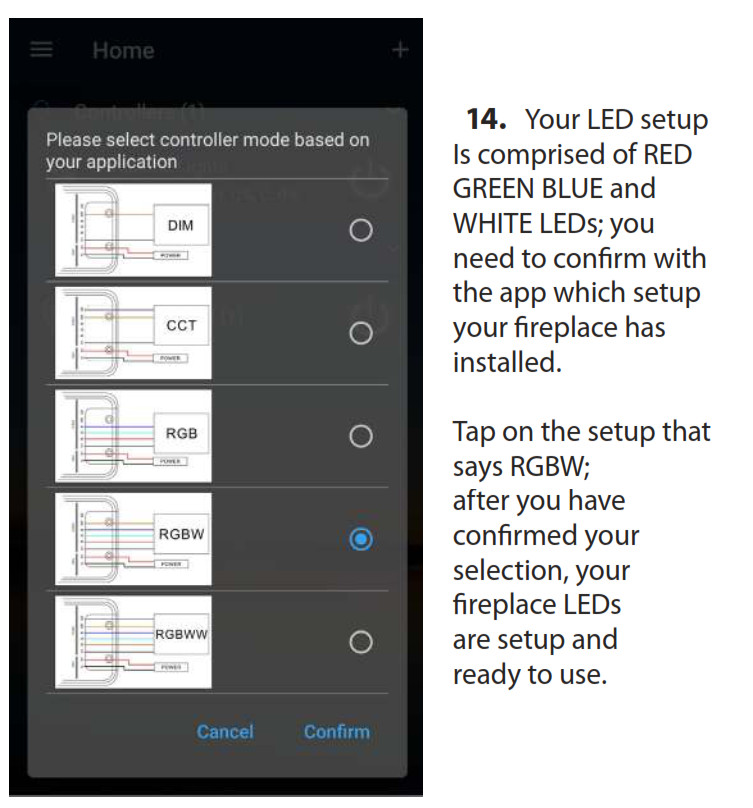
The Urbana Series can be purchased with optional WIFI controlled LED lights. Our system comes with the addition of white LEDS to ensure our system has the largest variety and most natural choice of colours availiable.

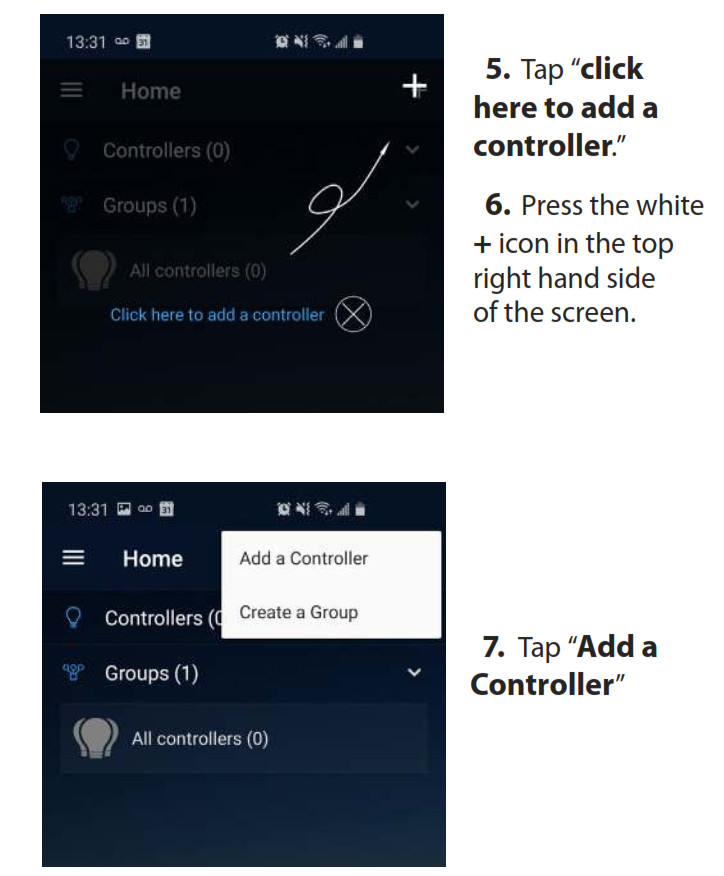
- Download the App MyLED Pro from either the Apple App store, or the Google Play store.
- Using either the remote control or the Proflame App, turn on the AUX input.
- Your LED lights should now cycle RED-GREEN-BLUE-WHITE continuously, this indicates pairing mode. if your lights do not do this, contact your dealer for assistance.
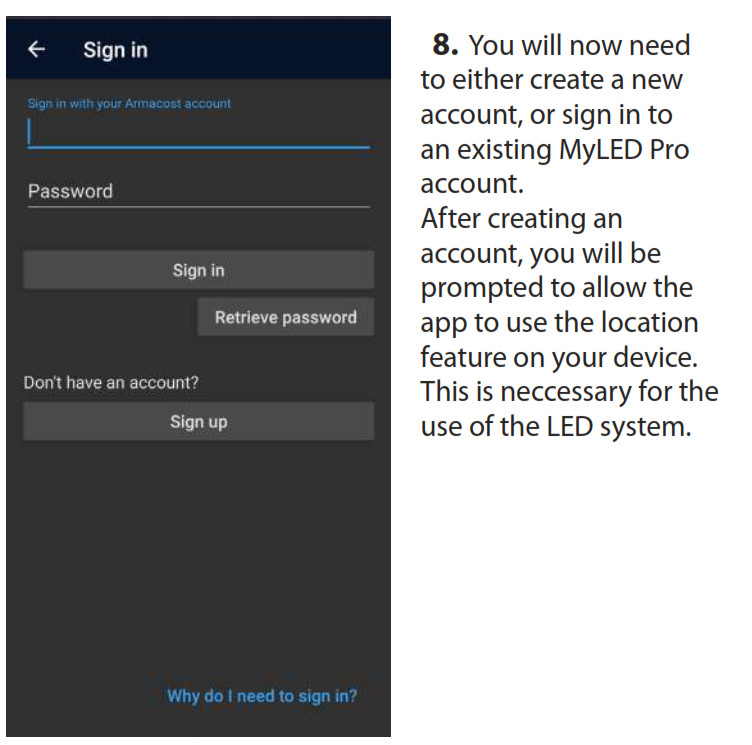
- Open the MyLED Pro App on your device.

How To Use MyLED Pro App
The MyLED Pro App has a multitude of different features and settings for your lights.
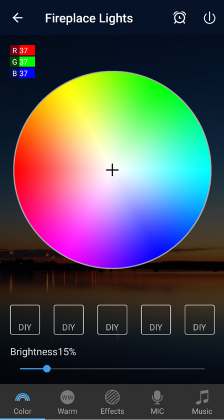
Colour WheelThe colour wheel allows you to select your desired colour. Drag your finger across the wheel to set the colour.The DIY buttons allow you to store your favourite colour for quick access.

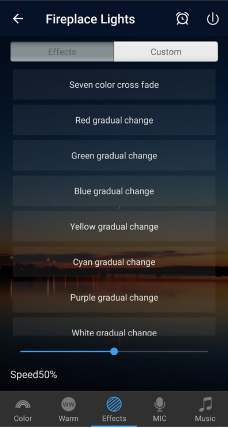
EffectsIn this mode you can set predefined colour sweep routines. You can also determine the speed of the colour sweep and set your own routines using your favourite colours.
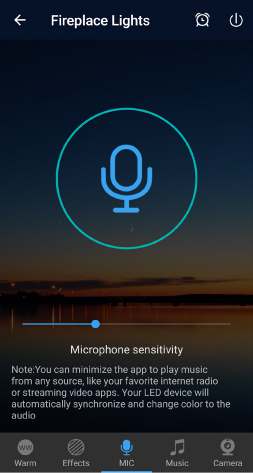
Microphone modeIn this mode your mobile device allows the lights to sync to the sound picked up by the microphone on your device.Use this mode when you want lights to sync to music not stored on your mobile device i.e spotify/apple music/ youtube.
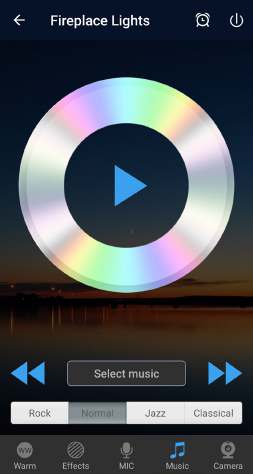
Music Moden this mode the app scans fostored music on your device and syncs the lights to the music.

Camera ModeIn this mode the colour of the lights is selected from the camera on your device. The colour is choosen in the centre of the screen. Automatic mode switches the colour of the lights depending on whatever is in the camera field of view.
Manual mode allows you to select the colours after pressing the Select Colour button.
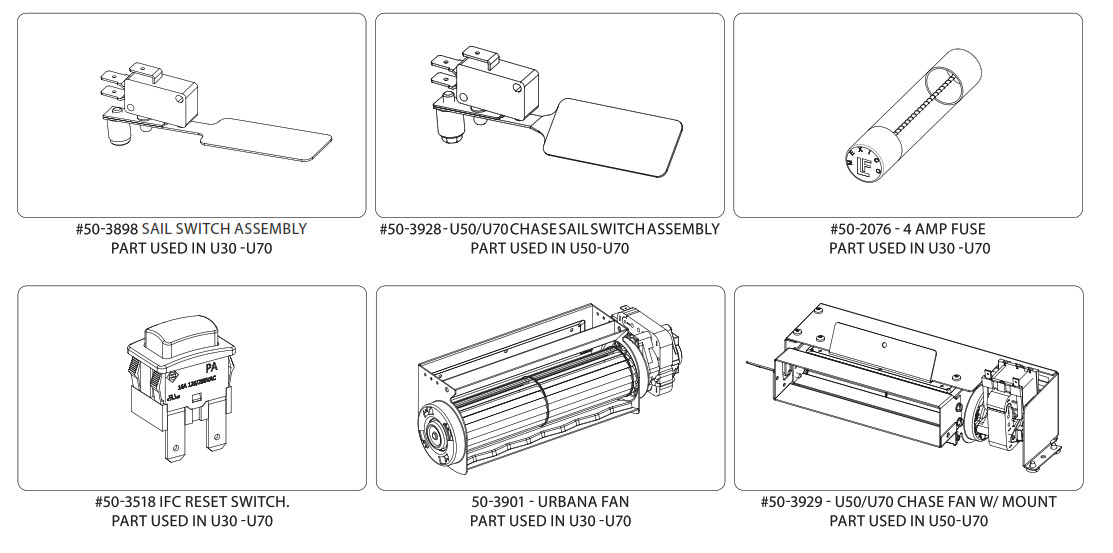
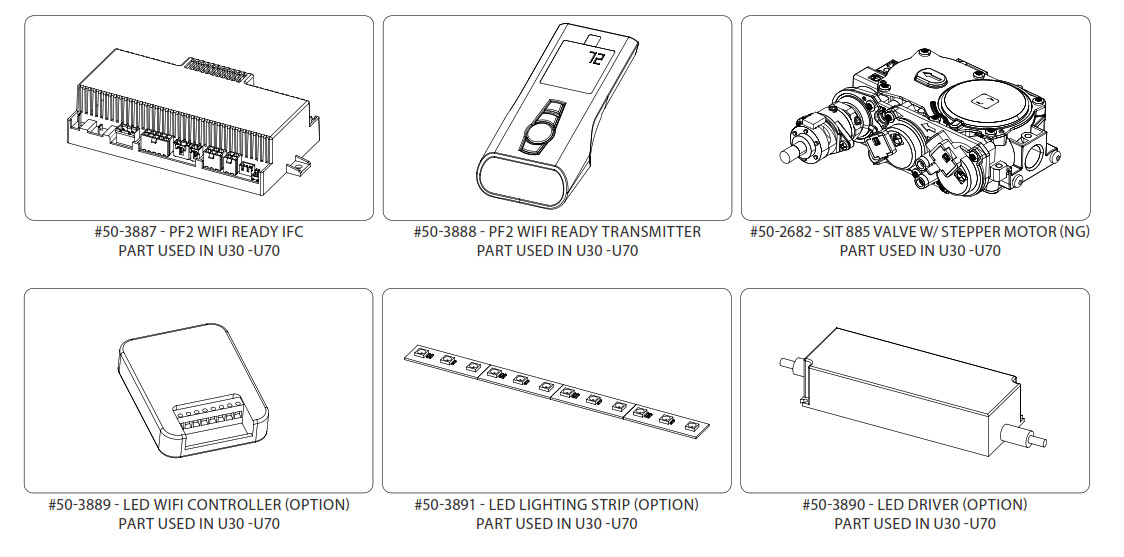
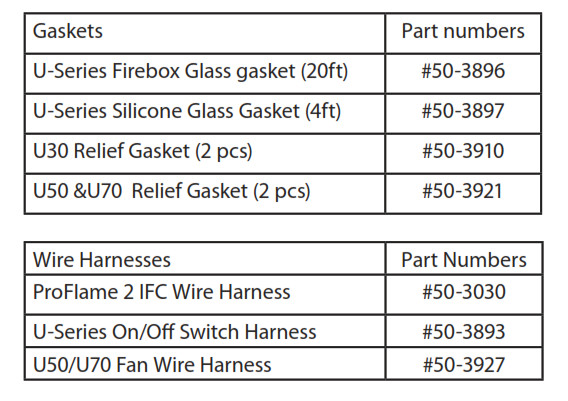
Parts List


Troubleshooting

Installation Reference Guide

Warranty Information
Sherwood Industries Ltd. (“Sherwood”) hereby warrants, subject to the terms and conditions herein set forth, this product against defects in material and workmanship during the specified warranty period starting from the date of original purchase at retail. In the event of a defect of material or workmanship during the specified warranty period, Sherwood reserves the right to make repairs or to assess the replacement of a defective product at Sherwood’s factory. The shipping costs are to be paid by the consumer. All warranties by Sherwood are set forth herein and no claim shall be made against Sherwood on any oral warranty or representation.Conditions
- A completed warranty registration must be submitted to Sherwood within 90 days of original purchase via the online warrant y registration page or via the mail-in warranty registration card provided. Have the installer fill in the installation data sheet in the back of the manual for warranty and future reference.
- This warranty applies only to the original owner in the original location from date of install.
- The unit must have been properly installed by a qualified technician or installer, and must meet all local and national building code requirements.
- The warranty does not cover removal and re-installation costs.
- Sherwood Industries Ltd. reserves the right to make changes without notice.
- Sherwood Industries Ltd. and its employees or representatives will not assume any damages, either directly or indirectly caused by improper usage, operation, installation, servicing or maintenance of this appliance.
- A proof of original purchase must be provided by you or the dealer including serial number.
ExclusionsAn expanded list of exclusions is available at www.urbanafireplaces.com/warranty.html This warranty does not cover:
- Damage as a result of improper usage or abuse.
- Damage caused from over-firing due to incorrect setup or tampering.
- Damage caused by incorrect installation.
To the Dealer
- Provide name, address and telephone number of purchaser and date of purchase.
- Provide date of purchase. Name of installer and dealer. Serial number of the appliance. Nature of complaint, defects or malfunction, description and part # of any parts replaced.
- Pictures or return of damaged or defective product may be required.
To the Distributor
- Sign and verify that work and information are correct.
Sherwood Industries Ltd.6782 Oldfield Road, Victoria, BC . Canada V8M 2A3Online warranty registration: www.urbanafireplaces.com/warranty/
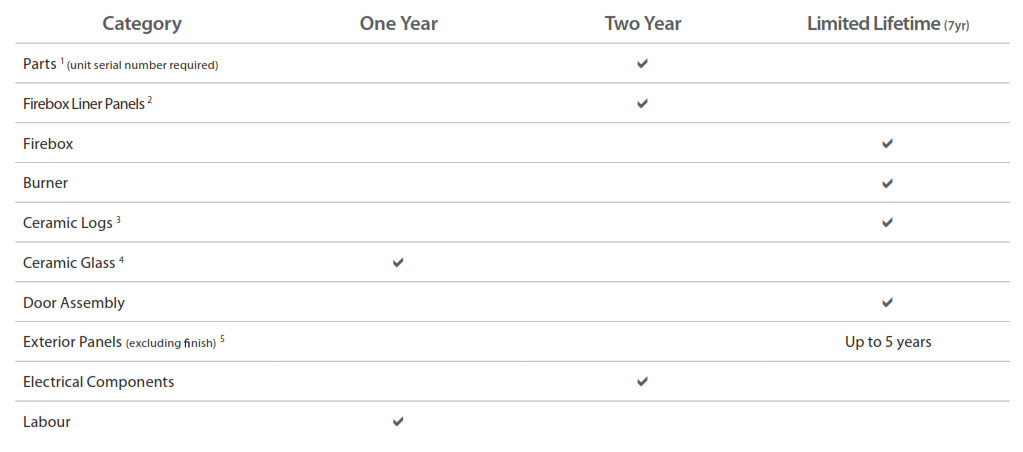
1 Whereas warranty has expired, replacement parts will be warrantied for 90 days from part purchase date. Labour not included. Unit serial # required.2 Excluding damage to the nish caused by improper setup of the appliance, or color changes.3 Log set and panels excludes wear and tear or breakage caused by cleaning or service.4 Glass is covered for thermal breakage. Photos of box, inside of door, and unit serial # must be supplied for breakage due to shipping.5 Exterior Surface nishing covers plating, enamel or paint and excludes colour changes, chipping, and ngerprints. Travel costs not included.
Urbana U30-U50-U70 Luxury Gas Fireplace User Manual – Urbana U30-U50-U70 Luxury Gas Fireplace User Manual –
[xyz-ips snippet=”download-snippet”]