
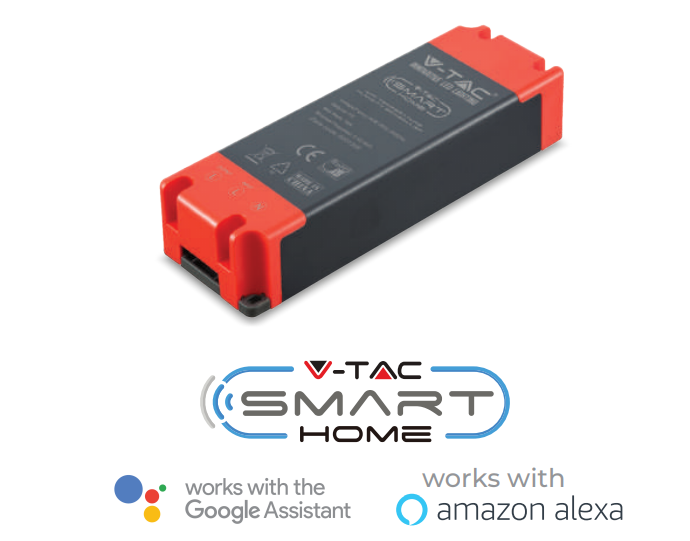
V-TAC Temperature Humidity Scheduler Intallation Instruction
(Temperature Sensor Not Included)
INTRODUCTION & WARRANTY
Thank you for selecting and buying V-TAC Product. V-TAC will serve you the best. Please read these instructions carefully before starting the installation and keep this manual handy for future reference. If you have any other query, please contact our dealer or local vendor from whom you have purchased the product. They are trained and ready to serve you at the best.
The warranty is valid for 2 years from the date of purchase. The warranty does not apply to damage caused by incorrect installation or abnormal wear and tear. The company gives no warranty against damage to any surface due to incorrect removal and installation of the product.
SPECIFICATIONS

INSTALLATION
V-TAC SMART HOME APP: Download V-TAC SMART HOME APP by going to APP Store or Google Play Store (OR) Download the VTAC SMART HOME APP by scanning the below QR Code

Note: For troubleshooting please scan the Barcode of FAQ and to read the instruction manual in a different language please scan the barcode of Multi-Language Manual
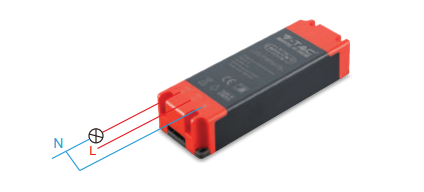
Wiring
- Cut Off the Power.
- Connect the wires correctly.
- Install and power it up.
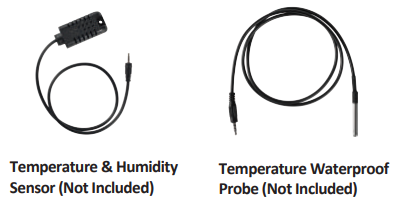
Note: The below two items are not included and are compatible with V-TACs Temperature Humidity Scheduler. These can be connected directly with the device.
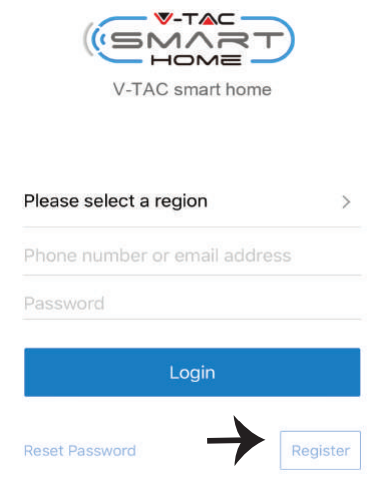
Step 1: Open the V-TAC Smart Home App and register. If you already have an existing account with V-TAC Smart Home, please proceed to logging in.
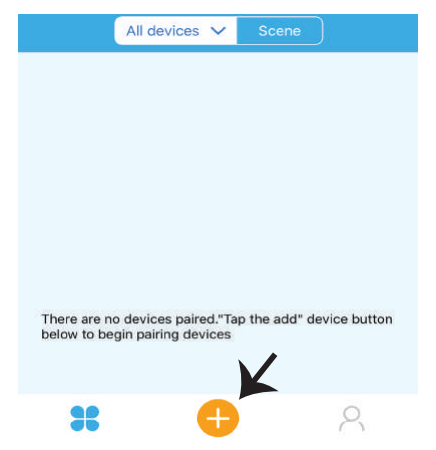
Step 2: To Add a New device tap on the “+” sign(as shown)
Step 3: Make sure your Smart Device is Powered.
- Tap and Hold on the Power Button for 6 seconds to make the device available in Pairing Mode. Once in pairing mode the LED will start blinking 3 timesrepeatedly.
- Tap on Next to start the pairing of device with the app. (Shown in the image)Note: If you are facing any trouble while pairing in Quick Pairing mode please try to pair the device in Compatible Pairing Mode (Click on the link as shown on the image).

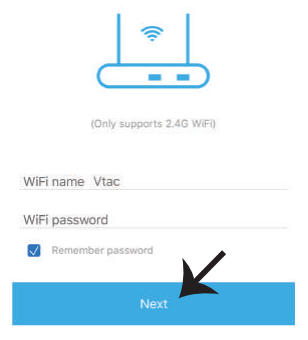
Step 4: Select your Wifi Name and enter the password and Tap on Next.
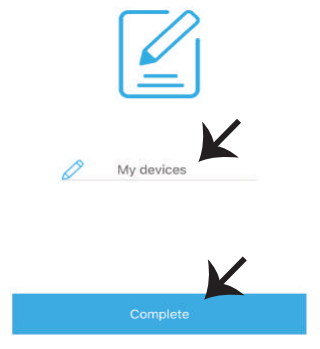
Step 5: Give a Name to your Device(Ex: Smart Plug/ smart switch) & Tap on complete.
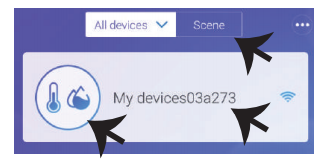
Step 6: Your Device is now paired and will appear as shown below example image
Temperature Humidifier, can be used as a normal Wifi Switch(On/Off) and also can be connected with probe temperature sensors (Not included) to detect the Temperature and Humidity. Note: The Temperature value displays on the APP only when the Sensors(Not included) are connected)
Sensor Connection Functions: Once your device is connected with the sensor and paired with the APP itwill display temperature and humidity values, and it can be set to Auto mode. Scene Mode: You can use V-TACs Temperature Humidity Scheduler to collect temperature value and set a temperature to turn on/off several types of other switches (such as V-TACs Smart Plug, Smart Power Strip etc) Example: You can set a condition stating when the temperature reaches 24 degrees turn on the smart Plug. Note: The V-TACs Temperature Humidity Scheduler should be in manual mode, not auto mode. When the real-time temperature is across the preset temperature range, it will trigger the condition.
ALEXA SETTINGS
Step 1: Install the Amazon Alexa app via the App Store (iOS) or the Play Store (Android) and register. If you already have an existing account with Amazon Alexa, please proceed to logging in.
Step 2: Once you are on the Amazon Alexa home page, tap on the lower right icon –– where the arrow is pointed–– to add a new device and Enable Skills.

Step 3: On the Home page of Amazon Alexa App, Tap on the icon as shown on the image below.

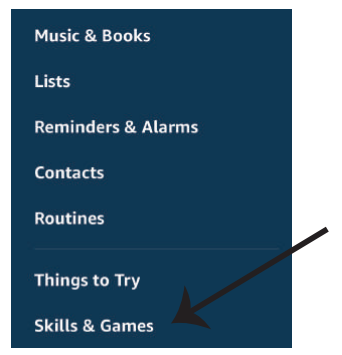
Step 4: Tap on “Skills & Games” as show below
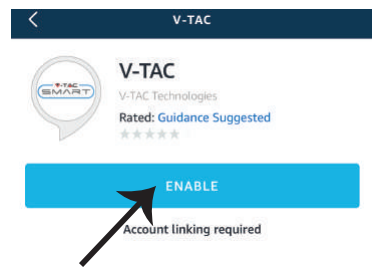
Step 5: On the Search bar as shown below type”V-TAC” and tap on the V-TAC skill as shown on the image.

Step 6: Tap on Enable Skill to link V-TAC Smart Home app with Amazon Alexa.
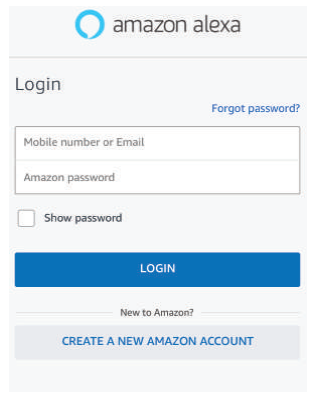
Step 7: Enter Login credentials of V-TAC Smart Home and then tap on Log In. If you do not have a existing account please register by tapping on the register.

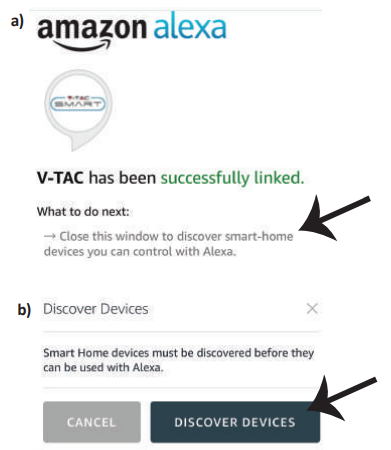
Step 8: a)Once you have successfully linked V-TAC Skill close the window & (b)tap on Discover device. Make sure Smart device is paired with V-TAC Smart Home app.
Step 8: Discover your smart device on Alexa. You can say”Alexa discover devices” to the Alexa device which you have. (OR) you can add new devices manually by going to the home page of Amazon alexa and tapping on the icon ![]() (Ref: image A) & tap on “+” sign to add new device(Ref: Image B). Once the device is discovered you can now control your smart device using Alexa.
(Ref: image A) & tap on “+” sign to add new device(Ref: Image B). Once the device is discovered you can now control your smart device using Alexa.

Note: Discovering the device must be done every time the device’s name is changed on the app.
ALEXA Commands
Now, you can control your smart device using voice commands on Alexa. Below is a example commands you can use:
- ! Alexa, turn ON Smart Plug
- ! Alexa, turn OFF Smart Plug
THINGS TO REMEMBER BEFORE STARTING INSTALLATION:
- V-TAC Smart Home App & Amazon Alexa App
- Make sure you have Amazon Alexa Device(including Echo, Echo Tap, or Echo Dot)
- Smart Home Device
- Stable Wifi network
Step 1:a&b) Install the Google Home app via the App Store (iOS) or the Play Store (Android) and register. If you already have an existing account with Google Home, please proceed to logging in.c) Create a New Home/Choose from the existing home if any.d) Power ON the Google Home device and connect it to the App.(Then Proceed to step 2)
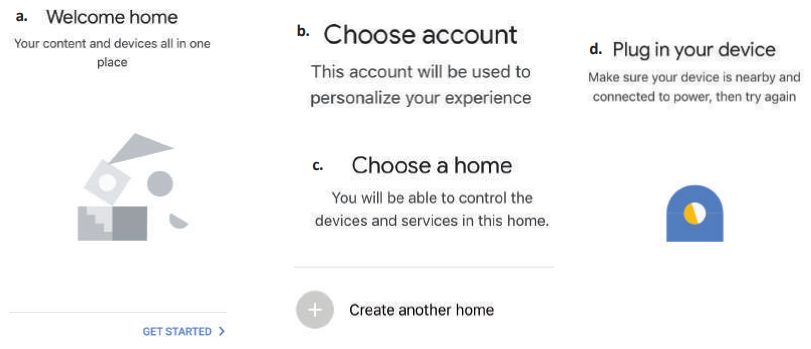
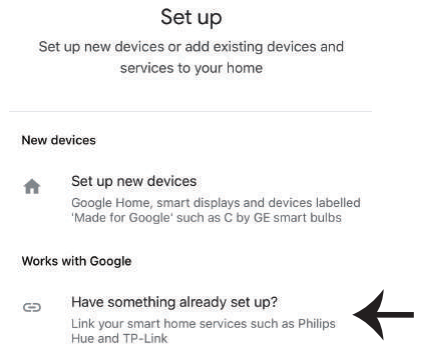
Step 2: Once you are on the Google home page, tap on the Add “+” icon– to add a new device and skill. And then tap on Set up device as shown in below image.

Step 3: Make sure the Smart Device is paired with V-TAC Smart Home app before starting step 3. Tap on the arrow section as highlighted in the belowimage.
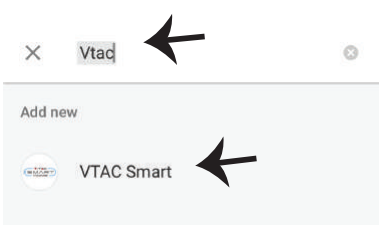
Step 4: Type “Vtac” on the search bar and tap on the icon from the drop down options of VTAC Smart as shown below.
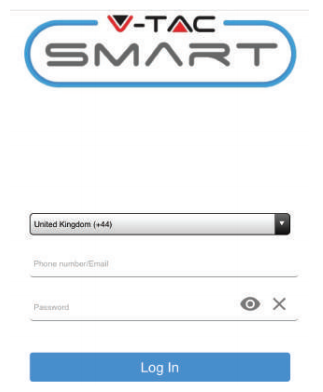
Step 5: Sign In with your V-TAC Smart Home Login credentials to Link the Smart Home device
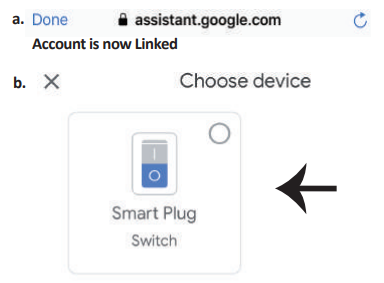
Step 6:a. Account will now be linked, please stay on the page you will be redirected in few seconds to select the device to add to your home.b. Select the device and tap on Next as show in image(b)
Step 7: Select the Home where you would like to add the Smart Device under. (Or) you can create a New home in order to add the Smart Device to it.

Step 8: You have successfully added V-TAC Smart device to your Google home App.

Step 9: You can turn the Device On/OFF by taping On/Off options as shown below. (OR) You can tap on the Name (Ex:Smart Plug as shown below) to redirect to new page.

Google Commands:
Now, you can control your smart device using voice commands on Google Home. Below are a few example commands you can use:
- ! OK Google, turn ON Smart Plug
- ! OK Google, turn OFF Smart Plug
THINGS TO REMEMBER BEFORE STARTING INSTALLATION:
- V-TAC Smart Home App & Google Home App
- Make sure you have Google Home Device
- Smart Home Device
- Stable Wifi network
In case of any query/issue with the product please reach out to us at [email protected]V-TAC EUROPE LTD, Bulgaria, Plovdiv 4000, bul.L.Karavelow 9B
[xyz-ips snippet=”download-snippet”]