
V-TAC VT-130W 20W Solar Garden Light Installation Instruction
WEEE Number: 80133970
INTRODUCTION & WARRANTY
Thank you for selecting and buying V-TAC product. V-TAC will serve you the best. Please read these instructions carefully before starting the installation and keep this manual handy for future reference. If you have any another query, please contact our dealer or local vendor from whom you have purchased the product. They are trained and ready to serve you at the best. The warranty is valid for 5 years from the date of purchase. The warranty does not apply to damage caused by incorrect installation or abnormal wear and tear. The company gives no warranty against damage to any surface due to incorrect removal and installation of the product. This product is warranted for manufacturing defects only.
WARNING
- Installation/Disassembling must be performed by a certified person.
- This is a solar powered lamp, please install it in a location where can get enough sunshine.
- Built-in intelligent system is with over-charge, over-discharge and over-voltage protection, safe and durable.
- The lamp is equipped with an internal battery pack which is replaceable. If any need, please contact seller for further support.
- Please do not dispose the battery with household garbage to avoid explosion.

This marking indicates that this product should not be disposed of with other household wastes.

MULTI-LANGUAGE MANUAL QR CODE
Please scan the QR code to access the manual in multiple languages.
TECHNICAL DATA

Installation Diagram
- Prepare lamp, accessories and tools, and then turn on the lamp by pressing the button on the lamp ( (1) ).
- Set the lamp on a lamp pole with a diameter of 60mm and fix it will 2 screws M8*20MM ( (2)-(3) ).
- Use remote control to set desired working mode ( (4) ).
FEATURES
NOTES
- When the lamp is turned off by pressing the button on lamp, it can’t get solar charged at day time. When it’s turned off by pressing on/off button on the remote control, it can still get the solar charged at day time.
- The lamp has a power-off memory function. Before resetting the work mode, It will remain the current mode after turning off or battery replaced.
- Please note the lighting time depends on the sunshine duration & weather & work modes.
APPLICATION
Ideal for streets, public parks, car parks and similar environments.
Parts Diagram

Dimensions

WORKING MODES
A. WORKING MODES BY PRESSING BUTTON ON THE LAMP
Press lamp button 1st time, It’s Sensor Mode:Lamp automatically turns to 100% brightness when motion is detected in the range of 8 Meters. After 20 seconds of no motion. it will dim to 15% brightness.
Press lamp button 2nd time, It’s Sensor Mode:Lamp automatically turns on at dusk and remains 50% brightness till it’s dawn or power off.
Press lamp button 3rd time, lamp turns off.
B. DIY WORKING MODES BY REMOTE CONTROL
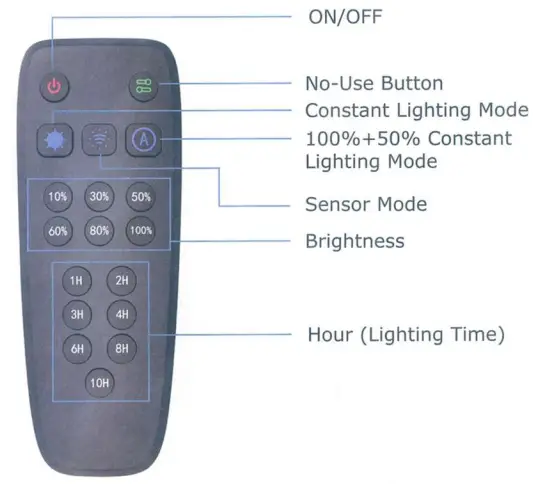
Remote Control Distance <12 Meters
- Please press button on the lamp firstly to turn on the lamp and activate remote control.
- During
 , only one working mode can be selected at a time.
 - Each time the Mode/Brightness/Hour button on the remote control is pressed, the lamp will flash once, indicating successful operation.
- Press the ON/OFF button on the remote control, the lamp reacts as below.

FUNCTIONALITY: (WITH DIFFERENT MODES ON REMOTE CONTROL)
1. CONSTANT LIGHTING MODE [![]() ]
]
- Under Constant Lighting ModeBrightness can be set vary 10%/30%/50%/60%/80%/100%Lighting Time can be set vary: 1H/2H/3H/4H/6H/8H/10H.
- Before reset the brightness or hour, please make sure to press button button first or press Hour button first are both ok.
OPTION 1: Press ![]()
It’s default setting of Constant Lighting Mode:Lamp automatically turns on at dusk and maintain 50% brightness till it’s dawn or power’s off

OPTION 2: Press ![]() + Press one of the 6 Brightness buttons
+ Press one of the 6 Brightness buttons
For ExamplePress ![]() + Press
+ Press ![]() Lamp automatically turns on at dusk and maintain 60% brightness till it’s dawn or power offNote: Under constant lighting mode, when you only select the brightness, but not lighting time, it will keep lighting on at the chosen brightness till it’s dawn or power off.
Lamp automatically turns on at dusk and maintain 60% brightness till it’s dawn or power offNote: Under constant lighting mode, when you only select the brightness, but not lighting time, it will keep lighting on at the chosen brightness till it’s dawn or power off.

OPTION 3: Press ![]() + press one of the 6 Brightness buttons + Press one of the 7 Hour buttons
+ press one of the 6 Brightness buttons + Press one of the 7 Hour buttons
For examplePress ![]() + Press
+ Press ![]() + Press
+ Press ![]() Lamp automatically turns on at dusk and maintain 60% brightness for 4 hours, then switch over to default Sensor Mode.
Lamp automatically turns on at dusk and maintain 60% brightness for 4 hours, then switch over to default Sensor Mode.

2. SENSOR MODE [![]() ]
]
- Press , lamp will switch to Sensor Mode
- Under Sensor Mode, the brightness when activated by motion can be set to 60%, 80%, or 100%. The standby brightness can be set to 10%, 30%, or 50%. The default standby brightness is 15%.
OPTION 2: Press ![]() + press one of the 6 Brightness buttons
+ press one of the 6 Brightness buttons
For Example:Press ![]() + Press
+ Press ![]() + Press
+ Press ![]() Lamp automatically turns to 60% brightness (1200lm, 60% of 100%) when motion is detected in the range of 8 meters. After 20 seconds of no motion, it will dim to 10% brightness (120lm, 10% of 60%).
Lamp automatically turns to 60% brightness (1200lm, 60% of 100%) when motion is detected in the range of 8 meters. After 20 seconds of no motion, it will dim to 10% brightness (120lm, 10% of 60%).

3. 100%+50% CONSTANT LIGHTING MODE [![]() ]
]
- Brightness buttons and hour buttons are invalid under this mode.
- Press the button , it’s 100% + 50% Constant Lighting Mode:Lamp automatically turns on at dusk and maintain 100% brightness for 5 hours then it turns to 50% brightness constant lighting till dawn.

PIR SENSOR WORK INDICATOR FUNCTIONS
There are 4 colors (green, red, blue, and yellow) in the indicator light by default, each color indicates the working status of different parts of lamp, by which we can easily know whether each part is working well or quickly find the defective part to repair.
IN CASE OF ANY OUERY/ISSUE WITH THE PRODUCT, PLEASE REACH OUT TO US AT: [email protected]FOR MORE PRODUCTS RANGE, INQUIRY PLEASE CONTACT OUR DISTRIBUTOR OR NEAREST DEALERS. V-TAC EUROPE LTD. BULGARIA, PLOVDIV 4000, BUL.L.KARAVELOW 9B
[xyz-ips snippet=”download-snippet”]