V-TAC VT-4961 50W Led Floodlight black slim smd
Super Bright Installation Guide
TECHNICAL DATA
WARNING
- Please make sure to turn off the power before starting the installation.
- The light source of this luminaire is not replaceable, when the light source reaches its end of life the whole luminaire should be replaced.
- If the external flexible cable or cord of this luminaire is damaged, it shall be exclusively replaced by the manufacturer or his service agent or a similar qualified person in order to avoid a hazard.
- Proper grounding should be ensured throughout the installation.
- Installation must be performed by a qualified electrician.
- Terminal block not included.
![]() This marking indicates that this product should not be disposed of with other household wastes.
This marking indicates that this product should not be disposed of with other household wastes.
![]() Caution, risk of electric shock.
Caution, risk of electric shock.
INTRODUCTION & WARRANTY
Thank you for selecting and buying V-TAC product. V-TAC will serve you the best. Please read these instructions carefully before starting the installation and keep this manual handy for future reference. If you have any another query, please contact our dealer or local vendor from whom you have purchased the product.They are trained and ready to serve you at the best. The warranty is valid for 5 years from the date of purchase. The warranty does not apply to damage caused by incorrect installation or abnormal wear and tear. The company gives no warranty against damage to any surface due to incorrect removal and installation of the product. The products are suitable for 10-12 Hours Daily operation. Usage of product for 24 Hours a day would void the warranty. This product is warranted for manufacturing defects only
INSTALLATION INSTRUCTION
- DO NOT USE IN AREAS WITH LIMITED VENTILATION OR OUTSIDE THE RATED AMBIENT TEMPERATURERANGE. *CONNECT WITH WATERPROOF CABLE HOUSE ONLY. *ENSURE ELECTRICITY IS SWITCH OFF BEFORE INSTALLATION.
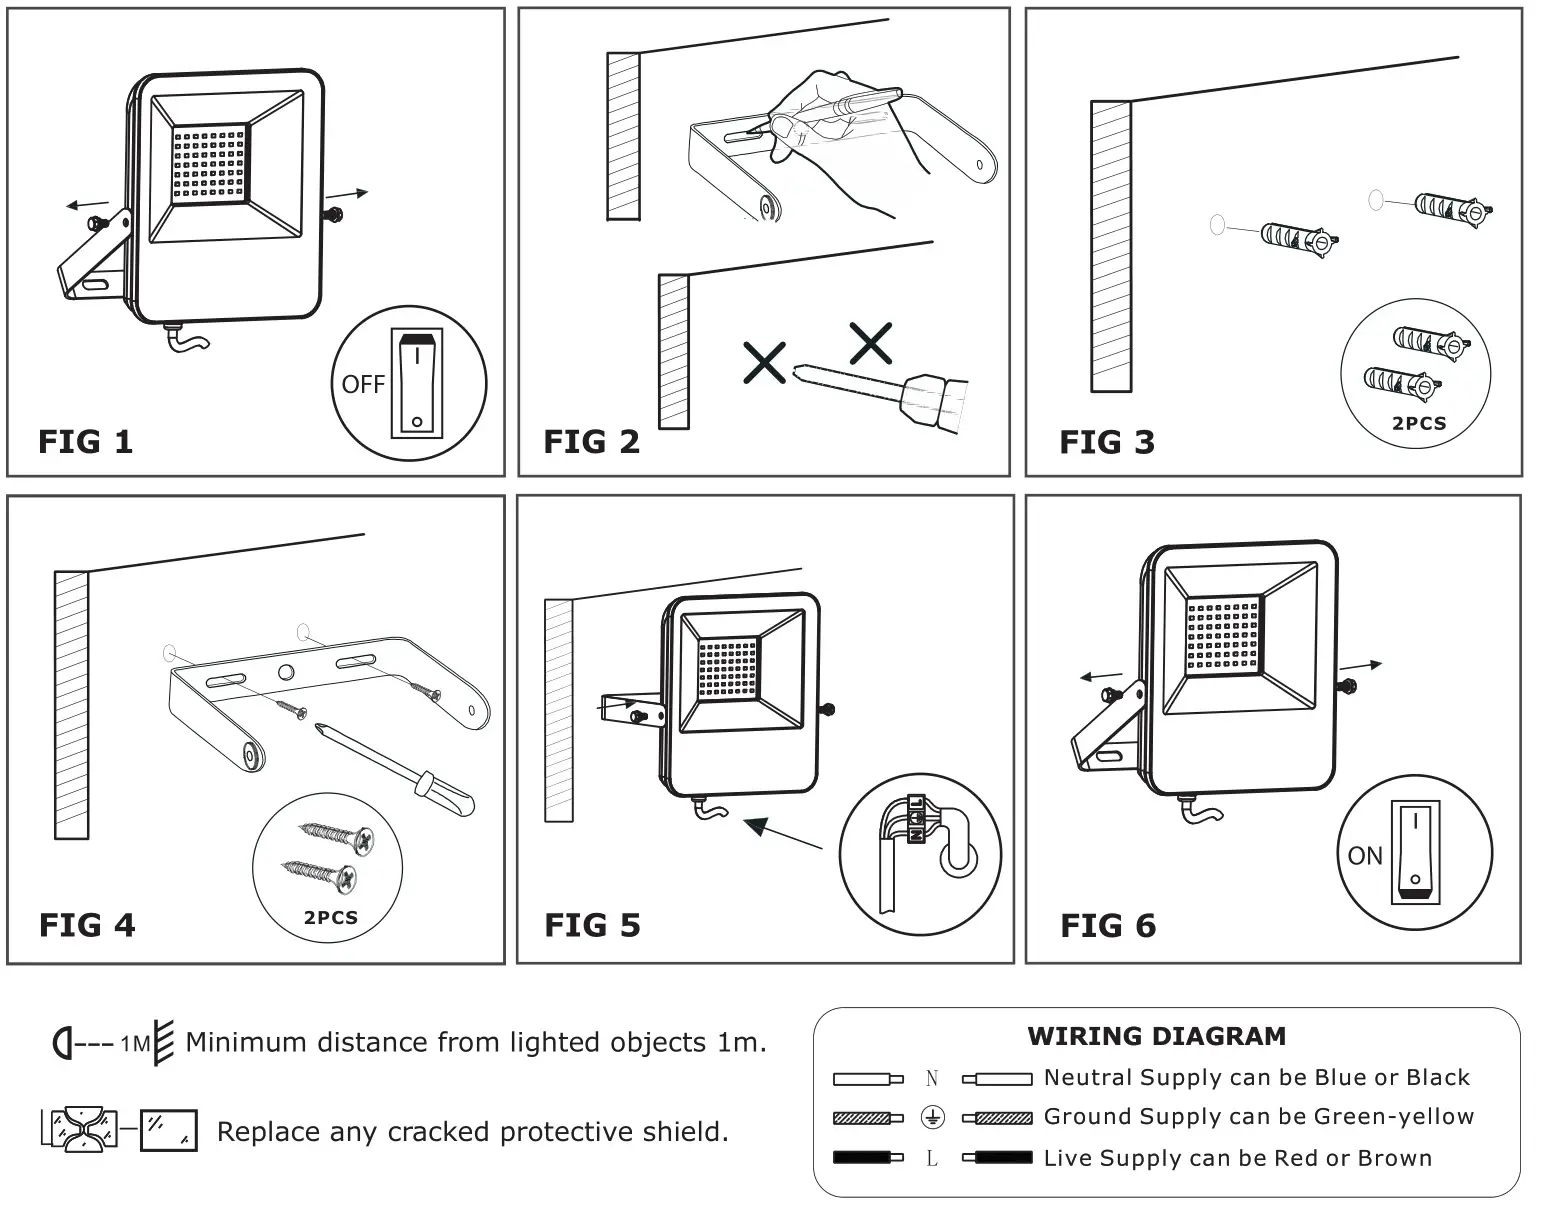
- Please do not mount to a surface that is prone to vibrations.*Remove the screw and the bracket afterward. (Figure 1)Before drilling, mark the hole position for fixing the bracket onto the wall (Screw not supplied). (Figure 2)
- Screw the retaining bracket to the wall with a suitable quantity of screws. (Figure 4)
- Mount the bracket back to the fixture. Adjust the floodlight according to the desired position. Tighten the screw. (Figure 5) Connect your main cable (H05RN-F3G1.0mm2 Recommended) with the input lead of our product through the waterproof junction box. Note, the line (-) of the lead. (Need to use the junction box of IP65 or above, ensure to tighten the waterproof screw) Switch on the power to make sure if the product is working. Adjust the direction angle as per your preference. (Figure 6)
IN CASE OF ANY QUERY/ISSUE WITH THE PRODUCT, PLEASE REACH OUT TO US AT: [email protected] FOR MORE PRODUCTS RANGE, INQUIRY PLEASE CONTACT OUR DISTRIBUTOR OR NEAREST DEALERS. V-TAC EUROPE LTD. BULGARIA, PLOVDIV 4000, BUL.L.KARAVELOW 9B
References
[xyz-ips snippet=”download-snippet”]