![]()
WEEE Number: 80133970INSTALLATION INSTRUCTION
| MODEL | WATTS | LUMENS | BEAMANGLE | ON/OFFCYCLE | COLORTEMPERATURE | INPUT POWER | DIMENSION |
| VT-8401 | 40W(4000K) | 2800LM(40W) | 120° | >15,000 | 3IN 1( CCT) | AC:175-265V, 50/60Hz | 465x 75m m |
| VT-8404 | 40W(4000K) | 2800LM(40W) | 120° | >15,000 | 31N1(CCT) | AC:175-265V, 50/60Hz | 388.5x75mm |
| VT-8405 | 40W(4000K) | 2800LM(40W) | 120° | >15,000 | 3IN 1( CCT) | AC:175-265V, 50/60Hz | 393x 75m m |
| VT-8403 | 40W(4000K) | 2800LM(40W) | 120° | >15,000 | 3IN 1( CCT) | AC:175-265V, 50/60Hz | 395x 75m m |
| VT-8555 | 60W(4000K) | 4200LM(60W) | 120° | >15,000 | 3IN 1( CCT) | AC:175-265V, 50/60Hz | 565x 75m m |
| VT-8557 | 60W(4000K) | 4200LM (60w) | 120° | >15,000 | 3IN 1( CCT) | AC:175-265V, 50/60Hz | 500x75mm |
| VT-8556 | 60W(4000K) | 4200LM(60W) | 120° | >15,000 | 3IN 1( CCT) | AC:175-265V, 50/60Hz | 493.9x75mm |
| VT-8503 | 60W(4000K) | 4200LM(60W) | 120° | >15,000 | 3IN 1( CCT) | AC:175-265V, 50/60Hz | 498x 80m m |
| VT-8472 | 72W(4000K) | 4200LM(60W) | 120° | >15,000 | 31N1(CCT) | AC:175-265V, 50/60Hz | 670x75mm |
| VT-8473 | 60W(4000K) | 4200 LM (60w) | 120° | >15,000 | 31N1(CCT) | AC:175-265V, 50/60Hz | 480x75mm |
| VT-8504 | 60W(4000K) | 4200LM(60W) | 120° | >15,000 | 31N1(CCT) | AC:175-265V, 50/60Hz | 500x85mm |
| VT-8402 | 40W(4000K) | 2800LM(40W) | 120° | >15,000 | 31N1(CCT) | AC:175-265V, 50/60Hz | 410x75mm |
| VT-8502 | 60W(4000K) | 4200LM(60W) | 120° | >15,000 | 31N1(CCT) | AC:175-265V, 50/60Hz | 510 x75m m |
INTRODUCTION & WARRANTYThank you for selecting and buying the V-TAC product. V-TAC will serve you the best. Please read these instructions carefully before starting the installation and keep this manual handy for future reference. If you have any other queries, please contact our dealer or local vendor from whom you have purchased the product. They are trained and ready to serve you at your best. The warranty is valid for 2 years from the date of purchase. The warranty does not apply to damage caused by incorrect installation or abnormal wear and tear. The company gives no warranty against damage to any surface due to incorrect removal and installation of the product. The products are suitable for 10-12 Hours of Daily operation. Usage of product for 24 hours a day would void the warranty. This product is warranted for manufacturing defects only.
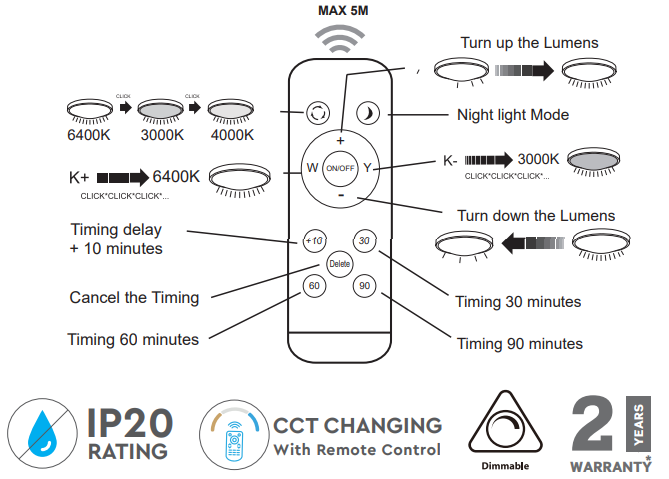
USAGE GUIDELINES / MAINTENANCEAny maintenance work must be performed when the power supply is cut off and the product has cooled down. Clean only with soft and dry cloths. Do not use chemical detergents. Do not cover the product. Ensure free air access. The product may heat up to a higher temperature. Product designed with a non-replaceable light source of the LED type. The product cannot be fixed if the light source becomes damaged. The remote control works on a 2xAAA battery (not included).ATTENTION! Do not look directly at the LED light beam. The product can only be supplied by rated voltage or voltage within the range provided. It’s forbidden to use the product with a damaged protective cover. The product must not be used in unfavorable conditions, e.g. dust, water, moisture, vibrations, explosive air atmosphere, fumes, or chemical fumes, etc. In the area of strong electromagnetic interference, the functioning of the product may be disrupted.WARNING:
- Please make sure to turn off the power before starting the installation.
- The light source of this luminaire is not replaceable, when the light source reaches its end of life the whole luminaire should be replaced.
- If the external flexible cable or cord of this luminaire is damaged, it shall be exclusively replaced by the manufacturer or his service agent or a similar qualified person in order to avoid a hazard.
- Method of attachment of the cable or cord such that any replacement can only be made by the manufacturer, his service agent or similarly qualified person.
- Installation must be performed by a certified person.
- For Indoor use only
 This marking indicates that this product should not be disposed of with other household wastes.
 Caution, risk of electric shock.
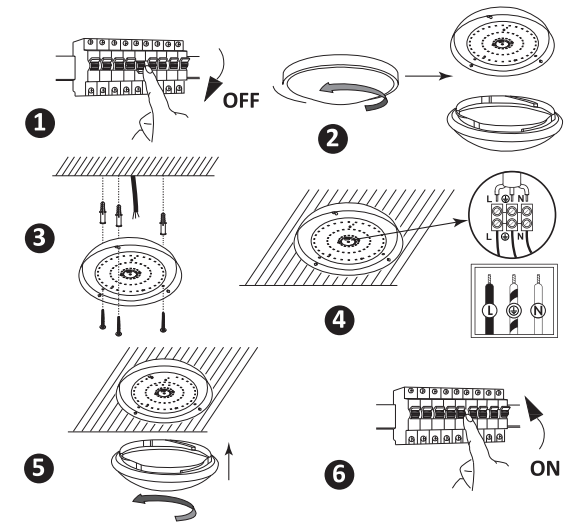
MOUNTING:Read the manual before mounting. Mounting should be performed by a qualified electrician. Exercise caution. The product has a protective contact /terminal.Failure to connect the protective lead may lead to electric shock. Mounting diagram: see pictures. Check for proper mechanical fastening and connection to electrical power prior to first use.INSTALLATION:
- Switch Off the Power Before Starting the Installation.
- Twist and remove the cover (Ref Image Part 2)
- Drill a hole in the ceiling to fix the light using screws (Ref Image Part 3)
- Connect the wires (Ref Image Part 4) before fixing the light using screws on the ceiling.
- Twist and lock the cover to the light (Ref Image Part 5)
- Switch ON the power and test the light.
INSTALLATION DIAGRAM:
In case of any query/issue with the product, please reach out to us at: [email protected]For More products range, inquiry please contact our distributor or nearest dealers.V-TAC EUROPE LTD. Bulgaria, Plovdiv 4000, bul.L.Karavelow 9B
References
[xyz-ips snippet=”download-snippet”]