
![]()
Wireless SwitchUser Manual
Product Appearance
* Note: The product depicted in this manual may appear slightly different from what you receive in the box *
Introduction
Based on radio frequency (RF) and energy harvesting technology, wireless switch does neither needs external power supply to control. When pressing the button, the mechanical energy automatically converts into electrical energy. Meanwhile, the switch will send out radio signals to control the receiver on/off.
Installing Receiver
WARNING!Please power off before installation!Fix the lines as per below picture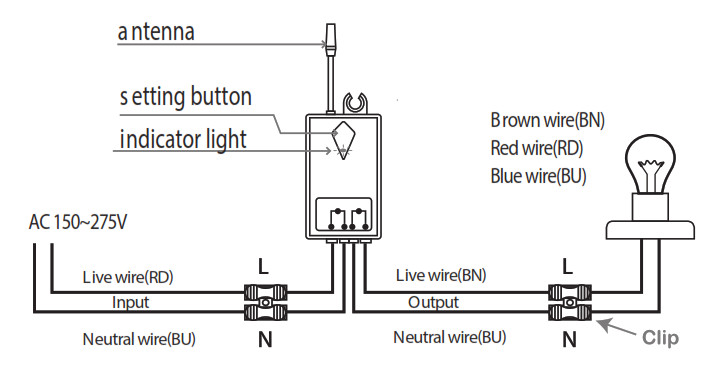
NOTES
a. The integrated load of the wireless receiver is 1000W.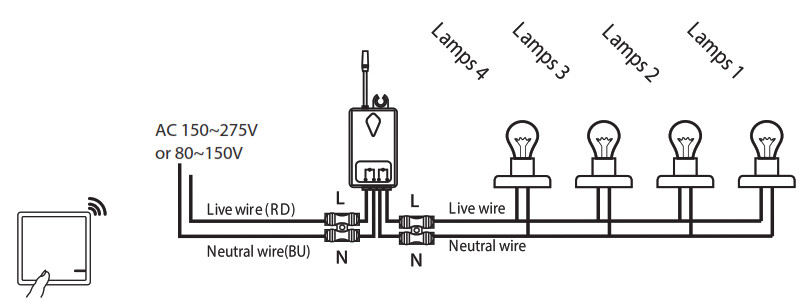
Lamps can be: LED lights, incandescent bulbs, exhaust fans, or WIFI devices etc.
b. A one-gang wireless switch controls a wireless receiver c. A two-gang wireless switch controls 2 wireless receivers
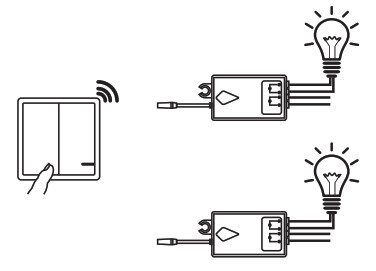
ApplicationHome, hotel, inn or Factory, etc.
d. A receiver can be controlled by 8pcs of wireless switch panels at most.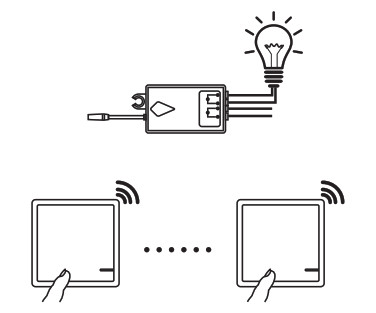
e. Three two-gang wireless switchs controls 2 wireless receivers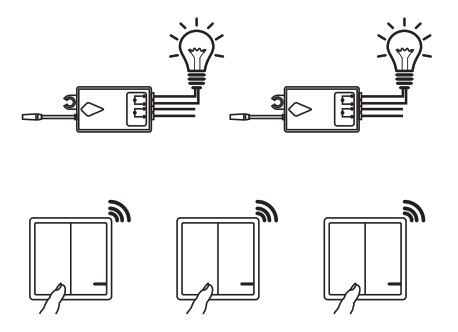 f. A three-gang wireless switch controls 3 wireless receivers
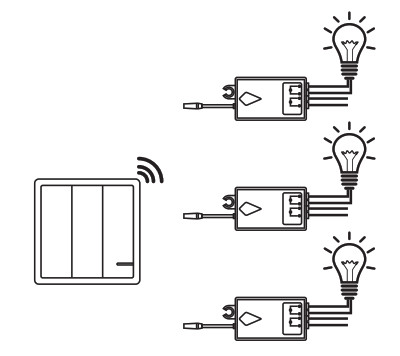 g. A hand remote control controls 3 wireless receivers
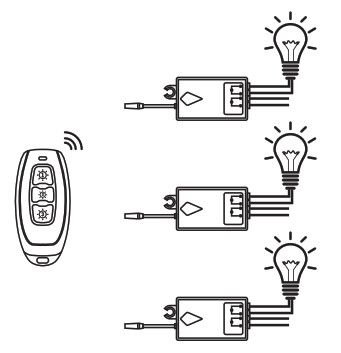
Code Operation
PAIRING THE SWITCH & THE RECEIVER
- Connect the receiver between the light and the power source.
- Power on electricity, press and hold the setting button for 2 seconds. When the indicator light flashes, it enters the matching code mode, then loosen your finger.
Press the wireless switch button that you want to pair. Use the wireless switch to control the light on or off, indicating that the learning code is successful.NOTE:(a) Not recommended that 1 switch controls many receivers.(b) Ensure that there is no other painting within 100 mtrs range to avoid interface.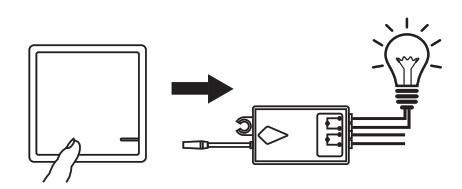 ADDING ANOTHER SWITCH TO A PAIRED SWITCHPress and hold paired switch panel for about 20s till LED indicator on switch blinks rapidly, then loosen your finger, press the new one, finally test whether it can turn on/off the lamps.
DELETING ADDITIONAL SWITCH FROM A PAIRED SWITCHPress and hold paired switch panel for about 60s, during which LED indicator on switch changes from firstly blinks rapidly; secondly blinks 8 times slowly, thirdly blinks 9 times at slower speed, finally blinks once at slowest speed, then loosen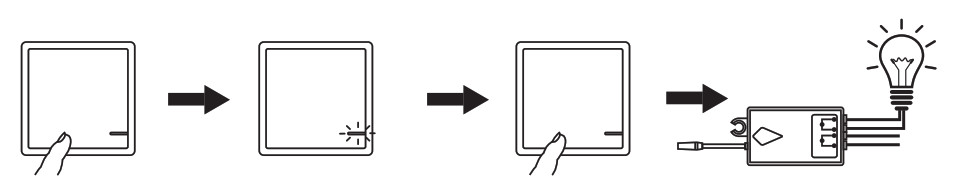 UNPAIRING THE RECEIVERPress and hold the receiver button for about 10s, loosen you finger when indicator light changes from rapid blinks to slower, press the paired switch panel cannot control the lamps
How to set Open/Close state of receiver to make wireless switch compatible with the traditional switch
Note: The receiver is default in Close state.
- Power off electricity, install the receiver as the diagram, and distinguish live from neutral lines.
- Power on electricity, then program receiver with the switch according to the Learning code Operation chapter


If the receiver is in open state,– Turn on the traditional switch to light the lamps, the wireless switch can control the lamps.– Turn off the traditional switch to light the lamps, the wireless switch cannot control the lamps.
If the receiver is in open state,– Turn on the traditional switch and press the wireless switch to light the lamps, the wireless switch can control the lamps.– Turn off the traditional switch, the wireless switch cannot control the lamps.
Method of set the receiver in Open state
Press and hold switch button for 16s, loosen your finger when the indicator light is continuously bright. (During the 16s, the indicator light will change from quick flash to slower flash, after that, the indicator light will be off, then will be on.)
Method of set the receiver in Close state:
Same method of set the receiver in Open state, just press and hold setting button for 16s, loosen your finger when the indicator light is continuously bright.
Replace the battery

- Remove switch frame and panel with hand or screwdriver.
- Remove 4 screws with screwdriver, take off the battery cover ;
- Replace the old battery with the new one, pay attention to the positive and negative poles of the battery; 4. Install the panel and frame again.
INSTALLATION WIRELESS SWITCHThe switch can be surface mounted with screws or double-sided stickers. or set it on the table.
- Install with Double-sided adhesive. (Included)Pick up the area where you ‘re going to place the switch, clean the surface with wet rag, post the adhesive rubber in the back of the switch, then attach the switch to the clean surface.
- Install with screws (not included)First, take apart the frame and button panel of the switch, Fix the switch base on the wall with two screws, then install the parts together.
 Pick up the area where you ‘re going to place the switch, clean the surface with wet rag, post the adhesive rubber in the back of the switch, then attach the switch to the clean surface.
Specifications
Parameters of the wireless receiver
| Product Size | 39*23*22MM | Working voltage | AC 150~275V or 80∼150V |
| Switch times | >400,000 times | Working frequency | 433.932MHz +/-75KHz |
| Sensitivity | -116dB | Relay | 10A |
| Working current | ≤0.8W | Standby current | ≤0.5W |
| Resistive load | 1800W | Composite load | 1000W (LED) |
| Temperature rise when working | ≤15 |
Fireproof PC | CHIMEI |
| Signal light on the receiver | Red light | Package weight | 32~35g |
Parameters of the metal hand remote
| Size | 62*30*12MM | Working frequency | 433.932 MHz +/-75KHz |
| Waterproof | IP44 | Quantity of the button | 3 buttons |
| Working voltage | 2~3V(CR2032) | Life of the battery | ≥300,000 times |
| Standby current | ≤0.01 uA | Working temperature | 0~65 |
| Emission current | ≤25 mA | Storage temperature | -10~85 |
| Emission Power | ≥+5dbM | Remote distance | ≥160m outdoor≥20m indoor |
Parameters of the wireless switch
| Product Size | 86*86*11MM or 86*86*13MM | Type | 1-gang,2gang,3-gang |
| Switch times | >600,000 times | Working frequency | 433.932 MHz +/-75KHz |
| Sensitivity | -116dB | Working voltage | 3V CR2032 ) |
| Package weight | 82~86g | Life of the battery | ≥300,000 times |
| Emission current | ≤30 mA | Standby current | ≤0.01 uA |
| Working temperature | -40~+70 |
Waterproof | IP54 |
| Working characteristics | No need wiring | Fireproof PC | CHIMEI |
| Remote distance | >600m outdoor | Light on the switch | Blue light |
| Remote distance | >40m indoor | Interchangeable panel | The three kinds of panels can be interchangeable |
Incase of any queries/issues, kindly reach out to us at support vtacexports.comFor more product range, kindly contact our distributors or nearest dealers.V-Tac ( UK ) Limited, Springheath House, Kelpatrick Road, Slough, SL1 6BW
References
[xyz-ips snippet=”download-snippet”]