
VABSCE VB-007 Night Vision Binoculars
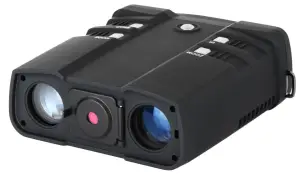
Congratulations on your purchase of this high quality night vision binoculars device. Use this device to view your surroundings in low light conditions or even in complete darkness with the built-in infrared light. You can even take pictures and video using the device which can be stored on a TF card. This device can also be used to take photos and video during the day. Use the supplied A/V cable to view your images on a television or download the images to your computer using the supplied USB cable. Also includes a neck strap and handy storage pouch
Accessories
- 1x Night vision binoculars device
- 1x Mini USB cable
- 1x Power bank holder
- 1x A/V cable
- 1x Storage pouch
- 1x User manual
Over View

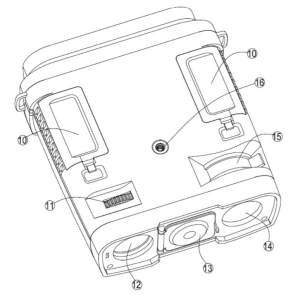
Parts overview
- Ocular
- Power button
- IR button
- Zoom button
- Mode button
- Snap button
- USB port
- TF card slot
- TV out
- Battery cover
- Objective lens focus wheel
- Objective lens
- Infrared filter
- IR Illuminator
- Infrared zoom
- Tripod adapted
Battery Installation
Open battery compartments and install the 8XAA batteries being sure to follow the polarity markings inside the battery compartment.Close the battery covers. Please pay attention to the direction of covers.
Inserting / Removing the TF card
Insert the TF card into the TF card port and push until it locks in place. To remove the installed TF card, please push the TF card inward to release it. Storage capacity: 8GB or above is recommendedNote: The device will show the icon “![]() “if the micro SD card in not installed
“if the micro SD card in not installed
Turning On the Night vision binoculars device
Power On: Press the power button still for about several seconds to start the Night vision binoculars device.
Turning Off the Night vision binoculars device
Power Off: Press the power button for about several seconds to turn off the Night vision binoculars device.
| 【MODE】 | Toggles between Video / Photo / Playback / Menu |
| 【SNAP】 | In video mode: Press to take video. To stop recording, press this button again.In photo capture mode: Press to take photo.In playback mode: Press to Play or delete the video.In Menu mode: Press to select. |
| 【ZOOM】 | In video mode: Press to zoom out.In photo capture mode: Press to zoom out.In playback mode: Press to select the next picture or videoIn menu mode: Press to select the previous menu listing. |
| 【IR】 | In Video/Photo mode: Press to turn on the infrared light.With each additional click, the IR brightness will increaseIn playback mode: Press to select the previous photo or video.In menu mode: Press to select the next menu listing. |
Taking Photo and Video Function
Taking a photo: Press the [MODE] button and select the capture photo mode. The icon![]() will appear in the top left corner of the screen. It means you enter the photo function. Press the [SNAP] button to take photos.
will appear in the top left corner of the screen. It means you enter the photo function. Press the [SNAP] button to take photos.
Taking a video: Press the [MODE] button and select the video mode.The icon ![]() will appear in the top left corner of the screen. It means you enter the video function. Press the [SNAP] button to start recording video and press the [SNAP] button again to stop recording.
will appear in the top left corner of the screen. It means you enter the video function. Press the [SNAP] button to start recording video and press the [SNAP] button again to stop recording.
Watching stored videos and photos: Press the [MODE] button and select playback mode . ![]() You may then look through your saved photos/videos with the [Zoom] or [IR] buttons. [Zoom] or [IR] buttons can be used for choosing the previous page or next page.
You may then look through your saved photos/videos with the [Zoom] or [IR] buttons. [Zoom] or [IR] buttons can be used for choosing the previous page or next page.
Deleting Stored Videos and Photos: In playback mode, press the [SNAP] button to enter the menu. You will be given the options to play or to delete the image or video. While deleting the photo, you will see the menu by pressing the [SNAP] button .The first one is “Delete” .You can choose “Delete, Delete All or Exit” by [ZOOM]![]() or [IR]
or [IR] ![]() . While playing or deleting the videos, you will see the menu by pressing the [SNAP] button. The first one is “Play” .You can choose “Play ,Delete, Delete All or Exit” by [ZOOM]
. While playing or deleting the videos, you will see the menu by pressing the [SNAP] button. The first one is “Play” .You can choose “Play ,Delete, Delete All or Exit” by [ZOOM] ![]() or [IR]
or [IR] ![]() button .
button .
The screen display during 【Playback】 mode
| Delete Photos | 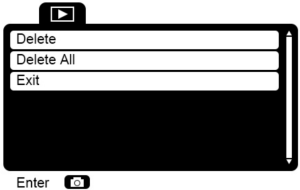 |
| Delete Photos | 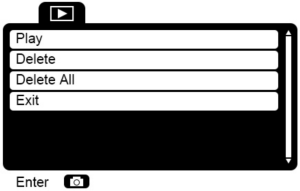 |
Focusing the image
Target the object you would like to view and turn the focusing wheel located just below the objective lens until the image on the screen is sharp and clear. The focusing wheel is No.11 in Parts overview picture.
Adjust infrared projection angle
You can adjust infrared projection angle from 5.2°to 10.2° by No.15 in Parts overview picture.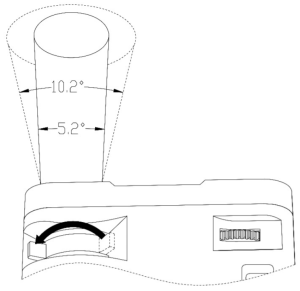
LCD Display Information
Your screen display in photo mode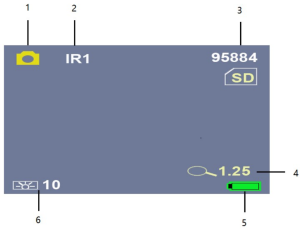
| 1 | Icon displaying that you are in Photo Mode |
| 2 | Brightness of IR from 1 to 5 (while plugging in USB power supply the IR brightness from 1 to 7) |
| 3 | Remain capacity quantity |
| 4 | Digital zoom |
| 5 | Battery power |
| 6 | Backlight from 0 to 15 |
Your screen display in video mode
| 1 | Icon displaying that you are in Video Mode |
| 2 | Brightness of IR from 1 to 5(while plugging in USB power supply the IR brightness from 1 to 7) |
| 3 | Remaining time of recording |
| 4 | Digital zoom |
| 5 | Battery power |
| 6 | Backlight from 0 to 15 |
LCD Display Information.
Press [MODE] four times continuously and enter menu mode.Note: [ZOOM] means “up” ![]() [IR] means “down”
[IR] means “down” ![]() [SNAP] means “ok” button. After setting, you can press [MODE] again to exit the menu.
[SNAP] means “ok” button. After setting, you can press [MODE] again to exit the menu.
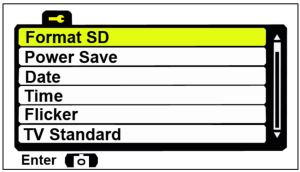
Your screen display during menu mode

![]()
![]()
| Format SD | 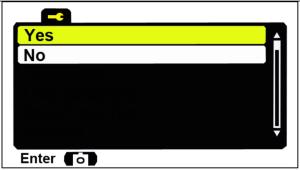 Select to format the TF card Select to format the TF card |
| Format is an operation that initializes a partition on a disk or disk. This usually causes all files in the existing disk or partition to be erased. You can choose yes or no by [ZOOM] |
|
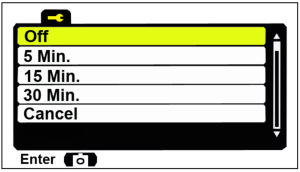
| Power Save | Power off mode :The NV can be set to automatically shut down when not operating after the selected period of time. |
 |
|
| You can choose off 5min.,15 min.,30 min or cancel. For turning the device off automatically. The buttons of selection and confirmation is the same as mentioned before. Then choose cancel to exit. | |
| Date | 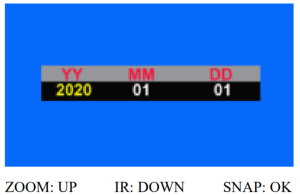 |
| Find Date input function by [ZOOM] and [IR]. Press [SNAP] to confirm and start to set the date .[ZOOM] means up |
|
| Time | 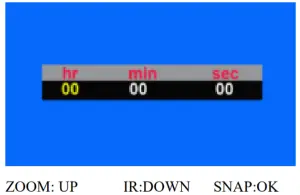 |
| Find time input function by [ZOOM] and [IR]. Press [SNAP] to confirm and start to set the date .[ZOOM] means up |
|
| Flicker | 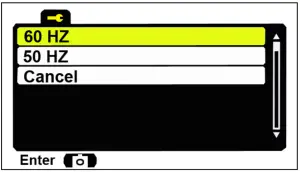 |
| You can choose 50Hz or 60Hz by [ZOOM] |
|
| TV Standard | The video output mode can be set to NTSC (North America) or PAL (Europe)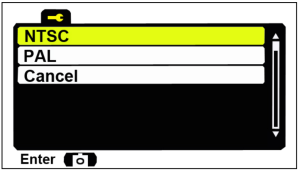 |
| You can choose NTSC or PAL by [ZOOM] |
|
| Language | 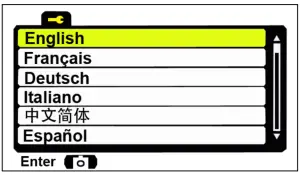 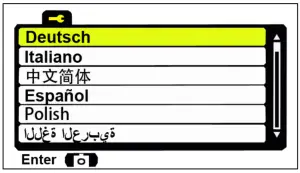 |
| You can choose language you need by [ZOOM] |
|
| LCD Backlight | 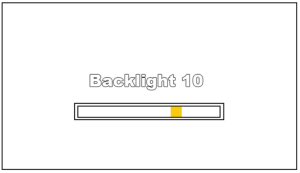 set the backlight from 0 to 15 set the backlight from 0 to 15 |
| You can choose from level 0-15 to decide screen backlight intensity. Find Backlight function and start to set the level by [ZOOM] |
|
| Date/Time Tag |  When you choose on, the date/time will be showed in the picture or video. When you choose on, the date/time will be showed in the picture or video. |
| You can choose Off or On you need by [ZOOM] |
|
| Version | 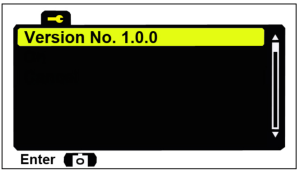 The software version of the device The software version of the device |
Using the zoom function
This device features a zoom function that can be used while taking a video or photo.Press the [ZOOM] button to toggle between 1X and 3X digital zoom. Optical magnification power :3.6X-10.8X. (The optical magnification is 3.6X) (3.6X-10.8X Zoom Magnification = Optical Magnification × Digital Magnification)
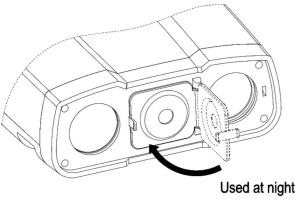
Using IR light in complete darkness
This device can be used in complete darkness when using the built in IR (infrared) light. Press the [IR] button to activate the infrared light. Remove the IR Lens cover and press the [IR] button to select between the 5 levels of brightness (while plugging in USB power supply the IR brightness from 1 to 7).
Note: Don’t forget to remove the IR Lens cover while using in the darkness.
 Pic. 1
 Pic. 2
Viewing videos and photos on TV
Connect the AV output port of the night vision binoculars device with an A/V cable. Connect the other end of the A/V cable to the TV video input.In playback mode, press the ZOOM/IR buttons to select the file you will display on your TV.Note: When the night vision binoculars device is connected to a TV, the screen inside the device will not work.
Transmitting stored videos and photos to a computer
Using a USB cable, you can connect the night vision binoculars device to a computer. You can find the stored photo/video files on the computer by looking under “My computer \ removable disk”.Once the removable disk is selected, you can view, delete, move, or copy any video or photo.
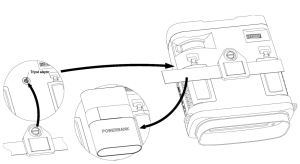
Install power bank on night vision binoculars device
Care and maintenance
Clean the device only with a dry or slightly damp, lint-free cloth. Do not use abrasive cleaners to clean the device.This device is a high-precision optical instrument, so in order to avoid damage, please avoid the following practice:
- Use the device in ultra-high or ultra-low temperature.
- Keep it or use it in moist environment for long.
- Deliver or use it in strongly shocking environment.
 report this ad
Note: Remove the batteries from the device if it is not used for a longer time.
VB007 Specification |
|
| Catalog | Function Description |
| Optical performance | Magnification (3.6-10.8) X31 |
| Digital Zoom Max 3x | |
| Angle Of View 9.2° | |
| Objective Aperture 31mm | |
| Exit Pupil Distance 30mm | |
| F# for Objective lens 1.3 | |
| IR ZOOM 2X | |
| 2m~∞ in daytime; Viewing in the darkness up to 300M (monochrome) | |
| Imager | High-sensitivity CMOS Sensor |
| Size 1/2.7” | |
| Resolution 1920X1080 | |
| Displayer | Backlight 0-15 grades adjustment |
| OSD menu display | |
| CVBS always output with VGA resolution | |
| IR LED | 5W Infrared 850nm LED |
| TF Card | Support SDHC 8GB~128GB TF Card |
| Operation | Preview |
| Record JPEG file in TF storage | |
| Capture mp4 file in TF storage | |
| Playback media file from SD storage | |
| Power | External power supply – DC 5V/2A |
| 8 pcs AA battery 8-12 V | |
| Low battery warning |
[xyz-ips snippet=”download-snippet”]