
Dry VacuumOperator’s Manual
3 GallonModel No.VZA306P 0201
FOR YOUR SAFETYRead and understand this manual before use.Keep this manual for future reference.
| Suzhou Cleva Electric Appliance Co., Ltd.NO.8 Ting Rong Street 215122 Suzhou, China | Replacement Filters &Accessories available at: Vacmaster.com |
Thank you for purchasing this Vacmaster® dry vacuum cleaner. Feel confident that with Vacmaster® you are obtaining a high quality product engineered for optimal performance. This vacuum is capable of picking up dry materials.
FOR YOUR SAFETY: CAREFULLY READ AND UNDERSTAND ALL INSTRUCTIONS.
WARRANTY
We take pride in producing a high quality, durable product. This Vacmaster® product carries a limited two (2) year warranty against defects in workmanship and materials from date of purchase under normal household use. If product is to be used for commercial, industrial, or rental use, a 90 day limited warranty will apply. Please keep your receipt as proof of purchase. This warranty gives you specific legal rights, and you may have other rights, which vary from state to state. For product service call Customer Service at 1-866-384-8432.
Not Covered by Warranty:
- Any part that has become inoperative due to misuse, negligence, direct/indirect abuse, accidents, improper maintenance, repairs, or alterations;
- Consumables such as filters and accessories;
- Normal wear and tear of parts and attachments, such as hose, nozzles, or casters;
- Normal deterioration of the exterior finish due to use or exposure;
- Any product where serial number/data label is tampered with or removed; · Any product purchased from an unauthorized retailer.
IMPORTANT SAFETY INSTRUCTIONS
When using an electrical appliance, basic precautions should always be followed, including the following: READ ALL INSTRUCTIONS BEFORE USING THIS VACUUM CLEANER. Failure to follow the warnings and instructions may result in electric shock, fire and/or serious injury.
![]() WARNING: TO REDUCE THE RISK OF FIRE, ELECTRIC SHOCK, OR INJURY:
WARNING: TO REDUCE THE RISK OF FIRE, ELECTRIC SHOCK, OR INJURY:
- Do not leave appliance when plugged in. Unplug from outlet when not in use and before servicing.
- Do not use outdoors or on wet surfaces.
- Do not allow to be used as a toy. Close attention is necessary when used by or near children.
- Use only as described in this manual. Use only manufacturer’s recommended attachments.
- Do not use with damaged cord or plug. If appliance is not working as it should, has been dropped, damaged, left outdoors, or dropped into water, return it to a service center.
- Do not pull or carry by cord, use cord as a handle, close a door on cord, or pull cord around sharp edges or corners. Do not run appliance over cord. Keep cord away from heated surfaces.
- Do not unplug by pulling on cord. To unplug, grasp the plug, not the cord.
- Do not handle plug or appliance with wet hands.
- Do not put any object into openings. Do not use with any opening blocked; keep free of dust, lint, hair, and anything that may reduce air flow.
- Keep hair, loose clothing, fingers, and all parts of body away from openings and moving parts.
- Turn off all controls before unplugging.
- Use extra care when cleaning on stairs.
- Do not use to pick up flammable or combustible liquids, such as gasoline, or use in areas where they may be present.
- Do not pick up anything that is burning or smoking, such as cigarettes, matches, or hot ashes.
- Do not use without dust bag and/or filters in place.
- Hold plug when rewinding cord reel. Do not allow plug to whip when rewinding.
SAVE THESE INSTRUCTIONSFor Household Use Only
EXTENSION CORDS
When using an extension cord with your Dry Vacuum refer to the following table to determine the required A.W.G. wire size. Before using the cleaner make sure the power cord and extension cord are in good working condition. Make repairs or replacements before using the vacuum cleaner. Only use extension cords that are rated for outdoor use.
| Length of Extension Cord | |||||
| 120V | 25ft (7.62m) | I 50ft (15.24m) | I 100ft(30.48m) | I 150ft (45.72m) | |
| Ampere rating | A.W.G. Wire Size | ||||
| More than | Not more than | ||||
| 0 | 6 | 18 | 16 | 16 | 14 |
| 6 | 10 | 18 | 16 | 14 | 12 |
| 10 | 12 | 16 | 16 | 14 | 12 |
| 12 | 16 | 14 | 12 | Not recommended |
SYMBOLS
The following signal words and meanings are intended to explain the levels of risk associated with this product.
| SYMBOL | SIGNAL | MEANING |
| DANGER | Indicates an imminently hazardous situation, which, if notavoided, will result in death or serious injury. | |
| WARNING | Indicates a potentially hazardous situation, which, if not avoided, could result in death or serious injury. | |
| CAUTION | Indicates a potentially hazardous situation, which, if not avoided, may result in minor or moderate injury. | |
| NOTICE | (Without Safety Alert Symbol) Indicates a situation that may result in property damage. |
UNPACKING & CHECKING CARTON CONTENTS
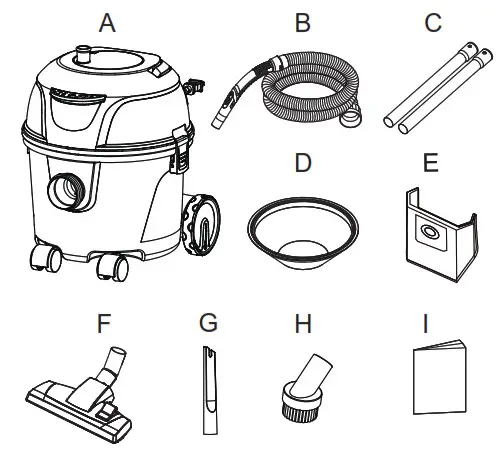
Remove all contents from the box. Remove the power head and take out any contents inside the collection tank. Check each item against the carton contents list.
Carton Contents List
| Key | Description | Qty |
| ABCDEFGHI | VacuumHoseExtension WandPre-filterDust Collection BagMulti-Surface Floor NozzleCrevice ToolRound Dust BrushOperator’s Manual | 112151111 |
NOTE: The hose and accessories for this dry vacuum are 1-1/4 inch diameter.
GENERAL ASSEMBLY INSTRUCTIONS
WARNING: DO NOT PLUG POWER CORD INTO POWER OUTLET. MAKE SURE PLUG IS DISCONNECTED BEFORE ASSEMBLING THE VACUUM. TO REDUCE THE RISK OF ELECTRIC SHOCK, DO NOT EXPOSE TO RAIN.
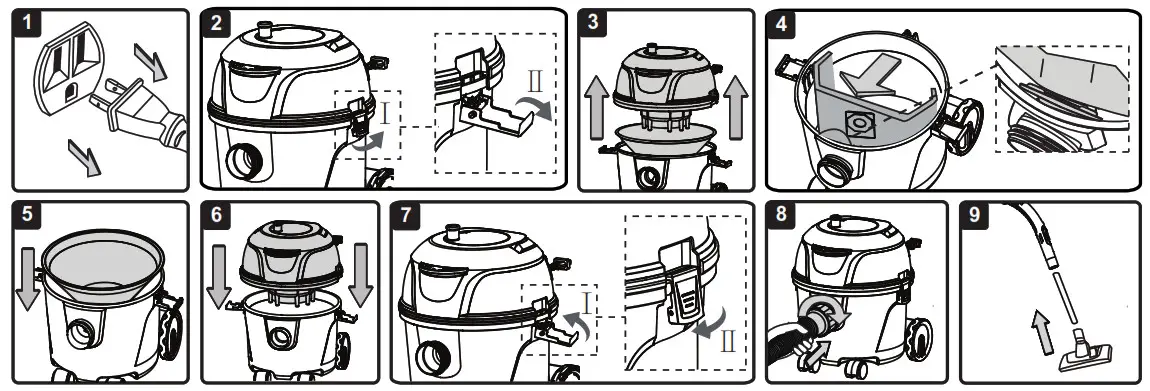
UNPACKING YOUR DRY VACUUM & GENERAL ASSEMBLY
- Verify that the power cord is disconnected from the outlet (Fig. 1).
- Undo the latches (Fig. 2).
- Lift the power head off the collection tank and remove the pre-filter (Fig. 3).
- Remove the contents from inside the collection tank and the box; make sure you have all contents as listed in carton content list on page 5.
- For improved dust filtration, fit the dust bag flange onto the inlet port, taking care not to damage the bag (Fig. 4).
- Place the pre-filter onto the rim of the collection tank. Make sure the edge of the filter fits snugly along the edge of the collection tank (Fig. 5). NOTE: Ensure the dust collection bag and the pre-filter are correctly installed before each use.
- With the filters installed, place the power head onto the collection tank and secure it with the latches (Fig. 6 & 7).
- Insert the locking end of the hose into the vacuum port of the collection tank and turn clockwise to lock into place (Fig. 8).
- Choose the desired attachment and insert onto the end of hose or extension wand (Fig. 9).
POLARIZED PLUGTo reduce the risk of electrical shock, this appliance has a polarized plug (one blade wider than the other). This plug will fit in a polarized outlet only one way. If the plug does not fit fully in the outlet, reverse the plug. If it still does not fit, contact a qualified electrician to install the proper outlet. Do not change the plug in any way.
DRY VACUUM OPERATION
DRY VACUUMING
![]() WARNING: BE SURE TO READ, UNDERSTAND, AND APPLY INFORMATION ENTITLED “IMPORTANT SAFETY INSTRUCTIONS”. DO NOT VACUUM IN AREAS WITH FLAMMABLE GASES, VAPORS, OR EXPLOSIVE DUSTS IN THE AIR. FLAMMABLE GASES OR VAPORS INCLUDE BUT ARE NOT LIMITED TO: LIGHTER FLUID, SOLVENT TYPE CLEANERS, OIL-BASED PAINTS, GASOLINE, ALCOHOL, OR AEROSOL SPRAYS. EXPLOSIVE DUSTS INCLUDE BUT ARE NOT LIMITED TO: COAL, MAGNESIUM, GRAIN, OR GUN POWDER. TO REDUCE THE RISK OF HEALTH HAZARDS FROM VAPORS OR DUST, DO NOT VACUUM TOXIC MATERIALS.
WARNING: BE SURE TO READ, UNDERSTAND, AND APPLY INFORMATION ENTITLED “IMPORTANT SAFETY INSTRUCTIONS”. DO NOT VACUUM IN AREAS WITH FLAMMABLE GASES, VAPORS, OR EXPLOSIVE DUSTS IN THE AIR. FLAMMABLE GASES OR VAPORS INCLUDE BUT ARE NOT LIMITED TO: LIGHTER FLUID, SOLVENT TYPE CLEANERS, OIL-BASED PAINTS, GASOLINE, ALCOHOL, OR AEROSOL SPRAYS. EXPLOSIVE DUSTS INCLUDE BUT ARE NOT LIMITED TO: COAL, MAGNESIUM, GRAIN, OR GUN POWDER. TO REDUCE THE RISK OF HEALTH HAZARDS FROM VAPORS OR DUST, DO NOT VACUUM TOXIC MATERIALS.
![]() WARNING: DO NOT PLUG THE POWER CORD INTO A POWER OUTLET. MAKE SURE THE PLUG IS DISCONNECTED BEFORE CHANGING THE FILTERS.
WARNING: DO NOT PLUG THE POWER CORD INTO A POWER OUTLET. MAKE SURE THE PLUG IS DISCONNECTED BEFORE CHANGING THE FILTERS.
![]() CAUTION: DO NOT VACUUM DRYWALL DUST, FIREPLACE SOOT, OR ASH WITH THIS VACUUM. THIS IS A VERY FINE DUST WHICH WILL NOT BE CAPTURED BY THE FILTER AND WILL CAUSE DAMAGE TO MOTOR.
CAUTION: DO NOT VACUUM DRYWALL DUST, FIREPLACE SOOT, OR ASH WITH THIS VACUUM. THIS IS A VERY FINE DUST WHICH WILL NOT BE CAPTURED BY THE FILTER AND WILL CAUSE DAMAGE TO MOTOR.
![]() CAUTION: THIS VACUUM IS INTENDED FOR DRY PICK-UP ONLY.
CAUTION: THIS VACUUM IS INTENDED FOR DRY PICK-UP ONLY.
- Verify that the power cord is disconnected from the outlet (Fig. 1).
- For improved dust filtration, fit the dust bag flange onto the inlet port, taking care not to damage the bag (Fig. 2).
- Place the pre-filter onto the rim of the collection tank. Make sure the edge of the filter fits snugly along the edge of the collection tank (Fig. 3).
- Place the power head back on the collection tank, and secure it in place using the latches (Fig. 4).OPERATING INSTRUCTIONS: DRY VACUUMING
- Insert the locking end of the hose into the vacuum port on the collection tank and turn clockwise to lock into place.
- Choose the desired attachment and insert onto the end of the hose or extension wand (Fig. 5).
- The air flow regulation on the hose handle allows you to adjust the amount of vacuum suction.For best cleaning results, fully close the air flow regulation (Fig. 6).NOTE: Open the air flow regulation for lightweight rugs or thick carpets. Close the air flow regulation suction for upholstery, hard floor or low pile carpets.
- Pull out the power cord slowly (Fig. 7).
- Plug the power cord into the outlet, turn on the dry vacuum by pressing the On/Off switch once (Fig. 8 & 9).
- Once you have finished vacuuming, press the power switch again to turn the vacuum off and unplug the cord from the power outlet.
- To rewind the cord, hold onto the vacuum port to ensure unit remains stationary and turn the cord rewind knob clockwise.
USING THE ATTACHMENTS
- Floor Nozzle: Use the standard setting for carpet cleaning. Push the carpet/bare floor selector down to release the brush and squeegee for bare floor cleaning (Fig. 10).
- Crevice Tool: For vacuuming edges, gaps, and reaching tight spaces.
- Round Dust Brush: For vacuuming fragile or easily scratched items, such as furniture and drapes.NOTE: You may use the attachments by inserting onto the extension wands or directly onto the hose.
MAINTENANCE

EMPTYING THE COLLECTION TANK
![]() WARNING: ALWAYS DISCONNECT THE PLUG FROM THE POWER OUTLET BEFORE REMOVING THE POWER HEAD FROM COLLECTION TANK.
WARNING: ALWAYS DISCONNECT THE PLUG FROM THE POWER OUTLET BEFORE REMOVING THE POWER HEAD FROM COLLECTION TANK.
- Verify that the power cord is disconnected from the outlet (Fig. 1).
- Disconnect the hose from the vacuum by turning counter-clockwise (Fig. 2).
- Undo the latches and remove the power head from the collection tank (Fig. 3). Place power head on a soft, clean surface upside down.
- Clear all dirt or debris from the collection tank and hose into a proper waste container.
- Clean or replace the filters .
- Check the hose, attachments, and power cord to verify that they have not been damaged.
- Place power head on collection tank and secure latches.
REMOVING & CLEANING THE PRE-FILTER
- Verify that the power cord is disconnected from the outlet.
- Remove the pre-filter up (Fig. 4).
- Clean the pre-filter by gently tapping or brushing dirt off. If necessary, gently rinse the pre-filter with clean water. Do not scrub or brush the pre-filter. Allow the pre-filter to air dry for 24 hours before re-installing. DO NOT install pre-filter if it is damp, or it will damage the machine.
- For optimal performance it is recommended to periodically replace the pre-filter.
REMOVING & CLEANING THE AIR INLET FILTER
- Verify that the power cord is disconnected from the outlet.
- With the removed power head in an upside down position, carefully remove the air inlet filter from the tabs (Fig.5).
- Wash and rinse the air inlet filter with clean water (Fig. 6).
- Allow the wet filter to air dry for 24 hours before re-installing.CAUTION: Make sure that the pre-filter and air inlet filter are dry before use, otherwise it may cause poor cleaning performance or damage to the motor. 9
REMOVING & CLEANING EXHAUST FILTER
- Verify that the power cord is disconnected from the outlet.
- Unlock the exhaust filter door by lifting both of the locking tabs upwards and pull the door out (Fig. 7 & 8).
- Remove the exhaust filter from the vacuum (Fig. 9).
- Clean the exhaust filter by gently tapping or brushing off dirt. If necessary, gently rinse the exhaust filter with clean water. Do not scrub or brush the exhaust filter while wet. Allow the exhaust filter to air dry for 24 hours before re-installing.
- For optimal performance a new filter is recommended.
![]() CAUTION: Make sure the exhaust filter is dry before use.
CAUTION: Make sure the exhaust filter is dry before use.
IMPORTANT! Clean or change the filters regularly for best performance. ALWAYS USE FILTERS FOR DRY VACUUMING. If the machine is used without the filters, the motor will burn out and the warranty will be voided. Always keep spare filters on hand.
NOTICE! The filters included are made of high quality materials designed to stop small dust particles. The filters should be used for dry pick-up only. A dry filter is necessary to pick up dust. If the filter is wet, it will clog quickly and be very difficult to clean. Handle the filter carefully when removing it for cleaning and replacing it. Check the filters for tears or small holes, a small hole can let dust pass through and out of the filter. Do not use a filter with holes or tears; replace it immediately.
STORAGEBefore storing your vacuum, the collection tank should be emptied and cleaned. The accessories should be cleaned and stored so they can be readily available when needed. Store the vacuum indoors.
- Store the power cord in place by rotating the cord rewind knob clockwise as shown (Fig. 10).NOTE: To avoid the power cord from getting stuck, do not retract the cord too fast or in wrong direction.
- Put the wands onto the attachment storage (Fig. 11 & 12).
- The floor nozzle has a storage hook that slides into the slot on the back of the collection tank (Fig. 12).
REPAIRSRepairs for this dry vacuum should be performed only by qualified service personnel using only identical replacement parts.
TROUBLESHOOTING
![]() WARNING: TO REDUCE THE RISK OF ELECTRIC SHOCK, UNPLUG BEFORE TROUBLESHOOTING.
WARNING: TO REDUCE THE RISK OF ELECTRIC SHOCK, UNPLUG BEFORE TROUBLESHOOTING.
| PROBLEM | POSSIBLE CAUSE | SOLUTION |
| The appliance does not work. | The socket is damaged. | Check if the socket has power. |
| The plug is not plugged into the wall outlet tightly. | Insert the plug into the power source and press the on/off switch button. | |
| Switch in the wrong position. | Press the ON button on the power head. | |
| Motor overheating protection during use. | Unplug the plug. check whether the the dust bag is full and the or exhaust filter is locked. Replace the dust bag or clean up the pre-filter or exhaust filter. wait for the motor to cool enough about 50 minutes before restarting it for use. | |
| Functional fault in the power cord. switch, or motor. | Have the damaged part checked by qualified personnel or contact the after sales helpline. | |
| Dust is escaping from the motor cover. | The exhaust filter is missing. damaged or not fully installed. | Ensure the exhaust filter is correctly installed or replace it if damaged. |
| The pre-filter is missing or damaged. | Ensure the pre-filter is correctly installed or replace if damaged. | |
| The air inlet filter is missing or damaged. | Ensure the air inlet filter iscorrectly installed or replace if damaged. | |
| The power cord cannot be retracted. | The power cord is stuck. | Release the power cord and retract it again. |
| The winding direction is reversed. | Winding in the exact direction | |
| Retract the power cord too fast. | Retract the power cord slowly. | |
| Low suction power and high operating noise / vibrations. | Dust bag is full. | Replace the dust bag. |
| Suction nozzle. hose. or tank inlet is blocked, | Check the suction nozzle. hose. and tank inlet for obstructions. | |
| The pre-filter or air inlet filter needs to be cleaned. | Check and clean the pre-filter andair inlet filter. Replace if damaged. | |
| The accessories such as hose. floor nozzle and extension wand or the power head are not installed into place. causing air leakage. | Install each part correctly. |
EXPLODED VIEW

PARTS LIST
| Part | Drawing Number | Description | Quantity |
| 1 | 551590101 | Exhaust Filter Door | 1.0 |
| 2 | 551590102 | NEPA filter | 1.0 |
| 3 | Power Head Assembly | 1.0 | |
| 4 | 551603102 | Latch assembly | 2.0 |
| 5 | 551590105 | Pre-Filter Assembly | 1.0 |
| 6 | 551603103 | Rear Wheel Assembly | 2.0 |
| 7 | Collection Tank | 1.0 | |
| 8 | 551590108 | Vacuum Port Assembly | 1.0 |
| 9 | 551137124 | Caster | 2.0 |
| 10 | 551590109 | Hose | 1.0 |
| 11 | 551590110 | Multi-Surface Floor Nozzle | 1.0 |
| 12 | 551004116 | Round Dust Brush | 1.0 |
| 13 | 551121144 | Extension Wand | 2.0 |
| 14 | 551004114 | Crevice Tool | 1.0 |
| 15 | 551590111 | Dust Collection Bag | 5.0 |
References
[xyz-ips snippet=”download-snippet”]