972697 VB-MAC Sewing Machine
11/2021-012/2Machines à coudre Sewing Machine NaaimachinesMáquinas de coser972697 VB-MAC
CONSIGNES D’UTILISATION INSTRUCTIONS FOR USE GEBRUIKSAANWIJZINGEN INSTRUCCIONES DE USO
………………..02 ………………..34 ………………..64 ………………..94
Merci !Merci d’avoir choisi ce produit VALBERG. Choisis, testés et recommandés par ELECTRO DEPOT, les produits de la marque VALBERG vous assurent une utilisation simple, une performance fiable et une qualité irréprochable. Grâce à cet appareil, vous savez que chaque utilisation vous apportera satisfaction. Bienvenue chez ELECTRO DEPOT. Visitez notre site Internet : www.electrodepot.frwww.electrodepot.beVOTRE AVIS COMPTE !PARTAGEZ VOTRE EXPERIENCE SUR LES PRODUITSParce que votre satisfaction est notre priorité, nous vous proposons de donner votre avis sur ce produit. Il sera transmis et analysé parnos équipes afin d’améliorer continuellement le produit. Donnez votre avis sur http://www.electrodepot.fr/avis-client
2
FR
Table des matières
A Aperçu de l’appareil B Utilisation del’appareilC Nettoyage et entretien
Composants Aperçu de l’appareil Utilisation prévue CaractéristiquesPrésentation de la machine Enfilage de la machine CoutureNettoyage et entretien Remplacement de la lampe de couture Dépannage Rangement
Les notices sont aussi disponibles sur le site http://www.electrodepot.fr/sav/notices/http://www.electrodepot.be/fr/sav/notices
3
FR
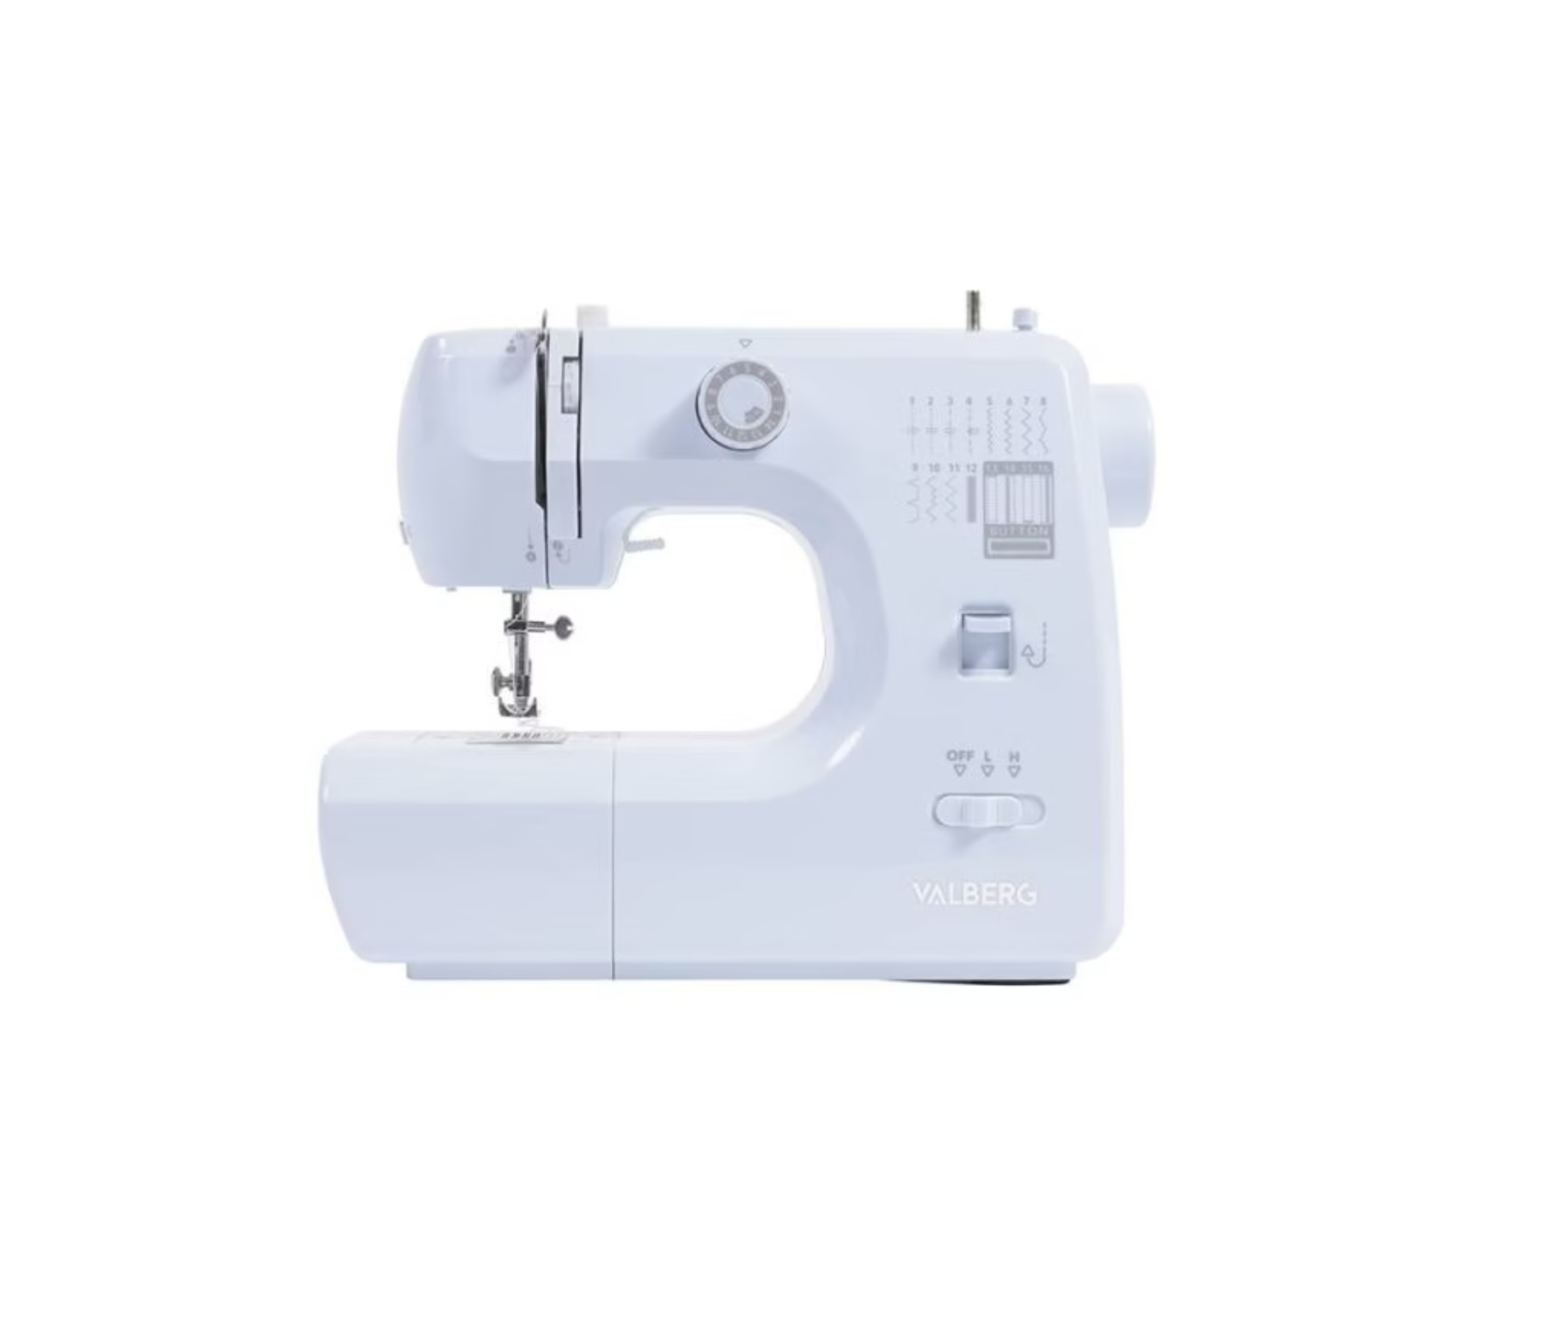
A Aperçu de l’appareilLISEZ ATTENTIVEMENT CETTE NOTICE D’UTILISATION, AINSI QUE LE LIVRET D’AVERTISSEMENTS RÉGLEMENTAIRES AVANT D’UTILISER CET APPAREIL. GARDEZ LES DEUX LIVRETS AFIN DE POUVOIR VOUS Y RÉFÉRER ULTÉRIEUREMENT.ComposantsVolant – il contrôle le mouvement du levier releveur de fil et de l’aiguille. Il peut être contrôlé automatiquement ou manuellement. Lorsque vous faites tourner le volant à la main, faites-le toujours tourner vers vous (dans le sens inverse des aiguilles d’une montre).Molette de sélection de motif utilisez la molette pour sélectionner le point souhaité pour la couture. La molette est numérotée de 1 à 16 et les numéros correspondent aux motifs de points indiqués sur le corps de la machine à coudre.Levier de marche arrière il inverse le sens de couture d’un point droit (point n° 1 à 4). Poussez simplement le levier complètement vers le bas et maintenez-le en place. Relâchez-le pour reprendre la couture vers l’avant.Bouton marche/arrêt et contrôle de vitesse il permet d’allumer ou d’éteindre la machine à coudre et de régler la vitesse. Sélectionnez « L » ou « H » (vitesse lente ou rapide) pour allumer la machine et régler la vitesse. Sélectionnez « OFF » (arrêt) pour éteindre la machine.Rallonge amovible avec compartiment à accessoires – elle offre une plus grande surface plane pour la couture. Elle peut être retirée pour accéder au bras libre afin de coudre des zones de tissu plus petites et difficiles à atteindre, telles que les ourlets de pantalon ou de manche. Elle est conçue avec un compartiment de rangement à l’intérieur afin de ranger les accessoires de la machine.Releveur de pied presseur utilisez ce levier pour relever et abaisser le pied presseur. Levez le releveur de pied presseur avant d’enfiler la machine ou pour retirer votre tissu de la machine, et abaissez-le avant de coudre.Bouton de la lumière et lampe de couture – ils s’utilisent pour éclairer la zone de couture.Coupe-fil il est intégré sur le côté de la machine pour plus de confort. Utilisez-le pour couper les bouts de fil rapidement et facilement après avoir terminé un point.Façade avant – elle abrite le levier releveur de fil, la lampe de couture, le mécanisme de tension et d’autres pièces.
4
FR
A Aperçu de l’appareilMolette de tension du fil elle vous permet de sélectionner la bonne tension pour votre point, votre fil et votre tissu. Les disques de tension, situés à l’intérieur de la machine, régulent la tension sur le fil supérieur. La molette de tension du fil est numérotée de 1 à 9. Plus le nombre est bas, plus la tension est faible sur le fil supérieur, et plus le nombre est élevé, plus la tension est grande. Les réglages 3, 4 et 5 sont marqués d’un petit carré autour du numéro pour indiquer la plage de réglage à laquelle la plupart de vos coutures seront effectuées.Levier releveur de fil il contrôle la quantité de fil supérieur fournie. La fente à enfilage automatique simplifie l’enfilage du levier releveur.Guide-fil il guide le fil du porte-bobine aux disques de tension ou à l’enrouleur de canette.Poignée de transport – elle est intégrée pour un transport facile de la machine.Enrouleur de canette il enroule le fil sur la canette pour l’utiliser comme fil inférieur.Butée d’enrouleur de canette – elle est utilisée dans le processus d’enroulage de la canette.Vis de fixation de l’aiguille – elle maintient l’aiguille dans la machine à coudre pour la couture.Aiguille elle est insérée dans la barre à aiguille. Elle contient le fil pour la couture.Support du pied presseur il est fixé à la barre du pied presseur. Il maintient le pied presseur en place pour la couture.Plaque à aiguille – elle est située sous la zone du pied presseur, autour des griffes d’entraînement. Elle fournit une surface plane pour le tissu pendant la couture.Bouton de déverrouillage du couvercle de la canette il est situé à droite du couvercle de la canette. Poussez le bouton vers la droite pour retirer le couvercle de la canette lors du remplacement de la canette.Couvercle de la canette (et boîtier de la canette à l’intérieur) il couvre la canette et le boîtier de la canette. Il est transparent, ce qui facilite le contrôle de l’alimentation en fil (inférieur) de la canette. Boîtier de la canette – il maintient fermement la canette et fournit une tension adéquate au fil de la canette pendant la couture.Griffes d’entraînement elles déplacent le tissu sous le pied presseur.
5
FR
A Aperçu de l’appareilPied presseur il maintient le tissu à plat contre les griffes d’entraînement. Utilisez le releveur de pied presseur pour abaisser le pied presseur (pour coudre) ou pour le relever (pour retirer le tissu).Vis du support du pied presseur elle est située à gauche du support du pied presseur. Elle maintient le support du pied presseur en place sur la barre du pied presseur.Levier de déverrouillage du pied presseur il est situé à l’arrière du support du pied presseur. Utilisez ce levier pour retirer le pied presseur du support du pied presseur.Barre du pied presseur elle maintient le support du pied presseur et le pied presseur. Elle se lève et s’abaisse à l’aide du releveur de pied presseur.Porte-bobine avec capuchon de porte-bobine – il maintient la bobine de fil en place avec le capuchon de porte-bobine, permettant au fil supérieur de se dérouler sans excès ou manque de tension . Le porte-bobine peut être utilisé horizontalement ou verticalement, selon la taille de la bobine de fil.Bobine de fil – elle maintient et fournit le fil supérieur aux disques de tension. Le schéma visible sur le dessus de la machine indique comment le fil supérieur doit passer à travers le guide-fil.Bras libre – il vous permet de coudre des ourlets de manche ou de pantalon, des encolures ou d’autres petites ouvertures dans les vêtements. Retirez la rallonge pour accéder au bras libre.Entrée de la pédale elle est située à l’arrière de la machine. Branchez la pédale à cette entrée avant de commencer à coudre.Entrée de l’adaptateur secteur elle est située à l’arrière de la machine. Branchez l’adaptateur secteur (fourni) à cette entrée.Pédale – elle est utilisée pour mettre en marche et arrêter la machine. Appuyez sur la pédale avec le pied pour commencer à coudre et retirez votre pied de la pédale pour arrêter la couture.Adaptateur secteur – l’une de ses extrémités se branche à l’entrée d’alimentation de la machine et l’autre se branche à la prise secteur.Bobine de fil x 2Canette x 2Enfile-aiguille x 1
6
FR
A Aperçu de l’appareil
Aiguille x 1 Pied pour boutonnière automatique x 1 Pied pour boutonnière x 1
Aperçu de l’appareil· Déballez l’appareil. Retirer toutes les étiquettes du produit. Veuillez vérifier son exhaustivité et s’il est en bon état. Si l’appareil est endommagé ou présente un dysfonctionnement, ne l’utilisez pas et rapportez-le à votre revendeur ou service après-vente.· Conservez tous les emballages hors de portée des enfants. Il existe un risque d’accident si les enfants jouent avec les matériaux d’emballage.Utilisation prévue· Cet appareil est destiné uniquement à un usage domestique et à la couture, comme décrit dans ce manuel d’utilisation. Il n’est pas conçu pour une utilisation industrielle ou commerciale. N’utilisez cet appareil qu’en intérieur et dans un endroit sec.· Toute autre utilisation est susceptible d’endommager l’appareil ou d’entraîner un incendie, un choc électrique ou des blessures.Caractéristiques
Modèle :Entrée de l’adaptateur secteur :Tension de fonctionnement de la machine à coudre :Consommation :
972697 VB-MAC 100-240 V CA, 50/60 Hz12 V CC, 2,0 A 24 W
7
FR
B Utilisation de l’appareilPrésentation de la machineMISE EN GARDE ! Avant d’ajouter ou de retirer des pièces de la machine à coudre, assurez-vous qu’elle est débranchée de l’alimentation secteur.Rallonge amovible avec compartiment à accessoires · Pour retirer la rallonge de la machine, tenez-la fermement et tirez-la vers la gauche.Une fois la rallonge retirée, vous aurez accès au bras libre. Ce réglage vous permet de coudre des ourlets de pantalon ou de manche, ainsi que d’autres zones de tissu difficiles à atteindre.
· La rallonge est conçue avec un compartiment à accessoires à l’intérieur afin de ranger les accessoires de la machine. Pour ouvrir le compartiment à accessoires, rabattez le couvercle vers le bas, comme illustré.· Pour remettre la rallonge en place, alignez-la avec le côté gauche de la machine et poussez-la jusqu’à ce qu’elle s’enclenche.
Branchement du cordon d’alimentation et de la pédale Cette machine à coudre est fournie avec un adaptateur secteur qui doit être branché à une prise secteur adaptée.
8
FR
B Utilisation de l’appareil1. Assurez-vous que le bouton marche/arrêt de la machine est réglé sur « OFF » (arrêt). 2. Branchez la pédale à l’entrée de la pédale à l’arrière de la machine, comme illustré. 3. Branchez le cordon de l’adaptateur secteur à l’entrée d’alimentation de la machine, puisbranchez l’adaptateur à une prise secteur adaptée. Veillez à ce que toutes les fiches soient fermement insérées.
ATTENTION ! · Utilisez uniquement l’adaptateur secteur (modèle : S030A1202000E) fourni aveccet appareil pour éviter tout risque lié à l’électricité et éviter d’endommager l’appareil. · Cet appareil ne doit être utilisé qu’avec la pédale (modèle : FPD-700) fournie.Mise en marche/arrêt · Pour mettre la machine en marche, réglez le bouton marche/arrêt sur la vitesse « L »ou « H » (vitesse lente ou rapide). · Pour éteindre et débrancher la machine, réglez le bouton marche/arrêt sur « OFF »(arrêt) et débranchez l’adaptateur secteur de la prise secteur. Retirez ensuite le cordon de l’adaptateur de la machine.MISE EN GARDE ! · Gardez les doigts éloignés de toutes les pièces mobiles. Une attentionparticulière est requise autour de l’aiguille de la machine à coudre et du coupe-fil. Évitez tout contact avec les pièces mobiles. · Pour éviter tout risque lié à l’électricité ou toute blessure, débranchez toujours la machine de la prise secteur immédiatement après l’utilisation, avant de la nettoyer ou de l’enfiler et avant d’ajouter ou de retirer des pièces.Aiguille, tissu et guide-fil Il existe différents styles d’aiguilles disponibles pour votre machine, selon le type de tissu que vous cousez. Assurez-vous d’utiliser le bon style et la bonne taille d’aiguille pour obtenir les meilleurs résultats pour vos projets de couture.
9
FR
B Utilisation de l’appareil
· Les styles d’aiguilles les plus courants sont les aiguilles à pointe ordinaire et à pointe arrondie. Les tailles les plus couramment utilisées sont : 11/80, 14/90 et 16/100. Plus le numéro de taille est petit, plus l’aiguille est petite. Plus le numéro de taille est grand, plus l’aiguille est grosse. Utilisez des aiguilles de plus petite taille pour les tissus plus légers et des aiguilles de plus grande taille pour les tissus plus lourds. Le tableau ci-dessous propose quelques suggestions pour faire correspondre le type de fil et le type d’aiguille avec divers tissus, pour de meilleurs résultats.· Les aiguilles à pointe ordinaire sont conçues pour être utilisées avec des tissus tissés, tels que le coton, le lin, la soie, le denim ou le sergé.· Les aiguilles à pointe arrondie sont conçues pour être utilisées avec des tissus en tricot extensible, tels que l’élasthanne, les mailles pour t-shirt ou les tricots.
Matières Types de matières Epaisseurs
Tissés
Tissus fins, organza, tulle, voileVoile, popeline, crêpe, taffetas, soies, coton, sous- vêtements, dentellesCrêpe, popeline, vichy, taffetas, satins, cotons et lainage d’habillement, chemisiers, blouses, robes, doublures, veloursLainage d’habillement, robes, jupes, manteaux, tweed, draps, linges, gabardines, salopettes, jeansGrosses toiles, lainages épais, couvertures, gabardines, manteaux, tissus d’habillement et d’ameublement, vêtements de travail, salopettes, jeans
Fines Mi-fines Moyennes Mi-épaissesépaisses
Type d’aiguille 130/705H 130/705H I30/705H130/705H-J130/705H-J
Diamètre de l’aiguille60- 70
Type de filCoton à coudre
Numéro d’étiquette120-100
70
Coton à coudre
100
80
Coton à coudre
100-60
80-90
Coton à coudre
80 -40
90-100
Coton à coudre
40
10
FR
B Utilisation de l’appareil
Cuirs souples
Daim, veau,
Cuirs, élastiques, imitations cuirs
chevreauSimili cuir, matières plastiques.
Type vinyle
I30/705H-LR 13O/7O5H-LR 130/705H-LL 130/705H-LL
Tricots, stretch
Toile cirée
130/705H-LL
Tricots, jerseys, sous- vêtementsJersey, velours stretch, interlock, tricots moyens, gaineJersey et stretch d’habillement, tricots grosses mailles bonneterie matières élastiques
Fines MoyennesMi-épaisses
I30/705H-S 130/705H-S130/705H-SUK
90-100 90-100 90-100 80-100 80-100 80-90 60-10060-80
Coton à coudre Coton à coudreCoton à coudreCoton à coudre Coton à coudre Coton à coudreCoton à coudre
60 60 60-4060-40 8080-90
Coton à coudre
90-100
Changement ou remplacement de l’aiguilleRemplacez régulièrement les aiguilles, surtout lorsqu’elles montrent des signes d’usure ou causent des problèmes. 1. Réglez le bouton marche/arrêt sur « OFF » (arrêt) et débranchez la machine de la prisesecteur. 2. Desserrez la vis du support d’aiguille en la faisant tourner dans le sens inverse desaiguilles d’une montre. 3. Retirez l’aiguille. Jetez-la si elle est pliée, usée ou endommagée. 4. Insérez la nouvelle aiguille avec le côté plat vers l’arrière de la machine, le plus hautpossible. 5. Serrez la vis de serrage de l’aiguille pour maintenir l’aiguille en place.
11
FR
B Utilisation de l’appareilLes aiguilles doivent être en parfait état. Des problèmes peuvent survenir avec : A. Des aiguilles tordues, B. Des pointes endommagées, C. Des aiguilles émoussées.Releveur de pied presseur Le releveur de pied presseur est situé à l’intérieur de la zone « C » de la machine. Utilisez ce levier pour relever et abaisser le pied presseur. · Avant d’enfiler la machine, levez toujours le releveur de pied presseur pour vous assurerque la machine peut être enfilée correctement. · Levez le releveur de pied presseur pour retirer le tissu de la machine lorsque la coutureest terminée. · Abaissez le releveur de pied presseur après avoir placé le tissu sous le pied presseurpour commencer à coudre.
Retrait et installation du pied presseur· Réglez le bouton marche/arrêt sur « OFF » (arrêt) et débranchez la machine de la prise secteur.· Faites tourner le volant vers vous (dans le sens inverse des aiguilles d’une montre) pour relever l’aiguille à sa position la plus haute.· Pour retirer le pied presseur : Levez le releveur de pied presseur. Appuyez sur le levier de déverrouillage du pied presseur, à l’arrière du support du pied presseur, pour libérer le pied presseur.
12
FR
B Utilisation de l’appareil· Pour installer le pied presseur : Levez le releveur de pied presseur. Placez le pied presseur en l’alignant sous le support du pied presseur. Abaissez le releveur de pied presseur jusqu’à ce que la découpe du support du pied presseur se trouve directement au-dessus de la broche. Le pied presseur s’enclenchera automatiquement.
Enfilage de la machineLa canette se trouve au bas de votre machine et fournit le fil inférieur pour vos points. Cette machine à coudre utilise des canettes métalliques. Le boîtier de la canette est magnétisé. C’est en utilisant la canette métallique que la tension correcte peut être obtenue pour le fil de canette. Utilisez toujours des canettes métalliques de type 15K.
Important : Utilisez uniquement des canettes métalliques dans cette machine à coudre. La tension du fil de canette est obtenue magnétiquement. Par conséquent, une canette métallique est nécessaire. L’utilisation de canettes transparentes ou en plastique, même si elles semblent s’insérer dans la machine, ne permettra pas à la machine de fonctionner correctement et les points obtenus ne seront pas satisfaisants. L’utilisation de canettes métalliques permettra d’obtenir des point corrects.Enroulage de la canette 1. Assurez-vous que le bouton marche/arrêt est réglé sur « OFF » (arrêt). 2. Insérez la base de la bobine, la bobine de fil et le capuchon du porte-bobine sur le porte-bobine.
13
FR
B Utilisation de l’appareil3. Le fil doit être orienté vers l’arrière de la bobine. Assurez-vous que, lorsque vous tirez le fil depuis la gauche, la bobine de fil tourne dans le sens inverse des aiguilles d’une montre, comme illustré.4. Faites passer le fil en dessous de la fente située à droite du guide-fil puis à travers, enroulez le fil autour du guide de tension et tirez le fil vers la droite, comme illustré.5. Faites passer le fil dans un trou supérieur de la canette, de l’intérieur vers l’extérieur. Placez ensuite la canette sur l’enrouleur de canette et enfoncez-la pour l’enclencher.6. Poussez fermement l’enrouleur de canette et la canette vers la droite, contre la butée de l’enrouleur de canette.
14
FR
B Utilisation de l’appareil7. Tenez l’extrémité du fil et appuyez sur la pédale pour enrouler quelques tours sur la canette. Retirez votre pied de la pédale pour arrêter l’enroulage. Relâchez l’extrémité du fil et coupez-le près du haut de la canette.8. Appuyez à nouveau sur la pédale pour continuer à enrouler la canette. L’enroulage s’arrête automatiquement lorsque la canette est pleine. Vous pouvez aussi arrêter l’enroulage lorsque vous avez enroulé suffisamment de fil pour votre projet.9. Retirez votre pied de la pédale pour arrêter la machine. 10. Poussez l’enrouleur de canette vers la gauche, coupez le fil et retirez la canette enfilée.
Insertion de la canette1. Assurez-vous que le bouton marche/arrêt est réglé sur « OFF » (arrêt). 2. Poussez le bouton de déverrouillage du couvercle de la canette vers la droite pour retirerle couvercle. 3. Tenez la canette avec le fil se déroulant dans le sens inverse des aiguilles d’une montreet placez-la dans le boîtier de la canette.
4. Tirez sur l’extrémité du fil pour vous assurer que la canette tourne dans le sens inverse des aiguilles d’une montre. Si la canette tourne dans le sens des aiguilles d’une montre, la position est incorrecte. Retirez la canette, retournez-la et insérez-la à nouveau dans le boîtier de la canette. Tirez sur l’extrémité du fil pour vérifier une fois de plus.
15
FR
B Utilisation de l’appareil
5. Suivez les sections suivantes pour enfiler le fil supérieur et tirer le fil de la canette.Enfilage du fil supérieur L’enfilage du fil supérieur est un processus simple, mais il doit être réalisé correctement pour obtenir des résultats de couture corrects. Suivez les étapes ci-dessous et consultez les schémas numérotés pour l’enfilage supérieur, qui sont indiqués sur votre machine.
2
1
4
5
3
6
1. Réglez le bouton marche/arrêt sur « OFF » (arrêt) et débranchez la machine de la prise secteur.2. Relevez l’aiguille à la position la plus haute en faisant tourner le volant vers vous (dans le sens inverse des aiguilles d’une montre) et continuez à le faire tourner jusqu’à ce que l’aiguille commence juste à descendre.
3. Levez le releveur de pied presseur pour relâcher la tension de la machine.
16
FR
B Utilisation de l’appareilImportant : Si le releveur de pied presseur n’est pas levé avant l’enfilage, cela entraînera un bourrage de fil sous le tissu lorsque vous commencerez à coudre.4. Levez le porte-bobine et insérez la base de la bobine, la bobine de fil et le capuchon du porte-bobine. Le fil doit être orienté vers l’arrière. Tirez légèrement sur le fil depuis la gauche pour vous assurer que la bobine de fil tourne dans le sens inverse des aiguilles d’une montre, comme illustré.· Si la bobine de fil est suffisamment petite, le porte-bobine peut être abaissé en position horizontale.Remarque : Si la bobine de fil est dotée d’une fente à une extrémité, placez cette extrémité sur la droite pour éviter que le fil ne s’y coince pendant la couture. · Si la bobine de fil est grande et ne peut pas s’insérer sur le porte-bobine en position horizontale, soulevez le porte-bobine pour le mettre en position verticale. Lorsque vous utilisez la position verticale, desserrez légèrement le couvercle de la bobine ou retirez-le complètement du porte-bobine, afin qu’il n’empêche pas la bobine de tourner pendant la couture.5. Tout en tenant fermement la bobine de fil sur le porte-bobine de la main droite, commencez à enfiler le fil supérieur de la main gauche comme suit :1) Passez le fil en dessous de la fente située à droite du guide-fil puis à travers, et enroulez le fil autour du guide de tension, comme illustré.
17
FR
B Utilisation de l’appareil2) Tirez le fil vers le bas et insérez-le dans la rainure à droite de la façade avant pour faire passer le fil entre les disques de tension.3) Faites un demi-tour autour du bas de la façade.
4) Faites passer le fil à travers le levier releveur de fil, de droite à gauche. Si vous ne voyez pas le levier releveur de fil, faites tourner le volant vers vous (dans le sens inverse des aiguilles d’une montre) pour lever le levier releveur jusqu’à la position la plus élevée.5) Faites passer le fil dans le guide-fil audessus de l’aiguille.6) Enfilez ensuite le fil dans le chas de l’aiguille, de l’avant vers l’arrière.
Tirage du fil de la canette (fil inférieur)Après avoir enfilé le fil supérieur et inséré la canette, le fil de la canette doit être tiré avant de commencer à coudre. 1. Assurez-vous que le bouton marche/arrêt est réglé sur « OFF » (arrêt) et que la machineest débranchée de la prise secteur. 2. Levez le releveur de pied presseur (1). 3. Pour ouvrir le couvercle de canette, poussez le bouton de déverrouillage du couverclede canette vers la droite (2).
18
FR
B Utilisation de l’appareil
4. Insérez la canette enfilée dans le boîtier de la canette, en laissant l’extrémité du fil surla gauche. Assurez-vous que, lorsque vous tirez le fil depuis la gauche, la canette tourne dans le sens inverse des aiguilles d’une montre (3).5. Tenez le fil supérieur de la main gauche et faites tourner le volant vers vous (dans le sens inverse des aiguilles d’une montre) de la main droite pour abaisser l’aiguille (4) (5).Continuez à le faire tourner jusqu’à ce que l’aiguille remonte à la position la plus haute.6. Tirez le fil supérieur vers le haut pour tirer le fil de la canette à travers la plaque à aiguille (6).7. Tirez les deux fils à travers la plaque à aiguille et placez-les sous le pied presseur vers l’arrière de la machine, en laissant environ 15 cm de fil qui dépasse pour les deux fils (7).8. Fermez le couvercle de la canette (8).
(1)
(2)
(3)
(4)
(5)
(6)
(7)
(8)
Tension du fil Après avoir sélectionné la bonne combinaison d’aiguille et de fil pour le tissu utilisé, il peut être nécessaire d’ajuster la tension de la machine à coudre pour garantir le bon équilibre des points. Un point est bien équilibré lorsque les fils supérieur et inférieur semblent identiques sur le tissu. Votre machine est équipée d’une molette de tension du fil réglable. Elle permet d’exercer une tension sur les fils supérieur et inférieur lorsqu’ils passent dans la machine pour former un point.Trop de tension produira un point serré qui causera une plissure du tissu.Trop peu de tension produira un point lâche.Lorsqu’une tension uniforme est exercée sur les deux fils, un point régulier, soit bien équilibré, est obtenu.La molette de tension du fil de la machine est numérotée de 1 à 9, et les réglages 3, 4 et 5 sont marqués d’un petit carré autour du numéro pour indiquer la plage de réglage dans laquelle la plupart de vos coutures seront effectuées.
19
FR
B Utilisation de l’appareilComment fonctionne la tension ? Pour vous aider à comprendre l’effet de la tension sur le tissu et le fil, essayez ce test simple.Prenez 2 morceaux d’un tissu tissé de poids moyen et de couleur unie et claire, d’environ 15 cm de long. Placez une aiguille de taille 14 dans la machine. Enfilez le haut de la machine avec un fil tout usage (couleur plus foncée) et placez le même type de fil (couleur plus claire) dans la canette. Réglez la machine sur le point n° 3, l’une des options de point droit. Cousez les deux morceaux de tissu ensemble en commençant avec un réglage de tension du fil supérieur égal à 1. Tout en cousant, faites lentement tourner la molette de tension de 1 à 9. Cousez une autre rangée en ramenant la molette sur 1. Vous devriez voir un point équilibré sur chaque rangée à mi-chemin entre le début et la fin. Les fils de couleurs différentes vous permettront de voir l’effet de la tension sur les fils supérieur et inférieur.
Trop de tension
Pas assez de tension
Points bien équilibrés
Test de tensionPour vérifier que le fil supérieur est bien enfilé dans les disques de tension, faites ce test simple : 1. Avec le pied presseur relevé et le fil retiré de l’aiguille, tirez le fil vers l’arrière de la machine.Vous ne devriez détecter qu’une légère résistance et peu ou pas de déviation de l’aiguille. 2. Abaissez maintenant le pied presseur et tirez à nouveau le fil vers l’arrière de la machine.Cette fois, vous devriez détecter une résistance considérable et beaucoup plus de déviation de l’aiguille. Si vous ne détectez pas de résistance, cela signifie que vous n’avez pas enfilé correctement la machine et que vous devez l’enfiler à nouveau.
20
FR
B Utilisation de l’appareil
Couture
Types de tissus adaptés à la couture
Caractéristiques de couture
Caractéristiques du tissuOrdinaire Épais Fin Dur Doux
Tissu Coton/Lin Soie/Laine Polyester Élastique
Caractéristiques de couture : = Facile à coudre = Difficile à coudre = Ne favorise pas une couture fluide
REMARQUE :1. Définition de l’épaisseur du tissu : Fin : Épaisseur de deux couches de tissu = < 0,35 mm. Épais : Épaisseur de deux couches de tissu = > 0,8 mm. Ordinaire : Épaisseur de deux couches de tissu = 0,35 mm et 0,8 mm.2. Définition du tissu élastique : Si un tissu de taille « 100 mm × 30 mm » est extensible jusqu’à 106 mm ou plus sous une force de tension de 0,5 kg, le tissu est défini comme élastique, sinon il est inextensible.3. Textures de tissu : Doux : Tissus tels que serviettes, plumeaux, etc. Dur : Tissus tels que jeans, toile fine, etc.
Choix d’un motif de pointUtilisez la molette de sélection de motif pour choisir le motif de point souhaité. Les chiffres sur la molette correspondent directement aux motifs imprimés sur le devant de la machine. Faites simplement tourner la molette jusqu’à ce que le numéro de point souhaité s’aligne avec le point rouge sur la molette.
N° du point 1
Nom du point Point droit court
UtilisationPour coudre des tissus légers
Pied recommandé Pied tout usage
21
FR
B Utilisation de l’appareil
2
Point droit moyen
Pour coudre des tissus de poids moyen
Pied tout usage
3
Point droit long
Pour coudre des tissus plus lourds
Pied tout usage
4
Point droit en position gauche
Surpiqûre
Pied tout usage
Pour la couture
5
Point zigzag satin d’appliqués et la couture Pied pour point satin*
décorative
Pour la finition des
6
Point zigzag court coutures, la couture
Pied pour point satin*
décorative
Pour la finition des
7
Point zigzag moyen coutures, la couture
Pied pour point satin*
décorative
Pour la finition des
8
Point zigzag long coutures, la couture
Pied pour point satin*
décorative
9
Ourlet invisible
Pour des ourlets sur des tissus tissés; la couture décorative
Pied pour ourlet invisible*
10
Pour des ourlets sur des Ourlet invisible long tissus tissés; la couturedécorative
Pied pour ourlet invisible*
11
Ourlet invisible extensible
Pour des ourlets sur des tricots extensibles; la couture décorative
Pied pour ourlet invisible*
12
Point zigzag multiple
Pour le raccommodage, l’insertion d’élastique, la couture décorative
Pied pour point satin*
13
Couture des boutonnières
1re étape de couture d’une boutonnière
14
Couture des boutonnières
2e étape de couture d’une boutonnière
Pied pour boutonnière
15
Couture des boutonnières
3e étape de couture d’une boutonnière
16
Couture des boutonnières
4e étape de couture d’une boutonnière
22
FR
B Utilisation de l’appareil* Remarque : Vous pouvez réaliser ce point avec le pied tout usage, cependant vous obtiendrez un meilleur résultat avec le pied spécifique mentionné ( non fourni ).Point droit Le point droit est le point le plus fréquemment utilisé pour tous les types de couture. 1. Pour commencer à coudre, levez d’abord le releveur de pied presseur. 2. Tirez le fil supérieur et le fil de canette sous le pied-presseur vers l’arrière de la machine,en laissant un surplus de fil d’environ 15 cm à l’extrémité du fil. 3. Placez le tissu sous le pied presseur, puis abaissez le releveur de pied presseur. 4. Faites tourner le volant vers vous (dans le sens inverse des aiguilles d’une montre) jusqu’àce que l’aiguille pénètre dans le tissu. 5. Démarrez la machine en appuyant sur la pédale. Guidez le tissu avec vos mains. Lorsquevous atteignez le bord du tissu, arrêtez la machine à coudre.ATTENTION ! Ne tirez pas et ne poussez pas le tissu pendant la couture, car cela pourrait faire dévier l’aiguille et la casser.6. Faites tourner le volant vers vous (dans le sens inverse des aiguilles d’une montre) jusqu’à ce que l’aiguille soit dans la position la plus haute, puis levez le releveur de pied presseur.7. Tirez le tissu vers l’arrière et coupez l’excédent de fil avec le coupe-fil, situé sur le côté de la machine.Point inverse Les points inverses se font généralement au début et à la fin d’une couture. Le but est de bloquer les fils aux deux extrémités de la couture afin qu’elle ne se défasse pas. · Réglez la molette de sélection de motif sur un point droit (point n° 1 à 4), selon le tissuque vous cousez. · Placez le tissu sous le pied presseur, juste au niveau de l’intérieur des bords brutssupérieurs du tissu. · Abaissez le pied presseur et cousez environ 3 points. · Arrêtez de coudre, puis maintenez le levier de marche arrière, situé à l’avant de la machine,appuyé. Maintenez-le appuyé pendant que vous cousez 3 points en sens inverse.Remarque : La longueur du point lors de la couture en marche arrière est préréglée, quel que soit le point sélectionné.· Relâchez le levier de marche arrière et cousez à nouveau vers l’avant, jusqu’à atteindre l’extrémité opposée du tissu.· Maintenez le levier de marche arrière appuyé pour coudre à nouveau en arrière sur environ 3 points.· Relâchez le levier pour coudre à nouveau vers l’avant jusqu’au bout du tissu. · Levez le releveur de pied presseur, puis retirez le tissu de la machine.
23
FR
B Utilisation de l’appareil
Coupage du filPour couper les extrémités de fil, tenez le tissu dans votre main gauche. Ramenez le fil depuis l’arrière de la machine, puis placez les extrémités de fil dans le coupe-fil sur le côté de la machine. Tirez vers le bas jusqu’à ce que les fils soient coupés.
fabric
Point zigzag Le point zigzag peut être utilisé pour la finition des coutures, les appliqués ou la couture décorative.Finition des coutures Les bords des coutures soutiennent le vêtement et doivent bénéficier d’une finition durable, en particulier si le tissu est susceptible de s’effilocher. Il existe deux manières différentes de parfaire les coutures : Couper après avoir cousu le bord de la couture ou réaliser un surjet. Essayez d’abord ces techniques sur une chute de tissu pour déterminer celle qui convient à votre projet.
24
FR
B Utilisation de l’appareil1. Finition de couture sur-bordée · Réglez la machine sur le point n° 5 ou 6 et fixez le pied pour point satin (non fourni). · Cousez, avec le côté droit du point au bord de la couture. Coupez les bords de coutureuniformément.
2. Couture décorative Vous pouvez ajouter une touche personnelle ou embellir vos projets avec des fils décoratifs. Mélangez différents types et différentes couleurs de fil pour créer des finitions semblables à des bordures sur les vêtements, les articles de décoration intérieure, les projets manuels et plus encore. · Réglez la machine sur les points n° 7 ou n° 8, selon le style recherché. · Fixez le pied pour point satin (non fourni). · Si vous utilisez un fil plus épais (comme du fil de surpiqûre), assurez-vous également dechanger l’aiguille pour une aiguille de taille plus grande.Appliqué Les appliqués s’effectuent en cousant des morceaux de tissu de certaines formes sur un tissu de base afin de former un dessin ou un motif. Cette technique offre des possibilités de création illimitées.1. Préparation de l’appliqué · Appliquez une bande thermocollante avec un dos en papier sur l’envers du tissu del’appliqué, en suivant les recommandations du fabricant. · Dessinez la forme de l’appliqué, puis découpez cette forme dans le tissu qui a été fusionnéà la bande thermocollante. · Retirez le papier au dos de la bande. Positionnez l’appliqué sur le tissu de base, puisfusionnez-les pour les maintenir en place.2. Couture de l’appliqué · Réglez la machine sur le point n° 5, le point zigzag satin. · Pour coudre l’appliqué, cousez de manière à ce que le côté droit du point tombe du bordextérieur de l’appliqué, en enfermant le bord brut du tissu. Le côté gauche du point entre dans le tissu d’appliqué.
25
FR
B Utilisation de l’appareil
Ourlet invisibleLe point d’ourlet invisible est principalement utilisé pour créer des ourlets presque invisibles sur divers types de projets, tels que des rideaux, des pantalons, des jupes, etc. Il existe deux sélections différentes de point d’ourlet invisible sur la machine : le point d’ourlet invisible standard (pour les ourlets sur les tissus tissés) et le point d’ourlet invisible extensible (pour les ourlets sur les tissus extensibles). 1. Réglez la machine sur le point n° 9 pour le point d’ourlet invisible standard ou réglez lamachine sur le point n° 11 pour le point d’ourlet invisible extensible. 2. Fixez le pied à ourlet invisible (non fourni). 3. Insérez l’aiguille adaptée au tissu à ourler ( « Aiguille, tissu et guide-fil »). 4. Enfilez le haut de la machine et la canette avec une couleur de fil qui correspond ou sefond le plus possible à la couleur de l’article à ourler. 5. Pliez et épinglez le tissu, comme illustré (1). 6. Placez le tissu sous le pied presseur pour ourlet invisible (non fourni) avec le pli du tissupositionné de manière à ce que l’aiguille ne perce le pli que lorsque l’aiguille passe à gauche. Assurez-vous de retirer les épingles à mesure que vous cousez (2). 7. Lorsque vous avez terminé, rabattez l’ourlet et appuyez (3).
Under side
Under side
Top side
Point zigzag multiple Le point zigzag multiple est un point très polyvalent. Utilisez-le pour un raccommodage, une insertion d’élastique ou simplement comme embellissement décoratif.Réparation d’une déchirure · Réglez la machine sur le point n° 12 et fixez le pied pour point satin (non fourni). · Coupez les fils lâches de la zone déchirée. · Pour renforcer la zone déchirée, placez une sous-couche d’entoilage ou une petite chutede tissu (d’un type de tissu et d’une couleur similaires) sous la déchirure. · En travaillant à partir du côté droit, rapprochez les bords de la déchirure, puis cousez-les. · Utilisez une aiguille de couture à la main pour tirer les fils du mauvais côté, puis nouez-les et coupez-les. · Coupez le surplus de sous-couche.
26
FR
B Utilisation de l’appareilInsertion d’un élastique Il est facile d’insérer un élastique avec le point zigzag multiple. L’élasticité de ce point empêche les points de casser lorsque l’élastique est étiré. · Réglez la machine sur le point n° 12 et fixez le pied pour point satin (non fourni). · Si vous réparez un vêtement avec un élastique cassé, retirez d’abord l’ancien élastiquedu vêtement, puis appuyez. · Divisez l’élastique et la zone du vêtement où l’élastique sera cousu en quatre parties.Placez une épingle au niveau de ces quatre parties sur l’élastique et sur le vêtement. · Tirez doucement sur l’élastique pour couvrir le tissu uniformément pendant que vouscousez. Couture de boutonnière manuelle 1. Fixez le pied pour boutonnière. 2. Placez le tissu sous le pied pour boutonnière et abaissez le pied sur le tissu à l’endroitoù vous devez coudre la boutonnière. 3. Sélectionnez le point n° 13. Appuyez sur la pédale pour coudre 5 à 6 points à vitesse lente,puis relâchez la pédale pour arrêter (Fig. a).Fig.a4. Sélectionnez le point n° 14. Appuyez sur la pédale pour coudre une longueur de points adéquate sur le tissu, puis relâchez la pédale. Assurez-vous que le point est droit. (Fig.b).Fig.b5. Sélectionnez le point n° 15. Appuyez sur la pédale pour coudre 5 à 6 points à vitesse lente, puis relâchez la pédale (Fig. c).Fig.c
27
FR
B Utilisation de l’appareil6. Levez le releveur de pied presseur et faites pivoter le tissu de 180° (Fig. d).Fig.d180°7. Sélectionnez le point n° 16. Abaissez le releveur de pied presseur et appuyez sur la pédale pour finir de coudre la boutonnière. (Fig. e).Fig.e
28
FR
C Nettoyage et entretienNettoyage et entretien MISE EN GARDE ! · Mettez toujours l’appareil hors tension et débranchezle de la prise secteur avant de le nettoyer. · Pour éviter tout risque lié à l’électricité, n’immergez jamais l’appareil, le cordon ou la fiche d’alimentation ou la pédale dans l’eau ou tout autre liquide. Ne les rincez jamais sous le robinet. Important : N’utilisez pas de solvants, de produits de nettoyage chimiques ou abrasifs, de brosses métalliques, d’objets pointus ou de tampons à récurer pour nettoyer l’appareil.· Nettoyez la machine avec un chiffon doux et sec. · Ouvrez le couvercle de la canette, sortez la canette et utilisezune petite brosse pour nettoyer le boîtier de la canette. Fermez à nouveau le couvercle. · N’exposez pas la machine à des températures élevées. · Ne faites pas tomber la machine. · Changez les accessoires comme décrit dans ce manuel d’utilisation. · Assurez-vous toujours que les accessoires sont installés correctement avant de brancher la machine. Remplacement de la lampe de coutureDANGER ! Avant de remplacer la lampe de couture, débranchez la machine de la prise secteur pour éviter tout choc électrique.
29
FR
C Nettoyage et entretien1. Débranchez la machine de la prise secteur. 2. Desserrez la vis à l’arrière du capot avant, comme illustré. 3. Refermez le capot avant. 4. Observez les branchements + et de la lampe LED, puis retirez-la. 5. Remplacez la lampe LED par une lampe de même type nominal ( 0,6 W et tensions LED3,2 V, LED 5 mm). 6. Fermez le capot avant et serrez la vis.
Dépannage Suivez ce guide de dépannage pour résoudre les problèmes courants. Si le problème persiste, arrêtez d’utiliser l’appareil et contactez un centre de réparation agréé pour le faire inspecter ou réparer.
30
FR
C Nettoyage et entretien
Problème Pas de courant ou la machine fonctionne au ralenti. Saut de point.Le fil de canette ne peut pas être tiré.Le fil ne cesse de casser.Points trop lâches ou irréguliers. L’aiguille casse.
Cause possible· L’adaptateur secteur n’est pas adapté.
Solution· Utilisez l’adaptateur secteur fourni avec cet appareil.
· Aiguille mal insérée. · L’aiguille est tordue. · Le pied presseur esttrop lâche.· La canette est vide. · L’aiguille est malenfilée.· L’aiguille est tordue. · La tige de l’aiguillen’est pas bien en place. · La molette de tension du fil, le guide-fil ou la barre de tirage du fil sont trop serrés.· La tension des points est déséquilibrée.· L’aiguille est tordue ou déformée.
· Retirez et réinsérez l’aiguille avec le côté plat vers l’arrière.· Remplacez-la par une nouvelle aiguille. · Resserrez le pied presseur. · Remplacez-la par une canette pleine. · Enfilez à nouveau l’aiguille de l’avantvers l’arrière. · Remplacez-la par une nouvelle aiguille. · Remplacez-la par une nouvelle aiguille. · Relâchez la tension du fil ensélectionnant un nombre compris entre 3 et 5.· Enfilez à nouveau le fil supérieur et le fil de canette.· Remplacez-la par une nouvelle aiguille.
Pourquoi le fil fait-il des boucles ou des plis sous mon tissu ?Lorsque le fil fait des boucles sous votre tissu, c’est en général à cause d’un mauvais enfilage et une mauvaise tension du fil supérieur. Dans ce cas, suivez ces étapes : 1. Avec le releveur de pied presseur levé et la molette de tension du fil réglée sur 4, enfilez ànouveau le fil supérieur en respectant les schémas d’enfilage sur votre machine : Placez la bobine de fil sur le porte-bobine et fixez-la avec le capuchon de bobine de fil. Tout en maintenant la bobine de fil en place avec la main droite, utilisez la main gauche pour tenir le fil et faites-le passer à travers le guide-fil, puis suivez le chemin du fil en faisant descendre le fil dans le canal de tension, autour du bas de la machine et vers le haut de l’autre côté. Continuez à enfiler la machine, mais n’enfilez pas le fil dans l’aiguille. 2. Avant d’enfiler le fil dans l’aiguille, effectuez ce test simple pour vous assurer que le fil supérieur est correctement enfilé. Pendant que le pied presseur est levé, tirez sur le fil. Il devrait être facile à tirer. Abaissez ensuite le pied presseur. Le fil doit maintenant résister lorsque vous le tirez. Il devrait y avoir une augmentation significative de la tension du fil. S’il n’y a pas plus de tension, l’enfilage du fil supérieur est incorrect. Essayez à nouveau ( « Enfilage du fil supérieur »).
31
FR
C Nettoyage et entretienPourquoi ma machine saute-t-elle des points ? Des points peuvent être sautés si les aiguilles sont émoussées ou endommagées, ou si elles sont mal insérées dans la machine. · Tout d’abord, vérifiez si l’aiguille est émoussée ou endommagée et remplacez-la sinécessaire. Assurez-vous également que vous utilisez la bonne taille d’aiguille pour le type de tissu à coudre ( « Aiguille, tissu et guide-fil »). · Ensuite, vérifiez que l’aiguille est correctement insérée. L’aiguille doit être poussée le plus haut possible. Il est facile d’insérer l’aiguille à mi-chemin, de la serrer et de penser qu’elle est correctement installée. De plus, le côté plat de l’aiguille doit être positionné vers l’arrière. Si l’aiguille n’est pas correctement insérée, elle ne pourra pas tirer le fil de la canette, ce qui provoquera des sauts de points.Rangement· Débranchez toujours l’appareil de la prise de courant avant de le ranger.· Rangez l’appareil dans un endroit frais, sec et propre, hors de la portée des enfants et des animaux domestiques.· Veuillez conserver l’emballage pour ranger votre appareil lorsque vous ne l’utilisez pas sur une plus longue période.
32
FR
33
FR
Thank you!Thank you for choosing this VALBERG product. VALBERG products are chosen, tested, and recommended by ELECTRO DEPOT, so you can be sure you are getting a top-quality, easy-to-use product that won’t let you down. We’re confident your new device will be a pleasure to use every day!Welcome to ELECTRO DEPOT.
34
EN
Table of Contents
A Product overview B Product usage C Cleaning andmaintenance
Parts Product overview Intended use SpecificationsMachine overview Threading the machine SewingCleaning and maintenance Replacing the sewing light Troubleshooting Storage
35
EN
A Product overviewBEFORE USING THE UNIT, CAREFULLY READ BOTH THIS MANUAL AND THE REGULATORY WARNINGS BOOKLET. KEEP BOTH BOOKLETS FOR FUTURE REFERENCE.PartsHandwheel – Controls the movement of the take-up lever and needle. It can be controlled automatically or manually. When turning the handwheel by hand, always turn it towards you (anticlockwise).Stitch selection dial – Use the dial to select the desired stitch type. The dial is numbered 1 to 16 and the numbers correspond to the various stitches indicated on the body of the sewing machine.Reverse lever – Reverses the sewing direction of a straight stitch (stitches 1 to 4). Simply push the lever all the way down and hold it in place. Release it to resume sewing forwards.On/off and speed control switch – Used to turn the sewing machine on or off and to adjust the speed. Select “L” or “H” (low or high speed) to turn on the machine and adjust the speed. Select “OFF” to turn off the machine.Removable extension with accessory compartment – Provides a larger flat sewing surface. It can be removed to access the free arm for sewing smaller, hard-to-reach areas of fabric, such as trouser or sleeve hems. It has been designed with a built-in storage compartment to store machine accessories.Presser foot lifter – Use this lever to raise and lower the presser foot. Raise the presser foot lifter before threading the machine or removing your fabric from the machine, and lower it before sewing.Light button and sewing light – Used to illuminate the sewing area.Thread cutter – It is built onto the side of the machine for added convenience. Use it to quickly and easily cut thread ends after completing a stitch.Front panel – Houses the thread take-up lever, sewing light, tension mechanism and other parts.Thread tension dial – Lets you select the correct tension for your stitch, thread and fabric. The tension discs, located inside the machine, regulate the tension on the upper thread. The thread tension dial is numbered 1 to 9. The lower the number, the lower the tension on the upper thread, and the higher the number, the greater the tension. Settings 3, 4 and 5 are marked with a small square around the number to indicate the adjustment range at which most of your stitches will be made.
36
EN
A Product overviewThread take-up lever – Controls the amount of upper thread supplied. The selfthreading slot makes it easier to thread the take-up lever. Thread guide – Guides the thread from the spool pin to the tension discs or bobbin winder.Carry handle – It is built in to make the machine easy to transport.Bobbin winder – Winds the thread onto the bobbin for use as the lower thread.Bobbin winder stopper – This is used during the bobbin-winding process.Needle clamp screw – Secures the needle in the sewing machine for sewing purposes.Needle – It is inserted into the needle bar. It contains the sewing thread.Presser foot holder – This is attached to the presser foot bar. It keeps the presser foot in place for sewing. Throat plate – This is located under the presser foot area, around the feed dogs. It provides a flat sewing surface for the fabric. Bobbin cover release button – This is located to the right of the bobbin cover. Push the button to the right to remove the bobbin cover when replacing the bobbin. Bobbin cover (and bobbin case inside) – It protects both the bobbin and bobbin case. It is transparent, which makes it easy to check the bobbin’s (lower) thread feed. Bobbin case – Securely holds the bobbin and keeps the bobbin thread taut whilst sewing.Feed dogs – Move the fabric under the presser foot.Presser foot – Keeps the fabric flat against the feed dogs. Use the presser foot lifter to lower the presser foot (for sewing) or raise it (to remove the fabric). Presser foot holder screw – This is located to the left of the presser foot holder. It secures the presser foot holder in place on the presser foot bar. Presser foot release lever – This is located at the rear of the presser foot holder. Use this lever to remove the presser foot from the presser foot holder.
37
EN
A Product overviewPresser foot bar – Secures the presser foot support and presser foot. It can be raised and lowered via the presser foot lifter. Spool pin with spool cap – Secures the spool of thread in place by means of the spool cap, thus allowing the upper thread to unwind without too much or little tension. The spool pin can be used horizontally or vertically, depending on the size of the spool of thread. Spool of thread – Holds and feeds the upper thread to the tension discs. The diagram on the top of the machine indicates how the upper thread should pass through the thread guide. Free arm – Allows you to sew sleeve or trouser hems, necklines or other small openings in clothing. Remove the extension to access the free arm. Foot control input – Located at the back of the machine. Connect the foot control to this input before starting to sew. AC adapter input – Located on the back of the machine. Connect the AC adapter (supplied) to this inlet. Foot control – Used to start and stop the machine. Press down on the pedal with your foot to start sewing and take your foot off the pedal to stop sewing. AC Adapter – One end plugs into the machine’s power inlet and the other plugs into the mains socket.2 x spools of thread2 x bobbins1 x needle threader1 x needle1 x automatic buttonhole foot1 x buttonhole foot
38
EN
A Product overview
Product overview· Unpack the product. Remove all the labels from the product. Check that it is complete and in a good condition. If the unit is damaged or faulty, do not use it and take it to your retailer or after-sales service centre.· Keep all packaging out of the reach of children. There is a risk of accidents if children play with packaging materials.Intended use· This unit is intended exclusively for domestic sewing purposes, as described in this user manual. It has not been designed for industrial or commercial use. Only use this unit indoors, in a dry place.· Any other use may damage the unit or result in fire, an electric shock or injury.Specifications
Model: AC adapter input: Sewing machine operating voltage: Power consumption:
972697 VB-MAC 100-240 V~ AC, 50/60 Hz12 V DC, 2.0 A 24 W
39
EN
B Product usageMachine overviewCAUTION! Before adding or removing parts from the sewing machine, make sure that it has been unplugged from the mains power.Removable extension with accessory compartment · To remove the extension from the machine, firmly grasp hold of it and pull it to the left.Once the extension has been removed, you will have access to the free arm. This setting makes it easier to sew trouser or sleeve hems, in addition to other hard-to-reach areas of fabric.
· The extension has been designed with a built-in accessory compartment for storing machine accessories. To open the accessory compartment, fold the cover down as shown.· To reposition the extension, align it with the left side of the machine and push it in until it clicks into place.
Connecting the power cable and foot controlThis sewing machine is supplied with an AC adapter which must be plugged into a suitable mains socket. 1. Make sure that the machine’s on/off switch is set to “OFF”.
40
EN
B Product usage2. Connect the foot control to the foot control input on the back of the machine, as shown. 3. Connect the AC adapter cable to the machine’s power input, then plug the adapter intoa suitable mains socket. Make sure all plugs are firmly inserted.
WARNING! · Only use the AC adapter (model: S030A1202000E) supplied with this unit toavoid any electrical risks and damaging the unit. · This unit must only be used with the foot control (model: FPD-700) supplied.Power on/off · To start the machine, set the on/off switch to “L” or “H” speed (low or high). · To turn off and unplug the machine, set the on/off switch to “OFF” and unplug the ACadapter from the mains socket. Next, disconnect the adapter cable from the machine.CAUTION! · Keep fingers away from all moving parts. Take care when approaching thesewing machine needle and thread cutter. Avoid contact with moving parts. · To avoid any electrical hazards or injury, always unplug the machine fromthe mains socket immediately after use, before cleaning it, threading it, and before adding or removing parts.Needle, fabric and thread guide Different types of needles can be used with your machine, and these depend on the type of fabric you are sewing. Be sure to use the correct needle type and size to obtain the best results for your sewing projects. · The most common needle types are regular-point and ball-point needles. The mostcommonly used sizes are: 11/80, 14/90 and 16/100. The smaller the number, the smaller the needle. The larger the number, the bigger the needle. Use smaller size needles for lighter weight fabrics and larger size needles for heavier fabrics. The table below provides some suggestions – with best results in mind – for matching the thread and needle type with various fabrics.
41
EN
B Product usage
· Regular-point needles are designed for use with woven fabrics, such as cotton, linen, silk, denim or twill.· The ball-point needles are designed for use with stretch knit fabrics, such as Spandex, mesh T-shirt fabrics or knits.
Materials Types of materials Thicknesses Needle type
Woven
Fine fabrics, organza, tulle, voileVoile, poplin, crepe, taffeta, silks, cotton, underwear, laceCrepe, poplin, gingham, taffeta, satins, cottons and woollen clothing, shirts, blouses, dresses, linings, velvetWoollen clothing, dresses, skirts, coats, tweed, sheets, linens, gabardines, overalls, jeansHeavy canvases, thick woollens, blankets, gabardines, coats, clothing and upholstery fabrics, work clothes, overalls, jeans
Fine Medium-fineMediumMedium/ thickThick
130/705H 130/705H I30/705H 130/705H-J130/705H-J
Needle diameter60-70 708080-9090-100
Thread type Cottonsewing threadCotton sewing thread
Label number 120-100100
Cotton sewing thread
100-60
Cotton sewing thread
80-40
Cotton
sewing
40
thread
42
EN
B Product usage
Soft leathers
Leathers, elastics, faux leathers
Suede, calfskin, kidskinFaux leather, plastics.
Vinyl type
I30/705H-LR
90-100
13O/7O5H-LR
90-100
130/705H-LL
90-100
130/705H-LL
80-100
Oilcloth
130/705H-LL
80-100
Knitwear, jerseys, underwear
Knitwear, stretch
Jersey, stretch velvet, interlock, medium knits, corsetsJersey and stretch clothing, chunky knitwear, knits, hosiery, elastic materials
FineMediumMedium/ thick
I30/705H-S 130/705H-S 130/705H-SUK
80-90 60-100 60-80
Cotton sewing thread Cotton sewing thread Cotton sewing thread Cotton sewing thread Cotton sewing thread Cotton sewing threadCotton sewing thread
60 60 60-4060-40 8080-90
Cotton sewing thread
90-100
Changing or replacing the needleReplace needles regularly, especially when they show signs of wear or start causing problems. 1. Set the on/off switch to “OFF” and unplug the machine from the mains socket. 2. Loosen the needle clamp screw by turning it anticlockwise. 3. Remove the needle. Dispose of it if it is bent, worn or damaged. 4. Insert the new needle as high as possible with the flat side facing the back of the machine. 5. Tighten the needle clamp screw to hold the needle in place.
43
EN
B Product usageThe needles must be in a perfect condition. Problems can arise with: A. Bent needles. B. Damaged tips. C. Blunt needles.Presser foot lifter The presser foot lifter is located inside area “C” of the machine. Use this lever to raise and lower the presser foot. · Before threading the machine, always raise the presser foot lifter to make sure that themachine can be threaded correctly. · Raise the presser foot lifter to remove the fabric from the machine once you have finishedsewing it. · Once the fabric has been positioned underneath the presser foot, lower the presser footonce more to start sewing.
Removing and installing the presser foot· Set the on/off switch to “OFF” and unplug the machine from the mains socket. · Turn the handwheel toward you (anticlockwise) to raise the needle to its highest position. · To remove the presser foot:Raise the presser foot lifter. Press the presser foot release lever on the back of the presser foot holder to release the presser foot. · To install the presser foot: Raise the presser foot lifter. Position the presser foot by aligning it under the presser foot holder. Lower the presser foot lifter until the presser foot holder’s cut-out is positioned directly above the pin. The presser foot will automatically engage.
44
EN
B Product usage
Threading the machineThe bobbin is located at the bottom of your machine and provides the lower thread for your stitches. This sewing machine uses metal bobbins. The bobbin case is magnetised. Use the metal bobbin to obtain the correct tension for the bobbin thread. Always use 15K-type metal bobbins.Important: Only use metal bobbins in this sewing machine. The bobbin thread is magnetically tautened. Therefore, a metal bobbin is required. Should transparent or plastic bobbins be used – even if they seem to fit into the machine – the machine will not be able to operate properly and unsatisfactory stitches will be obtained. Using metal bobbins will result in correct stitches.Winding the bobbin 1. Make sure the on/off switch is set to “OFF”. 2. Insert the spool base, spool of thread and spool cap onto the spool pin. 3. The thread should face the back of the spool. Make sure that when the thread is pulledfrom the left, the spool of thread turns anticlockwise as shown.
45
EN
B Product usage
4. Pass the thread under the slot to the right of the thread guide, then through it; next, wrap the thread around the tension guide and pull the thread to the right as shown.5. Pass the thread through an upper hole in the bobbin from the inside to the outside. Then place the bobbin on the bobbin winder and push it in until it clicks into place.
6. Firmly push the bobbin winder and bobbin to the right, against the bobbin winder stopper.
7. Hold the end of the thread and step on the foot control to wind the bobbin a few turns. Remove your foot from the pedal to stop winding. Release the end of the thread and cut it near the top of the bobbin.
46
EN
B Product usage8. Step on the foot control again to continue winding the bobbin. Winding stops automatically when the bobbin is full. You can also stop winding when you have wrapped enough yarn for your project.9. Take your foot off the pedal to stop the machine. 10. Push the bobbin winder to the left, cut the thread and remove the threaded bobbin.
Inserting the bobbin1. Make sure the on/off switch is set to “OFF”. 2. Push the bobbin cover release button to the right to remove the cover. 3. Hold the bobbin with the thread unwinding anticlockwise and place it in the bobbin case.
4. Pull the end of the thread to make sure the bobbin turns anticlockwise. If the bobbin turns clockwise, it has been incorrectly positioned. Remove the bobbin, turn it over and reinsert it into the bobbin case. Pull on the end of the thread to check once more.
5. Follow the below-indicated sections to thread the upper thread and pull the bobbin thread.
47
EN
B Product usage
Threading the upper threadThreading the upper thread is a straightforward process, but it must be done correctly to achieve correct sewing results. Follow the steps below and refer to the numbered upper threading-related diagrams, which are indicated on your machine.
2
1
4
5
3
6
1. Set the on/off switch to “OFF” and unplug the machine from the mains socket. 2. Raise the needle to the highest position by turning the handwheel towards you(anticlockwise) and keep turning it until the needle starts to descend.
3. Raise the presser foot lifter to release the tension on the machine.Important: If the presser foot lifter is not raised before being thread, it will cause the thread to jam under the fabric when you start to sew.4. Raise the spool pin and insert the spool base, spool of thread and spool cap. The thread should be facing backwards. Gently pull the thread from the left to make sure that the spool of thread turns anticlockwise as shown.
· If the spool of thread is small enough, the spool pin can be lowered to a horizontal position.
48
EN
B Product usageNote: If the spool of thread is frayed at one end, position that end to the right to prevent the thread from getting caught whilst sewing. · If the spool of thread is large and cannot fit over the spool pin in the horizontal position, lift the spool pin up into the vertical position. When using the vertical position, slightly loosen the spool cover or remove it completely from the spool pin, so that it won’t prevent the spool from rotating whilst sewing.5. Whilst firmly holding the spool of thread on the spool pin with your right hand, start threading the upper thread with your left hand as follows:1) Pass the thread under the slot to the right of the thread guide, then through it; next, wrap the thread around the tension guide as shown.2) Pull the thread downwards and insert it into the groove on the right of the front panel to pass the thread between the tension discs.3) Make a U-turn around the bottom of the panel.
49
EN
B Product usage4) Pass the thread through the take-up lever from right to left. If you cannot see the takeup lever, turn the handwheel towards you (anticlockwise) to raise the take-up lever to the highest position.5) Pass the thread through the thread guide above the needle.6) Then thread the thread through the eye of the needle from front to back.Pulling the bobbin thread (lower thread) After threading the upper thread and inserting the bobbin, the bobbin thread must be pulled out before the sewing process can begin. 1. Make sure that the on/off switch is set to “OFF” and the machine is unplugged from themains socket. 2. Raise the presser foot lifter (1). 3. To open the bobbin cover, push the bobbin cover release button to the right (2). 4. Insert the threaded bobbin into the bobbin case, leaving the tail of the thread on the left.Make sure that the bobbin turns anticlockwise (3) when pulling the thread from the left. 5. Hold the upper thread with your left hand and turn the handwheel towards you(anticlockwise) with your right hand to lower the needle (4) (5). Keep turning it until the needle rises to the highest position. 6. Pull the upper thread upwards to pull the bobbin thread through the throat plate (6). 7. Pull both threads through the throat plate and position them under the presser foot (towards the rear of the machine), leaving a thread tail of approx. 15 cm for both threads (7). 8. Close the bobbin cover (8).
50
EN
B Product usage
(1)
(2)
(3)
(4)
(5)
(6)
(7)
(8)
Thread tension After having selected the correct needle and thread combination for the fabric being used, you may need to adjust the sewing machine’s tension in order to ensure the correct stitch balance. A stitch is well balanced when the upper and lower threads appear the same on the fabric. Your machine is equipped with an adjustable thread tension dial. It allows tension to be exerted on the upper and lower threads as they pass through the machine to form a stitch.Too much tension will produce a tight stitch which will cause the fabric to pucker.Too little tension will produce a loose stitch.When a uniform tension is exerted on the two threads, a regular stitch, i.e. a well-balanced one, is obtained.The machine’s thread tension dial is numbered 1 through 9, and settings 3, 4 and 5 are marked with a small square around the number to indicate the adjustment range at which most of your stitches will be made.How does the tension work? To help you understand the role tension plays on fabrics and threads, try this simple test.Take 2 pieces of a medium-weight woven fabric – in a solid, light colour – that measure approx. 15 cm long. Place a size 14 needle in the machine. Thread the top of the machine with an all-purpose thread (darker colour) and put the same type of thread (lighter colour) in the bobbin. Set the machine to stitch No. 3; one of the straight stitch options. Sew the two pieces of fabric together, starting with an upper thread tension set to 1. Whilst sewing, slowly turn the tension dial from 1 to 9. Sew another row by returning the handwheel to 1. You should see a balanced stitch on each row halfway between the start and end.
51
EN
B Product usageThe different-coloured threads will allow you to see the effect that tension has on the upper and lower threads.
Too much tension
Not enough tension
Well-balanced stitches
Tension testTo check that the upper thread has been properly threaded through the tension discs, perform this simple test: 1. With the presser foot raised and the thread removed from the needle, pull the threadtowards the back of the machine. You should only detect slight resistance and little or no needle deflection. 2. Now lower the presser foot and pull the thread back towards the back of the machine. This time you should detect considerable resistance and much more needle deflection. If you do not detect any resistance, it means that you have not threaded the machine correctly and will need to rethread it.
Sewing
Types of sewing-suitable fabrics
Sewing features
Fabric characteristics Standard Thick Fine Hard Soft
Cotton/ Fabric Linen
Silk/Wool Polyester
Elastic
52
EN
B Product usage
Sewing features: = Easy to sew = Difficult to sew = Not ideal for a fluid stitchNOTE: 1. Fabric thickness definition:Fine: Thickness of two layers of fabric = < 0.35 mm. Thick: Thickness of two layers of fabric = > 0.8 mm. Standard: Thickness of two layers of fabric = 0.35 mm and 0.8 mm. 2. Definition of stretch fabric: If a piece of fabric measuring “100 mm x 30 mm” can be stretched up to 106 mm or more under a tensile force of 0.5 kg, the fabric is defined as stretch; if not, it is a non-stretch fabric. 3. Fabric textures: Soft: Fabrics such as towels, feather dusters, etc. Hard: Fabrics such as jeans, fine canvas, etc.Choosing a stitch type Use the stitch selection dial to choose the desired stitch type. The numbers on the dial directly correspond to the designs printed on the front of the machine. Simply rotate the dial until the desired stitch number lines up with the red dot on the dial.
Stitch number 1 2 3 4 5 6 7 89
Stitch name
Use
Short straight stitchMedium straight stitchLong straight stitch Straight stitch in leftpositionSatin zigzag stitchShort zigzag stitchMedium zigzag stitchLong zigzag stitchBlind hem
For sewing lightweight fabricsFor sewing mediumweight fabricsFor sewing heavier fabricsTopstitchingFor sewing appliqués and decorative stitchingFor finishing seams and decorative stitchingFor finishing seams and decorative stitchingFor finishing seams and decorative stitchingFor hems on woven fabrics; decorative stitching
Recommended foot All-purpose foot All-purpose foot All-purpose foot All-purpose foot Satin stitch foot* Satin stitch foot* Satin stitch foot* Satin stitch foot*Blind hem foot*
53
EN
B Product usage
For hems on woven
10
Long blind hem fabrics; decorative
Blind hem foot*
stitching
11
Stretch blind hem
For hems on stretch knits; decorative stitching
Blind hem foot*
12
Multiple zigzag stitch
For mending, inserting elastic and decorative stitching
Satin stitch foot*
13
Sewing buttonholes
1st step of sewing a buttonhole
14
Sewing buttonholes
2nd step of sewing a buttonhole
15
Sewing buttonholes
3rd step of sewing a buttonhole
Buttonhole foot
16
Sewing buttonholes
4th step of sewing a buttonhole
*N.B.: This stitch can be created with the all-purpose foot; however, you will get a better result with the aforementioned specific foot (not supplied).
Straight stitch The straight stitch is the stitch most frequently used for all types of sewing. 1. To start sewing, first raise the presser foot lifter. 2. Pull the upper thread and bobbin thread under the presser foot towards the back of themachine, leaving approx. a 15 cm tail of excess thread at the end. 3. Place the fabric under the presser foot and then lower the presser foot lifter. 4. Rotate the handwheel towards you (anticlockwise) until the needle penetrates the fabric. 5. Start the machine by pressing the foot control. Guide the fabric with your hands. Whenyou reach the edge of the fabric, stop the sewing machine.WARNING! Do not pull or push the fabric while sewing, as this may cause the needle to deflect and break.6. Turn the handwheel towards you (anticlockwise) until the needle is in the highest position, and then raise the presser foot lifter.7. Pull the fabric backwards and cut the excess thread with the thread cutter located on the side of the machine.Reverse stitch Reverse stitches are usually performed at the start and end of a seam. The goal is to block the threads at both ends of the seam so that it doesn’t come undone.
54
EN
B Product usage· Set the stitch selection dial to a straight stitch (stitches No. 1-4), depending on the fabric being sewn.· Position the fabric under the presser foot, just level with the inside of the fabric’s top raw edges.· Lower the presser foot and sew approximately 3 stitches. · Stop sewing, then hold down the reverse lever, located at the front of the machine. Keepit pressed while you reverse stitch 3 stitches.Note: The reverse stitch length is pre-set, regardless of the selected stitch.· Release the reverse lever and sew forwards again, until you reach the opposite end of the fabric.· Hold the reverse lever down to sew approx. 3 reverse stitches again. · Release the lever to sew forwards again until you reach the end of the fabric. · Raise the presser foot lifter, then remove the fabric from the machine.
55
EN
B Product usageCutting threads To cut the ends of the thread, hold the fabric in your left hand. Bring the thread back from the back of the machine, then thread the ends of the thread through the thread cutter on the side of the machine. Pull down until the threads are cut.fabricZigzag stitch The zigzag stitch can be used for finishing seams, appliqués or decorative stitching. Finishing seams The edges of the seams support the garment and should have a durable finish, especially if the fabric is prone to fraying. Seams can be finished in two different ways: Trimmed after sewing the edge of the seam or overlocked. Try these techniques on a scrap piece of fabric first to determine which method is right for your project. 1. Overlocked seam finish · Set the machine to stitch No. 5 or 6 and attach the satin stitch foot (not supplied). · Then sew with the right side of the stitch at the edge of the seam. Evenly trim the seamedges.
2. Decorative stitchingYou can add a personal touch or spruce up your projects with decorative threads. Mix different types and colours of thread to create trim-like finishes on clothing, home décor items, crafts projects and more. · Set the machine to stitch No. 7 or No. 8, depending on the style you are looking for.
56
EN
B Product usage· Attach the satin stitch foot (not supplied). · If you are using thicker thread (like topstitching thread), be sure to change the needle toa larger size needle as well.Appliqués Appliqués are made by sewing pieces of certain-shaped fabric onto a base fabric to form a design or pattern. This technique offers unlimited creative possibilities.1. Preparing appliqués · Apply iron-on tape with a paper backing to the back of the appliqué fabric, according tothe manufacturer’s recommendations. · Outline the shape of the appliqué, then cut this shape out of the fabric that was fused tothe iron-on tape. · Remove the paper from the back of the tape. Position the appliqué on the base fabric,then fuse them into place.2. Sewing appliqués · Set the machine to stitch No. 5: the satin zigzag stitch. · To sew the appliqué, sew it in such a way that the right side of the stitch falls from theouter edge of the appliqué, thus enclosing the fabric’s raw edge. The left side of the stitch will enter the appliqué fabric.
Blind hemThe blind hem stitch is mainly used to create seemingly invisible hems on various types of projects, such as curtains, trousers, skirts, etc. There are two different blind hem stitch types to choose from on the machine: standard blind hem stitch (for hems on woven fabrics) and stretch blind hem stitch (for hems on stretch fabrics). 1. Set the machine to stitch No. 9 for the standard blind hem stitch or to stitch No. 11 forthe stretch blind hem stitch. 2. Attach the blind hem foot (not supplied). 3. Insert the appropriate needle for the fabric being hemmed ( “Needle, fabric and threadguide”). 4. Thread the top of the machine and the bobbin with a thread colour that closely matchesor blends with the colour of the item being hemmed. 5. Fold and pin the fabric, as shown (1). 6. Place the fabric under the blind hem presser foot (not supplied) with the fold of the fabricpositioned in such a way that the needle only pierces the fold when the needle passes to the left. Make sure to remove the pins as you sew (2). 7. When you have finished, fold the hem and press (3).
57
EN
B Product usage
Under side
Under side
Top side
Multiple zigzag stitch The multiple zigzag stitch is an ultra-versatile stitch. Use it for mending, inserting elastic or simply as a decorative embellishment.Repairing a tear · Set the machine to stitch No.12 and attach the satin stitch foot (not supplied). · Cut any loose threads from the torn area. · To reinforce the torn area, place interfacing or a small scrap of fabric (a similar fabricand colour) underneath the tear. · Work from the right side to bring the edges of the tear together, and then sew them. · Use a hand sewing needle to pull the threads on the wrong side, then tie them off andcut them. · Cut off the excess underlay.Inserting elastic It is easy to insert a piece of elastic using the multiple zigzag stitch. As these stitches are very elastic, they are not prone to break when the elastic is stretched. · Set the machine to stitch No.12 and attach the satin stitch foot (not supplied). · If you are repairing a garment with a broken elastic, first remove the old elastic from thegarment, then press down. · Divide the elastic and the area of the garment in which the elastic will be sewn into fourparts. Place a pin at these four parts on the elastic and the garment. · Gently pull the elastic to evenly cover the fabric as you sew.Manually sewing a buttonhole 1. Attach the buttonhole foot. 2. Place the fabric under the buttonhole foot and lower the foot onto the fabric at the pointyou would like to sew the buttonhole. 3. Select stitch No. 13. Step on the foot control to sew 5-6 stitches at a slow speed, thenrelease the foot control to stop (Fig. a).Fig.a
58
EN
B Product usage4. Select stitch No. 14. Step on the foot control to sew the correct length of stitches on the fabric, then release the foot control. Make sure the stitch is straight. (Fig. b).Fig.b5. Select stitch No. 15. Step on the foot control to sew 5-6 stitches at slow speed, then release the foot control (Fig. c).Fig.c6. Raise the presser foot lifter and rotate the fabric 180° (Fig. d).Fig.d 180°7. Select stitch No. 16. Lower the presser foot lifter and step on the foot control to finish sewing the buttonhole. (Fig. e).Fig.e
59
EN
C Cleaning and maintenance
Cleaning and maintenance
CAUTION! · Always turn off and unplug the unit from the mainssocket before cleaning it. · To avoid all electricity-related risks, never immerse theunit, cable, power plug or foot control in water or any other liquid. Never rinse them under a tap.Important: Do not use solvents, chemical or abrasive cleaning products, wire brushes, sharp objects or scouring pads to clean the unit. · Clean the machine with a soft, dry cloth. · Open the bobbin cover, take out the bobbin and use a small brush to clean the bobbin case. Close the cover again. · Do not expose the machine to high temperatures. · Do not drop the machine. · Change the accessories as described in this user manual. · Always ensure that the accessories have been correctly installed before plugging in the machine. Replacing the sewing light
DANGER! Before replacing the sewing light, unplug the machine from the mains socket to avoid an electric shock.1. Unplug the machine from the mains socket. 2. Loosen the screw on the back of the front cover as shown. 3. Close the front cover. 4. Observe the LED bulb’s + and – connections, then remove it. 5. Replace the LED bulb with a bulb with the same rated power ( 0.6 W and LED voltages3.2 V, LED 5 mm).
60
EN
C Cleaning and maintenance6. Close the front cover and tighten the screw.
Troubleshooting Follow this troubleshooting guide to resolve common issues. If the problem persists, do not use the unit and contact an authorised repair centre to have it inspected or repaired.
ProblemNo power or the machine is idling.Stitches are being skipped.
Possible Cause· The AC adapter is not suitable.· Needle incorrectly inserted.· The needle is bent. · The presser foot istoo loose.
Solution· Use the power adapter supplied with this unit.· Remove and reinsert the needle with the flat side facing backwards.· Replace it with a new needle. · Retighten the presser foot.
61
EN
C Cleaning and maintenance
Problem The bobbin thread cannot be pulled out. The thread keeps breaking.The stitches are too loose or irregular. The needle is breaking.
Possible Cause· The bobbin is empty. · The needle has beenincorrectly threaded.· The needle is bent. · The needle shaft isnot properly seated. · The thread tensiondial, thread guide or thread take-up bar is too tight.· The stitch tension is unbalanced.
Solution · Replace it with a full bobbin. · Thread the needle from front to backagain. · Replace it with a new needle. · Replace it with a new needle. · Release the thread tension by selectinga number between 3 and 5.· Thread the upper thread and the bobbin thread again.
· The needle is bent or · Replace it with a new needle. warped.
Why is the thread making loops or folds under my fabric?When the thread loops under your fabric, it is usually because it has not been threaded properly or there is an incorrect upper thread tension. In this case, follow these steps: 1. With the presser foot lifter raised and the thread tension dial set to 4, re-thread the upperthread according to the threading diagrams indicated on your machine: Place the spool of thread on the spool pin and secure it with the thread spool cap. Whilst holding the spool of thread in place with your right hand, use your left hand to hold the thread and pass it through the thread guide, then follow the thread path, bringing the thread down through the tension channel, around the bottom of the machine and up the other side. Continue to thread the machine, but do not thread the thread through the needle. 2. Before threading the thread through the needle, perform this simple test to make sure that the upper thread has been threaded correctly. While the presser foot is raised, pull the thread. It should be easy to pull. Then lower the presser foot. The thread should now resist when you pull it. There should be a significant increase in thread tension. If there is no more tension, the upper thread is threaded incorrectly. Try again ( “Threading the upper thread”).
Why is my machine skipping stitches?Stitches may be skipped if the needles are dull or damaged, or if they have been incorrectly inserted in the machine. · First, check whether the needle is dull or damaged, and replace it if necessary. Furthermore,make sure that you are using the correct needle size for the type of fabric being sewn ( “Needle, fabric and thread guide”).
62
EN
C Cleaning and maintenance· Then check that the needle is correctly inserted. The needle should be pushed as high as possible. It’s easy to insert the needle halfway, tighten it and think that it’s been properly installed. In addition, the flat side of the needle should be positioned backwards. If the needle is not inserted correctly, it will not be able to pull the bobbin thread, thus resulting in stitches being skipped.Storage· Always unplug the unit before storing it. · Store the unit in a fresh, dry and dust-free place, out of thereach of children and pets. · Please retain the packaging and use it to store your unit whenit is not in use for an extended period of time.
63
EN
Bedankt!Proficiat met uw keuze voor een product van VALBERG. De selectie en de testen van de toestellen van VALBERG gebeuren volledig onder controle en supervisie van ELECTRO DEPOT. We staan garant voor de kwaliteit van de toestellen van VALBERG, die uitmunten in hun eenvoudig gebruik, hun betrouwbare werking en hun onberispelijke kwaliteit.ELECTRO DEPOT beveelt de VALBERG toestellen aan en is ervan overtuigd dat u uiterst tevreden zal zijn bij elk gebruik van het toestel. Welkom bij ELECTRO DEPOT.Bezoek onze website: www.electrodepot.be
64
NL
Inhoudstafel
A Overzicht van het toestelB Gebruik van het toestelC Reiniging en onderhoud
Onderdelen Overzicht van het apparaat Doelmatig gebruik SpecificatiesPresentatie van de machine De machine van draad voorzien NaaienReiniging en onderhoud De naailamp vervangen Probleemoplossing Opslag
65
NL
A Overzicht van het toestelLEES DEZE GEBRUIKERSHANDLEIDING EN DE GIDS MET WETTELIJKE VOORSCHRIFTEN AANDACHTIG DOOR ALVORENS HET APPARAAT TE GEBRUIKEN. BEWAAR DEZE TWEE HANDLEIDINGEN VOOR TOEKOMSTIGE RAADPLEGING.OnderdelenHandwiel – regelt de beweging van de draadgever en de naald. Het kan automatisch of handmatig worden bediend. Wanneer u het handwiel met de hand draait, draai het dan altijd naar u toe (tegen de klok in).Patroonkeuzewiel – gebruik het wiel om de gewenste naaisteek te selecteren. Het keuzewiel is genummerd van 1 tot 16 en de nummers stemmen overeen met de steekpatronen die op de behuizing van de naaimachine zijn aangegeven.Achteruitnaaiknop – Keert de naairichting van een rechte steek om (steek 1 tot 4). Duw de knop volledig omlaag en houd deze op zijn plaats. Laat los om het naaien naar voren te hervatten.Aan/uit-knop en snelheidsregeling om de naaimachine in of uit te schakelen en de snelheid te regelen Selecteer “L” of “H” (lage of hoge snelheid) om de machine in te schakelen en de snelheid te regelen. Selecteer “OFF” om de machine uit te schakelen.Afneembare verlengstuk met accessoirevak – biedt een groter vlak oppervlak voor het naaien. Het kan worden verwijderd om toegang te krijgen tot de vrije arm om kleinere en moeilijk bereikbare delen van de stof te naaien, zoals zomen van broeken of mouwen Het is ontworpen met een opbergvak aan de binnenkant om het toebehoren van de machine op te bergen.Persvoethendel gebruik deze hendel om de persvoet omhoog en omlaag te brengen. Breng de persvoethendel omhoog voordat u de machine van draad voorziet of de stof uit de machine verwijdert en breng de hendel omlaag voordat u begint te naaien.Lichtknop en naailamp deze worden gebruikt om het naaigebied te verlichten.Draadafsnijder is geïntegreerd aan de zijkant van de machine voor extra comfort. Gebruik het om de stukjes draad snel en eenvoudig door te knippen na het afwerken van een steek.Voorkant – biedt plaats aan de draadgever, naailamp, spanningsmechanisme en andere onderdelen.
66
NL
A Overzicht van het toestelDraadspanningswiel om de juiste spanning voor uw steek, draad en stof te selecteren. De spanningsschijven, die zich in de machine bevinden, regelen de spanning op de bovendraad. Het draadspanningswiel is genummerd van 1 tot 9. Hoe lager het getal, hoe lager de spanning op de bovendraad en hoe hoger het getal, hoe hoger de spanning. Instellingen 3, 4 en 5 zijn gemarkeerd met een klein vierkantje rond het nummer om het instelbereik aan te geven voor de meest gebruikelijke steken.Draadgever – regelt de hoeveelheid geleverde bovendraad. De automatische draadgleuf vereenvoudigt het aanbrengen van de draad op de draadgever.Draadgeleider – leidt de draad van de klopspen naar de spanningsschijven of de spoelopwinder.Draaggreep – is geïntegreerd voor een eenvoudig transport van de machine.Spoelopwinder – windt de draad op de spoel op om deze te gebruiken als de onderdraad.Spoelopwinderstop – wordt gebruikt tijdens het opwinden van de spoel.Naaldbevestigingsschroef – zet de naald in de naaimachine vast om te kunnen naaien.Naald wordt ingebracht in de naaldstang. Bevat het naaigaren.Persvoethouder – wordt aan de persvoetstang vastgemaakt. Houdt de persvoet tijdens het naaien op zijn plaatsen.Naaldplaat – bevindt zich onder de persvoet, rond de transporteurs. Zorgt voor een vlak oppervlak voor de stof tijdens het naaien.Ontgrendelingsknop van spoelhuisklep – bevindt zich rechts van de spoelhuisklep. Duw de knop naar rechts om de spoelhuisklep te verwijderen voor het vervangen van de spoel.Spoelhuisklep (en klephuis binnenin) – het bedekt de spoel en het spoelhuis. Het is transparant om op eenvoudige wijze de (onderste) draadtoevoer van de spoel te regelen. Spoelhuis – houdt de spoel stevig op zijn plaats vast en zorgt voor voldoende spanning op de spoeldraad tijdens het naaien.Transporteurs verplaatsen de stof onder de persvoet.
67
NL
A Overzicht van het toestelPersvoet houdt de stof vlak tegen de transporteurs. Gebruik de persvoethendel om de persvoet omlaag (naaien) of omhoog (stof) te brengen.Persvoethouderschroef bevindt zich links van de persvoethouder. Houdt de persvoethouder op de stang van de persvoet vast.Ontgrendelingshendel voor persvoet bevindt zich aan de achterkant van de persvoetsteun. Gebruik deze hendel om de persvoet van de persvoethouder te verwijderen.Persvoetstang – houdt de persvoethouder en de persvoet vast. Gaat omhoog en omlaag met behulp van de persvoethendel.Spoelhouder met spoelhouderkap – houdt de draadspoel op zijn plaats met de spoelhouderkap, waardoor de bovendraad niet te veel en zonder te weinig spanning afgewikkeld kan worden. De spoelhouder kan horizontaal of verticaal worden gebruikt, afhankelijk van de grootte van de draadspoel.Draadspoel – houdt de bovendraad vast en levert deze aan de spanningsschijven. Het schema aan de bovenkant van de machine laat zien hoe de bovendraad door de draadgeleider dient te gaan.Vrije arm – naaien van mouw- of broekzomen, halslijnen of andere kleine openingen in kleding. Verwijder het verlengstuk om toegang tot de vrije arm te krijgen.Pedaalingang bevindt zich aan de achterkant van de machine. Sluit het pedaal aan op deze ingang voordat u begint met naaien.Netadapteringang bevindt zich aan de achterkant van het apparaat. Sluit de netadapter (inbegrepen) aan op deze ingang.Pedaal – wordt gebruikt om de machine te starten en te stoppen. Druk met je voet op het pedaal om te beginnen met naaien en haal uw voet van het pedaal om te stoppen met naaien.Netadapter – Sluit het ene uiteinde aan op de voedingsingang van de machine en steek de stekker vervolgens in het stopcontact.Draadspoel x 2Klos x 2Draadinrijger x 1
68
NL
A Overzicht van het toestel
Naald x 1 Automatische knoopsgatvoet x 1 Knoopsgatvoet x 1
Overzicht van het apparaat· Haal het apparaat uit de verpakking. Verwijder alle etiketten van het product. Controleer het apparaat op volledigheid en of het zich in een goede staat bevindt. Als het apparaat beschadigd of defect is, gebruik het niet en breng het terug naar uw handelaar of klantendienst.· Bewaar alle verpakking buiten het bereik van kinderen. Er is risico op een ongeval als kinderen met de verpakking spelen.Doelmatig gebruik· Dit apparaat is alleen bestemd om in een huishoudelijke omgeving te naaien, zoals beschreven in deze gebruikershandleiding. Het apparaat is niet ontworpen voor industrieel of commercieel gebruik. Dit apparaat is alleen bestemd voor gebruik in een droge binnenruimte.· Elk ander gebruik kan leiden tot schade aan het apparaat, brand, een elektrische schok of letsel aan personen.Specificaties
Model: Ingang van netadapter: Bedrijfsspanning van de naaimachine: Stroomverbruik:
972697 VB-MAC 100-240 V CA, 50/60 Hz12 V CC, 2,0 A 24 W
69
NL
B Gebruik van het toestelPresentatie van de machineWAARSCHUWING! Voordat u onderdelen aan de naaimachine toevoegt of verwijdert. zorg dat de stekker niet langer in het stopcontact zit.Afneembaar verlengstuk met accessoirevak · Als u het verlengstuk van het apparaat wilt verwijderen, houd het verlengstuk stevig vasten trek het naar links. Zodra het verlengstuk is verwijderd, hebt u toegang tot de vrije arm. Met deze instelling kunt u zomen van broeken of mouwen naaien, evenals andere moeilijk bereikbare delen van de stof.
· Het verlengstuk is voorzien van een accessoirevak aan de binnenkant om de accessoires van de machine in op te bergen. Om het accessoirevak te openen, vouw u de klep omlaag, zoals weergegeven.· Om het verlengstuk opnieuw aan te brengen, lijn het uit met de linkerkant van de machine en duw het in totdat het op zijn plaats vastklikt.
Het snoer en het pedaal aansluiten Deze naaimachine wordt geleverd met een netadapter die moet worden aangesloten op een geschikt stopcontact.
70
NL
B Gebruik van het toestel1. Zorg ervoor dat de aan/uit-knop van het apparaat op ‘OFF’ is ingesteld. 2. Sluit het pedaal aan op de pedaalingang aan de achterkant van het apparaat, zoalsaangegeven. 3. Sluit het snoer van de netadapter aan op de voedingsingang van het apparaat en sluit deadapter vervolgens aan op een geschikt stopcontact. Zorg ervoor dat alle aansluitingen stevig vastzitten.
OPGELET! · Gebruik alleen de meegeleverde netadapter (model: S030A1202000E) omelektrisch gevaar en schade aan het apparaat te voorkomen. · Dit apparaat mag alleen worden gebruikt met het meegeleverde pedaal (model:FPD-700).In-/uitschakelen · Om de machine in te schakelen, stel de aan/uit-knop in op ‘L’ of ‘H’ snelheid (lage ofhoge snelheid). · Om het apparaat uit te schakelen en van de voeding te ontkoppelen, zet de aan/uit-knopop ‘off’ (uit) en trek de stekker uit het stopcontact. Trek vervolgens het snoer van de adapter uit het apparaat.WAARSCHUWING! · Houd uw vingers uit de buurt van alle bewegende onderdelen. Specialeaandacht is vereist rond de naald van de naaimachine en de draadsnijder. Vermijd elk contact met de bewegende onderdelen. · Om het risico op elektrocutie en letsel te voorkomen, haal de stekker na gebruik, voor reiniging en voor het aanbrengen of verwijderen van onderdelen altijd uit het stopcontact.
71
NL
B Gebruik van het toestel
Naald, stof en draadgeleiderEr zijn verschillende soorten naalden beschikbaar voor uw machine, afhankelijk van het type stof dat u wilt naaien. Zorg ervoor dat u de juiste soort en naaldgrootte gebruikt om het beste resultaat voor uw naaiprojecten te krijgen. · De meest voorkomende soorten naalden zijn naalden met een gewone punt en naaldenmet een afgeronde punt. De meest gebruikte groottes zijn: 11/80, 14/90 en 16/100. Hoe kleiner het nummer, hoe kleiner de naald. Hoe groter het nummer, hoe groter de naald. Gebruik kleinere naalden voor lichtere stoffen en grotere naalden voor zwaardere stoffen. De onderstaande tabel biedt enkele suggesties voor het overeenstemmen van het type draad met de soort naald voor de verschillende stoffen om het beste resultaat te krijgen. · Gewone puntnaalden zijn ontworpen voor gebruik met geweven stoffen, zoals katoen, linnen, zijde, jeans of keper. · Naalden met afgeronde punt zijn ontworpen voor gebruik met stretch gebreide stoffen, zoals spandex, stof voor T-shirts of breigoed.
Materiaal Geweven
Soorten materialenDunne stoffen, organza, tule, doekDoek, poplin, crêpe, taf, zijde, katoen, ondergoed, kantCrêpe, poplin, vichy, taf, satijn, katoen en wol, hemden, blouses, jurken, voeringen, fluweelWol, jurken, rokken, jassen, tweed, lakens, linnengoed, gabardines, overalls, jeansGrote doeken, dikke wollen stoffen, dekens, gabardines, jassen, kleding en meubelstoffen, werkkleding, overalls, jeans
Dikte Dun Middeldun MediumHalfdikDik
Soort naald 130/705H 130/705H I30/705H130/705H-J130/705H-J
Diameter naald60- 70
Type draad
Etiketnummer
Naaigaren 120-100
70
Naaigaren
100
80
Naaigaren 100-60
80-90
Naaigaren
80 -40
90-100 Naaigaren
40
72
NL
B Gebruik van het toestel
Zacht leer
Suède, kalfsleer,
Leer,
geitenleer
elastiek, Kunstleer,
imitatieleer kunststoffen.
Vinyl
Breigoed, stretch
ZeildoekBreigoed, truien, ondergoedJersey, stretch fluweel, interlock, medium breigoed, bekledingJersey en kledingstretch, breigoed met gebreide of gehaakte elastische materialen
Dun MediumHalfdik
I30/705H-LR 13O/7O5H-LR 130/705H-LL 130/705H-LL 130/705H-LLI30/705H-S130/705U-S130/705H-SUK
90-100 90-10090-100 80-100 80-100 80-90
Naaigaren NaaigarenNaaigaren Naaigaren Naaigaren Naaigaren
60-100 Naaigaren
60-80
Naaigaren
60 60 60-40 60-40 80 80-9090-100
De naald wijzigen of vervangenVervang naalden regelmatig, in het bijzonder wanneer ze tekenen van slijtage vertonen of problemen veroorzaken. 1. Zet de aan/uit-knop op ‘OFF’ en haal de stekker uit het stopcontact. 2. Draai de naaldschroef tegen de klok in los. 3. Verwijder de naald. Gooi de naald weg als deze krom, versleten of beschadigd is. 4. Breng de nieuwe naald zo hoog mogelijk aan, met de platte kant naar de achterkant vande machine gericht. 5. Draai de naaldklemschroef vast om de naald op zijn plaats te houden.
De naalden moeten in perfecte staat zijn. Er kunnen problemen optreden met: A. Kromme naalden, B. Beschadigde punten, C. Stompe naalden.
73
NL
B Gebruik van het toestelPersvoethendel De persvoethendel bevindt zich in de zone ‘C’ van de machine. Gebruik deze hendel om de persvoet omhoog en omlaag te brengen. · Breng voordat u de machine van draad voorziet altijd de persvoethendel omhoog omervoor te zorgen dat de machine juist van draad wordt voorzien. · Breng de persvoethendel omhoog om de stof na het naaien uit de machine te verwijderen. · Breng de persvoethendel na het plaatsen van de stof onder de persvoet omlaag om tebeginnen met naaien.De persvoet verwijderen en installeren · Zet de aan/uit-knop op ‘OFF’ en haal de stekker uit het stopcontact. · Draai het handwiel naar u toe (tegen de klok in) om de naald naar de hoogste positie tebrengen. · De persvoet verwijderen:Breng de persvoethendel omhoog. Druk op de ontgrendelingshendel van de persvoet aan de achterkant van de persvoethouder om de persvoet los te maken. · De persvoet installeren: Breng de persvoethendel omhoog. Plaats de persvoet door deze onder de persvoethouder uit te lijnen. Breng de persvoethendel omlaag totdat de uitsparing van de persvoethouder zich direct boven de spindel bevindt De persvoet wordt automatisch vastgezet.
74
NL
B Gebruik van het toestelDe machine van draad voorzienDe spoel zit aan de onderkant van uw machine en levert de onderdraad voor uw steken. Deze naaimachine maakt gebruik van metalen spoelen. De buitenkant van de spoel is gemagnetiseerd. Gebruik alleen metalen spoelen om de juiste spanning op de spoeldraad te bereiken. Gebruik altijd metalen spoelen van het type 15K.Belangrijk: Gebruik alleen metalen spoelen in deze naaimachine. De spanning op de spoeldraad wordt magnetisch verkregen. Daarom is een metalen spoel vereist. Het gebruiken van transparante of plastic spoelen, zelfs als ze in de machine blijken te passen, zal leiden tot een verkeerde werking van de machine en teleurstellende steken. Het gebruiken van metalen spoelen leidt tot juiste steken. De spoel opwinden 1. Zorg ervoor dat de aan/uit-knop op ‘OFF’ (uit) staat. 2. Plaats de spoelbasis, de draadspoel en spoelhouderkap op de spoelhouder. 3. De draad moet naar de achterkant van de spoel zijn gericht. Zorg ervoor dat wanneer u de draad vanaf de links trekt, de draadspoel tegen de klok in draait, zoals weergegeven.4. Breng de draad onder de gleuf rechts van de draadgeleider aan, wikkel de draad vervolgens rond de spanningsgeleider en trek de draad naar rechts, zoals weergegeven.
75
NL
B Gebruik van het toestel5. Haal de draad door een bovenste gat in de spoel, van binnen naar buiten. Plaats vervolgens de spoel op de spoelopwinder en duw op de spoel om deze vast te klikken.6. Duw de spoelopwinder en de spoel stevig naar rechts, tegen de stop van de spoelopwinder.7. Houd het uiteinde van de draad vast en druk het pedaal in om de draad enkele keren rond de spoel op te winden. Haal uw voet van het pedaal om te stoppen met opwinden. Laat het uiteinde van de draad los en knip het in de buurt van de bovenkant van de spoel.8. Druk opnieuw op het pedaal om de spoel verder op te winden. Het opwinden stopt automatisch wanneer de spoel volledig is opgewonden. U kunt ook stoppen met opwinden zodra er voldoende draad voor uw project is opgerold.9. Haal uw voet van het pedaal om de machine te stoppen. 10. Duw de spoelopwinder naar links, knip de draad door en verwijder de spoel met draad.
De spoel aanbrengen1. Zorg ervoor dat de aan/uit-knop op ‘OFF’ (uit) staat. 2. Duw de ontgrendelingsknop op de spoelklep naar rechts om de klep af te halen. 3. Pak de spoel vast en wikkel de draad op de spoel tegen de richting van de klok af enplaats de spoel in het spoelhuis.
76
NL
B Gebruik van het toestel
4. Trek aan het uiteinde van de draad om ervoor te zorgen dat de spoel tegen de klok in draait. Als de spoel met de klok mee draait, dan is deze in de verkeerde richting aangebracht. Verwijder de spoel, draai deze om en breng opnieuw in het spoelhuis aan. Trek aan het uiteinde van de draad om nogmaals te controleren.
5. Volg de volgende secties om de machine van bovendraad te voorzien en aan de spoeldraad te trekkenDe machine van bovendraad voorzien De bovendraad aanbrengen is eenvoudig, maar het moet correct worden uitgevoerd om goed naairesultaten te bereiken. Volg de onderstaande stappen en bekijk de genummerde schema’s op uw machine om de bovendraad aan te brengen.
2
1
4
5
3
6
1. Zet de aan/uit-knop op ‘OFF’ en haal de stekker uit het stopcontact. 2. Breng de naald naar de hoogste positie door het handwiel naar u toe te draaien (tegende klok in) en blijf draaien totdat de naald net begint te dalen.
77
NL
B Gebruik van het toestel
3. Breng de persvoethendel omhoog om de spanning op de machine vrij te geven.Belangrijk: Als u de persvoethendel voor het aanbrengen van de draad niet omhoog brengt, zal de draad onder de stof vast komen te zitten wanneer u begint met naaien. 4. Til de spoelhouder op en breng de spoelbasis, de draadspoel en spoelhouderkap aan. De draad moet naar achteren zijn gericht. Trek de draad lichtjes vanaf links om ervoor te zorgen dat de draadspoel tegen de klok in draait, zoals weergegeven.· Als de draadspoel klein genoeg is, kan de spoelhouder horizontaal worden aangebracht.Opmerking: Als de draadspoel aan een uiteinde van een sleuf is voorzien, plaats dit uiteinde aan de rechterkant om te voorkomen dat de draad tijdens het naaien erin vast komt te zitten. · Als de draadspoel groot is en niet horizontaal in de spoelhouder past, til de spoelhouder op om deze verticaal aan te brengen. Wanneer de verticale positie wordt gebruikt, maak de spoelklep lichtjes los of haal deze volledig van de spoelhouder af om te vermijden dat de spoel tijdens het naaien draait.
5. Terwijl u de draadspoel stevig op de spoelhouder met de rechterhand houdt, breng de bovendraad als volgt met uw linkerhand aan:
78
NL
B Gebruik van het toestel1) Breng de draad onder de gleuf rechts van de draadgeleider en vervolgens door de geleider aan en wikkel de draad rond de spanningsgeleider, zoals afgebeeld.2) Trek de draad omlaag en steek deze in de groef rechts van het voorpaneel om de draad tussen de spanningsschijven aan te brengen.3) Maak een U-bocht rond de onderkant van het voorpaneel.4) Breng de draad van rechts naar links door de draadgever aan. Als u de draadgever niet ziet, draai het stuurwiel naar u toe (tegen de klok in) om de draadgever naar de hoogste positie te brengen.5) Breng de draad door de draadgeleider boven de naald aan.6) Steek vervolgens de draad van voor naar achteren door het oog van de naald.
79
NL
B Gebruik van het toestel
Aan de spoeldraad (onderdraad) trekkenNa het rijgen van de bovendraad en het aanbrengen van de spoel, moet aan de spoeldraad worden getrokken voordat u begint te naaien. 1. Zorg ervoor dat de aan/uit-knop op ‘OFF4 (uit) en dat de stekker niet in het stopcontact zit. 2. Breng de persvoethendel omhoog (1). 3. Om de spoelklep te openen, duw de ontgrendelingsknop van de spoelklep naar rechts (2). 4. Steek de spoel met draad in de spoelhuis en laat het uiteinde van de draad aan de linkerkant.Zorg ervoor dat wanneer u de draad vanaf links trekt, de spoel tegen de klok in draait (3). 5. Houd de bovendraad met uw linkerhand vast en draai het handwiel met uw rechterhandnaar u toe (tegen de klok in) om de naald te laten zakken (4) (5). Blijf het handwiel draaien totdat de naald zich opnieuw volledig omhoog bevindt. 6. Trek de bovendraad omhoog om de spoeldraad door de naaldplaat te trekken (6). 7. Trek beide draden door de naaldplaat en plaats ze onder de persvoet naar de achterkant van de machine, zodat er ongeveer 15 cm draad uitsteekt voor beide draden (7). 8. Sluit de spoelklep (8).
(1)
(2)
(3)
(4)
(5)
(6)
(7)
(8)
Draadspanning Na het selecteren van de juiste combinatie van naald en draad voor de gebruikte stof, kan het nodig zijn om de spanning van de naaimachine aan te passen om een juiste balans van de steken te garanderen. Een steek is volledig in balans wanneer de boven- en onderdraad er identiek uitziet op de stof. Uw machine is voorzien van een regelbare draadspanningswiel. Deze oefent spanning op de boven- en onderdraad uit terwijl ze door de machine gaan om een steek te vormen.Te veel spanning zorgt voor een strakke steek waardoor de stof gaat kreuken.Te weinig spanning zorgt voor een losse steek.Wanneer er een gelijkmatige spanning op beide draden wordt uitgeoefend, dan wordt een regelmatige steek gemaakt, die goed in balans is.
80
NL
B Gebruik van het toestelHet draadspanningswiel van de machine is genummerd van 1 tot 9 en de instellingen 3, 4 en 5 zijn gemarkeerd met een klein vierkantje rond het nummer om het instelbereik aan te geven voor de meest gebruikelijke steken.Hoe werkt de spanning? Om u het effect van de spanning op de stof en draad beter te laten begrijpen, voer deze eenvoudige test uit.Neem 2 stukken van een geweven stof van een gemiddeld gewicht en effen en lichte kleur, van ongeveer 15 cm lang. Installeer een naald van maat 14 in de machine. Rijg de bovenkant van de machine met een universele draad (donkere kleur) en breng hetzelfde type draad (lichtere kleur) in de spoel aan. Stel de machine in op steek nr. 3, een van de rechte steekopties. Naai de twee stukken stof aan elkaar, startend bij de hogere draadspanningsinstelling nr. 1. Draai tijdens het naaien het spanningswiel langzaam van 1 naar 9. Naai nog een rij door het wiel naar 1 terug te draaien. U zou een uitgebalanceerde steek moeten zien op elke rij halverwege tussen het begin en het einde. Draden van verschillende kleuren stellen u in staat om het effect van de spanning op de boven- en onderdraad te zien.
Te veel spanning
Te weinig spanning
Goed uitgebalanceerde steken
SpanningstestVoer deze eenvoudige test uit om te controleren of de bovendraad juist in de spanningsschijven is aangebracht: 1. Met de persvoet omhoog en de draad van de naald verwijderd, trek de draad naar deachterkant van de machine. U mag slechts een lichte weerstand en weinig of geen naaldafwijking detecteren. 2. Laat de persvoet nu zakken en trek de draad opnieuw naar de achterkant van de machine. Deze keer moet u een aanzienlijke weerstand en veel meer naaldafwijking detecteren. Als u geen weerstand detecteert, betekent dit dat de draad niet goed op de machine is aangebracht en u dit opnieuw dient te doen.
81
NL
B Gebruik van het toestel
Naaien
Soorten stoffen geschikt om te naaien
Eigenschappen van het stiksel
Eigenschappen van de stofGewoon Dik Dun Hard Zacht
Stof Katoen/ Linnen
Zijde/Wol Polyester
Elastiek
Eigenschappen van het stiksel: = Makkelijk te naaien = Moeilijk te naaien = Niet bevorderlijk voor een vloeiend stiksel
OPMERKING:1. Definitie van stofdikte: Dun: Dikte van twee lagen stof = < 0,35 mm. Dik: Dikte van twee lagen stof = > 0,8 mm. Gewoon: Dikte van twee lagen stof = 0,35 mm en 0,8 mm.2. Definitie van elastische stof: Als een stof met een afmeting van ‘100 mm × 30 mm’ rekbaar is tot 106 mm of meer onder een spanningskracht van 0,5 kg, dan wordt de stof gedefinieerd als elastisch, anders is deze niet-elastisch.3. Textuur van stof: Zacht: Stoffen zoals handdoeken, stofdoeken, etc. Hard: Stoffen zoals jeans, fijn linnengoed, etc.
82
NL
B Gebruik van het toestel
Een steekpatroon kiezenGebruik het patroonkeuzewiel om het gewenste steekpatroon te kiezen. De nummers op het wiel stemmen overeen met de patronen die op de voorkant van de machine zijn gedrukt. Draai het wiel totdat het gewenste steeknummer zich op één lijn bevindt met de rode stip op het wiel.
Steeknr. 1 2 3 4 5 6 7 8 9 10111213 14 15 16
Steeknaam
Gebruik
Korte rechte steek Naaien van lichte stoffen
Middellange rechte Naaien van middelzware
steek
stoffen
Lange rechte steek
Naaien van zwaardere stoffen
Linkse rechte steek Stiksel
Satijnen zigzagsteek
Appliqueren en decoratief naaien
Kort zigzagsteek
Naden afwerken, decoratief naaien
Middellange zigzagsteek
Naden afwerken, decoratief naaien
Lange zigzagsteek
Naden afwerken, decoratief naaien
Blinde zoom
Voor zomen op geweven stoffen; decoratief naaien
Lange blinde zoom
Voor zomen op geweven stoffen; decoratief naaien
Elastische blinde zoom
Voor zomen op elastisch breigoed; decoratief naaien
Meervoudige zigzagsteek
Voor herstellingswerk, aanbrengen van elastiek, decoratief naaien
Knoopsgaten naaien
1e stap van het naaien van een knoopsgat
Knoopsgaten naaien
2e stap van het naaien van een knoopsgat
Knoopsgaten naaien
3e stap van het naaien van een knoopsgat
Knoopsgaten naaien
4e stap van het naaien van een knoopsgat
Aanbevolen voet Universele voet Universele voet Universele voet Universele voet Satijnsteekvoet* Satijnsteekvoet* Satijnsteekvoet* Satijnsteekvoet* Blindzoomvoet* Blindzoomvoet* Blindzoomvoet*Satijnsteekvoet*Knoopsgatvoet
83
NL
B Gebruik van het toestel* Opmerking: U kunt deze steek maken met de universele voet, maar u krijgt een beter resultaat met de specifieke voet die is vermeld (niet inbegrepen).Rechte steek De rechte steek is de meest gebruikte steek voor alle soorten naaiwerken. 1. Om te beginnen met naaien, breng eerst de persvoethendel omhoog. 2. Trek de bovendraad en de spoeldraad onder de persvoet naar de achterkant van demachine en laat ongeveer 15 cm draad aan het einde van de draad over. 3. Plaats de stof onder de persvoet en laat de persvoethendel vervolgens zakken. 4. Draai het handwiel naar u toe (tegen de klok in) totdat de naald in de stof komt te zitten. 5. Start de machine door het pedaal in te duwen. Leid de stof met uw handen. Wanneer ude rand van de stof bereikt, stop de naaimachine.OPGELET! Trek of duw de stof niet tijdens het naaien, dit kan ertoe leiden dat de naald buigt en breekt.6. Draai het handwiel naar u toe (tegen de klok in) totdat de naald in de hoogste positie staat en breng de persvoethendel vervolgens opnieuw omhoog.7. Trek de stof naar achteren en knip de overtollige draad af met de draadafsnijder, die zich aan de zijkant van de machine bevindt.Achteruitsteek Achteruitsteken worden over het algemeen aan het begin en einde van een naaiwerk gemaakt. Het doel is om de draden aan beide uiteinden van het naaiwerk vast te zetten, zodat ze niet loskomen. · Stel het patroonkeuzewiel in op een rechte steek (steek nr.1 tot 4), afhankelijk van de stofdie u aan het naaien bent. · Plaats de stof onder de persvoet, binnen de bovenste knipranden van de stof. · Laat de persvoet zakken en naai ongeveer 3 steken. · Stop met naaien en houd vervolgens de achteruitnaaiknop aan de voorkant van de machineingedrukt. Houd deze ingedrukt terwijl u 3 steken in de tegenovergestelde richting naait.Opmerking: De lengte van de steek tijdens het achteruitnaaien is vooraf ingesteld, ongeacht de gekozen steek.· Laat de achteruitnaaiknop los en naai opnieuw naar voren, totdat u het andere uiteinde van de stof bereikt.· Houd de achteruitnaaiknop ingedrukt om opnieuw ongeveer 3 steken achteruit te naaien. · Laat de hendel los om opnieuw naar voren te naaien tot aan het einde van de stof. · Breng de persvoethendel omhoog en verwijder de stof uit de machine.
84
NL
B Gebruik van het toestel
De draad doorknippenOm de uiteinden van de draad te knippen, houd de stof in uw linkerhand vast. Neem de draad vanaf de achterkant van de machine en plaats de draaduiteinden in de draadafsnijder aan de zijkant van de machine. Trek omlaag totdat de draden zijn doorgeknipt.
fabric
Zigzagsteek De zigzagsteek kan worden gebruikt voor het afwerken van stiksels, appliqueren of decoratief naaien.Stiksels afwerken De stikranden ondersteunen het kledingstuk en moeten een duurzame afwerking hebben, in het bijzonder wanneer de stof kan rafelen.
85
NL
B Gebruik van het toestelEr zijn twee verschillende manieren om het naaiwerk af te werken: Knip na het naaien van de stikrand of maak een overlock. Probeer deze technieken eerst op een restje stof om te bepalen wat het meest voor uw project geschikt is.1. Stikranden afwerken · Stel de machine in op steek nr. 5 of 6 en bevestig de satijnsteekvoet (niet inbegrepen). · Naai, met de rechterkant van de steek aan de rand van het naaiwerk. Knip de stikrandengelijkmatig af.
2. Decoratief naaien U kunt een persoonlijke toets toevoegen of uw projecten verfraaien met decoratieve draad. Meng verschillende soorten en kleuren draad om de randen van kleding, interieuritems, handwerk en zoveel meer af te werken. · Stel de machine in op steek nr. 7 of 8, afhankelijk van de gewenste stijl. · Bevestig de satijnsteekvoet (niet inbegrepen). · Als u een dikkere draad gebruikt (zoals stikdraad), vervang de naald dan tevens door eennaald van een grotere maat.Appliqueren Appliqueren vindt plaats door stukken stof van bepaalde vormen op een basisstof te naaien om een tekening of patroon te vormen. Deze techniek biedt onbeperkte creatieve mogelijkheden.1. Het oplegwerk voorbereiden · Breng een warmteklevende band met een papieren rug aan op de achterkant van destof die u voor het oplegwerk wilt gebruiken, volgens de aanbevelingen van de fabrikant. · Teken de vorm van het oplegwerk en knip deze vorm vervolgens uit in de stof die van dewarmteklevende band is voorzien. · Verwijder de papieren rug van de band. Breng het oplegwerk op de basisstof aan en maakze stevig aan elkaar vast zodat het oplegwerk op zijn plaats blijft zitten.2. Appliqueren · Stel de machine in op steek nr. 5, de satijnen zigzagsteek. · Om te appliqueren, naai zodat de rechterkant van de steek op de buitenrand van hetoplegwerk valt en de kniprand van de stof wordt omsloten. De linkerkant van de steek komt in de stof van het oplegwerk terecht.
86
NL
B Gebruik van het toestel
Blinde zoomDe blinde zoomsteek wordt voornamelijk gebruikt om bijna onzichtbare zomen te maken op verschillende soorten projecten, zoals gordijnen, broeken, rokken, enz. Er zijn twee verschillende opties van blinde zoomsteken op de machine: de standaard blinde zoomsteek (voor zomen op geweven stoffen) en de elastische blinde zoomsteek (voor zomen op elastische stoffen). 1. Stel de machine in op steek nr. 9 voor de standaard blinde zoomsteek of stel de machinein op steek nr. 11 voor de elastische blinde zoomsteek. 2. Bevestig de blindzoomvoet (niet inbegrepen). 3. Installeer een gepaste naald voor het maken van de blinde zoom ( ‘Naald, stof endraadgeleider’). 4. Rijg de bovenkant van de machine en de spoel met een draadkleur die zo dicht mogelijkovereenstemt met de kleur van het artikel dat u wilt omzomen. 5. Vouw en speld de stof vast, zoals afgebeeld (1). 6. Plaats de stof onder de blindzoomvoet (niet inbegrepen) met de vouw van de stof zogeplaatst dat de naald de vouw niet doorboort totdat de naald naar links gaat. Zorg ervoor dat u de spelden verwijdert terwijl u naait (2). 7. Als u klaar bent, vouw de zoom omlaag en druk (3).
Under side
Under side
Top side
Meervoudige zigzagsteek De meervoudige zigzagsteek is een zeer veelzijdige steek. Gebruik het voor herstelwerk, het aanbrengen van een elastiek of gewoon als decoratieve versiering.Een scheur herstellen · Stel de machine in op steek 12 en bevestig de satijnen steekvoet (niet inbegrepen). · Knip de losse draden van de zone met de scheur af. · Om de zone met de zone te verstevigen, breng tussenvoering of een restje stof (van eenvergelijkbaar type stof en kleur) onder de scheur aan. · Start vanaf de rechterkant, breng de randen van de scheur naar elkaar toe en naai ze dicht. · Gebruik een handnaald om de draden naar de verkeerde kant te trekken, knoop zevervolgens vast en knip ze door. · Knip het overtollig stuk tussenvoering af.
87
NL
B Gebruik van het toestelEen elastiek aanbrengen Het is eenvoudig om een elastiek met behulp van de meervoudige zigzagsteek aan te brengen. De elasticiteit van deze steek voorkomt dat de steken breken wanneer het elastiek wordt uitgerekt. · Stel de machine in op steek 12 en bevestig de satijnen steekvoet (niet inbegrepen). · Als u een kledingstuk met een kapotte elastiek repareert, verwijder eerst het oude elastiekvan het kledingstuk en druk vervolgens. · Verdeel het elastiek en het gebied van het kledingstuk waar het elastiek in wordt genaaid invier delen. Breng een speld aan in deze vier delen van zowel het elastiek als het kledingstuk. · Trek zachtjes aan het elastiek om de stof gelijkmatig tijdens het naaien te bedekken. Handmatig een knoopsgat naaien 1. Bevestig de knoopsgatvoet. 2. Plaats de stof onder de knoopsgatvoet en laat de voet op de stof zakken waar u hetknoopsgat wilt naaien. 3. Kies de steek nr. 13. Duw het pedaal in om 5-6 steken op lage snelheid te naaien en laathet pedaal vervolgens los om te stoppen (Fig. a).Fig.a4. Kies de steek nr. 14. Duw het pedaal in om een voldoende lengte van steken op de stof te naaien en laat het pedaal vervolgens los. Zorg ervoor dat de steek recht is. (Fig. b).Fig.b5. Kies de steek nr. 15. Duw het pedaal in om 5-6 steken op lage snelheid te naaien en laat het pedaal vervolgens los (Fig. c).Fig.c
88
NL
B Gebruik van het toestel6. Breng de persvoethendel omhoog en draai de stof 180° (Fig. d).Fig.d180°7. Kies de steek nr. 16. Laat de persvoethendel zakken en duw het pedaal in om het naaien van het knoopsgat te voltooien. (Fig. e).Fig.e
89
NL
C Reiniging en onderhoud
Reiniging en onderhoud
WAARSCHUWING! · Schakel het apparaat altijd uit en haal de stekker uithet stopcontact voordat het wordt schoongemaakt. · Om elektrische gevaren te vermijden, dompel hetapparaat, het snoer, de stekker of het pedaal nooit onder in water of een andere vloeistof. Spoel ze nooit onder de kraan.Belangrijk: Maak het apparaat nooit schoon met een oplosmiddel, chemisch of agressief schoonmaakmiddel, metalen borstel, scherp voorwerp of een schuursponsje. · Reinig de machine met een zachte, droge doek. · Open de spoelklep, haal de spoel uit en gebruik een borsteltje om het spoelhuis schoon te maken. Sluit de klep opnieuw. · Stel de machine niet bloot aan hoge temperaturen. · Laat de machine niet vallen. · Vervang de accessoires zoals beschreven in deze gebruikershandleiding. · Zorg er altijd voor dat de accessoires juist zijn geïnstalleerd voordat u de stekker in het stopcontact steekt. De naailamp vervangen
GEVAAR! Voordat u de naailamp vervangt, haal de stekker uit het stopcontact om het risico op elektrische schokken te voorkomen.1. Haal de stekker uit het stopcontact. 2. Maak de schroef aan de achterkant van de voorklep los, zoals afgebeeld. 3. Sluit de voorklep.
90
NL
C Reiniging en onderhoud4. Observeer de + en aansluiting van de LED-lamp en verwijder deze vervolgens. 5. Vervang de LED-lamp door een lamp van hetzelfde nominale type ( 0,6 W en LED-spanning 3,2 V, LED 5 mm). 6. Sluit de voorklep en draai de schroef vast.
Probleemoplossing Volg deze probleemoplossingsgids om veelvoorkomende problemen op te lossen. Als het probleem opnieuw optreedt, gebruik het apparaat dan niet en neem contact op met een erkend servicecentrum voor controle of reparatie.
ProbleemEr is geen stroom of de machine werkt langzaam.
Mogelijke oorzaak· De netadapter is niet geschikt.
Oplossing· Gebruik alleen de netadapter die met dit apparaat is meegeleverd.
91
NL
C Reiniging en onderhoud
Probleem Er worden steken overgeslagen.Er kan niet aan de spoeldraad worden getrokken. De draad blijft breken.Steken zijn te los of onregelmatig. De naald breekt.
Mogelijke oorzaak· Naald is verkeerd ingebracht.· De naald is krom. · De persvoet zit te los.· De spoel is leeg. · De naald is op eenverkeerde manier van draad voorzien.· De naald is krom. · De naaldstang zit nietgoed op zijn plaats. · Het draadspanningswiel,draadgeleider of draadtrekstang zitten te strak.· De spanning van de steken is niet in balans.· De naald is krom of vervormd.
Oplossing · Verwijder de naald en breng dezeopnieuw aan met de platte kant naar achteren gericht. · Vervang door een nieuwe naald. · Zet de persvoet vast. · Vervang het door een volle spoel. · Rijg de naald opnieuw van voor naar achteren.· Vervang door een nieuwe naald. · Vervang door een nieuwe naald. · Verlaag de draadspanning door eennummer tussen 3 en 5 te kiezen.· Breng de bovendraad en spoeldraad opnieuw aan.· Vervang door een nieuwe naald.
Waarom krul of vouwt de draad onder mijn stof op?Wanneer de draad onder uw stof opkrult, is dit over het algemeen te wijten aan een verkeerd aangebrachte draad of een verkeerde spanning van de bovendraad. Ga in dit geval als volgt te werk: 1. Met de persvoet omhoog en het draadspanningswiel ingesteld op 4, breng de bovendraadopnieuw aan met inachtneming van de schema’s op uw machine: Plaats de draadspoel op de spoelhouder en zet deze vast met de draadspoelkap. Terwijl u de draadspoel met de rechterhand op zijn plaats houdt, gebruik uw linkerhand om de draad vast te houden en door de draadgeleider te steken en volg vervolgens de weg van de draad door deze omlaag in de spanningsgleuf te laten zakken, rond de onderkant van de machine en vervolgens omhoog aan de andere kant aan te brengen. Blijf de machine van draad voorzien, maar steek deze niet in de naald. 2. Voordat u de draad in de naald steekt, voert deze eenvoudige test uit om ervoor te zorgen dat de bovendraad juist is aangebracht. Terwijl de persvoet omhoog is gebracht, trek aan de draad. U moet eenvoudig aan de draad kunnen trekken. Laat de persvoet vervolgens zakken. De draad moet nu weerstand bieden als u eraan trekt. De spanning op de draad moet aanzienlijk groter zijn. Als de spanning niet toeneemt, is de bovendraad verkeerd aangebracht. Probeer het opnieuw ( ‘De machine van bovendraad voorzien’).
Waarom slaat mijn machine steken over? Steken kunnen worden overgeslagen als de naalden zijn stomp of beschadigd zijn, of als ze verkeerd in de machine worden aangebracht.
92
NL
C Reiniging en onderhoud· Controleer eerst of de naald stomp of beschadigd is en vervang deze indien nodig. Zorg er ook voor dat u de juiste naaldmaat gebruikt voor het type stof dat moet worden genaaid ( ‘Naald, stof en draadgeleider’).· Controleer vervolgens of de naald juist is ingebracht. De naald moet zo hoog mogelijk worden geduwd. Het is gemakkelijk om de naald halverwege aan te brengen, vast te draaien en te denken dat deze juist is geïnstalleerd. Bovendien moet de platte kant van de naald naar achteren zijn gericht. Als de naald niet juist is ingebracht, kan ze de draad niet uit de spoel trekken, wat tot het overslaan van steken zal leiden.Opslag· Haal altijd de stekker uit het stopcontact voordat u het apparaat opbergt.· Bewaar het apparaat in een koele, droge en schone ruimte, uit de buurt van kinderen en huisdieren.· Bewaar de verpakking om uw apparaat in op te bergen als u het langere tijd niet denkt te gebruiken.
93
NL
¡Muchas gracias!Muchas gracias por haber elegido nuestro producto VALBERG. Seleccionados, testados y recomendados por ELECTRO DEPOT, los productos de la marca VALBERG le aseguran una utilización sencilla, un rendimiento fiable y una calidad incuestionable.Con este dispositivo puede estar seguro de que siempre quedará satisfecho al utilizarlo. Le damos la bienvenida a ELECTRO DEPOT.Visite nuestra página web: www.electrodepot.es
94
ES
ÍndiceA Descripción del aparatoB Utilización del aparatoC Limpieza y mantenimiento
Componentes Descripción del aparato Uso previsto CaracterísticasDescripción general de la máquina Enhebrado de la máquina CosturaLimpieza y mantenimiento Sustitución de la lámpara de costura Resolución de problemas Almacenamiento
95
ES
A Descripción del aparatoLEA DETENIDAMENTE ESTE MANUAL DE INSTRUCCIONES Y LAS ADVERTENCIAS NORMATIVAS ANTES DE UTILIZAR EL APARATO. GUARDE AMBOS MANUALES PARA FUTURAS CONSULTAS.ComponentesVolante: controla el movimiento de la palanca tirahilos y la aguja. Se puede controlar de forma automática o manual. Cuando gire el volante a mano, hágalo siempre hacia usted (en sentido antihorario).Dial de selección de patrón: utilice el dial para seleccionar la puntada deseada para coser. El dial está numerado del 1 al 16 y los números corresponden a los patrones de puntadas indicados en el cuerpo de la máquina de coser.Palanca de marcha atrás: invierte el sentido de costura de una puntada recta (puntada n.º 1 a 4). Simplemente empuje la palanca completamente hacia abajo y manténgala en su lugar. Suéltela para reanudar la costura hacia adelante.Interruptor de encendido/apagado y control de velocidad: se utiliza para encender o apagar la máquina de coser y para ajustar la velocidad. Seleccione «L» o «H» (velocidad lenta o rápida) para encender la máquina y ajustar la velocidad. Seleccione «OFF» para apagar la máquina.Extensión extraíble con compartimento para accesorios: proporciona una superficie plana más grande para coser. Se puede quitar para acceder al brazo libre y poder coser áreas de tela más pequeñas y difíciles de alcanzar, como dobladillos de pantalones o de mangas. Está diseñada con un compartimento de almacenamiento en el interior para almacenar los accesorios de la máquina.Alzador del prensatelas: use esta palanca para subir y bajar el prensatelas. Levante el alzador del prensatelas antes de enhebrar la máquina o sacar la tela de la máquina, y bájelo antes de coser.Botón de la luz y lámpara de costura: se utiliza para iluminar el área de costura.Cortahilos: está integrado en el lateral de la máquina para mayor comodidad. Úselo para cortar los extremos del hilo rápida y fácilmente después de completar una puntada.Panel frontal: aloja la palanca tirahilos, la lámpara de costura, el mecanismo de tensión y otras piezas.
96
ES
A Descripción del aparatoDial de tensión del hilo: permite seleccionar la tensión correcta para la puntada, el hilo y la tela. Los discos tensores, ubicados en el interior de la máquina, regulan la tensión en el hilo superior. El dial de tensión del hilo está numerado del 1 al 9. Cuanto menor sea el número, menor será la tensión en el hilo superior, y cuanto mayor sea el número, mayor será la tensión. Los ajustes 3, 4 y 5 están marcados con un pequeño cuadrado alrededor del número para indicar el rango de ajuste en el que se realizarán la mayoría de labores de costura.Palanca tirahilos: controla la cantidad de hilo superior suministrado. La hendidura de enhebrado automático simplifica el enhebrado del alzador.Guiahilos: guía el hilo desde el portacarretes hasta los discos tensores o el devanador de canilla.Asa de transporte: está integrada para facilitar el transporte de la máquina.Devanador de canilla: enrolla el hilo en la canilla para usarlo como hilo inferior.Tope del devanador de canilla: se utiliza en el proceso de bobinado de la canilla.Tornillo de fijación de la aguja: sujeta la aguja en la máquina de coser para coser.Aguja: se inserta en la barra de la aguja. Contiene el hilo para coser.Soporte del prensatelas: se fija a la barra del prensatelas. Mantiene el prensatelas en su lugar para coser.Placa de la aguja: se encuentra debajo del área del prensatelas, alrededor de los dientes de arrastre. Proporciona una superficie plana para la tela mientras se cose.Botón de liberación de la tapa de la canilla: se encuentra a la derecha de la tapa de la canilla. Presione el botón de la derecha para retirar la tapa de la canilla cuando reemplace la canilla.Tapa de la canilla (y canillero en el interior): cubre la canilla y el canillero. Es transparente, lo que facilita el control del avance del hilo (inferior) de la canilla. Canillero: sujeta la canilla de forma segura y proporciona la tensión adecuada al hilo de la canilla mientras se cose.Dientes de arrastre: desplazan la tela debajo del prensatelas.
97
ES
A Descripción del aparatoPrensatelas: mantiene la tela plana contra los dientes de arrastre. Utilice el alzador del prensatelas para bajar el prensatelas (para coser) o para levantarlo (para retirar la tela).Tornillo del soporte del prensatelas: se encuentra a la izquierda del soporte del prensatelas. Mantiene el soporte del prensatelas en su lugar en la barra del prensatelas.Palanca de liberación del prensatelas: se encuentra en la parte posterior del soporte del prensatelas. Utilice esta palanca para retirar el prensatelas del soporte del prensatelas.Barra del prensatelas: sostiene el soporte del prensatelas y el prensatelas. Se sube y baja con el alzador del prensatelas.Portacarretes con tapa del portacarretes: sujeta el carrete de hilo en su lugar con la tapa del portacarretes, lo que permite que el hilo superior se desenrolle sin exceso o falta de tensión. El portacarretes se puede utilizar de forma horizontal o vertical, según el tamaño del carrete de hilo.Carrete de hilo: sujeta y suministra el hilo superior a los discos tensores. El diagrama de la parte superior de la máquina muestra cómo debe pasar el hilo superior a través del guiahilos.Brazo libre: permite coser dobladillos de mangas o pantalones, escotes u otras aberturas pequeñas en la ropa. Retire la extensión para acceder al brazo libre.Entrada del pedal: está ubicada en la parte posterior de la máquina. Conecte el pedal a esta entrada antes de empezar a coser.Entrada del adaptador de corriente: ubicada en la parte posterior de la máquina. Conecte el adaptador de corriente (suministrado) a esta entrada.Pedal: sirve para poner en marcha la máquina y detenerla. Pise el pedal con el pie para comenzar a coser y retire el pie del pedal para dejar de coser.Adaptador de corriente: un extremo se conecta a la entrada de alimentación de la máquina, y el otro, a la toma de corriente.Carrete de hilo x 2Canilla x 2Enhebrador de agujas x 1
98
ES
A Descripción del aparato
Aguja x 1 Prensatelas para ojales automático x 1 Prensatelas para ojales x 1
Descripción del aparato· Desembale el aparato. Retire todas las etiquetas adhesivas presentes en el producto. Compruebe que el aparato esté completo y en perfecto estado. Si el aparato presentara daños o no funcionara como es debido, no lo utilice y llévelo a su distribuidor o servicio de posventa.· Mantenga todos los elementos del embalaje fuera del alcance de los niños. Podrían producirse accidentes si los niños jugaran con los materiales del embalaje.Uso previsto· Este aparato está diseñado solo para uso doméstico y para coser, como se describe en este manual de usuario. No está concebido para un uso industrial o comercial. Utilice este aparato únicamente en interiores y en un entorno seco.· Cualquier otro uso podría dañar el aparato o provocar un incendio, una descarga eléctrica o lesiones.Características
Modelo:Entrada del adaptador de corriente:Tensión de funcionamiento de la máquina de coser:Consumo:
972697 VB-MAC 100-240 V CA, 50/60 Hz12 V CC, 2,0 A 24 W
99
ES
B Utilización del aparatoDescripción general de la máquina¡ADVERTENCIA! Antes de agregar o quitar piezas de la máquina de coser, asegúrese de que esté desenchufada de la red eléctrica.Extensión extraíble con compartimento para accesorios · Para retirar la extensión de la máquina, sosténgala firmemente y tire de ella hacia laizquierda. Una vez retirada la extensión, tendrá acceso al brazo libre. Este ajuste le permite coser dobladillos de pantalones o mangas, así como otras áreas de tela de difícil alcance.
· La extensión está diseñada con un compartimento para accesorios en el interior que sirve para guardar los accesorios de la máquina. Para abrir el compartimento de accesorios, baje la tapa como se muestra.· Para volver a colocar la extensión, alinéela con el lado izquierdo de la máquina y empújela hasta que encaje en su lugar.
Conexión del cable de alimentación y del pedalEsta máquina de coser se suministra con un adaptador de corriente que debe enchufarse a una toma de corriente adecuada. 1. Asegúrese de que el interruptor de encendido/apagado de la máquina esté en «OFF».
100
ES
B Utilización del aparato2. Conecte el pedal a la entrada del pedal en la parte posterior de la máquina, como se muestra.3. Conecte el cable del adaptador de corriente en la entrada de alimentación y, a continuación, enchufe el adaptador en una toma de corriente adecuada. Asegúrese de que todos los enchufes estén firmemente insertados.
 report this ad
¡ATENCIÓN! · Utilice únicamente el adaptador de corriente (modelo: S030A1202000E)suministrado con este aparato para evitar cualquier riesgo eléctrico y evitar daños en el aparato. · Este dispositivo solo debe utilizarse
References
[xyz-ips snippet=”download-snippet”]