
User Manual
VBESTLIFE 4G Intelligent Solar Energy Alert PTZ Camera
1. PRODUCTS & PACKING LIST
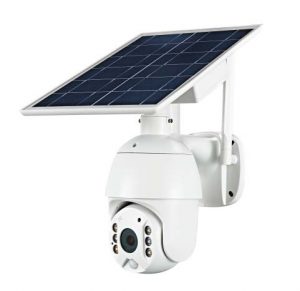
1.1 Product Picture:
1.2 Packing list:

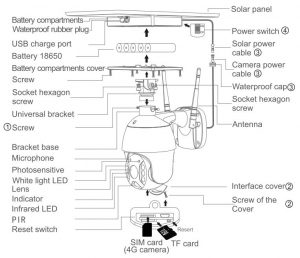
Product diagram
1.3 Process
- Solar panel: connect panel to camera, fix a suitable angle with screws
- Sim and TF card: loosening the cap in above remark
- Insert SIM card and TF card , then tightening the screws.. Power cable: connect the cables between the panel and camera, then tightening the waterproof cap.
- Panel power-on: Remove the rubber of panel, make sure it is power on. Then put the rubber back to the panel.
Installation
Integrated installation
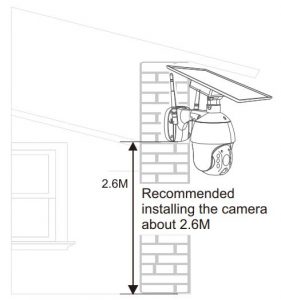
Separated installation

3. APP INSTALLATION
- Scan the following QR codes or seach for 〝UBox〞from the App Store(for iOS devices) or Google Play Store (for Android smartphones) to download and install the app.

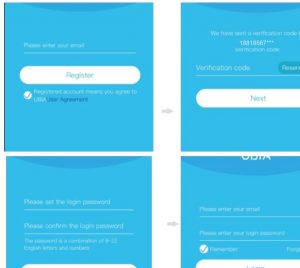
APP REGISTRATION
- Open the app then input your E-mail address then press ‘Register’. Check and select to agree the agreement then your E-mail box will get an verification code.( For better user’s experience, please allow to open all permissions to avoid missing any notifications from the app.)
- Input the “Verification code” and press ‘Next’. (if you not found the mail you might find the code in your email spam box.)
- Set the login password and confrim the login password.Then press ‘Register’ to next step.(For your password safety, the password requires more than 8 characters plus a combination of letters)
- Enter your E-mail address, and input your login password. Then press ‘Login’.
4. WI-FI CONNECTION
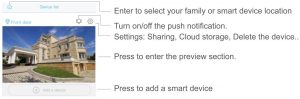
- Press ‘Add Family’ then set the room or position as per reminders.
- Enter your family name and then press ‘Next’.
- input the necessary information just like Country, Province, then press ‘Done’
- Press ‘Add a device’ to add a smart device


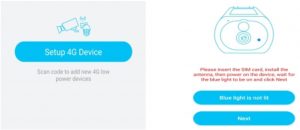
- Insert the SIM card into device then put the battery into the decice, and some of models need install antenna.
- After the power on the device, wait for about 1 minute the device bule LED light up Then press next. .
- If the device blue LED not light up, please check below config notes.
- Find the UID QR code on deive , then use APP scan the QR code.

- APP are search the device in internet it may take 5-60 seconds.
- Select the name and device location then press ‘Done.’

- The device will enter to the device list automatically. Setup success!
- The device is ready to use. 12.Notes about PIR detection.
- User can change the PIR detection sensitivity in device setings.we recommend to set sensitivity at “Disabled” or “Low” to reduce flase alret and save the battery power in noisy environments.
- Disabled: disabled PIR detection.
- Low: deleay 7 seconds PIR detects a moving.
- Medium: deleay 5 seconds PIR detects a moving.
- High: deleay 1 second PIR detects a moving.
5. DEVICE SETTING

6. SPECIAL NOTES!
- The device is equipped with a rechargeable lithium battery. The battery life will be affected by the device wake-up time and the number of wake-ups. Therefore, the PIR sensor alarm detection function is used in an environment with a lot of people. It is recommended to turn off or set the device to low sensitivity to reduce device wake-up and call times extend battery life. When the battery is low, please charge the battery immediately.
- Keep the device in range of your router. Make sure the device is placed close to the Wi-Fi router. If there has to be thick or insulated objects between the device and the Wi-Fi router, which may lead to weak Wi-Fi signal, please make sure the Wi-Fi signal is in good level before you start using the device.
- It is a delicated device with low power consumption design. Everytime the device is awakened and will work for few seconds. After that, the device will enter standy mode to save power. You can set the work time in the app settings.
- Because the mainland China does not receive Google’s system push messages, you need to open the app’s self-starting function in your phone to receive push messages.
- This device provides one month of free cloud storage services. If you need to continue using value-added services after the trial period expires, you need to purchase them in the app.
[xyz-ips snippet=”download-snippet”]