velleman SMART1310 PEREL Smart Converter User Manual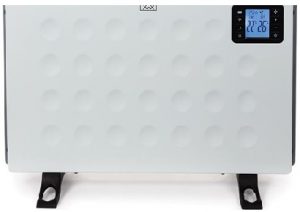
This product is only suitable for well-insulated spaces or occasional use.
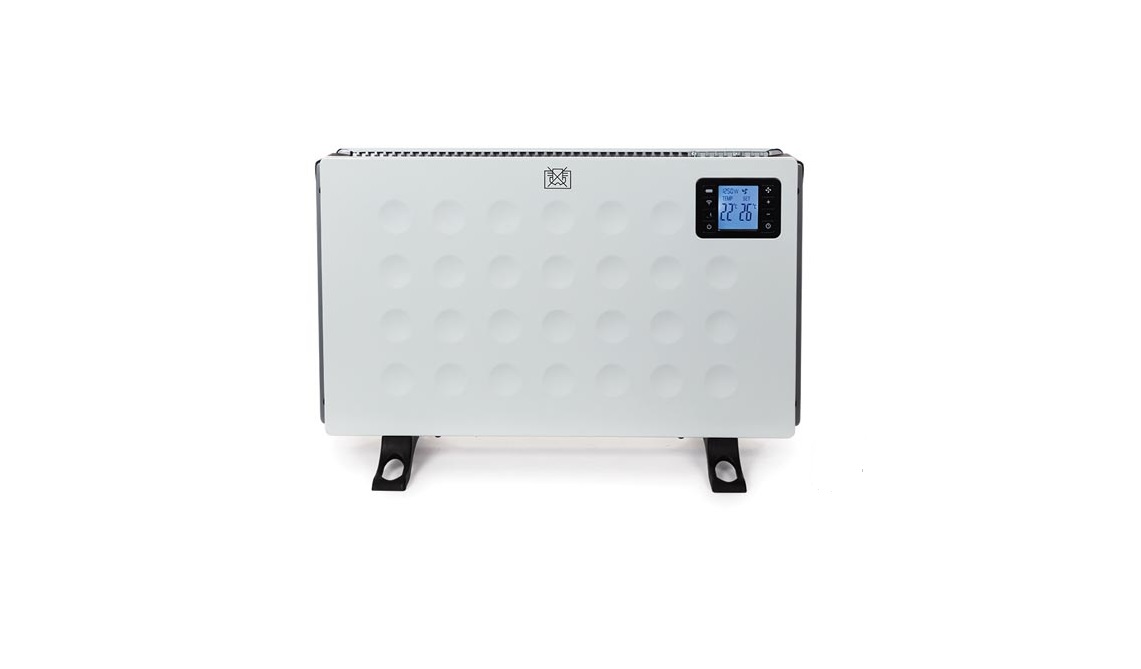
SMART1310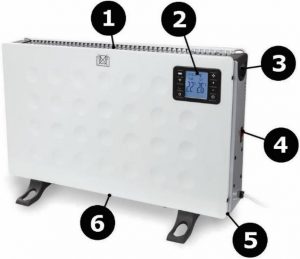
1. Introduction
 To all residents of the European UnionImportant environmental information about this productThis symbol on the device or the package indicates that disposal of the device after its lifecycle could harm the environment. Do not dispose of the unit (or batteries) as unsorted municipal waste; it should be taken to a specialized company for recycling. This device should be returned to your distributor or to a local recycling service. Respect the local environmental rules.If in doubt, contact your local waste disposal authorities.
Thank you for choosing Perel! Please read the manual thoroughly before bringing this device into service. If the device was damaged in transit, do not install or use it and contact your dealer.
2. Safety Instructions
![]() Read and understand this manual and all safety signs before using this appliance.
Read and understand this manual and all safety signs before using this appliance.![]() Warning: In order to avoid overheating, do not cover the heater.
Warning: In order to avoid overheating, do not cover the heater.![]() For household use only.
For household use only.![]() CAUTION – Some parts of this product can become very hot and cause burns. Particular attention has to be given where children and vulnerable people are present.
CAUTION – Some parts of this product can become very hot and cause burns. Particular attention has to be given where children and vulnerable people are present.
- Children of less than 3 years should be kept away unless continuously supervised.Children aged from 3 years and less than 8 years shall only switch on/off the appliance provided that it has been placed or installed in its intended normal operating position and they have been given supervision or instruction concerning use of the appliance in a safe way and understand the hazards involved. Children aged from 3 years and less than 8 years shall not plug in, regulate and clean the appliance or perform user maintenance.
- This appliance can be used by children aged from 8 years and above, and persons with reduced physical, sensory or mental capabilities or lack of experience and knowledge if they have been given supervision or instruction concerning the use of the appliance in a safe way and understand the hazards involved. Children shall not play with the appliance. Cleaning and user maintenance shall not be made by children without supervision.
- If the external flexible cable or cord of this appliance is damaged, it shall be exclusively replaced by the manufacturer or his service agent or a similar qualified person in order to avoid a hazard.
- Do not use this appliance in the immediate surroundings of a bath, a shower or a swimming pool.
- The appliance must not be located immediately below a socket outlet.
- Some parts of this product can become very hot and cause burns. Do not touch the appliance when in use or shortly after use. Do not rest the power cable on the appliance when hot.
- This appliance must not be supplied through an external switching device, such as a timer, or connected to a circuit that is regularly switched on and off by the utility.
- The use of an extension lead or multi-plug adaptor is not advised when connecting this appliance to the mains. Connection through these devices could lead to a risk of overloading, overheating and even fire at the extension lead or adaptor due to inadequate connection quality.
- Install the appliance in a vertical position and at a distance of minimum 0.5 m away from furniture and other objects. Never operate the appliance near inflammable or explosive materials or gases.
- Do not use the appliance in rooms when these are occupied by persons not capable of leaving the room on their own, unless constant supervision is provided.
- The first time you use the appliance, a little smoke and smell due to the protective substances applied to the heating element before transport may be given off. This is normal and should not be considered a fault.
3. General Guidelines
- Refer to the Velleman® Service and Quality Warranty on the last pages of this manual.
- All modifications of the device are forbidden for safety reasons. Damage caused by user modifications to the device is not covered by the warranty.
- Only use the device for its intended purpose. Using the device in an unauthorised way will void the warranty.
- Damage caused by disregard of certain guidelines in this manual is not covered by the warranty and the dealer will not accept responsibility for any ensuing defects or problems.
- Nor Velleman nv nor its dealers can be held responsible for any damage (extraordinary, incidental or indirect) – of any nature (financial, physical…) arising from the possession, use or failure of this product.
- Keep this manual for future reference.
4. Technical Specifications
|
Power Supply |
220-240 V~, 50/60 Hz |
|
Power Consumption |
1800-2000 W |
|
WLAN Frequency |
2.4 Ghz |
|
WLAN Frequency |
White |
|
Colour |
White |
|
Dimensions |
605 X 210 X 375 Mm |
| Weight |
3.2 Kg |
Information requirements for electric local space heaters
| Model identifier(s): | |||||
| Item | Symbol | Value | Unit | Item | Unit |
| Heat output | Type of heat input, for electric storage local space heaters only (select one) | ||||
| Nominal heat output | Pnom | 2,0 | kW | manual heat charge control, with integrated thermostat | no |
| Minimum heat output (indicative) | Pmin | 0,75 | kW | manual heat charge control with room and/or outdoor temperature feedback | no |
| Maximum continuous heat output |
Pmax,c |
2,0 |
kW |
electronic heat charge control with room and/or outdoor temperature feedback |
no |
| Auxiliary electricity consumption | fan-assisted heat output | no | |||
| At nominal heat output | elmax | 2,000 | kW | Type of heat output/room temperature control (select one) | |
| At minimum heat output | elmin | 0,75 | kW | single-stage heat output and no room temperature control | no |
| In standby mode | elSB | 0,001 | kW | two or more manual stages, no room temperature control | no |
| with mechanic thermostat room temperature control | no | ||||
| with electronic room temperature control | no | ||||
| electronic room temperature control plus day timer | yes | ||||
| electronic room temperature control plus week timer | no | ||||
| Other control options (multiple selections possible) | |||||
| room temperature control, with presence detection | no | ||||
| room temperature control, with open window detection | no | ||||
| with distance control option | no | ||||
| with adaptive start control | no | ||||
| with working time limitation | yes | ||||
| with black bulb sensor | yes | ||||
| Contact details | Velleman NVLegen Heirweg, 33 9890 Gavere, Belgium |
5. Assembly
Fit the included feet to the unit before using the appliance. These are to be attached to the base of the heater using the four included self-tapping screws, taking care to ensure that they are located correctly in the bottom ends of the side mouldings.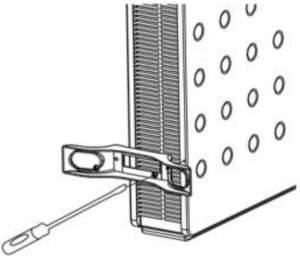
6. Overview
Refer to the illustrations on page 2 of this manual.
Heater
|
1 |
air outlet |
|
2 |
control panel |
|
3 |
Handle |
|
4 |
on-off switch |
|
5 |
temperature sensor |
|
6 |
air inlet |
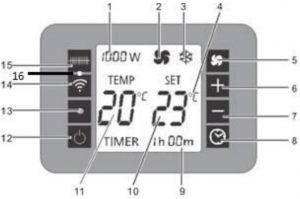
Control Panel
|
1 |
selected heating level |
|
2 |
fan |
|
3 |
frost protection |
|
4 |
selected temperature unit |
|
5 |
fan button |
|
6 |
temperature increase |
|
7 |
temperature decrease |
|
8 |
timer button |
|
9 |
running time |
|
10 |
selected temperature |
|
11 |
measured temperature |
|
12 |
on-off button |
|
13 |
IR eye |
|
14 |
Wi-Fi button |
|
15 |
heat setting button |
|
16 |
Wi-Fi LED |
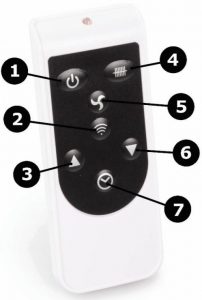
Remote Control
|
1 |
on-off |
|
2 |
Wi-Fi |
|
3 |
temperature increase |
|
4 |
heat setting |
|
5 |
fan |
|
6 |
temperature decrease |
|
7 |
timer |
7. Use
Powering the Appliance
- Connect the appliance to the mains and switch it on. The current ambient temperature is displayed.
- Select the heating mode (750 W/1250 W/2000 W + frost protection).
Setting the Temperature
- Set the desired temperature with the temperature increase/decrease button. The setting range is 5 °C to 37 °C. The appliance will automatically enter the stand-by mode as soon as the room temperature reaches the set temperature, and restart heating when the ambient temperature drops 1 °C below the set temperature.
- In frost protection mode, an appliance in stand-by will automatically switch to the highest heating mode (2000 W) as soon as the room temperature drops to 5 °C and switch off when the ambient temperature reaches 9 °C.
Timer
- Set the timer (increments of 1 hour) with the timer button. The timer will automaticallycount down; the appliance will automatically enter stand-by mode after the countdown hasfinished.
Fan
- Activate and de-activate the fan with the fan button. The fan will disperse the heat betteracross the room.
Memory
- This heater features an internal memory and will memorize the last set temperature before switch-off.
8. Tuya Smart App
- iOS

- Android


Activating/De-Activating the Wi-Fi
- Switch on the appliance.
- Press and hold the Wi-Fi button on the remote control or control panel for 3 seconds. The Wi-Fi LED will flash quickly to indicate the appliance is connected.
- You can disconnect the appliance from the Wi-Fi by simply switching off the appliance, or by pressing and holding the Wi-Fi button on the remote control or control panel for 5 seconds.
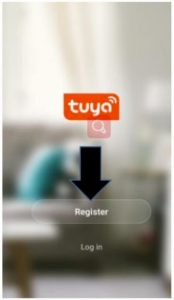
Registering the Tuya Smart App
- Press the register button.
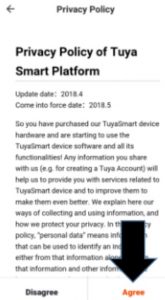
- Read the privacy policy and agree.
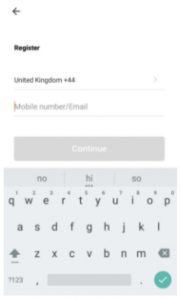
- Enter your e-mail address and phone number, and press Continue.
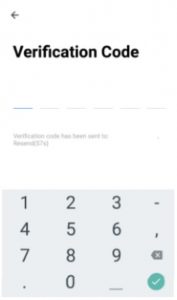
- A verification code will be sent. Enter the code into the app.
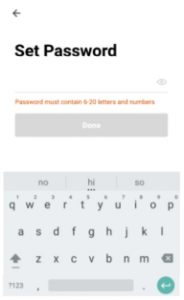
- Set a valid password.
- The app is now registered.

Creating RoomsThe Tuya Smart app is designed so it can work with multiple compatible smart devices in your home. When a new appliance is added, it is assigned to one of the rooms you have created.
- Press the Add Home button.
- Enter your home name.
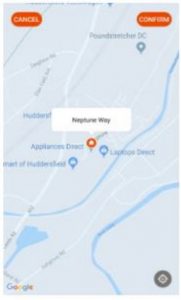
- Set a geographic location (see below).Setting Your Location
- To add a new room, select your room and click the Add Another Room button (see below).Adding a RoomEnter the name of the room and press the Done button to confirm.
- To remove a room, uncheck the undesired room.
- Confirm by clicking the Done button.


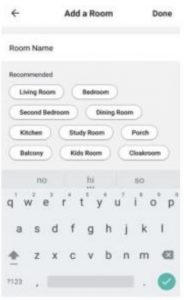 Enter the name of the room and press the Done button to confirm.
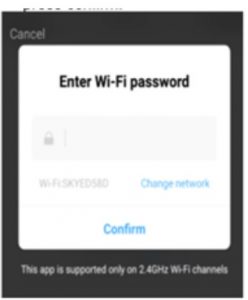
Connecting the HeaterSet the appliance in stand-by mode with the Wi-Fi LED blinking. Also, ensure your phone is connected to the Wi-Fi network.
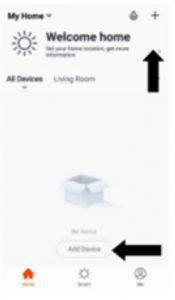
- Open the app and click + or the Add Device button to add the appliance.
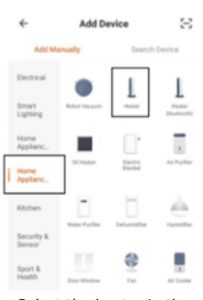
- Select the heater in the Home Appliance tab.
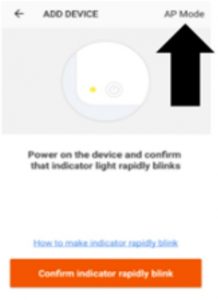
- Click the AP Mode button.
- Make sure the Wi-Fi LED on the heater is blinking. Click the Confirm button.
- Enter your Wi-Fi password and press Confirm.
- The appliance will now pair (please retry if this was unsuccessful).


Controlling the Appliance through the App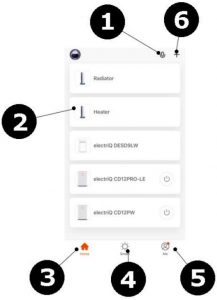
- Voice Control: Press to give vocal instructions.
- Heater Name: Press to enter the Device screen (see below).
- Home: Press to return to the home screen.
- Smart Scene: Allows you to set up programmes.
- Profile: Modify your personal settings.
- Add Device: Add an appliance and set it up.
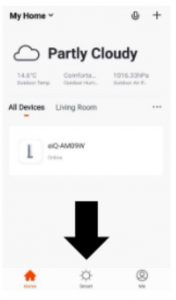
Device Screen

- Back: Return to the home screen.
- Desired Temperature: Target temperature.
- Decrease Temperature: Range 5 to 37 °C.
- Power: Switch the unit on/off.
- Mode: Select the preset mode.
- Level: Select the heat setting.
- Countdown Timer: Set up your timer.
- Settings: Set up multiple options.
- Increase Temperature: Range 5 to 37 °C.
- Current Mode: Selected heater mode.
- Edit Name: Modify the name of the appliance.
- Device Name.
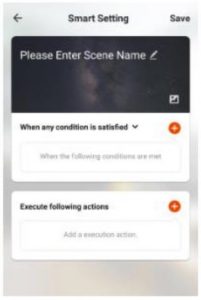
Smart Scenes
Smart Scenes allows you to customize the operation of your heater. Below is an example.
- Click the Smart tab at the bottom of the screen.
- Add a scene by clicking +.
- Enter the scene name. Click on + to add an action.
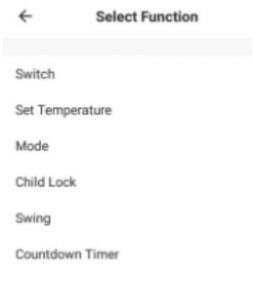
- Select an action and set the values.

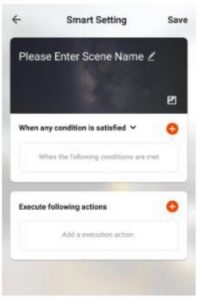

Once all functions have been added, press the Save button.
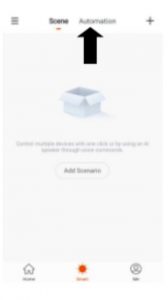
Automation
- Set an action, which will be automatically triggered. Below is an example. Click the Smart tab at the bottom of the screen.
- Click the Automation button.
- Click + or the Add Automatic Action button to add an action.
- Set up an action, similarly to a Smart Scene above. Set a trigger condition and add an action.
- Select the trigger condition (multiple triggers are combinable).

Me Profile Tab
Home ManagementManage your Tuya account.Message CenterView notifications from connected appliances.Help CenterProvides assistance.More ServicesAllows your appliance to be integrated to other appliances.
9. Connection Troubleshooting
- Check whether the appliance and Wi-Fi connection mode are switched on.
- Make sure to enter the correct Wi-Fi password (case sensitive).
- Ensure your phone is connected to the Wi-Fi network. The network signal (2.4 GHz) should be strong.
10. Care and Maintenance
Cleaning
- Before cleaning, switch of the appliance, disconnect from the mains and allow to cool completely.
- Occasionally wipe with a damp cloth to keep it looking new. Do not use harsh chemicals, cleaning solvents or strong detergents.
- Never immerse the appliance in water or any other liquid. Protect it from splashes and spraying liquid.
Storage
- Store the appliance in its original package in a cool and dry place.
RED Declaration of ConformityHereby, Velleman NV declares that the radio equipment type SMART1310 is in compliance withDirective 2014/53/EU.The full text of the EU declaration of conformity is available at the following internet address:www.velleman.eu.
Use this device with original accessories only. Velleman nv cannot be held responsible in the event of damage or injury resulting from (incorrect) use of this device. For more info concerning this product and the latest version of this manual please visit our website www.velleman.eu. The information in this manual is subject to change without prior notice.
References
[xyz-ips snippet=”download-snippet”]