
![]()
Instructions to Set Up Your E-Dasher
Diagram

We know you are excited about getting going but please:✓ Reseat and charge the battery before the first ride✓ Make sure the pedals are tight✓ Make sure the front wheel is installed properly and tight✓ Check to be sure the tires are inflated properly✓ Learn how to turn on the bike.Please Note: The bike may need further adjustments after assemblyIf you have any trouble with setup please contact us through [email protected]
Assembling Your E-Bike
- Read all of the instructions carefully. Be familiar with the proper operation of all items.
- This quick guide is intended to list the steps needed to assemble your bike with some mechanical skills. It is not a complete manual or training. If you do not feel comfortable or lack some of the skills to assemble it yourself, reach out to a cyclist friend, a local bike mechanic or one of our support technicians for guidance.
- Our QA mechanics have assembled and tested your bike beforehand.
- To assemble your bike, work on a clean area with enough space to maneuver.
- If installed, remove the battery from the bike to start the assembly.
- Inspect the bike completely to be sure no damage occurred during shipping.
- The kickstand is designed to support the bicycle only. Not the rider mounted.
- You can adjust the tilt on your handlebar items for comfort.
- Check all screws and parts are tight and properly fixed. We recommend a pre-trip inspection before your first rides.
Installing Your Handlebars
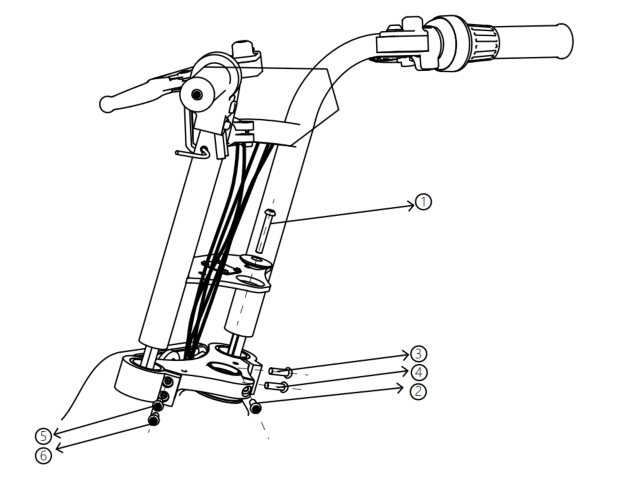
- Remove the screw ① and then release the screw ② a little bit as the following figure shows.
- Insert the handlebar into the right position of the stem.
- Tighten the screw ① first by 8-10 torque force and then tighten the screw ②.
- Tighten the test screws ③④⑤⑥ in the same way by 8-10 torque force.
Installing Your Front Wheel – Through-Axle Version
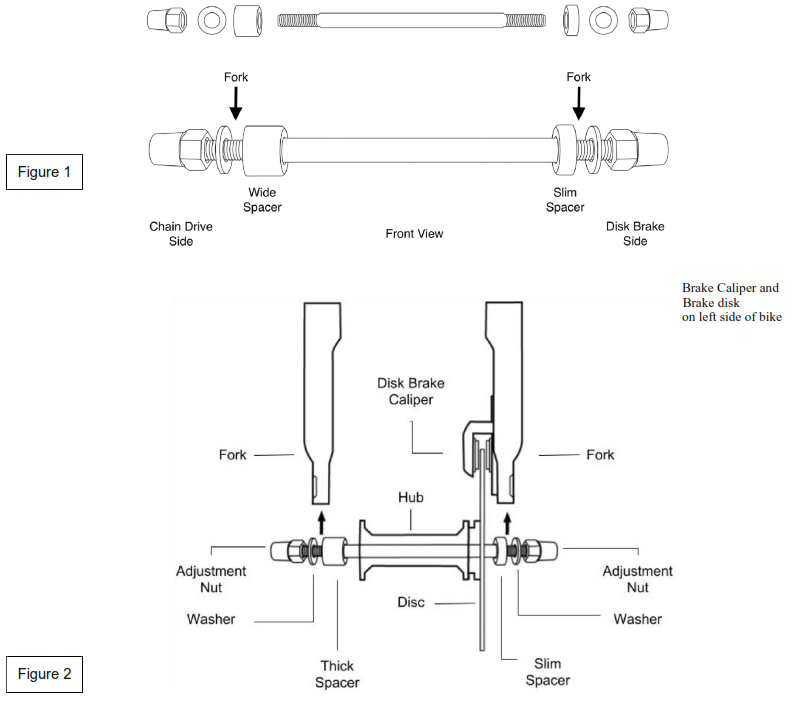
- Insert the axle into the wheel hub as shown. Add the Slim Spacer on the LEFT side (Brake Disk) and the Wide Spacer on the RIGHT side.
- Insert the front wheel with the spacers in between the front fork on the bike. Be sure to align the disk between the brake caliper as shown in Figure 2.
- Now on the outside add the washer and nut on each side and hand turn until snug.
- Using your wrench, tighten each side alternatively until snug (you might need to secure the opposite nut slightly so the whole axle doesn’t turn).
- Now tighten each nut putting your weight into the wrench. Your front wheel is now installed.
- The Adjustment Nut needs to be very tight, be sure to retighten after your first couple rides.
Installing Your Pedals
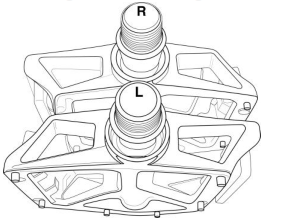
1) Warning: Incorrect installation will cause damage. Please read the instructions and watch our videos if needed.2) Identify the Left and Right markings on the pedals. They can only be installed in their respective side.a. L is for the Left Pedal and it goes on the Left Crank Arm.b. R is for the Right pedal and it goes on the Right Crank Arm (Chain Side)
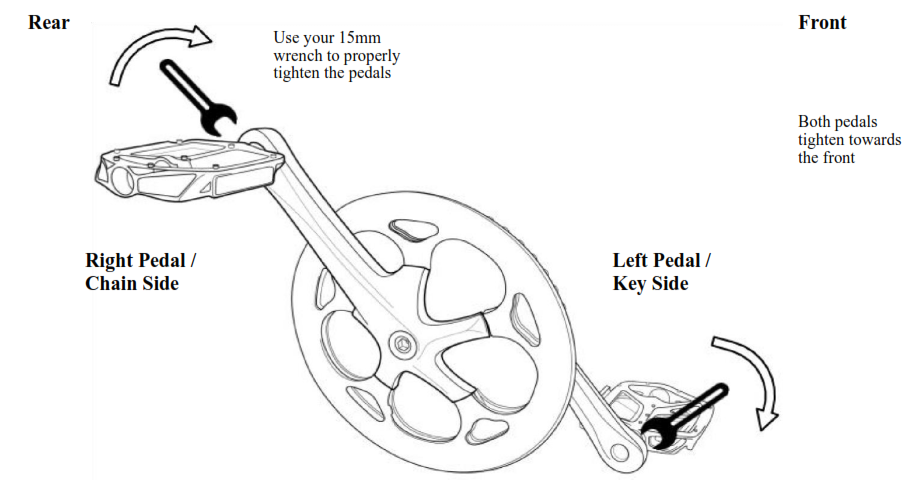
3) Sitting on your bike the pedals go on the Left and Right side respectively.4) Keep the pedal Horizontal while hand screwing to get the thread started. Then Use your 15mm wrench to tighten them.5) Both pedals tighten towards the front of the bike. The left pedal is reverse threaded to allow this.6) The pedals need to be very tight, be sure to retighten after your first couple rides.
How To Use Your Bike
- Read all instructions carefully, be familiar with the proper operation of all items. Check for detailed information and guidance on our product offer page.
- Warning: Basic electric precautions should always be followed to avoid issues or malfunction.
- Charge your battery fully in preparation for your first ride.
- Seat your battery securely and remove the key from the lock.

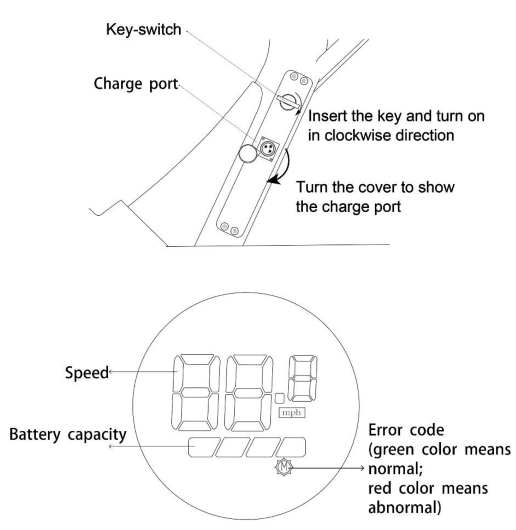
- Locate the Key-switch beneath your seat. Insert the key and turn it ON in the clockwise direction, which will illuminate the display screen and the headlight. Your bike will be ON. The key will remain in the switch during use.Note: The bike must be on a complete Stop with no feet on the pedals before powering up the bike.
- Your display is embedded in the downtube, predefined with optimal riding settings. It shows Speed, Battery Charge Capacity and Error Code (Green means in function; Red means abnormal).
- Slowly twist the throttle at the right hand or pedaling to start your first test ride.Note: This bike is equipped with strong power. Do NOT give a boost to the throttle or pedal to avoid accidents with sudden speedup.
- To turn OFF the bike, switch the key in an anti-clockwise direction and pull it out from the socket. Never leave the key on the bike during your absence.
How to Charge Your Bike
There are two options to charge your battery.Option 1, to charge the battery ON the bike
- Seat the battery on the bike.
- Locate the Charge Port beneath the seat under the key-switch.
- Turn the cover to show the charge port.
- Insert the charger’s output plug into the charge port and connect the input plug into the power supply. It starts to charge as the small LED light on the charger turns RED.
Option 2, to charge the battery of the bike (as shown in below figure)
- Use the key to unlock the battery and take it off the bike.
- Place the battery in a clean and flat place at room temperature.
- Connect the adapter cable to the charger to make them into one piece. Insert the adapter output plug to the battery charge port. Then connect the charger input plug to the power supply. It starts to charge as the small LED light on the charger turns RED.

Notes:
- Charging time varies from 6 to 10 hours.
- The small LED light on the charger in RED indicates it is in charge; The small LED light on the charger in GREEN indicates it is fully charged.
- Insufficient charging will not influence the battery lifecycle. AVOIDING deep discharge is helpful to protect the battery and extend its lifecycle.
- If the battery will not be used for a long period, discharge its capacity to 60%-80% for stock, disconnect it from the charger and place it in a dry, ventilated place without direct sunlight. In order to maintain a long lifecycle, it is recommended to charge the battery every two months.
- Pay attention to check whether the surface temperature of the battery case rises too high during charging. It is FORBIDDEN to cover the battery during charging.
- Due to the high temperature in the summertime, it is NOT advisable to charge it immediately after riding. In winter, it is FORBIDDEN to charge the battery in an environment below 0℃. You are recommended to charge it in warm circumstances.
References
[xyz-ips snippet=”download-snippet”]