Vent- Axia Pureair Sense Bathroom Fan With Odour Sense
Technology Instruction Manual
READ THIS FIRST! IMPORTANT!Please read these instructions carefully before use.The fan is designed for permanent installation and must be installed by an authorized electrician.According to the EN 60335 Standard, the following must be taken into account:
- This product can be used by persons aged 8 years and over and by persons with reduced physical or mental ability or lack of experience and knowledge, if they have received guidance or been instructed on the use of the product in a safe manner and are aware of the risks.
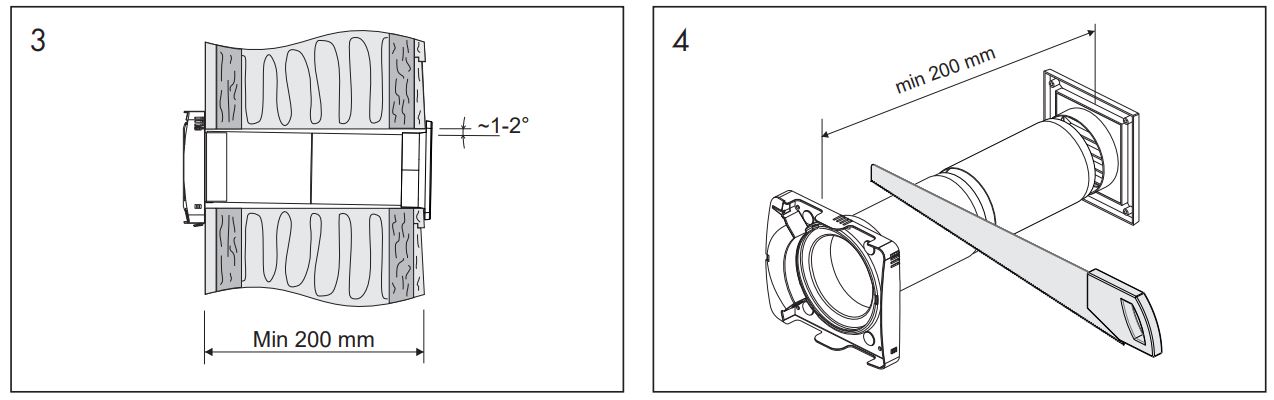
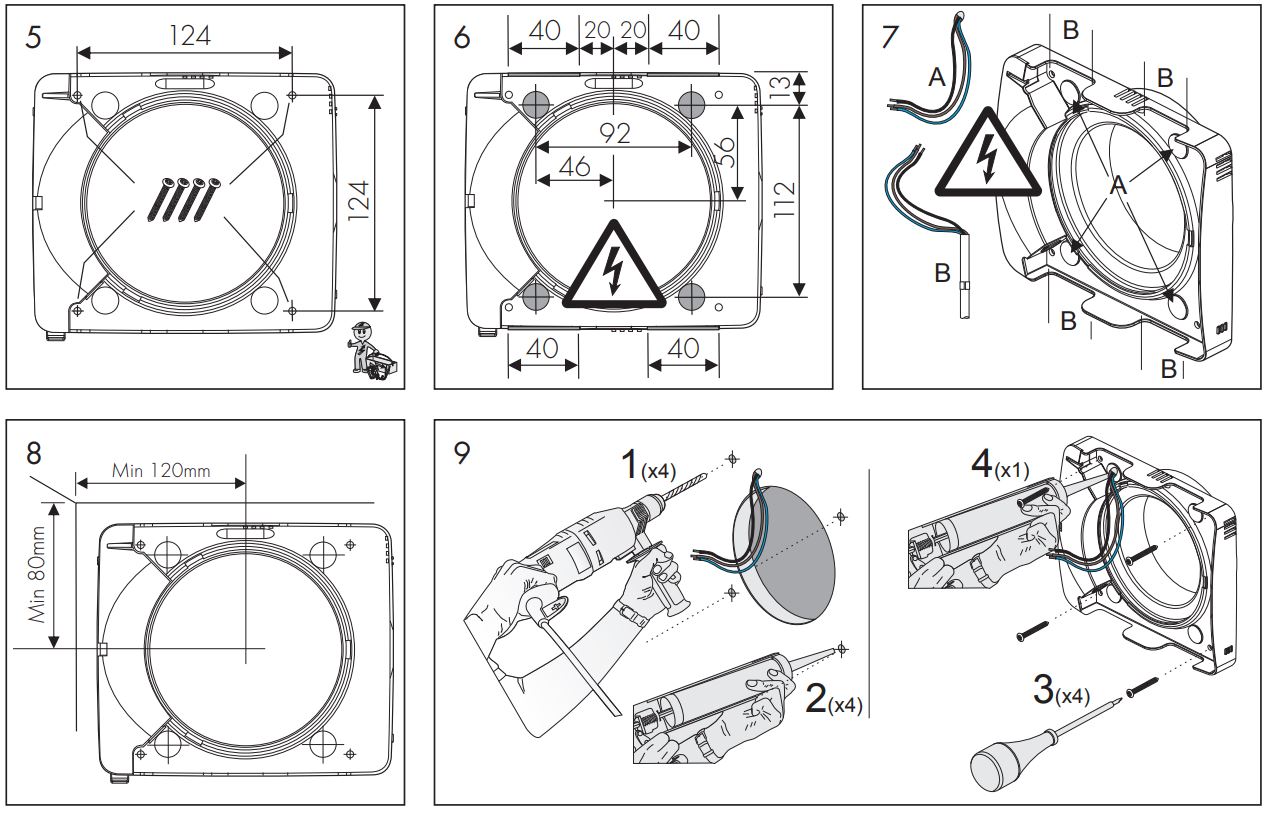
- Children must not play with the product. Cleaning and maintenance must not be carried out by children without supervision. The fan ducting length must not be less than 200mm.
- When mounting in wall or ceiling the external opening must always be protected against rain/snow with a hood/exterior grille.
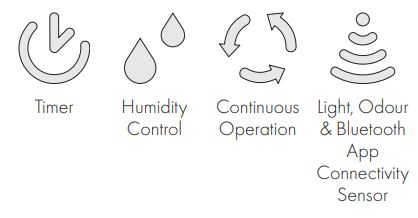
Functions
Odour SensorThe Vent-Axia Pure Air Sense fan is equipped with an Odour sensor that increases the airflow when the air is poor.
Adjustable TimerTriggered via light sensor. Possibility of a 2 minute delay, and selectable run-on time 15 or 30 minutes. The airflow can be adjusted from the control panel or via the app.
Automatic Humidity Control SystemFully automatic humidity control, which means the fan increases the airflow at increased humidity. The airflow can be adjusted from the control panel or via the app.
Continuous or Intermittent OperationLet the fan run continuously if you need basic ventilation in your home. The flow can be adjusted from the control panel or via the app.
Airing FunctionIf the fan has been inactive for 26 hours, it will run an airing program for 60 minutes. The airing function is not active when the fan is running continuously. The airflow can be adjusted from the control panel or via the app.
AppThe Vent-Axia Connect App can be downloaded to Android and IOS devices. The app gives you access to a variety of settings and functions. See the ‘Quick App Connection’ section in this manual (page 11) for initial set up, or visit the Vent-Axia website for detailed information and downloadable content on all fan functions with and without the app: www.vent-axia.com
![]()
![]()
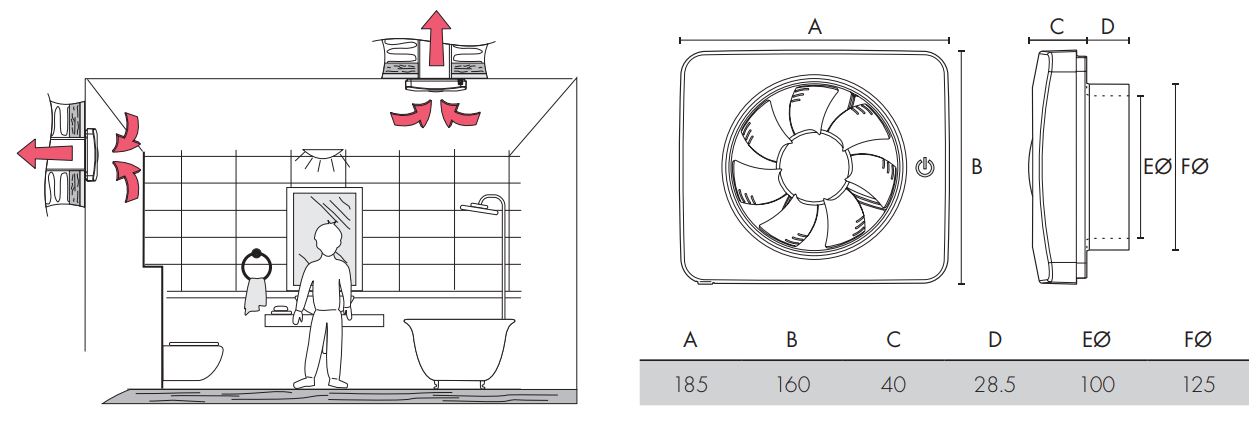
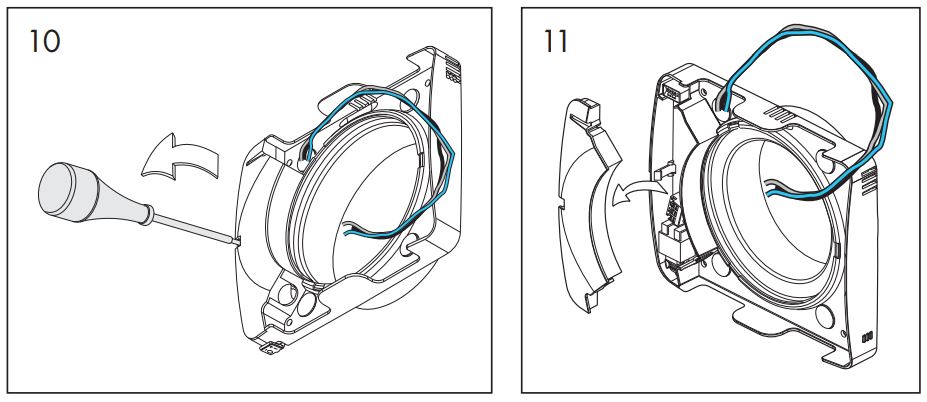
Dimensions (mm)

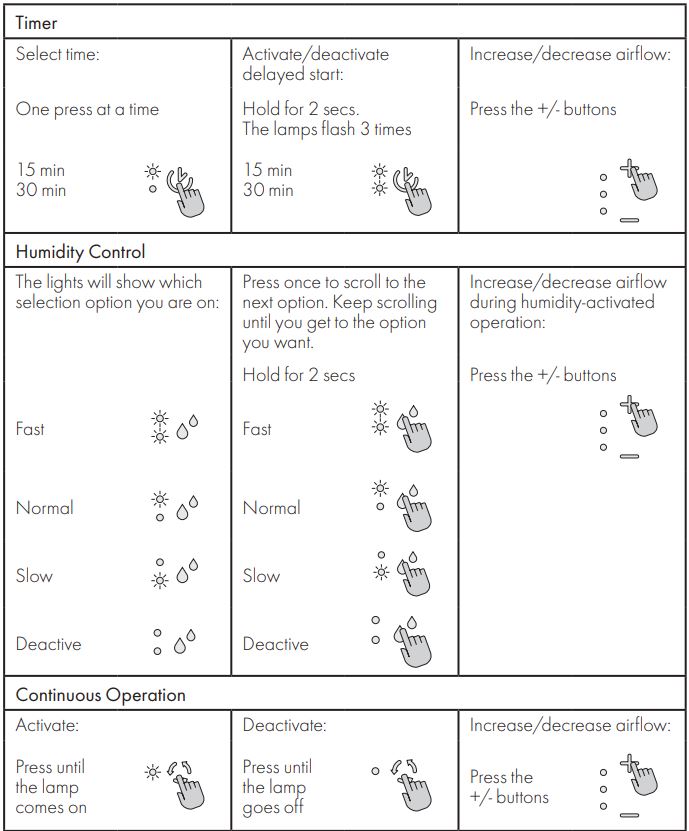
Settings
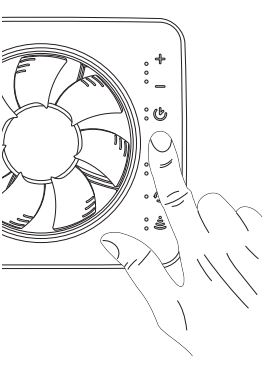
Press the function icon and all adjustable/programmable symbols will light up. Then press any of the Timer, Humidity control, Continuous or Light/Odour. This will only light up the selected function, which is then ready for adjustment. You can control speed/flow +/- is provided for certain functions. Lit lamps next to each symbol indicates the function is selected. See the Vent-Axia website for detailed information on all fan functions with and without the app: www.vent-axia.com
Default Factory Settings
Constant running low speed — ON – 10l/sAiring function (every 26hr) — ON – 15l/s 60minOverrun timer — ON – 15l/s 15min & 2min DelayHumidity function — ON – 28l/sLight sensor — OFF – 15l/sOdour sensor — ON – 28l/s
Reset
Press the function button once. Press and hold the functionbutton for at least 5 seconds.

Speed

Timer
![]()
Function
![]()
Humidity control
![]()
Continuous

Light, Odour & Bluetooth App Connectivity Sensor
Technical Data
Maximum airflow — 140 m³/h or 39l/sMin sound level — 19 dB (A) 3 mMax pressure — 57 PaPower consumption — 2 – 5 WSpigot depth — 29 mmHole size — 105 – 130 mmMaterial — ABS platsProtection rating — IP44Insulation class — XVoltage frequency — 100 – 240V ACCertificates — 50 – 60 HzMounting options — DC6 Wall or ceilingBluetooth LE — -12dBm EIRP (63µW), nominally 2450MHz
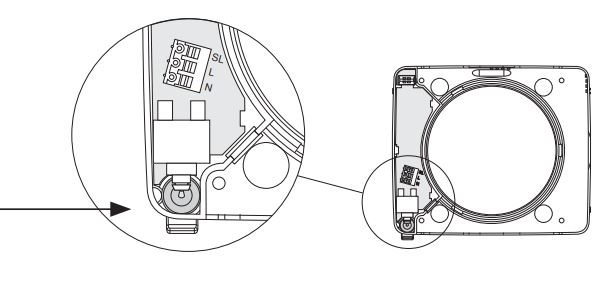
Electrical Wiring
- Electrical installation must be carried out by an authorized electrician.
- The fan is double insulated and should not be grounded.
- The fan is fitted with a multi-pole switch and does not require a pre-wired external switch.
Installation Options
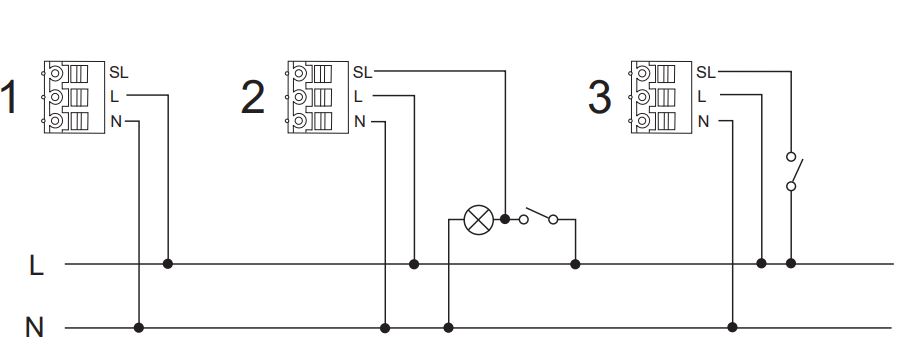
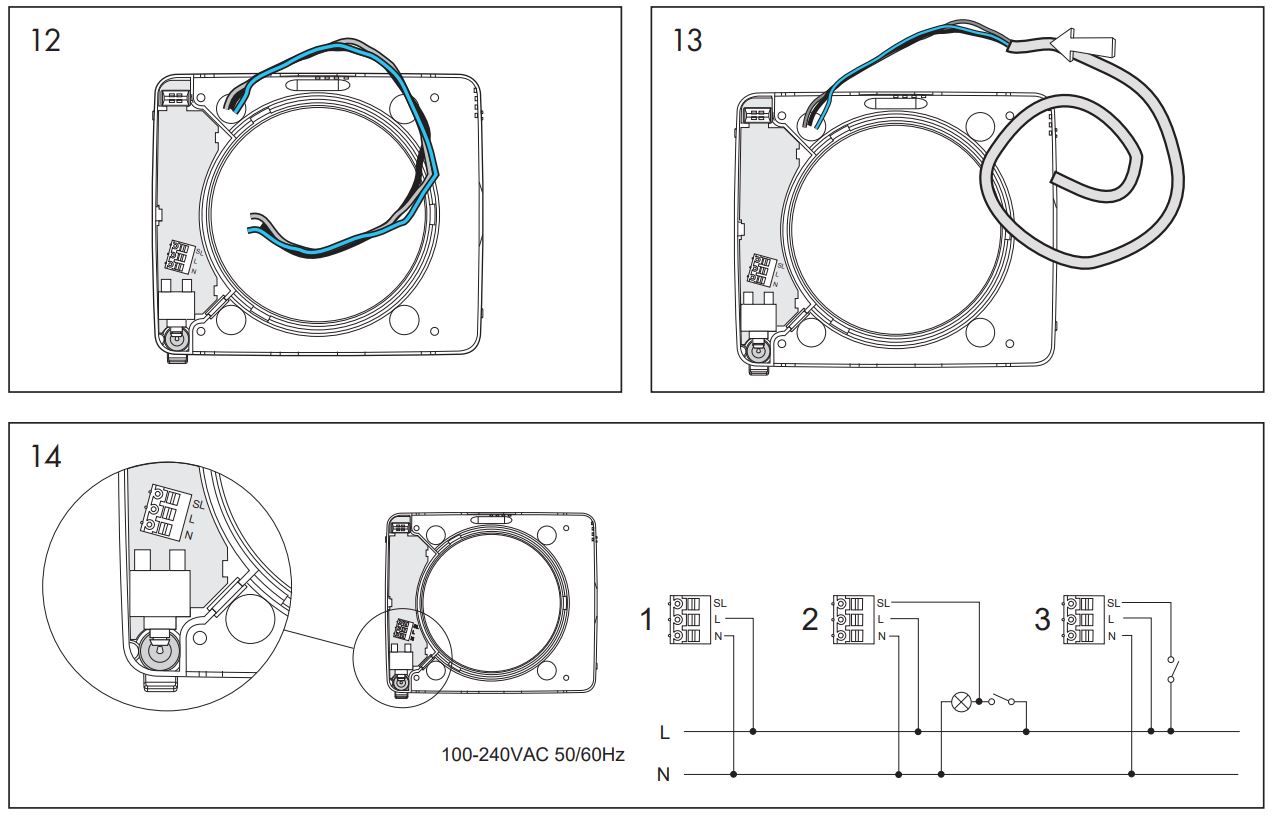
The fan can be connected in three different ways depending on the desired function.The fan is connected with constant voltage supply 100 – 240 VAC 50/60 Hz, phase (L) and Zero (N), see wiring diagram
- Time control with light switch, see wiring diagram 2. The fan is connected with constant voltage supply 100 – 240 VAC 50/60 Hz, phase (L) and Zero (N). The control phase (SL) is connected to activate the fan’s time control, i.e. when the bathroom light comes on, there is power to the igniter wire. This option provides a delayed start of 2 minutes. The fan will run as long as the light is lit. When the light goes out, the fan will run for another 15/30 minutes.
- Time control with spring-loaded switch, see wiring diagram 3. The fan is connected with constant voltage supply 100 – 240 VAC 50/60 Hz, phase (L) and Zero (N). The control phase (SL) is connected to activate the fan’s time control with spring-loaded switch. The fan runs for 15/30 minutes after the spring-loaded switch has been activated.
100-240VAC 50/60Hz
Mounting Options
The fan is suitable for ceiling and wall mounting.
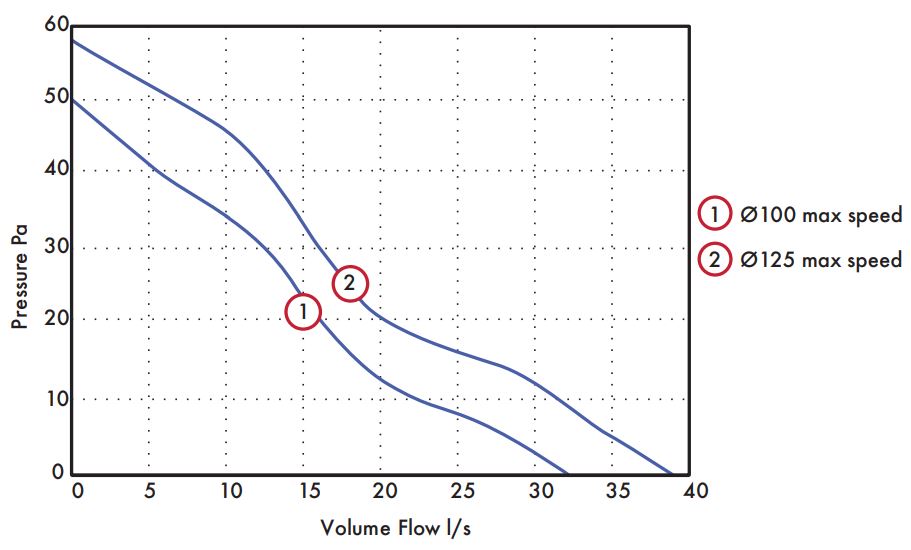
Capacity Curve
Maximum flow and available pressure 140 m³ / 39l/s / h_57 Pa with Ø 118mm (125) adapter.
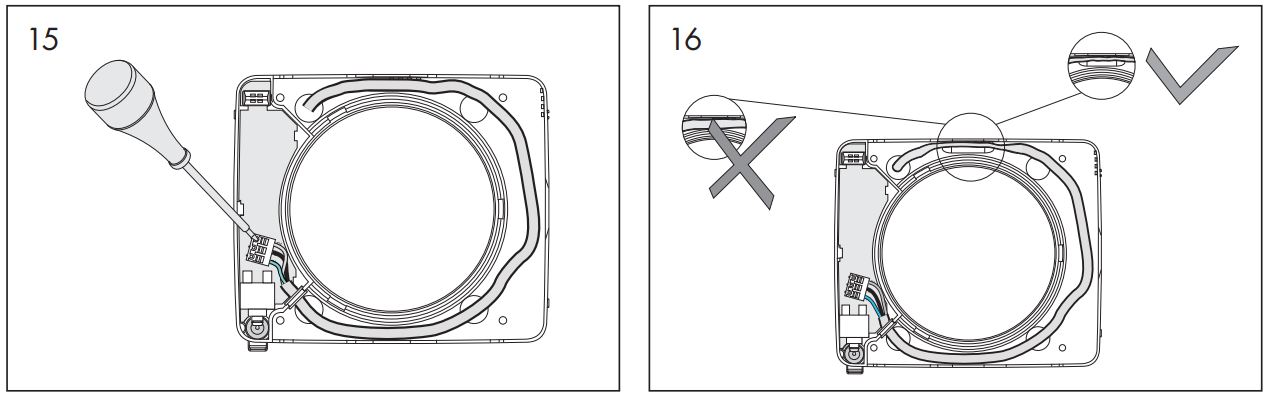
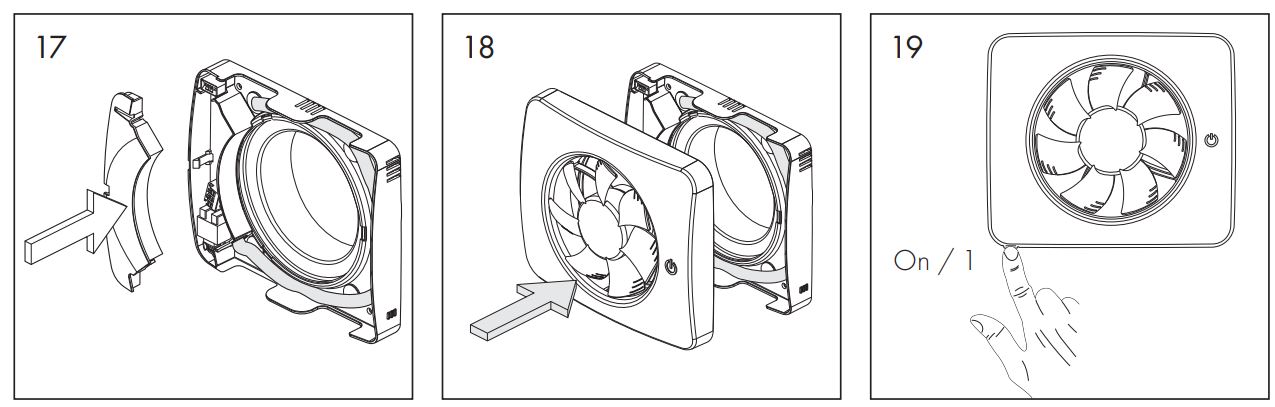
Mounting
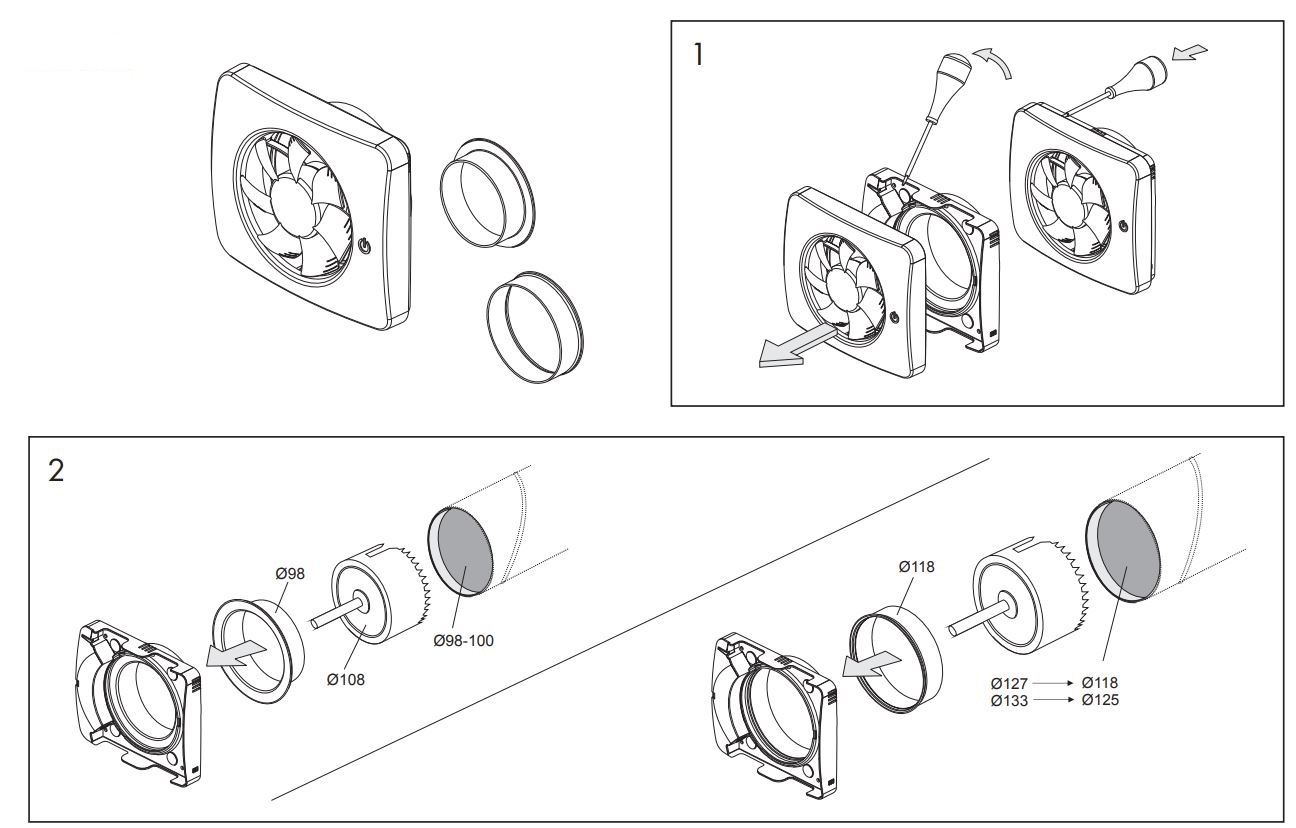
Installation
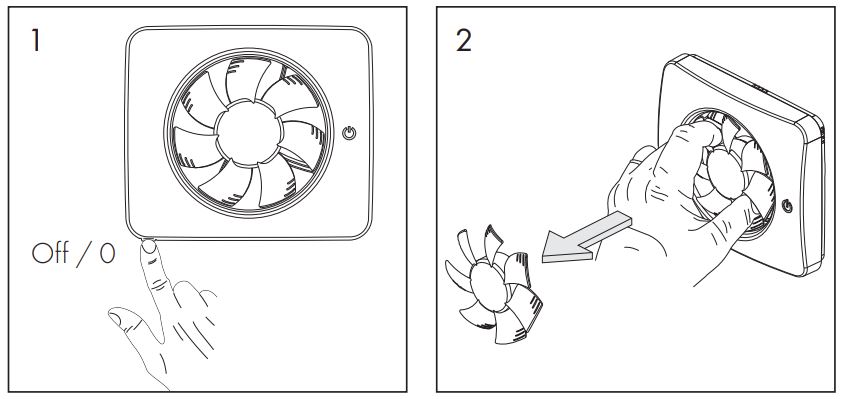
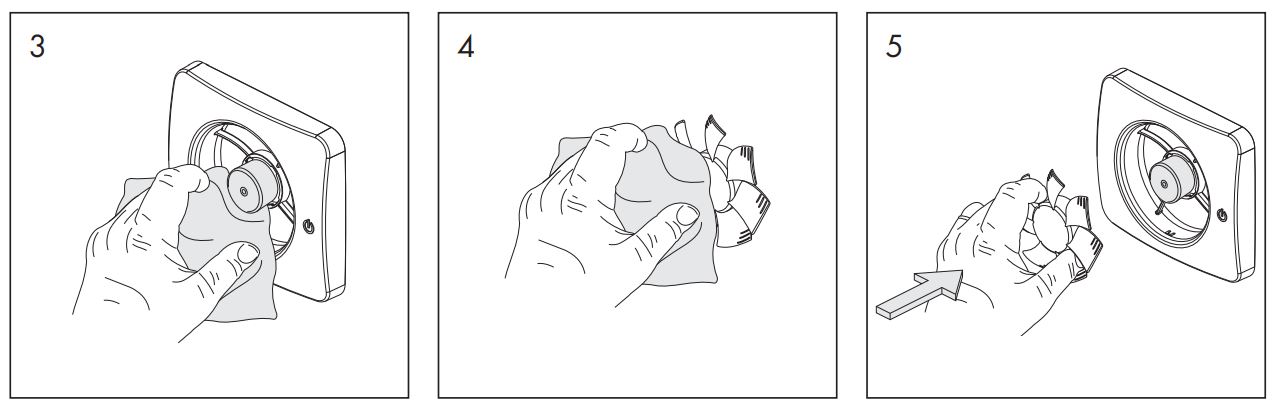
Cleaning & Maintenance
The Vent-Axia Pure Air Sense is designed to work efficiently for many years. For the fan to work correctly, it must be cleaned regularly. The cleaning interval is determined by how long the fan is operated and the air quality. Clean the fan at least twice/year or as necessary. When cleaning, disconnect the power to the fan by pressing the multi-pole switch upwards to the O-OFF position.
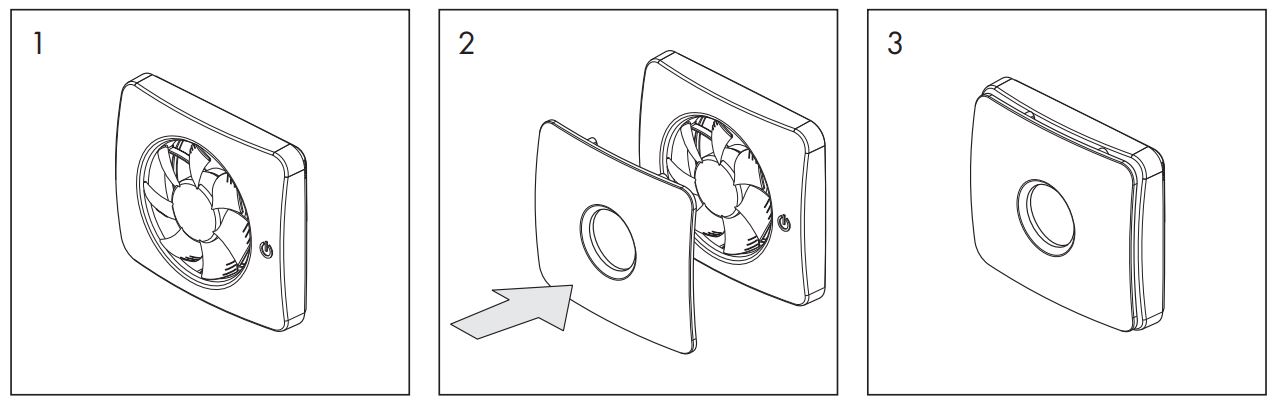
Mounting of Magnetic Front Cover (accessory)
Warranty
We provide a 7-year warranty against manufacturing defects. For the warranty to be valid, proof of purchase is required and the fan:
- must be assembled and installed in accordance with the installation guide in this manual

- must have been maintained according to the maintenance instructions in this manual
- must be mounted in a normal residential environment
- must be connected to a voltage of 100-240VAC 50/60Hz
- has not been exposed to lightning or abnormal power surges
- has not been subjected to tampering
- has been installed so that water cannot spray/flush the fan
- must not have been installed in an environment where the temperature has exceeded 50° Celsius

Product complaints shall be made to the point of purchase.
Recycling
The product is labelled with the WEEE symbol indicating that it must not be disposed of in the household waste, but should be recycled at the appropriate place in each municipality.
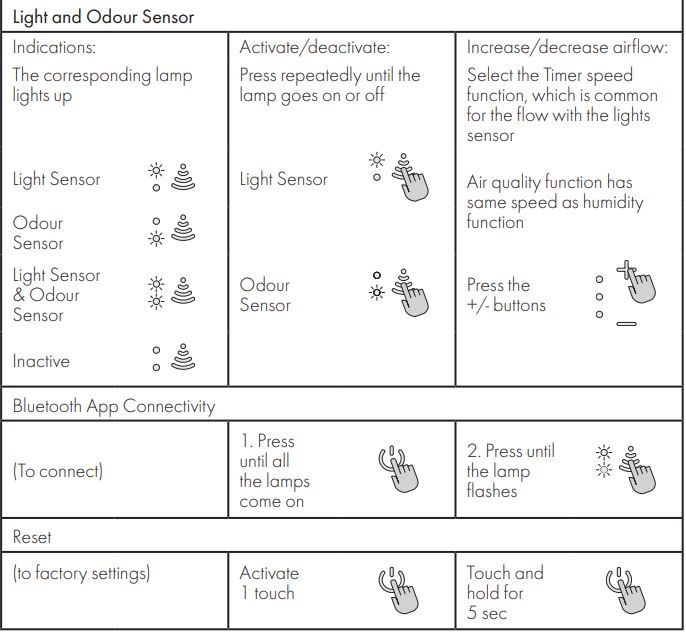
Quick App Connection
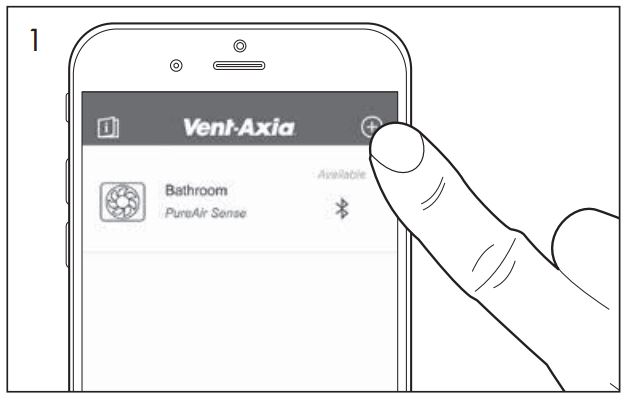
1. Once you have downloaded the app, simply start by pressing the ![]() symbol in the top right hand corner of the app to add your new fan.
symbol in the top right hand corner of the app to add your new fan.
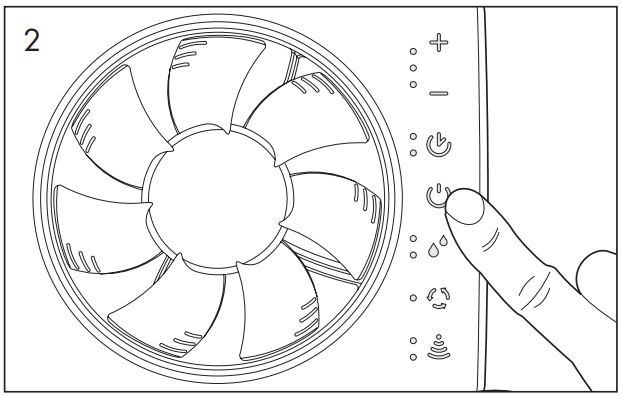
2. With your fan switched on, press the![]() Function (Power) symbol in the middle of the fan’s touch panel to illuminate all the available functions in blue.
Function (Power) symbol in the middle of the fan’s touch panel to illuminate all the available functions in blue.
![]()
3. Then press and hold the![]() Connectivity icon at the bottom of the touch panel. Once the symbol flashes, the app and fan are connected.
Connectivity icon at the bottom of the touch panel. Once the symbol flashes, the app and fan are connected.
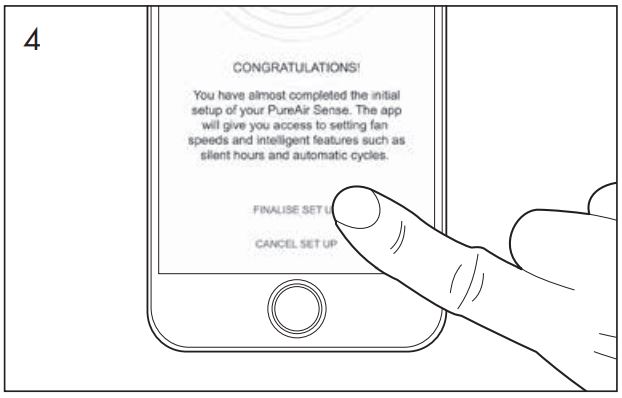
4. The fan will automatically connect to the app, with no need to input passwords or pin numbers. Click the ‘Finalize Set Up’ button to finish.
Please visit the Downloads section of the Pure Air Sense product page on our website for further instructions on using all the app functions: www.vent-axia.com/pureairsense
Quick Guide
Function indication is given with different colors.
![]()
The function symbol is lit depending on the active function:
No lightThe fan is off or activated for continuous operation.
Blue lightThe fan is running due to increased humidity.
Flashing blue lightThe fan is sensing the environment and recalibrating to assess its humidity surroundings.
Green lightThe Odour sensor has activated the fan and is boosting.
Purple lightThe fan has started the airing function after 26hrs of inactivity.
Yellow lightThe overrun timer is active triggered via light sensor or switch live.
Flashing yellowThe delay timer is counting down, flashing more quickly towards the end.
To access the functions that can be programmed:First press the function icon.
![]() All programmable function symbols light up.
All programmable function symbols light up.
To activate the desired function, press any of the four symbols and then follow the instructions to the right. The process is then ended by pressing the function icon twice.
![]()
© Copyright Vent-Axia®0119 479563A 008752
References
[xyz-ips snippet=”download-snippet”]