
One Talk
One Talk allows your office phone and mobile devices to work together with one number, so opportunity can find you—wherever you are.
Verizon ![]()
Quick-start guide
1. Service initialization page
- Access One TalkSM.
- From onetalk.com, log in to My Business. (Fig. 1)

- Once there, there are five different sections on the page. (Fig. 2)


- Portal navigation. Section 1 will allow you to navigate to the different management and resource areas of the portal.
- Shop One Talk. In section 2, you can make purchases for your lines and devices, including User, Hunt Group and Auto Receptionist options.
- Search and Set. Section 3 allows you to search by user telephone number and device. You can also set your company time zone.
- Quick tasks. Section 4 gives you quick links that take you directly to common tasks to help you set up and manage your lines and company wide services.
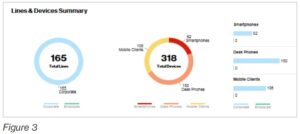
- Lines & Devices summary. Section 5 gives you a quick summary of all your One Talk lines and devices.
2. Line Summary
Review the lines (phone numbers) that have One Talk service within your company. Make sure you have the right number of lines for your business.
- This section shows a summary of One Talk lines tied to your employees’ physical devices.
- Device types include One Talk Desk Phone, One Talk Mobile Application and One Talk Dialer.
- You can see the quantity of corporate-and employee-liable lines that have One Talk. (Fig. 3)
- The Lines & Devices Summary section also shows a summary of One Talk lines (phone numbers) not associated with a physical device.– You can find Hunt Group and Auto Receptionist lines under Quick tasks. (Fig. 4)

3. Time zone
- Set your company’s time zone.
- The selected time zone will be used for all features that you set up in Company Schedule. (Fig. 5)

4. User profiles
4.1 Assign lines to users.
- View and assign company-owned lines to employees.
- Click Set Up User Info. (Fig. 6)
- Find the desired phone number. (Fig. 7)
- Double-click the user name, email, extension and Calling ID Name for each phone number and enter the appropriate information.


- Tips for entering user information.
- We recommend entering the employee’s name for the user name. For internal calls, this is the name that will display on users’ desk phone LCD screens if a four-digit extension is not assigned.
- Enter a secured employee email address that will be used for the One Talk Mobile App authorization PIN. If left blank, the authorization PIN will be sent only to the administrator.
- Enter a four-digit extension number under Ext to enable extension dialing between One Talk lines within the company. Extension numbers will be displayed on users’ desk phones if they are provided.
- The Calling ID Name you enter will be what displays on the phones of other One Talk numbers you call. Publishing the Calling ID Name to external parties requires the line to be subscribed to Share Name ID from within Account Maintenance.
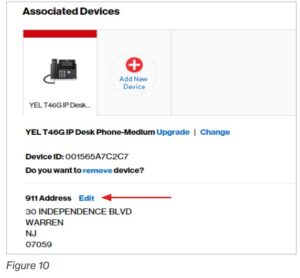
4.2 Review 911 addresses
- Please review the 911 (emergency) addresses that you have registered for your active desk phones.
- Click 911 Update Business Address to review and edit. (Fig. 8)
- Find and select the desired phone number line that needs its 911 address entered or verified. (Fig. 9)
- Click Edit 911 Address to enter or correct the address information (Figs. 10 and 11)


5 Company schedule
- One Talk can route incoming calls based on your normal business operating hours, evening hours and holidays for the following features:
- Employee line with:– Pre-Alerting Announcement– Simultaneous Ring Service– Selective Call Forward– Group Forwarding– Selective Call Acceptance/Rejection
- Hunt Group line with:– Selective Call Acceptance/Rejection– Selective Call Forward
- Auto Receptionist line with:– Selective Call Forward– Selective Call Acceptance/Rejection1. Click View/Update Schedule. (Fig. 12)2. Click Create Schedule. (Fig. 13)
- Identify the desired schedule type and give the schedule a name. (Fig. 14)– Schedule type as either Business or After Hours/Holiday.– Do not use spaces or special characters (such as *, ?, [], !, -, or #) in the schedule name.– If schedule runs overnight, then it needs to be split by Adding New Time. For example: If it runs from 7 PM to 7 AM, then set Time 1 to 7 PM–11:59 PM and set Time 2 to 12 AM–7 AM. (Fig. 15)3. Click Business Schedule.
- Select hours of business operation as 24×7, 9–5 or customize.
 2. Click Create Schedule. (Fig. 13)
 – Schedule type as either Business or After Hours/Holiday.– Do not use spaces or special characters (such as *, ?, [], !, -, or #) in the schedule name.– If schedule runs overnight, then it needs to be split by Adding New Time. For example: If it runs from 7 PM to 7 AM, then set Time 1 to 7 PM–11:59 PM and set Time 2 to 12 AM–7 AM. (Fig. 15)
 3. Click Business Schedule.
6 Optional settings
- Optional lines, such as for Hunt Group and Auto Receptionist, can be used for smart call handling of incoming calls. Hunt Group and Auto Receptionist require a dedicated telephone line.
- Verify that you have an available and corresponding line for Hunt Group or Automated Receptionist. (Figs. 16 and 17)
- Click the corresponding “option to buy” if you need to purchase a line for either Hunt Group or Auto Receptionist. (Fig. 18)
- Verify that you have an available and corresponding line for Hunt Group or Automated Receptionist. (Figs. 16 and 17)


6.1 Manage Auto Receptionist
- Click View/Manage Automated Receptionist. (Fig. 19)
- Select the desired active Auto Receptionist number. (Fig. 20)
- Create a profile for the line.
- Confirm line Status as Active.
- Enter names for both the Automated Receptionist Name and Calling ID Name, and select your local time zone.
- Click Set Up Automated Receptionist. (Fig. 21)
- Configure Auto Receptionist’s Business Hours. (Fig. 22 and 23)
- Click Business Hours.


- Select the desired Business Schedule.– You can use the same sequence, greeting and routing for Business Figure 20Hours and After Hours and Holidays. If you don’t configure the After Hours and Holidays settings, it will use what you configured for Business Hours.
- The drop-down menu lets you use a Business Schedule that you previously created.
6. Select Greeting style.
- The system-generated recording gives callers instructions for Keys 0, 1 and 2.
- Custom Greeting lets you record and upload a custom greeting using the BroadSoft® Recorder application found on Google Play™ and Apple® App Store.®– An example of a customized recording might go as follows: “Thank you for calling Joe’s Plumbing. For billing,press 1. To schedule an appointment,press 2. To speak to the manager,press 3. For immediate service,press 4.”
7. Set routing rule for Keys.
- The Keys column lets you define 10 caller options (Keys 0 to 9). If a caller presses a key number that has not been defined, it will not trigger a routing action.
- For optimal call network routing, please set the “#” option to Transfer to Operator and enter the Automated Receptionist number.
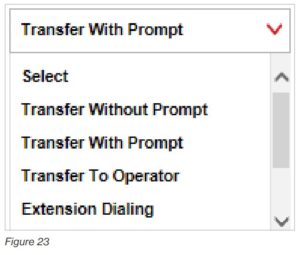
- Call Routing sets the action for the corresponding keypad number pressed by the caller.– Transfer Without Prompt will immediately transfer the caller once the caller presses the corresponding Keys number.– Transfer With Prompt causes the caller to hear, “Your call is being transferred; please hold.”– Transfer To Operator immediately transfers the caller to the number you entered in the Transfer to column. You can select any internal user or external number.– Extension Dialing allows the caller to type a four-digit extension and be immediately connected to that One Talk user in your organization.
- Transfer To is the number that callers will be sent to if they press the Transfer To keypad number. This number does not have to be a One Talk line. Calls can also be transferred to toll-free numbers.
8. Click Continue.
- If you want the After Hours and Holidays Auto Receptionist to give instructions that are different from those for Business Hours, you will also need to configure After Hours or Holiday Hours.– For After Hours and Holiday Hours, repeat the steps you used for Business Hours.– You can start with either After Hours or Holiday Hours.
6.2 Manage Hunt Group
- Click View/Manage Hunt Group. (Fig. 24)
- Select an active Hunt Group number.
- Create a profile for the Hunt Group number. (Fig. 25)• Confirm line Status as Active.
- Enter names for both the Hunt Group Name and the Calling ID Name, and select the local time zone.
- Click Select Calling Sequence. (Fig. 26)

 • Confirm line Status as Active.
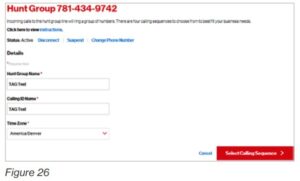
4. Select a desired calling sequence under Select Calling Sequence.
- The calling sequence determines which method will be used for ringing group member’s lines. (Fig. 27)– Simultaneous: All lines will ring at the same time.– Circular: It will start by ringing the number in the group listed after the group number that most recently answered a call.– Regular: The first number listed in the group of selected lines will ring first, regardless of recent calls.– Uniform: It will start by ringing the line that has been idle for the longest period.
- Add lines to the Hunt Group. Select the number using <>, or drag and drop available lines to Selected Lines within the Hunt or Calling Group sequence.
- Do not include Hunt Group or Auto Receptionist numbers within a sequence.
- Other settings:– Advance to Next Number lets you set the number of ring attempts before a call should progress from one group member to the next group member in line.– A checkmark in Advance Next Number when Busy (No Call Waiting) will cause an active call to skip trying to connect to a number that is busy.– The option “Where do you want to send call after all numbers in the sequence have been called or the defined time limit for hunting has passed?” will forward a queued call that has exceeded the time limit in seconds. You can forward calls from the Hunt Group to a user once the hold time has been met. And also enter the number.
 – Simultaneous: All lines will ring at the same time.– Circular: It will start by ringing the number in the group listed after the group number that most recently answered a call.– Regular: The first number listed in the group of selected lines will ring first, regardless of recent calls.– Uniform: It will start by ringing the line that has been idle for the longest period.
6.3 Set up Bridging
- Things to know about bridging:
- Bridging lets you make additional One Talk numbers available on a desk phone. This allows the desk phone to use more than one number to place and receive calls.
- The desk phone with a bridged line can barge-in to join that line’s active call.
- Only lines tied to a physical device can be bridged to a desk phone. (Note: Auto Receptionist and Hunt Group lines cannot be bridged.)
- The following desk phones are eligible for bridging:– T41—supports a maximum of five bridge lines.– T46 and T49—Both support a maximum of 11 bridge lines.
- Bridging can only be configured by the One Talk Admin in the My Business portal.
- Select a desk phone to be bridged to an additional line.From the Lines & Devices tab, choose the desk phone that you want bridged with another number. (Fig. 28)
- – Click the Devices option to list the desk phones by device type.– Double-click a listed desk phone to view its details.
- Add an additional line to a desk phone. (Figs. 29 and 30)


-
- Search for lines available for bridging by entering your search criteria in the magnifying glass entry field.
- Select the phone line you want and click Add.
- Click Bridge.
3. Reboot the phone to make the line visible on the desk phone.
-
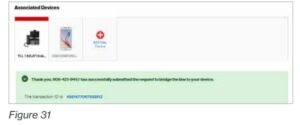
- Your system will update nightly, but you can reboot the desk phone to expedite the update.– A successful submission notice should display.– You can refresh the browser to verify that you have successfully bridged the additional line to the desk phone.– Reboot the device. Click Reboot to update the firmware and configuration version.– The additional line’s extension will display on the bridged desk phone’s LCD screen. (Fig. 31)
- Your system will update nightly, but you can reboot the desk phone to expedite the update.– A successful submission notice should display.– You can refresh the browser to verify that you have successfully bridged the additional line to the desk phone.– Reboot the device. Click Reboot to update the firmware and configuration version.– The additional line’s extension will display on the bridged desk phone’s LCD screen. (Fig. 31)
6.4 Set up Simultaneous Ring
- Things to know about Simultaneous Ring Service:
- Simultaneous Ring Service allows incoming calls to a One Talk number to also ring on other users’ lines.
- Simultaneous Ring Service is not available on Hunt Group or Auto Receptionist lines.
- It can be set to simultaneously ring on up to 10 other lines.
- Once set up, the line can accept up to 15 different callers at a time. The 16th caller will be routed based upon the line’s Call Forward Busy settings.
- It can be configured by either the user in My Verizon or or the administrator in My Business portal.1. Configure Simultaneous Ring Service for a user line. (Figs. 32 and 33)
- Select line.– Click the Features tab under Portal Navigation.– Click View Feature.– Search and select the desired line.– Click the Settings wheel.
- Configure Settings. (Fig. 34)– Choose the line phone number for incoming calls.– Add the additional line phone numbers that will simultaneously ring.– Configure when you want Simultaneous Ring to be active (i.e., Always or Previously Defined Schedule based on business and holiday hours).– Click Submit to save your settings.– Activate Simultaneous Ring Service. (Fig. 35)


 – Choose the line phone number for incoming calls.– Add the additional line phone numbers that will simultaneously ring.– Configure when you want Simultaneous Ring to be active (i.e., Always or Previously Defined Schedule based on business and holiday hours).– Click Submit to save your settings.– Activate Simultaneous Ring Service. (Fig. 35)
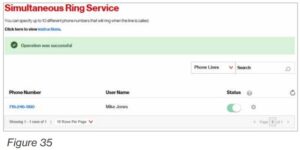
2. Slide Status to green and click Submit to enable.
One Talk Admin Portal User Manual – One Talk Admin Portal User Manual –