User Manual

One Talk Portal
Welcome to the One Talk User Portal.
You can manage your One TalkSM user information and settings for your desk phone, mobile phone and tablet, all from a convenient portal at your My Verizon One Talk account page.You can also view your call plan and usage status and check where you are in your monthly billing cycle.
Among the key features and preferences you can view, set and manage are the following:
- Anonymous Call Rejection
- Automatic Callback
- Call Forwarding
- Caller ID Blocking
- Call Waiting
- Remote Call Pickup with Barge-In
- Selective Call Acceptance
- Selective Call Rejection
- Simultaneous Ring Service
Note: The One Talk User Portal for line management is accessible to all end users of One Talk services that have been set up and approved by administrators at their place of business.
Getting Started
Register and set up your user profile.
- To access and manage your One Talk calling settings online for the first time, visit https://www.verizonwireless.com/
- Click My Verizon.

Note: Your My Verizon username/10-digit mobile number and password are used to access all Verizon Wireless portals.
3. Click on Register and navigate to the My Verizon Registration page.4. Follow the step-by-step instructions to complete registration.
Sign into your My Verizon account.
- If you have previously registered, visit: https://www.verizonwireless.com/ and clickon Sign In instead of Register.

- Click on the User ID or mobile number input field.
- Enter your 10-digit mobile number or the User ID you created when you registered.
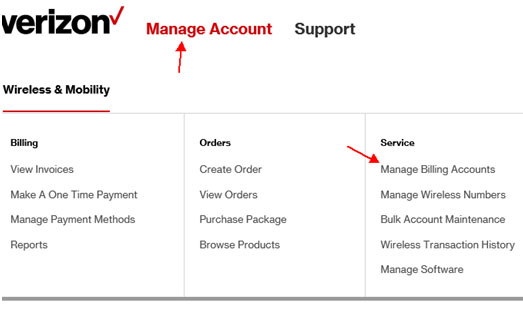
Access your One Talk User Portal.
Select My Devices and click on Manage One Talk.

You will see a table listing features that you can manage:

Edit your user information.
- Sign in.
- Click the My Devices drop-down.
- Click Manage One Talk.
- Locate Business line information.
- Click Edit user information.
- Edit your email address in the email input field.
- Edit your One Talk phone extension in the extension input field.
- Click Submit.
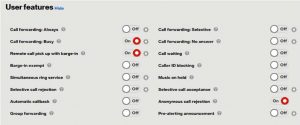
Manage your One Talk features.
Anonymous Call RejectionBlocks incoming calls that don’t display a caller ID number or name.
- From the One Talk User Portal under User features, locate Anonymous Call Rejection.
- Turn the feature ON or OFF.
Automatic Callback
Automatically redials a busy number until it is available.
- From the One Talk User Portal under User features, locate Automatic Callback.
- Turn the feature ON or OFF.
Note: Your line will ring before calling the end party. If you pick up, the call will complete. If you don’t pick up, the call will not complete. If you have multiple devices, the feature will ring back the device you used to request a callback.
Barge-In ExemptLets you block others from remotely joining a call on your line with or without warning (see Remote Call Pickup and Barge-In).
- From the One Talk User Portal, locate Barge-In Exempt under User feature.
- Turn the feature ON or OFF.
Call Forwarding AlwaysForwards all calls made to your One Talk phone number to an alternative phone number. Calls can be forwarded to any domestic U.S. and 800 number. If Group Forwarding or Call Forwarding Selective is configured and enabled, it will preempt Call Forwarding Always.
1. From the One Talk User Portal, locate Call Forwarding Always under User features.2. Tap ![]() to configure.3. Choose Voice mail or Phone number.4. If you choose Phone number, enter the telephone number to which you want your calls forwarded.
to configure.3. Choose Voice mail or Phone number.4. If you choose Phone number, enter the telephone number to which you want your calls forwarded.
Call Forwarding BusyForwards calls to an alternative number when your One Talk number is busy. Calls can be forwarded to any domestic U.S. and 800 number. If Group Forwarding, Call Forwarding Selective or Call Forwarding Always is enabled and configured, it will preempt Call Forwarding Busy.
- From the One Talk User Portal, locate Call Forwarding Busy under User features.
- Tap
 to configure.
 - Choose Voice mail or Phone number.
- If you choose Phone number, enter the telephone number to which you want your calls forwarded.
Call Forwarding No Answer
Forwards calls to an alternative phone number when there is no answer at your One Talk number.
- From the One Talk User Portal, locate Call Forwarding No Answer under User features.
- Tap to configure.
- Select Voice mail or Phone number.
- If you choose Phone number, enter the telephone number to which you want your calls forwarded.
Call Forwarding Selective
Lets you forward incoming calls from one or more specific phone numbers to an alternative phone number.
- From the One Talk User Portal, locate Call Forwarding Selective under User features.
- Tap to configure.
- Select Voice mail or Phone number.
- Click Add preset.
- Select whether to forward calls from all lines or specific lines.
- To specify one or more lines, click Add number.
- Enter the first phone number you would like to forward.
- Click Add.
- Repeat steps to add up to 10 lines to forward.
- In the Forward Phone Number input field, enter the phone number to which you want to forward the phone numbers specified.
- Select Always or Custom schedule.
- If Custom schedule is selected, click Business drop-down and select desired value and/or click Holiday drop-down and select the holiday on which you want calls forwarded.
- Click Submit.
Caller ID Blocking
Prevents your One Talk phone number from displaying at the receiving end when you make an outgoing call. It will work only when Line Caller ID is set to Individual.
- From the One Talk User Portal, locate Caller ID Blocking under User features.
- Turn the feature ON or OFF.
Call WaitingAlerts you to a second call and allows you to accept or ignore it when you are already on the line.
- From the One Talk User Portal, locate Call Waiting under User features.
- Turn the feature ON or OFF.
Group ForwardingLets you forward multiple lines to a single number. If your One Talk administrator has configured your number as part of Group Forwarding, and you wish to be excluded, set the feature to OFF.
- From the One Talk User Portal, locate Group Forwarding under User features.
- Turn the feature ON or OFF.
Music On-HoldWhen you need to put callers on hold, let them listen to your custom or default music and recorded messages.
- From the One Talk User Portal under Features, locate and select Music on Hold.
- Turn the feature ON or OFF.
- Choose from System Music or Custom Music.
- Click Submit. Please note: You must select Submit whenever you turn Music on Hold on or off, and when selecting either System Music or Custom Music.
- Custom Music: Click Upload to add an audio file. Please note: The file must be in the .WAV file format with the following specifications:a. Consultative Committee for International Telegraphy and Telephony (CCITT) or International Telecommunications Union- Telecommunication (ITU-T) standardsb. U-law or a-law codecc. 8,000 kHz sampling rate/frequencyd. 8-bit mono .WAV file typee. 5 MB or less total size

Pre-Alerting AnnouncementPlays an audio file of your choice when a caller calls your phone number and waits to be connected.
- From the One Talk User Portal, locate Pre-Alerting Announcement under User features.
- Tap to configure.
- Choose when you want the announcement to be active: Always or Custom schedule.
- If you choose Custom schedule, select Business or Holiday.
- Turn ON or OFF.
Remote Call Pickup with Barge-In
Allows others in your business to remotely pick up your line while it is ringing or join your call in progress with or without a warning tone.
- From the One Talk User Portal, locate Remote Call Pickup with Barge-In under User features.
- Tap to configure.
- Choose Allow warning tone during barge in or Allow automatic selection during barge in. If you choose Automatic, you will not be warned when a member joins your call.
- Turn feature ON or OFF.
Selective Call AcceptanceAccepts only specific calls, based on conditions you define.
- From the One Talk User Portal, locate Selective Call Acceptance under User features.
- Tap to configure.
- Create Preset condition. You can create up to five presets. Each preset allows different conditions to accepting calls based on caller and schedule.
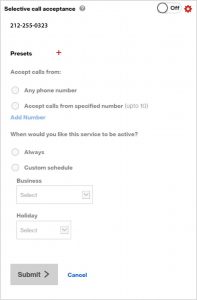
4. Choose to accept Any phone number or Accept calls from specified number (up to 10).5. To add more telephone numbers to accept, tap Add Number.6. Choose when you want to enact this feature: Always or according to a predefined Custom schedule.7. Click Submit.8. Turn ON or OFF.
Selective Call Rejection
- From the One Talk User Portal, locate Selective Call Rejection under User features.
- Tap to configure.
- Create Preset condition. You can create up to five presets. Each preset allows call rejection under different conditions based on caller and schedule.
- Choose what calls to reject as Any phone number or Accept calls from specified number (up to 10).
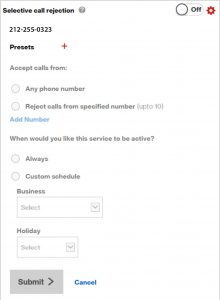
5. To add more telephone numbers to accept, tap Add Number. 6. Choose when you want to enact this feature: Always or according to a predefined Custom schedule.7. Click Submit.8. Turn ON or OFF.
Simultaneous Ring ServiceAllows you to specify other phone numbers toring when someone calls your line.
- From the One Talk User Portal, locate Simultaneous Ring Service under User features.
- Click to configure.
- Add phone numbers that will also ring when there is a call to your number. You can allow up to 10 different numbers to ring concurrently.
- Tap Add Number.
- Choose when you want this feature enabled: Always or according to a predefined Custom schedule.
- Click Submit.
- Turn ON or OFF.
Edit 911/Emergency Address.
- From the My Verizon user portal, click on the My Devices drop-down, then click Manage One Talk.
- Scroll to the bottom where Emergency Address is located.
- Click Edit next to Emergency Address.
- Click in the various input fields to update information.
- Click Submit.
Reboot Your Device.
When the phone is rebooted, it will power off and on and then reconnect for service. During that time, incoming calls will be handled in accordance with your settings. They can also be answered on another device that has been paired with your number.
- From the One Talk User Portal, click the My Devices drop-down, then click Manage One Talk. Scroll to the bottom where Reboot is located.
- Click Reboot.
Employee-Liable Devices
Add One Talk to your personal mobile device (with administrative preapproval).
- Sign in to My Verizon.
- From the portal, hover your cursor overMy Plan & Services to display options.

3. Select Manage Products & Apps.

4. Scroll through the options to find One Talk from Verizon and select Get it now.

5. Select the lines to which you would like to add One Talk service by clicking on the corresponding box.

6. Review the lines you’ve selected and your monthly charges, and click Confirm Purchase.

7. Your One Talk confirmation will appear. Click OK at the bottom or the “X” in the upper right to close popup.

Learn more:For more information, visit www.onetalk.com
Network details & coverage maps at vzw.com. © 2018 Verizon. UG0200118
One Talk Portal User Manual – One Talk Portal User Manual –
Questions about your Manual? Post in the comments!