User Manual
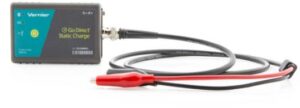
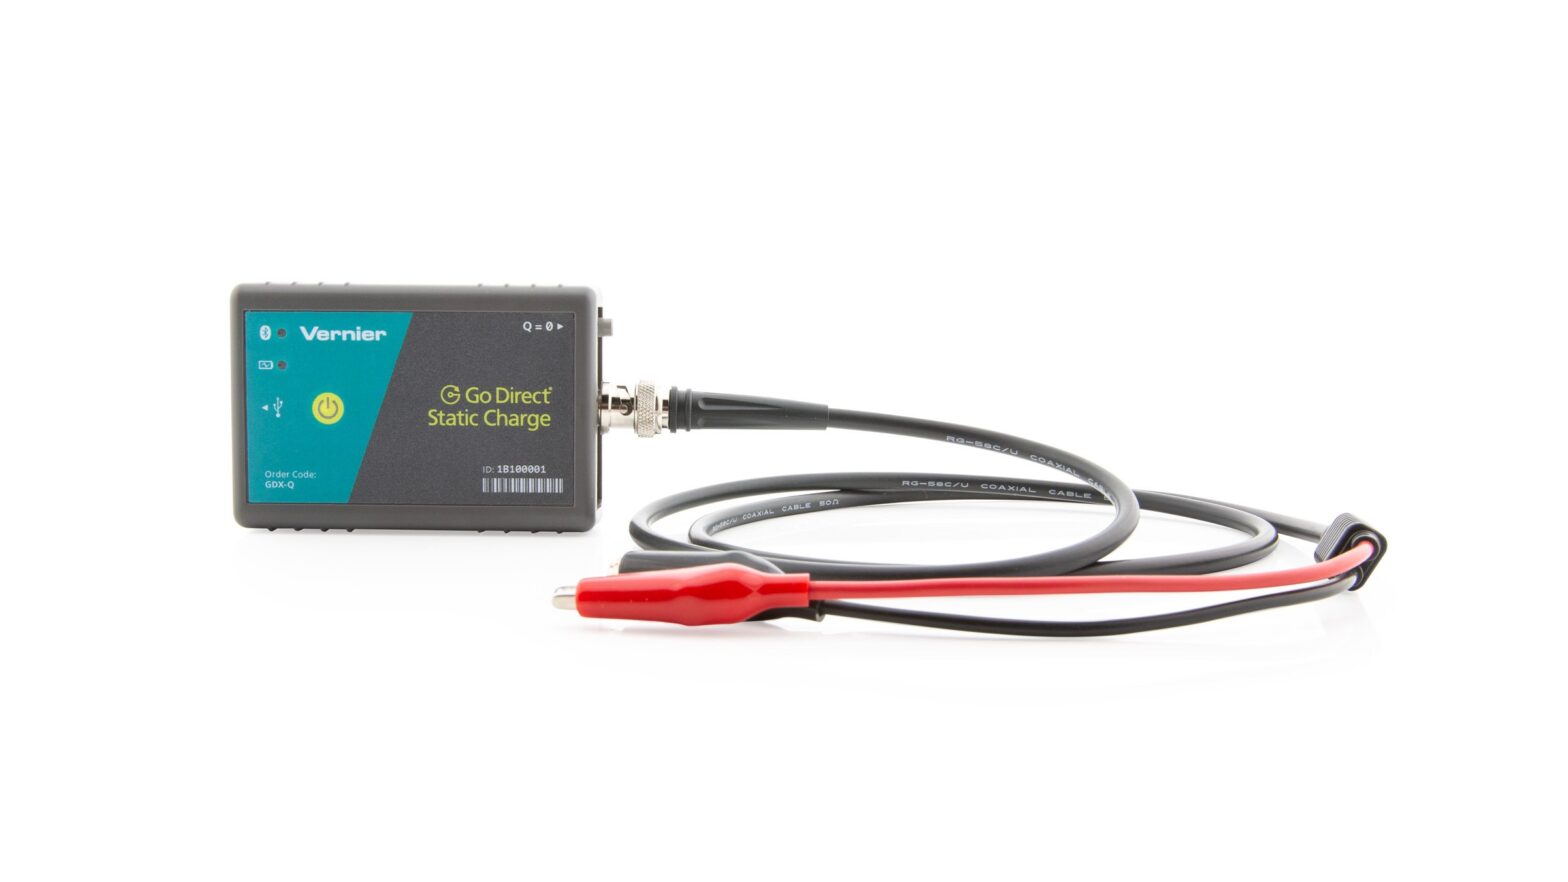
Go Direct Static Charge
Go Direct Static Charge is used as an electronic electroscope. Unlike a traditional electroscope, Go Direct Static Charge can make quantitative measurements. Numerical measurements improve many electrostatics experiments, such as charging by induction, charging by friction, and charging by contact. The sensor can also be used to determine charge polarity.
An extremely high impedance voltage sensor with a 0.01μF input capacitor makes these measurements possible. The sensor has a zeroing switch to discharge the input capacitor.
Note: Vernier products are designed for educational use. Our products are not designed nor are they recommended for any industrial, medical, or commercial process such as life support, patient diagnosis, control of a manufacturing process, or industrial testing of any kind.
What’s Included
- Go Direct Static Charge
- Low-leakage BNC/Alligator Clip Cable
- Micro USB Cable
Compatible Software
See www.vernier.com/manuals/gdx-q for a list of software compatible with Go Direct Static Charge.
Getting Started
Please see the following link for platform-specific connection information: www.vernier.com/start/gdx-q
Bluetooth Connection
- Install Vernier Graphical Analysis™ on your computer, Chromebook™, or mobile device. If using LabQuest, make sure LabQuest App is up to date. See www.vernier.com/ga4 for Graphical Analysis availability or www.vernier.com/downloads to update LabQuest App.
- Charge your sensor for at least 2 hours before first use.
- Turn on your sensor by pressing the power button once. The LED will blink red.
- Launch Graphical Analysis or turn on LabQuest.
- If using Graphical Analysis, click or tap Sensor Data Collection. If using LabQuest, choose Wireless Device Setup > Go Direct from the Sensors menu.
- Select your Go Direct sensor from the list of Discovered Wireless Devices. Your sensor’s ID is located near the barcode on the sensor. The LED will blink green when it is successfully connected.
- Click or tap Done. You are now ready to collect data.
- This is a multi-channel sensor. To change the channel selections, see www.vernier.com/start/gdx-q
USB Connection
- If using a computer or Chromebook, install Vernier Graphical Analysis. If using LabQuest, make sure LabQuest App is up to date. See www.vernier.com/ga4 for Graphical Analysis availability or www.vernier.com/downloads to update LabQuest App.
- Connect the sensor to the USB port.
- Launch Graphical Analysis or turn on LabQuest. You are now ready to collect data.
- This is a multi-channel sensor. To change the channel selections, seewww.vernier.com/start/gdx-q
Note: This sensor does not work with the original LabQuest. It works with LabQuest 2 or LabQuest 3.
Charging the Sensor Battery
Connect Go Direct Static Charge to the included USB Charging Cable and any USB device for two hours.
You can also charge up to eight Go Direct Static Charge Sensors using our Go Direct Charge Station, sold separately (order code: GDX-CRG). An LED on each Go Direct Static Charge indicates charging status.

Powering the Sensor

Connecting the Sensor
See the following link for up-to-date connection information: www.vernier.com/start/gdx-q
Connecting via Bluetooth

Connecting via USB
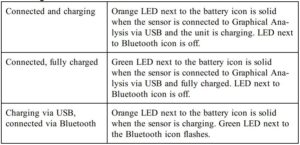
Identifying the SensorWhen two or more sensors are connected, the sensors can be identified by tapping or clicking Identify in Sensor Information.
Using the ProductConnect the low leakage BNC/alligator clip cable to the BNC connector on the sensor body. Prepare the sensor for data collection following the steps in the Getting Started section of this user manual.
General Tips
- When the sensor is stored, it is a good idea to clip together the wires in order to protect the sensor from high static potential that could damage the unit. Press the Reset button (Q = 0) with the red and black wires connected to a common conductor for a few seconds to zero the sensor.
- Pressing and releasing the Reset button with the clips connected to a voltage source, such as a power supply or battery, will cause an error in the reading and is not recommended, because it will short the power supply as well.
- Since the sensor is capable of measuring very small amounts of charge, it is essential to begin experiments by zeroing the sensor.
- You must be careful when handling the leads or you may alter the readings with stray charge. The insulator on the clip lead quickly becomes oily from handling, and fingers often carry small amounts of charge at high potential that can easily leak through the insulator and affect your reading. The best way to minimize this is by grounding your fingers, or wearing a grounding strap on your wrist, to remove any charge before releasing the positive (red) wire from its ground connection. Start recording data before removing the lead from ground so you will be aware if any stray charge accumulates before making your connection. When connecting to static sources (not a fixed voltage like a battery), the Reset button can be used while connected to a passive charge receptor. Make sure the output reads zero after reset. If it does not, re-connect the clips to a common conductor and re-zero the sensor.
- The sensor is not differential; therefore the negative (black) side is always at ground potential. The supplied cable is shielded and has a low leakage dielectric. When using other cables, the unit should be tested to make sure the cable does not allow excessive leakage currents.
- The negative (black) wire is the ground connection. The effects of stray static charges will be minimized by connecting the black lead to a metal ground plane below your experiment, such as a sheet of aluminum foil or a baking pan.
- Synthetic clothing can carry significant charge, as can the experimenter’s body. Grounding the experimenter by using a ground strap on one wrist will help. Wearing all cotton clothing can also help.
- When not using a Faraday Pail and ground plane, it helps to connect a metal cup to the positive (red) wire. This cup adds negligible capacitance to the system, but makes it easy to see induced or deposited charges. Insulate the cup from the ground plane using a glass jar or beaker. Plastic does not work well because it will accumulate stray charge quickly.
- Complete all experiments quickly. Due to leakage currents in the cable and apparatus, the reading will rarely be reliable after 15 seconds.
Tips for Use with a Faraday Pail and Ground Plane
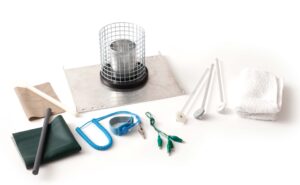
- Use of this sensor is simplified with the aid of a Faraday pail and ground plane such as found in the Vernier Electrostatics Kit (ESK-CRG).
- Since the sensor is capable of measuring very small amounts of charge, it is important to begin experiments by zeroing (resetting) the sensor. Simply press the Reset (Q=0) button on the sensor for a few seconds to zero the equipment. (Pressing the Reset button internally shorts the wires, shorts the internal input capacitor, and the internal integrator capacitor.)
- The sensor should be zeroed after initial power up and before collecting data.
- During data collection, monitor the sensor reading. If an excess charge develops on the sensor, zero the sensor prior to a new data-collection run.
Experiment Ideas
 Use the sensor with a Faraday pail to investigate charging by induction. Bring a charged object near the pail. What charge is measured? Ground the pail and remove the charged object. What charge is measured?
- Use a Faraday pail to investigate charging by contact. Do this by dropping a charged object into the can. All of the charge on the object will be transferred to or induced in the can.
- Without a grounding strap, scuff your feet on carpet or pull off a sweater. Hold your hand near a Faraday pail. Do you induce a charge? What sign? Does a ground strap remove or reduce this effect?
- Charge various objects and determine the sign of the charge.
- Measure how quickly objects lose charge. Plot the charge as a function of time; this will take some minutes on a dry day.
- Use Go Direct Static Charge and Faraday pail to observe the separation of charge when two strips of invisible tape are pulled apart. On two 3-inch pieces of tape, make a tab by folding over the top of each. Stick the combination to the table top. Pull the combination off the table and run your thumb or finger along the smooth side of the tape to neutralize the combination. Then pull the top strip off the bottom strip. Individually insert each strip into the Faraday pail to measure the charge. Simultaneously insert them in the pail to measure the charge.
- Charge a Faraday pail by contact on the inside; add more charge. How much charge can you add from the inside of the can? Can you add as much from the outside? More? Less? Investigate.
- Use a second pail (not connected to the red lead as a detector) and charge it by induction. Do this by charging an insulating object, holding it inside the pail (inducing a charge on the outside of the can) and then briefly grounding the pail. Remove the charged insulator and you’ve got a charged pail. Measure the charge by testing it by induction or by touching it to the inside of the detector pail.
Many of these tips are based on suggestions from Robert Morse, PhD.
ChannelsGo Direct Static Charge has two measurement channels:
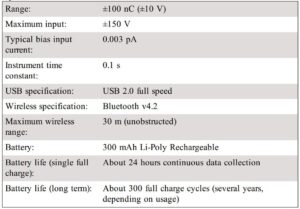
- Charge—The default channel that is active when the sensor is connected is Charge. This channel is calibrated in nanocoulombs and has a range of ±100 nanocoulombs.
- Potential—An alternative to measuring charge is measuring the difference of potential between the red and black alligator clips. The sensor compares the potential of the red clip to the assumed ground potential of the black clip.
CalibrationYou do not need to calibrate Go Direct Static Charge. We have set the sensor to match our stored calibration before shipping it.
Specifications
Care and Maintenance
Clean the sensor with a soft, damp cloth.
Battery InformationGo Direct Static Charge contains a small lithium-ion battery. The system is designed to consume very little power and not put heavy demands on the battery. Although the battery is warranted for one year, the expected battery life should be several years. Replacement batteries are available from Vernier (order code: GDX-BAT-300).
Storage and MaintenanceTo store Go Direct Static Charge for extended periods of time, put the device in sleep mode by holding the button down for at least three seconds. The red LED will stop flashing to show that the unit is in sleep mode. Over several months, the battery will discharge but will not be damaged. After such storage, charge the device for at least two hours, and the unit will be ready to go. Exposing the battery to temperatures over 35°C (95°F) will reduce its lifespan. If possible, store the device in an area that is not exposed to temperature extremes.
Water ResistanceGo Direct Static Charge is not water resistant and should never be immersed in water.
If water gets into the device, immediately power the unit down (press and hold the power button for more than three seconds). Disconnect the sensor and charging cable, and remove the battery. Allow the device to dry thoroughly before attempting to use the device again. Do not attempt to dry using an external heat source.
How the Sensor WorksGo Direct Static Charge is an extremely high impedance voltage sensor with a 0.01 μF capacitor in series with the input. The capacitor will accumulate charge until the source’s voltage is reached, i.e. equilibrium is achieved. Small amounts of charge can be measured even though their initial potential is higher than the input range of the sensor. The input circuit also includes a 1 MΩ resistor in series with the capacitor to protect the unit from large current surges. When connected by USB to a computer or to a data-collection interface connected to AC power, the negative polarity (black) input wire is grounded to Earth.
TroubleshootingFor additional troubleshooting and FAQs, see www.vernier.com/til/9652
Repair InformationIf you have followed the troubleshooting steps and are still having trouble with your Go Direct Static Charge, contact Vernier Technical Support at [email protected] or call 888-837-6437. Support specialists will work with you to determine if the unit needs to be sent in for repair. At that time, a Return Merchandise Authorization (RMA) number will be issued and instructions will be communicated on how to return the unit for repair.
Accessories/Replacements


Warranty
Warranty information for this product can be found on the Support tab atwww.vernier.com/gdx-qGeneral warranty information can be found at www.vernier.com/warranty
DisposalWhen disposing of this electronic product, do not treat it as household waste. Its disposal is subject to regulations that vary by country and region. This item should be given to an applicable collection point for the recycling of electrical and electronic equipment. By ensuring that this product is disposed of correctly, you help prevent potential negative consequences on human health or on the environment. The recycling of materials will help to conserve natural resources.
For more detailed information about recycling this product, contact your local city office or your disposal service.
Battery recycling information is available at www.call2recycle.orgDo not puncture or expose the battery to excessive heat or flame.
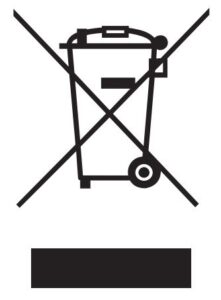 The symbol, shown here, indicates that this product must not be disposed of in a standard waste container.
Federal Communication Commission Interference StatementThis equipment has been tested and found to comply with the limits for a Class B digital device, pursuant to Part 15 of the FCC rules. These limits are designed to provide reasonable protection against harmful interference in a residential installation. This equipment generates, uses and can radiate radio frequency energy and, if not installed and used in accordance with the instructions, may cause harmful interference to radio communications.
However, there is no guarantee that interference will not occur in a particular installation. If this equipment does cause harmful interference to radio or television reception, which can be determined by turning the equipment off and on, the user is encouraged to try to correct the interference by one or more of the following measures:
- Reorient or relocate the receiving antenna.
- Increase the separation between the equipment and receiver.
- Connect the equipment into an outlet on a circuit different from that to which the receiver is connected.
- Consult the dealer or an experienced radio/TV technician for help.
FCC CautionThis device complies with Part 15 of the FCC Rules. Operation is subject to the following two conditions:
- This device may not cause harmful interference and
- This device must accept any interference received, including interference that may cause undesired operation
RF Exposure WarningThe equipment complies with RF exposure limits set forth for an uncontrolled environment. The antenna(s) used for this transmitter must not be co-located or operating in conjunction with any other antenna or transmitter. You are cautioned that changes or modifications not expressly approved by the party responsible for compliance could void your authority to operate the equipment.
IC Statement
This device complies with Industry Canada license-exempt RSS standard(s). Operation is subject to the following two conditions:
- This device may not cause interference, and
- This device must accept any interference, including interference that may cause undesired operation of the device.
Industry Canada – Class B This digital apparatus does not exceed the Class B limits for radio noise emissions from digital apparatus as set out in the interference-causing equipment standard entitled “Digital Apparatus,” ICES-003 of Industry Canada. Operation is subject to the following two conditions:
- This device may not cause interference, and
- This device must accept any interference, including interference that may cause undesired operation of the device.
To reduce potential radio interference to other users, the antenna type and its gain should be so chosen that the equivalent isotropically radiated power (e.i.r.p.) is not more than that permitted for successful communication.
RF exposure warning: The equipment complies with RF exposure limits set forth for an uncontrolled environment. The antenna(s) used for this transmitter must not be co-located or operating in conjunction with any other antenna or transmitter.
Note: This product is a sensitive measurement device. For best results, use the cables that were provided. Keep the device away from electromagnetic noise sources, such as microwaves, monitors, electric motors, and appliances.
Vernier Software & Technology13979 SW Millikan Way • Beaverton, OR 97005-2886Toll Free (888) 837-6437 • (503) 277-2299 • Fax (503) 277-2440[email protected] • www.vernier.com
Rev. 10/12/2020Go Direct, Graphical Analysis, LabQuest, and other marks shown are our trademarks or registered trademarks in the United States. All other marks not owned by us that appear herein are the property of their respective owners, who may or may not be affiliated with, connected to, or sponsored by us.
The Bluetooth® word mark and logos are registered trademarks owned by the Bluetooth SIG, Inc. and any use of such marks by Vernier Software & Technology is under license. Other trademarks and trade names are those of their respective owners.
Read More About This Manual & Download PDF:
Go Direct Static Charge User Manual – Go Direct Static Charge User Manual –

 Use the sensor with a Faraday pail to investigate charging by induction. Bring a charged object near the pail. What charge is measured? Ground the pail and remove the charged object. What charge is measured?