
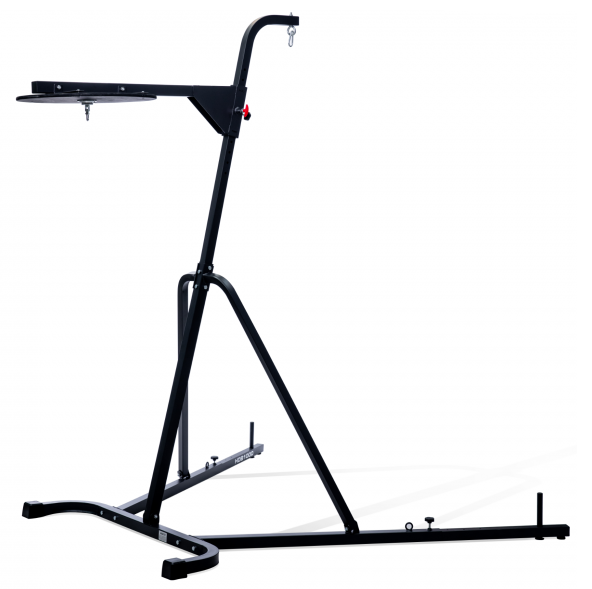
VIAVITO Heavy Duty Boxing Stand
Safety Information
- Please read all the instructions carefully before using this product.
- Retain this manual for future reference.
- The specifications of this product may vary slightly from the illustrations and are subject to change without notice.
This exercise machine is built for optimum safety. However, certain precautions apply whenever you operate a piece of exercise equipment. Be sure to read the entire manual before you operate your machine. In particular, note the following safety precautions:
- Check all the bolts, nuts and other connections before using the boxing stand for the first time and ensure that it has been built correctly and is safe to be used.
- This product is intended for indoor, home use only. Do not use the stand in any commercial, rental, or institutional setting.
- Set up the stand in a dry, level place and keep it away from moisture and water.
- Choking hazard! Keep small parts and polybags away from children.
- Place the stand on a stable and level surface with enough clearance around.
- Only use the stand for its intended purpose. It is not suitable for therapeutic or medical purposes.
- Always wear appropriate workout clothing when exercising. Sports shoes are required when using this equipment.
- It is the owner’s responsibility to ensure that all users of this stand have read the Owner’s Manual and are familiar with safety information and precautions.
- Periodically check all bolts, nuts and other connections to make sure that they are secure and in good working condition.
- Damaged or worn parts may be dangerous for users and the integrity of the stand. Replace worn or damaged components immediately and do not use the stand until any issues have been resolved. Use only spare parts supplied by Viavito.
- Unauthorized repairs or altering the stand’s design or functions may be dangerous and will void the warranty.
- WARNING! Inappropriate use of this stand such as while under the influence of drugs or alcohol, not in line with instructions or excessive usage, may result in serious injury or death.
- Disabled persons should not use this equipment without a qualified person or physician in attendance.
- Children and pets shall not play unsupervised on or near the stand.
- The heavy duty boxing stand is designed to support a maximum heavy bag weight of 45kg and a maximum weight of 40kg on each weight post.
WARNING: Before beginning using this equipment or doing any exercise program, consult your doctor. This is especially important for people over the age of 35 or those with pre-existing health problems.Viavito assumes no responsibility for the personal injury and/or property damage sustained by or though the use of this product.SAVE THESE INSTRUCTIONS.
Assembly
Product Overview
Thank you for selecting the Viavito HDB1000 Heavy Duty Boxing Stand. This manual will guide you through the assembly process.

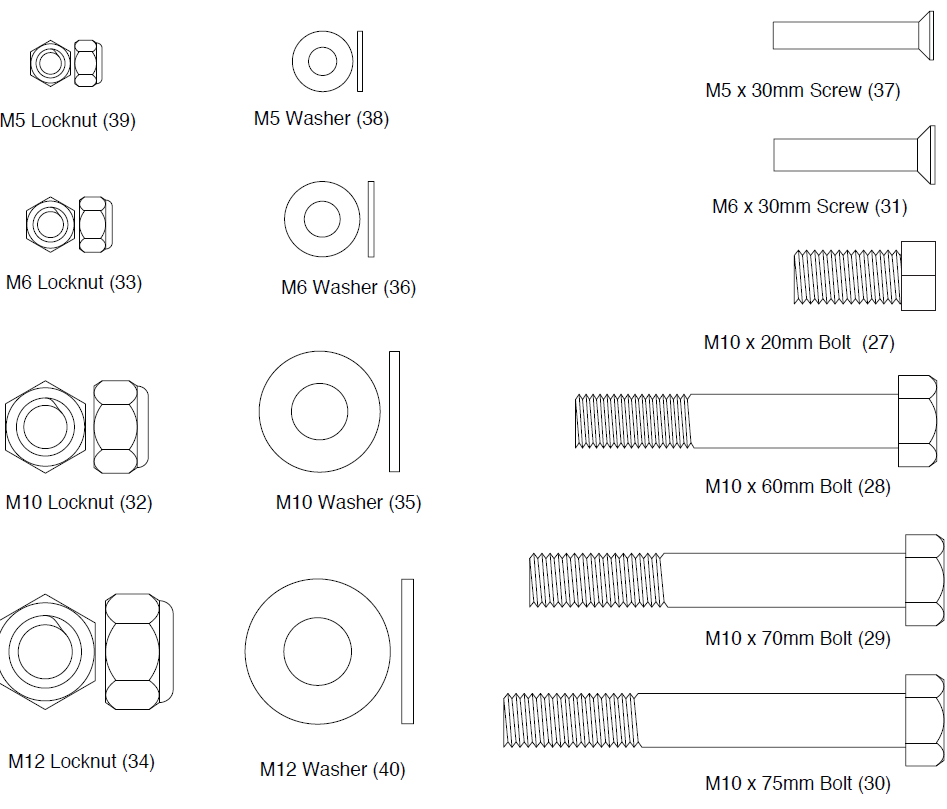
Part Identification Chart
Refer to the drawings below to identify small parts used in assembly. The number in brackets by each drawing is the key number of the part, from the Parts List on page 23.Note: Some small parts may have been preattached. If a part is not in the hardware kit, check if it has been preattached.
Before You Begin
Before beginning assembly, carefully read the following information and instructions:
- Assembly requires two persons.
- Because of its size, the boxing stand should be assembled in the location where it will be used. Make sure that there is enough room to walk around the boxing stand as you assemble it.
- Place all parts in a cleared area and remove the packing materials. Do not dispose of the packing materials until assembly is completed.
- Tighten all parts as you assemble them, unless instructed to do otherwise.
- As you assemble the boxing stand, make sure all parts are oriented as shown in the drawings.
- For help identifying small parts, use the PART IDENTIFICATION CHART
Assembly requires the following tools (not included):
 2 adjustable wrenches
- 1 rubber mallet
- 1 standard screwdriver
- 1 Phillips screwdriver
 2 adjustable wrenches
Assembly may be easier if you have a set of wrenches. To avoid damaging parts, do not use power tools.
Assembly Instructions
NOTE: Hand tighten bolts and locknuts until the machine is fully assembled.Locknuts may require additional force to tighten completely.
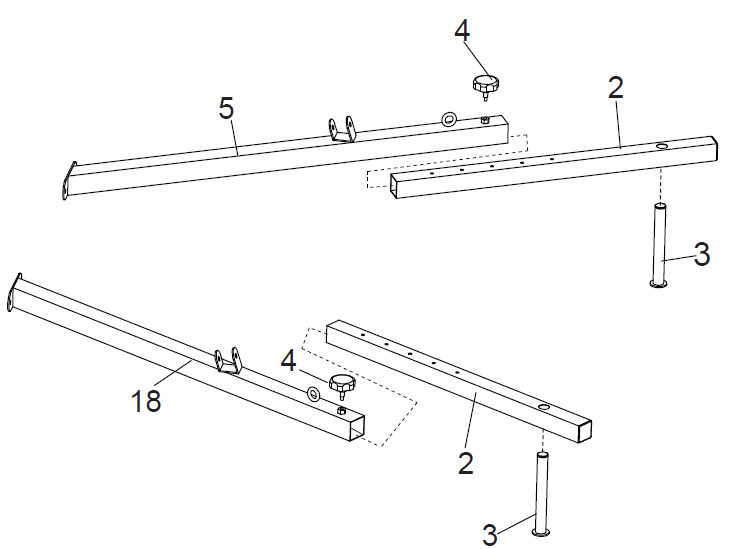
Step One.
- Insert Weight Bars (3) into Leg Extensions (2) from the bottom.
- Slide the Leg Extensions (2) into the end of the Left and Right Leg (5) (18) and secure with two Short Knob Bolts (4).
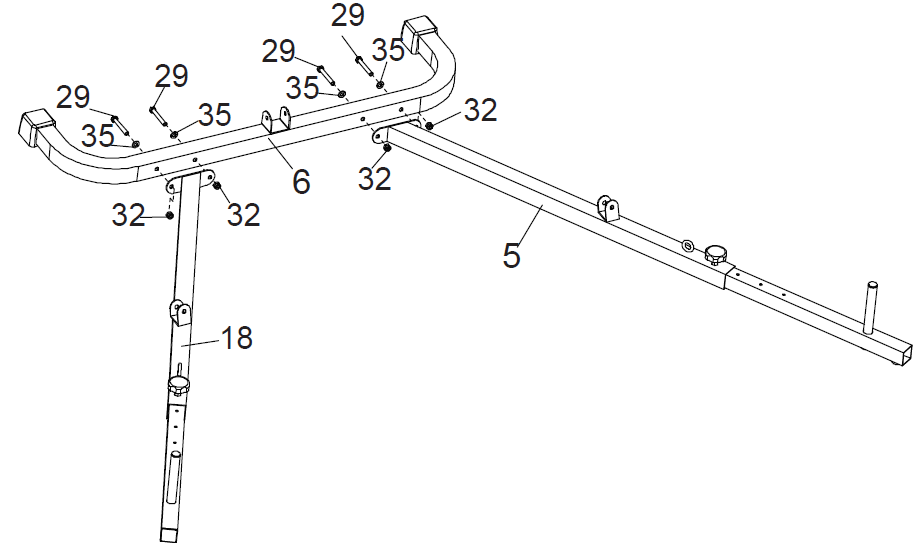
Step Two.
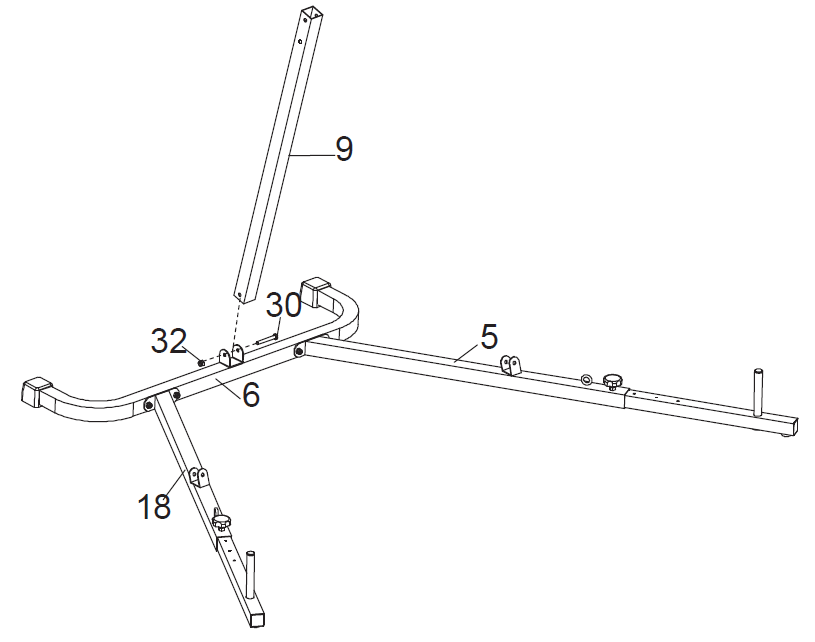
01 Attach the Left and Right Leg (5) (18) to the Main Base (6) and secure with four M10 x 70 Bolts (29), four M10 Washers (35) and four M10 Locknuts (32).
Step Three.
Attach the Lower Center Support (9) to the u-bracket of the Main Base (6) and secure with one M10 x 75 Bolt (30) and one M10 Locknut (32).
Step Four.
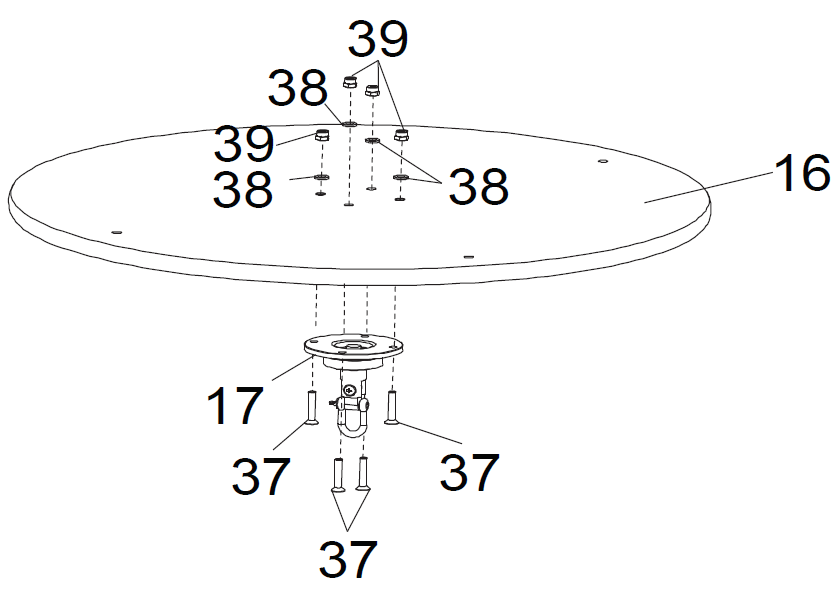
Attach Speed Bag Swivel (17) to Speed Bag Platform (16) and secure with four M5 x 30 Screws (37), four M5 Washers (38) and four M5 Locknuts (39).
Step Five.
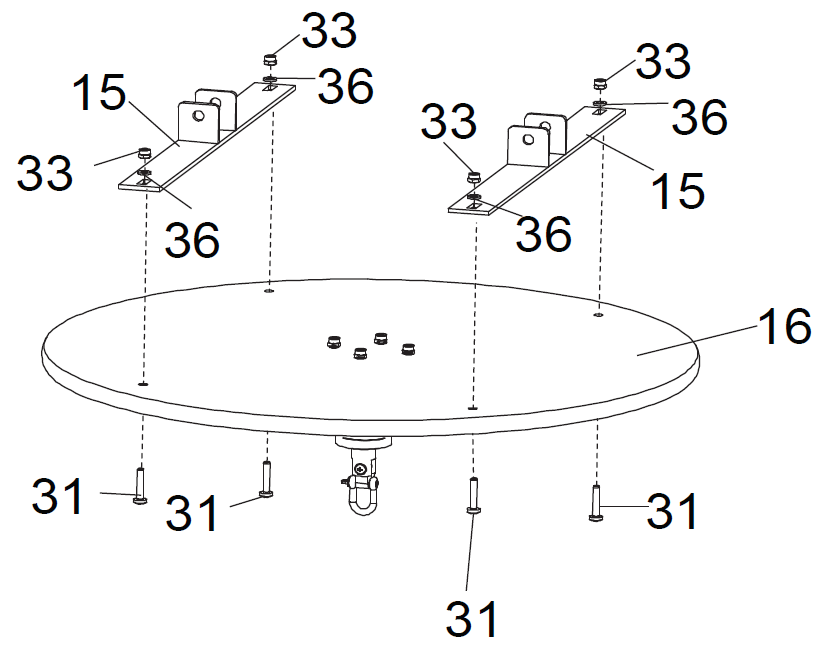
Attach Support Plates (15) to Speed Bag Platform (16) and secure with four M6 x 30 Screws (31), four M6 Washers (36) and four M6 Locknuts (33).
Step Six.
Connect Support Plates (15) to Speed Bag Support (14) with two M10 x 70 Bolts (29) and two M10 Locknuts (32).

Step Seven.
- Pull the Locking Pop Pin (11) out as far as it will go and Slide Heavy Bag Hanger Bar (10) into Speed Bag Support (14). Beware of the direction and secure with the Locking Pop Pin (11) and a Knob Bolt (23) as illustrated.
- Insert the Heavy Bag Hanger Bar (10) into the Lower Center Support (9), secure with two M10 x 20 Bolts (27) and two M10 Washers (35).

Step Eight.
- Insert Left and Right Supports (7) (8) into the u-brackets of the Left Leg (5) and Right Leg (18), securing with two M10 x 60 Bolts (28) and two M10 Locknuts (32).
- Attach the brackets of the Left and Right Supports (7) (8) to the Lower Center Support (9), secure with two M10 x 70 Bolts (29) and two M10 Locknuts (32).

Conditioning Guidelines
The following guidelines will help you to plan your exercise program and exercise safely. Remember that proper nutrition and adequate rest are essential for successful results.
WARNING: Before beginning this or any other exercise program consult your doctor. This is especially important for pregnant women and new mothers, all people over the age of 35, and those with medical problems such as heart disease, high or low blood pressure, injuries, joint problems, obesity and asthma.
Why exercise?Exercise has been proven essential for good health and general wellbeing.Regular exercise will:
- Relieve tension and stress
- Provide enjoyment and fun
- Stimulate the mind
- Help maintain stable weight
- Control appetite
- Boost self-image
- Improve muscle tone and strength
- Improve flexibility
- Lower blood pressure
- Relieve insomnia
Beginner’s Guide to Exercise
If you’re beginning an exercise program for the first time or starting a new exercise program, you must check with your doctor that you are fit to do so, particularly if:
- You have been diagnosed with heart problems, high blood pressure or other medical conditions.
- You have not exercised for over a year.
- You are over 35 and do not currently exercise.
- You are pregnant or are a new mother.
- You have diabetes.
- You have chest pain, or experience dizziness or fainting spells.
- You are recovering from an injury or illness.
Workout tips
- Always perform a warm-up and stretching exercises before your workout and a cool-down and stretching exercises at the end.
- Start slowly and build up your time, speed and resistance gradually; doing too much too soon can lead to injuries.
- If you are sore or tired, give yourself a few extra days to recover.
How to begin
- Start with two or three 15-minute sessions per week with a rest day between workouts.
- Warm up for 5 to 10 minutes with gentle movements incorporating the whole body such as walking while swinging your arms in a circle and then stretch the muscles you’ll use during your workout.
- Increase the intensity to slightly harder than comfortable and exercise for as long as you can. You may only be able to exercise for a few minutes at a time, but that will change quickly when you exercise regularly.
- End each workout with a 5-minute cool-down. You should then stretch the muscles you’ve just worked to develop flexibility, reduce muscle soreness and prevent injury.
- Increase your workout time by a few minutes each week until you can work continuously for 30 minutes per session.
How hard should you work?
Always be aware of how you feel when you exercise. If you feel dizzy or light-headed, stop immediately and rest.
Stretching Guide
Tips for stretching
- Begin with small mobility exercises of all the joints e.g. simply rotate the ankles, bend the knees and roll your hips. Gradually make the movements larger and faster. This will allow the body’s natural lubrication (synovial fluid) to protect the surface of your bones at these joints.
- Always warm up the body before stretching, as this increases blood flow around the body, creating warmth which makes the muscles more supple.
- Start with your legs, and steadily work up the body.
- Each stretch should be held for at least 10 seconds (working up to 20 to 30 seconds) and usually repeated about 2 or 3 times.
- Do not stretch until it hurts. If there’s any pain, ease off.
- Don’t bounce. Stretching should be gradual and relaxed.
- Don’t hold your breath during a stretch.
- Stretch after exercising to prevent muscles from tightening up.
- Stretch at least three times a week to maintain flexibility.
Warm-up and cool-down
A successful cardio-vascular exercise program consists of a full-body warm-up, aerobic exercise, and a cool-down. Do the entire program at least two and preferably three times a week, resting for a day between workouts. After several months, you can increase your workouts to four or five times per week.
Warm-up
The purpose of warming up is to prepare your body for exercise and to minimise injuries. Warm up for five minutes before strength-training or exercising aerobically. Perform activities that raise your heart rate and warm the working muscles.Activities may include brisk walking, jogging, jumping jacks, jump rope, and running on the spot. Try to incorporate moves that take the joints through their full range of motion.
Stretching
Stretching while your muscles are warm after a proper warm-up and again after your strength or aerobic training session is very important. Muscles stretch more easily at these times because of their elevated temperature, which greatly reduces the risk of injury. Stretching develops flexibility and reduces muscles soreness.Stretches should be held for 15 to 30 seconds.
Do not bounce or over-stretch. Take your time on each stretch. Gradually take each stretch a little deeper on every out breath to your personal maximum.

COOL-DOWNThe purpose of cooling down is to return the body to its normal or near normal, resting state at the end of each exercise session. A proper cool-down slowly lowers your heart rate, allows blood to return to the heart and helps prevent muscle soreness caused by the build-up of lactic acid in the muscles.
Customer Support
Contact Information
Should you require any assistance regarding this product please gather the following information and then contact us using the details below:
- Serial No. – This can be found on a label on the product itself
- Original purchase date
- Place of purchase
- Information about the place and conditions of use
- Precise description of the issue or defect.
IMPORTANT! Please retain your sales receipt. Viavito Customer Care may request proof of purchase to validate eligibility for warranty service.Warranty cover starts from the date shown on the proof of purchase.
The best way to contact us is via thewebsite: www.viavito.comViavito94 Cleveland StreetLondonW1T 6NWEmail: [email protected]
Manufacturer’s Warranty
Viavito warrants this product to be free of defects of material and workmanship, under normal use and conditions, for a period of 12 months from the date of the original purchase.Warranty extensions may apply to this product subject to registering this product with Viavito. To qualify for this, please complete the warranty registration form on the Viavito website at www.viavito.com Full details of warranty extensions and the Viavito Manufacturer’s Warranty are available online at www.viavito.com.
Terms.This warranty extends only to the original purchaser and is not transferable.The warranty does not cover:
- Normal wear and tear
- Any changes to upgrade this product from its normal state or use other than as described in the user manual
- Damage resulting from:a) Transportb) Abuse, misuse, failure to follow instructions or improper or abnormal usec) Non-home use – including commercial, professional, or rental purposesd) Repairs not provided by Viavitoe) Accidents, lightning, water, fire, or any other causes beyond the control of Viavitof) Improper location including, but not limited to, humid, dusty, or outdoor environments.
Viavito is not responsible or liable for direct, indirect, or consequential losses arising out of or in connection with the use of this product or damages with respect to any loss of property, revenue, profits, enjoyment or use, nor for any costs of removal or installation of this product.This warranty covers products purchased as new inside the United Kingdom.In the event of the machine requiring a repair, this may need to be performed at a Viavito authorised repair centre.This warranty is in addition and does not in any way affect your statutory rights.
Technical Information
Exploded Diagram

Parts List
| KEY NO. | DESCRIPTION | Q’TY |
| 1 | Adjustable Stoppers | 2 |
| 2 | Leg Extension | 2 |
| 3 | Weight Bar | 2 |
| 4 | Short Knob Bolt | 2 |
| 5 | Left Leg | 1 |
| 6 | Main Base | 1 |
| 7 | Left Support | 1 |
| 8 | Right Support | 1 |
| 9 | Lower Center Support | 1 |
| 10 | Heavy Bag Hanger Bar | 1 |
| 11 | Locking Pop Pin | 1 |
| 12 | Heavy Bag Hook | 1 |
| 13 | Heavy Bag Lock | 1 |
| 14 | Speed Bag Support | 1 |
| 15 | Support Plate 2 | 2 |
| 16 | Speed Bag Platform | 1 |
| 17 | Speed Bag Swivel | 1 |
| 18 | Right Leg | 1 |
| 19 | Square Plug 44 | 3 |
| 20 | Round Plug 25 | 2 |
| 21 | Square End Foot 50 | 2 |
| 22 | Square Plug 50 | 1 |
| 23 | Knob Bolt | 1 |
| 24 | Bushing | 2 |
| 27 | M10 x 20 Bolt | 2 |
| 28 | M10 x 60 Bolt | 2 |
| 29 | M10 x 70 Bolt | 8 |
| 30 | M10 x 75 Bolt | 1 |
| 31 | M6 x 30 Screw | 4 |
| 32 | M10 Locknut | 11 |
| 33 | M6 Locknut | 4 |
| KEY NO. | DESCRIPTION | Q’TY |
| 34 | M5 Locknut | 4 |
| 35 | M10 Washer | 6 |
| 36 | M6 Washer | 4 |
| 37 | M5 x 30 Screw | 4 |
| 38 | M5 Washer | 4 |
| 39 | M5 Locknut | 4 |
| 40 | M12 Washer | 1 |
Appendix 1: Space Required
For safety reasons, minimum clearance for the equipment is 0.6m in all directions.

![]()
References
[xyz-ips snippet=”download-snippet”]