
Insert the protective rubber (22) into the Victoria mill body (2) with the serrated surface facing down, then place the body (2) on the edge of a stable and firm surface; secure the Victoria mill body (2) by tightening the clamp screw (3) until it is fixed and firm.
Fully insert the feed screw (12) into the mill body(2)
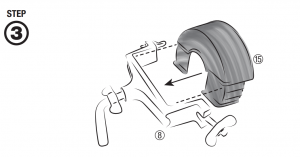
Place and tighten the grinding disk cover(15) to the bearing support(8), matching the external tracks.
Make sure to have the adjusting screw (14) as open as possible. Then fasten the bearing support (8) with the grinding disk cover (15) to the mill body (2), adjusting the wing nuts (9) to the brackets on each side and tightening until direct contact is ensured.
Place the crank handle (4) on the protrusion of the feed screw (12) and fix it with its respective screw (5)
Place the hopper (1) on top of the mill body (2), matching its pins and turning the hopper slightly clockwise to secure.

Once the mill is installed, adjust the grinding adjusting screw(14) to obtain the desired texture – the tighter, the finer the grind, and the more open, the coarser the grind. Finally, secure the adjusting screw(14) by tightening the lock nut(13).
IMPORTANT
Loosen the adjusting screw (14) before disassembling the Victoria grain mill.
For instructions on assembly visit our channelVictoriaCookware


__________________________________________________

![]() PBX +57 (4) 372 20 00
PBX +57 (4) 372 20 00
![]()
FAX +57 (4) 281 45 19 | 373 17 47
![]()
CRR42 #33 – 173 (AUTOPISTA SUR KM 9) C6digo postal 055412 ltaqui Antioquia – Colombia – Sur america
![]()
[email protected] | [email protected]

@VictoriaCastiron

@VictoriaCocinaCastironwww.victoria.co
FOR USA: Questions?
Contact us at [email protected]
[xyz-ips snippet=”download-snippet”]