ViewSonic VP2468 Display User Guide

IMPORTANT: Please read this User Guide to obtain important information on installing and using your product in a safe manner, as well as registering your product for futureservice. Warranty information contained in this User Guide will describe your limited coverage from ViewSonic Corporation, which is also found on our web site at http://www.viewsonic.com in English, or in specific languages using the Regional selection box in the upper right corner of our website. “Antes de operar su equipo lea cu idadosamente las instrucciones en este manual”
Thank you for choosing ViewSonic
With over 25 years as a world leading provider of visual solutions, ViewSonic is dedicated to exceeding the world’s expectations fortechnological evolution, innovation, and simplicity. At ViewSonic, we believe that our products have the potential to make a positive impact in the world, and we are confident that the ViewSonic product you have chosen will serve you well.
Once again, thank you for choosing ViewSonic !
Compliance Information
NOTE: This section addresses all connected requirements and statements regarding regulations. Confirmed corresponding applications shall refer to nameplate labelsand relevant markings on unit.
FCC Compliance StatementThis device complies with part 15 of FCC Rules. Operation is subject to the following two conditions: (1) this device may not cause harmful interference, and (2) thisdevice must accept any interference received, including interference that may cause undesired operation. This equipment has been tested and found to comply with the limits for a Class B digital device, pursuant to part 15 of the FCC Rules. These limits are designed to provide reasonable protection against harmful interference in a residentialinstallation. This equipment generates, uses, and can radiate radio frequency energy, and if not installed and used in accordance with the instructions, may causeharmful interference to radio communications. However, there is no guarantee that interference will not occur in a particular installation. If this equipment does causeharmful interference to radio or television reception, which can be determined by turning the equipment off and on, the user is encouraged to try to correct the interference by one or more of the following measures:
- Reorient or relocate the receiving antenna.
- Increase the separation between the equipment and receiver.
- Connect the equipment into an outlet on a circuit different from that to which the receiver is connected.
- Consult the dealer or an experienced radio/TV technician for help.
Warning: You are cautioned that changes or modifications not expressly approvedbby the party responsible for compliance could void your authority to operate theequipment.
Industry Canada Statement
CAN ICES-3 (B)/NMB-3(B)
CE Conformity for European Countries
 The device complies with the EMC Directive 2014/30/EU and Low VoltageDirective 2014/35/EU.
 Following information is only for EU-member states:The mark shown to the right is in compliance with the Waste Electrical and Electronic Equipment Directive 2012/19/EU (WEEE).The mark indicatesthe requirement NOT to dispose the equipment as unsorted municipal waste, but use the return and collection systems according to local law.
Congratulations!This product is TCO Certified – for Sustainable IT
 TCO Certified is an international third party sustainability certification for ITproducts. TCO Certified ensures that the manufacture, use and recycling of ITproducts reflect environmental, social and economic responsibility. Every TCOCertified product model is verified by an accredited independent test laboratory.
This product has been verified to meet all the criteria in TCO Certified, including:
Corporate Social ResponsibilitySocially responsible production – working conditions and labor law in manufacturing country
Energy EfficiencyEnergy efficiency of product and power supply. Energy Star compliant, where applicable
Environmental Management SystemManufacturer must be certified according to either ISO 14001 or EMAS
Minimization of Hazardous SubstancesLimits on cadmium, mercury, lead & hexavalent chromium including requirements for mercury-free products, halogenated substances and hazardous flame retardants
Design for RecyclingCoding of plastics for easy recycling. Limit on the number of different plastics used.
Product Lifetime, Product Take BackMinimum one-year product warranty. Minimum three-year availability of spare parts. Product takeback
PackagingLimits on hazardous substances in product packaging. Packaging prepared for recycling
Ergonomic, User-centered designVisual ergonomics in products with a display. Adjustability for user comfort (displays, headsets) Acoustic performance – protection against sound spikes (headsets) and fan noise (projectors, computers) Ergonomically designed keyboard (notebooks)
Electrical Safety, minimal electro-magnetic EmissionsThird Party Testing All certified product models have been tested in an independent, accredited laboratory.
A detailed criteria set is available for download at www.tcodevelopment.com, where you can also finda searchable database of all TCO Certified IT products.
TCO Development, the organization behind TCO Certified, has been an international driver in the field of Sustainable IT for 20 years. Criteria in TCO Certified are developed in collaboration with scientists, experts, users and manufacturers. Organizations around the world rely on TCO Certified as a tool to help them reach their sustainable IT goals. We are owned by TCO, a non-profit organization representing office workers. TCO Development is headquartered in Stockholm, Sweden, with regionalpresence in North America and Asia.
Declaration of RoHS2 ComplianceThis product has been designed and manufactured in compliance with Directive 2011/65/EU of the European Parliament and the Council on restriction of the useof certain hazardous substances in electrical and electronic equipment (RoHS2 Directive) and is deemed to comply with the maximum concentration values issuedby the European Technical Adaptation Committee (TAC) as shown below:
| Substance | Proposed Maximum Concentration | Actual Concentration |
| Lead (Pb) | 0.1% | < 0.1% |
| Mercury (Hg) | 0.1% | < 0.1% |
| Cadmium (Cd) | 0.01% | < 0.01% |
| Hexavalent Chromium (Cr6+) | 0.1% | < 0.1% |
| Polybrominated biphenyls (PBB) | 0.1% | < 0.1% |
| Polybrominated diphenyl ethers (PBDE) | 0.1% | < 0.1% |
Certain components of products as stated above are exempted under the Annex IIIof the RoHS2 Directives as noted below:
Examples of exempted components are:
- Mercury in cold cathode fluorescent lamps and external electrode fluorescent lamps (CCFL and EEFL) for special purposes not exceeding (per lamp):(1) Short length (≦500 mm): maximum 3.5 mg per lamp.(2) Medium length (>500 mm and ≦1,500 mm): maximum 5 mg per lamp.(3) Long length (>1,500 mm): maximum 13 mg per lamp.
- Lead in glass of cathode ray tubes.
- Lead in glass of fluorescent tubes not exceeding 0.2% by weight.
- Lead as an alloying element in aluminium containing up to 0.4% lead by weight.
- Copper alloy containing up to 4% lead by weight.
- Lead in high melting temperature type solders (i.e. lead-based alloys containing 85% by weight or more lead).
- Electrical and electronic components containing lead in a glass or ceramic other than dielectric ceramic in capacitors, e.g. piezoelectronic devices, or in a glass orceramic matrix compound.
Indian Restriction of Hazardous Substances
Restriction on Hazardous Substances statement (India) This product complies with the “India E-waste Rule 2011” and prohibits use of lead, mercury, hexavalentchromium, polybrominated biphenyls or polybrominated diphenyl ethers in concentrations exceeding 0.1 weight % and 0.01 weight % for cadmium, except forthe exemptions set in Schedule 2 of the Rule.
Cautions and Warnings
- Read these instructions completely before using the equipment.
- Keep these instructions in a safe place.
- Heed all warnings and follow all instructions.
- Sit at least 18” / 45cm from the LCD display.
- Always handle the LCD display with care when moving it.
- Never remove the rear cover. This LCD display contains high-voltage parts. You may be seriously injured if you touch them.
- Do not use this equipment near water. Warning: To reduce the risk of fire or electric shock, do not expose this apparatus to rain or moisture.
- Avoid exposing the LCD display to direct sunlight or another heat source. Orient the LCD display away from direct sunlight to reduce glare.
- Clean with a soft, dry cloth. If further cleaning is required, see “Cleaning theDisplay” in this guide for further instructions.
- Avoid touching the screen. Skin oils are difficult to remove.
- Do not rub or apply pressure to the LCD panel, as it may permanently damage the screen.
- Do not block any ventilation openings. Install the equipment in accordance with the manufacturer’s instructions.
- Do not install near any heat sources such as radiators, heat registers, stoves, or other devices (including amplifiers) that produce heat.
- Place the LCD display in a well ventilated area. Do not place anything on the LCD display that prevents heat dissipation.
- Do not place heavy objects on the LCD display, video cable, or power cord.
- If smoke, an abnormal noise, or a strange odor is present, immediately switch the LCD display off and call your dealer or ViewSonic. It is dangerous to continueusing the LCD display.
- Do not attempt to circumvent the safety provisions of the polarized or groundingtype plug. A polarized plug has two blades with one wider than the other. Agrounding type plug has two blades and a third grounding prong. The wide blade and the third prong are provided for your safety. If the plug does not fit into youroutlet, consult an electrician for replacement of the outlet. 18. When connecting to a power outlet, DO NOT remove the ground prong. Please ensure grounding prongs are NEVER REMOVED.
- Protect the power cord from being tread upon or pinched, particularly at the plug, and the point where if emerges from the equipment. Be sure that the power outletis located near the equipment so that it is easily accessible.
- Only use attachments/accessories specified by the manufacturer.
- Use only with the cart, stand, tripod, bracket, or table specified by the manufacturer, or sold with the equipment. When a cart is used, use caution when moving the cart/equipment combination to avoid injury from tipping over.
- Unplug this equipment when it will be unused for long periods of time.
- Refer all servicing to qualified service personnel. Service is required when the unit has been damaged in any way, such as: if the power-supply cord or plug isdamaged, if liquid is spilled onto or objects fall into the unit, if the unit is exposed to rain or moisture, or if the unit does not operate normally or has been dropped.
- Usage of other than specified head- or earphones can result in hearing loss due to excessive sound pressures.

Copyright Information
Copyright © ViewSonic Corporation, 2016. All rights reserved. Macintosh and Power Macintosh are registered trademarks of Apple Inc.Microsoft, Windows, and the Windows logo are registered trademarks of Microsoft Corporation in the United States and other countries.ViewSonic and the three birds logo are registered trademarks of ViewSonic Corporation.VESA is a registered trademark of the Video Electronics Standards Association. DPMS, DisplayPort, and DDC are trademarks of VESA.ENERGY STAR® is a registered trademark of the U.S. Environmental Protection Agency (EPA).As an ENERGY STAR® partner, ViewSonic Corporation has determined that this product meets the ENERGY STAR® guidelines for energy efficiency.Disclaimer: ViewSonic Corporation shall not be liable for technical or editorial errors or omissions contained herein; nor for incidental or consequential damages resultingfrom furnishing this material, or the performance or use of this product. In the interest of continuing product improvement, ViewSonic Corporation reservesthe right to change product specifications without notice. Information in this document may change without notice. No part of this document may be copied, reproduced, or transmitted by any means, for any purpose without prior written permission from ViewSonic Corporation.
Product Registration
To fulfill possible future product needs, and to receive additional product information as it becomes available, please visit your region section on ViewSonic’s website toregister your product online. The ViewSonic CD also provides an opportunity for you to print the product registration form. Upon completion, please mail or fax to a respective ViewSonic office. To find your registration form, use the directory “:\CD\Registration”. Registering your product will best prepare you for future customer service needs. Please print this user guide and fill the information in the “For Your Records” section. Your display serial number is located on the rear side of the display.For additional information, please see the “Customer Support” section in this guide.
For Your Records
Product Name: VP2468Model Number: ViewSonic DisplayDocument Number: VS16475Serial Number: VP2468_UG_ENG Rev. 1A 04-08-16Purchase Date:
Product disposal at end of product lifeViewSonic respects the environment and is committed to working and living green. Thank you for being part of Smarter, Greener Computing.Please visit ViewSonic website to learn more. USA & Canada: http://www.viewsonic.com/company/green/recycle-program/Europe: http://www.viewsoniceurope.com/uk/support/recycling-information/ Taiwan: http://recycle.epa.gov.tw/recycle/index2.aspx
Getting Started
Congratulations on your purchase of a ViewSonic® display.Important! Save the original box and all packing material for future shipping needs.NOTE: The word “Windows” in this user guide refers to Microsoft Windows operating system.
Package ContentsYour display package includes:
- Display
- Power cord
- Video cable
- USB cable
- Quick Start Guide
- ViewSonic CD— User Guide— INF/ICM files*— Registration information— Additional software (Optional)
NOTE: The INF file ensures compatibility with Windows operating systems, and the ICM file (Image Color Matching) ensures accurate on-screen colors. ViewSonicrecommends that you install both the INF and ICM files.
Quick Installation
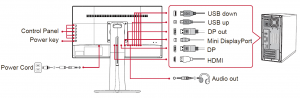
- Connect video cable• Make sure both the display and computer are turned OFF.• Remove rear panel covers if necessary.• Connect the video cable from the display to the computer.Macintosh users: Models older than G3 require a Macintosh adapter. Attach the adapter to the computer and plug the video cable into the adapter.To order a ViewSonic® Macintosh adapter, contact ViewSonic Customer Support.
- Connect power cord (and AC/DC adapter if required)
- Turn ON the display and computerTurn ON the display, then turn ON the computer. This sequence (display before computer) is important.NOTE: Windows users may receive a message asking them to install the INF file. To access the file, please use the directory “:\CD\vsfiles”.
- Insert the ViewSonic CD into the computer’s CD drive. If your computer does not have a CD-ROM drive, please refer to Customer Support page.
- Windows users: Set the timing mode (example: 1920 x 1080) For instructions on changing the resolution and refresh rate, see the graphics card’s user guide.
- Installation is complete. Enjoy your new ViewSonic display.
Additional Software Installation (Optional)
- Load the ViewSonic CD on your CD/DVD drive.
- Double click on the “Software” folder and choose an application, if desired.
- Double click on the Setup.exe file and follow the onscreen instructions to complete the simple installation.
Wall Mounting (Optional)
NOTE: For use only with UL Listed Wall Mount Bracket with minimum weight/load:8.5kgTo obtain a wall-mounting kit or height adjustment base, contact ViewSonic® or your local dealer. Refer to the instructions that come with the base mounting kit.To convert your display from a desk-mounted to a wall-mounted display, do thefollowing:
- Verify that the power button is turned Off, then disconnect the power cord.
- Lay the display face down on a towel or blanket.
- Remove the base. (Screws removal might be required.)
- Find and identify one of the following VESA mount interfaces (a,b,c) located on the back of your display (refer to “Specifications” page for your displays mountinginterface). Attach the mounting bracket from the VESA compatible wall mounting kit using screws of the appropriate length.
- Attach the display to the wall, following the instructions in the wall-mounting kit.

Using the Display
Setting the Timing ModeSetting the timing mode is important for maximizing the quality of the screen image and minimizing eye strain. The timing mode consists of the resolution (example1920 x 1080) and refresh rate (or vertical frequency; example 60 Hz). After setting the timing mode, use the OSD (On-screen Display) controls to adjust the screenimage. For optimal picture quality, please use the recommended timing mode specific to your display listed on the “Specification” page. To set the Timing Mode:
- Setting the resolution: Access “Appearance and Personalization” from Control Panel via the Start Menu, and set the resolution.
- Setting the refresh rate: See your graphic card’s user guide for instructions.IMPORTANT: Please make sure that your graphics card is set to 60Hz vertical refresh rate as the recommended setting for most displays. Choosing a nonsupportedtiming mode setting may result in no image being displayed, and a message showing “Out of Range” will appear on screen.
OSD and Power Lock Settings
- OSD Lock: Press and hold [2] and [3] for 10 seconds. If any buttons are pressed the message OSD Locked will display for 3 seconds.
- OSD Unlock: Press and hold [2] and [3] again for 10 seconds.
- Power Button Lock: Press and hold [2] and [4] for 10 seconds. If the power button is pressed the message Power Button Locked will display for 3 seconds.With or without this setting, after a power failure, your display’s power will automatically turn ON when power is restored.
- Power Button Unlock: Press and hold [2] and [4] again for 10 seconds.
Main Menu Explanation
NOTE: The Main Menu items listed in this section indicates whole Main Menu items of all models. For the actual Main Menu details corresponding to your product referto the items on your display’s OSD Main Menu.
A Audio Adjustadjusts the volume, mutes the sound, or toggles between inputs if you have more than one source.
B Brightnessadjusts background black level of the screen image.
C Color Adjustprovides several color adjustment modes, including preset color temperatures and a User Color mode which allows independentadjustment of red (R), green (G), and blue (B). The factory setting for this product is native.
Contrastadjusts the difference between the image background (black level) andthe foreground (white level).
I Informationdisplays the timing mode (video signal input) coming from the graphics card in the computer, the display model number, the serial number,and the ViewSonic® website URL. See your graphics card’s user guide for instructions on changing the resolution and refresh rate (vertical frequency).NOTE: VESA 1024 x 768 @ 60Hz (example) means that the resolution is1024 x 768 and the refresh rate is 60 Hertz.
Input Selecttoggles between inputs if you have more than one computer connected to the display.
M Manual Image Adjustdisplays the Manual Image Adjust menu. You can manually set a variety of image quality adjustments.
Memory Recallreturns the adjustments back to factory settings if the display is operating in a factory Preset Timing Mode listed in the Specifications of thismanual. Exception: This control does not affect changes made with the Language Select or Power Lock setting.
S Setup Menuadjusts On-screen Display (OSD) settings.
Power ManagementThis product will enter to Sleep/Off mode with black screen and reduced powerconsumption within 5 minutes of no signal input.
Other Information
Specifications

1 Macintosh computers older than G3 require a ViewSonic® Macintosh adapter. To order an adapter, contact ViewSonic.2 Do not set the graphics card in your computer to exceed these timing mode; doing so may result in permanentdamage to the display.
Cleaning the Display
- MAKE SURE THE DISPLAY IS TURNED OFF.
- NEVER SPRAY OR POUR ANY LIQUID DIRECTLY ONTO THE SCREEN OR CASE.
To clean the screen:
- Wipe the screen with a clean, soft, lint-free cloth. This removes dust and other particles.
- If the screen still not clean, apply a small amount of non-ammonia, non-alcohol based glass cleaner onto a clean, soft, lint-free cloth, and wipe the screen.
To clean the case:
- Use a soft, dry cloth.
- If the case still not clean, apply a small amount of a non-ammonia, non-alcoholm based, mild non-abrasive detergent onto a clean, soft, lint-free cloth, then wipe the
Disclaimer
- ViewSonic® does not recommend the use of any ammonia or alcohol-based cleaners on the display screen or case. Some chemical cleaners have beenreported to damage the screen and/or case of the display.
- ViewSonic will not be liable for damage resulting from use of any ammonia or alcoholbased cleaners.
Troubleshooting
No power
- Make sure power button (or switch) is ON.
- Make sure A/C power cord is securely connected to the display.
- Plug another electrical device (like a radio) into the power outlet to verify that the outlet is supplying proper voltage.
Power is ON but no screen image
- Make sure the video cable supplied with the display is properly secured to the video output port on the back of the computer. If the other end of the video cableis not attached permanently to the display, properly secure it to the display.
- Adjust brightness and contrast.
- If you are using an Macintosh older than G3, you need a Macintosh adap
Wrong or abnormal colors
- If any colors (red, green, or blue) are missing, check the video cable to make sure it is securely connected. Loose or broken pins in the cable connector couldcause an improper connection.
- Connect the display to another computer.
- If you have an older graphics card, contact ViewSonic® for a non-DDC adapter.
Control buttons do not work
- Press only one button at a time
Customer Support
For technical support or product service, see the table below or contact your reseller.NOTE: You will need the product serial number.

Limited Warranty ViewSonic® Display
What the warranty covers:ViewSonic warrants its products to be free from defects in material and workmanship, under normal use, during the warranty period. If a product proves to be defective in material or workmanship during the warranty period, ViewSonic will, at its sole option, repair or replace the product with a like product. Replacement product or parts may include remanufactured or refurbished parts or components.How long the warranty is effective:ViewSonic displays are warranted for between 1 and 3 years, depending on your country of purchase, for all parts including the light source and for all labour from the date of the first consumer purchase Who the warranty protects: This warranty is valid only for the first consumer purchaser. What the warranty does not cover:
- Any product on which the serial number has been defaced, modified or removed.
- Damage, deterioration or malfunction resulting from:a. Accident, misuse, neglect, fire, water, lightning, or other acts of nature, unauthorized productmodification, or failure to follow instructions supplied with the product.b. Any damage of the product due to shipment.c. Removal or installation of the product.d. Causes external to the product, such as electrical power fluctuations or failure.e. Use of supplies or parts not meeting ViewSonic’s specifications.f. Normal wear and tear.g. Any other cause which does not relate to a product defect.
- Any product exhibiting a condition commonly known as “image burn-in” which results when a static image is displayed on the product for an extended period of time.
- Removal, installation, one way transportation, insurance, and set-up service charges.
How to get service:
- For information about receiving service under warranty, contact ViewSonic Customer Support (Please refer to Customer Support page). You will need to provide your product’s serial number.
- To obtain warranty service, you will be required to provide (a) the original dated sales slip, (b) your name, (c) your address, (d) a description of the problem, and (e) the serial number of the product.
- Take or ship the product freight prepaid in the original container to an authorized ViewSonic service center or ViewSonic.
- For additional information or the name of the nearest ViewSonic service center, contact ViewSonic.
Limitation of implied warranties:There are no warranties, express or implied, which extend beyond the description contained herein including the implied warranty of merchantability and fitness for a particular purpose.
Exclusion of damages:ViewSonic’s liability is limited to the cost of repair or replacement of the product. ViewSonic shall not be liable for:
- Damage to other property caused by any defects in the product, damages based upon inconvenience, loss of use of the product, loss of time, loss of profits, loss of business opportunity, loss of goodwill, interference with business relationships, or other commercial loss, even if advised of the possibility of such damages.
- Any other damages, whether incidental, consequential or otherwise.
- Any claim against the customer by any other party.
- Repair or attempted repair by anyone not authorized by ViewSonic.
Effect of state law:This warranty gives you specific legal rights, and you may also have other rights which vary from state to state. Some states do not allow limitations on implied warranties and/or do not allow the exclusion of incidental or consequential damages, so the above limitations and exclusions may not apply to you.
Sales outside the U.S.A. and Canada:For warranty information and service on ViewSonic products sold outside of the U.S.A. and Canada, contact ViewSonic or your local ViewSonic dealer.The warranty period for this product in mainland China (Hong Kong, Macao and Taiwan Excluded) is subject to the terms and conditions of the Maintenance Guarantee Card.For users in Europe and Russia, full details of warranty provided can be found in www. viewsoniceurope.com under Support/Warranty Information.
Mexico Limited Warranty ViewSonic® Display
What the warranty covers:ViewSonic warrants its products to be free from defects in material and workmanship, under normal use, during the warranty period. If a product proves to be defective in material or workmanship during the warranty period, ViewSonic will, at its sole option, repair or replace the product with a like product. Replacement product or partsmay include remanufactured or refurbished parts or components & accessories.
How long the warranty is effective:ViewSonic displays are warranted for between 1 and 3 years, depending on your country of purchase, for all parts including the light source and for all labour from the date of the first consumer purchase
Who the warranty protects:This warranty is valid only for the first consumer purchaser.
What the warranty does not cover:
- Any product on which the serial number has been defaced, modified or removed.
- Damage, deterioration or malfunction resulting from:a. Accident, misuse, neglect, fire, water, lightning, or other acts of nature, unauthorized productmodification, unauthorized attempted repair, or failure to follow instructions supplied with the product.b. Any damage of the product due to shipment.c. Causes external to the product, such as electrical power fluctuations or failure.d. Use of supplies or parts not meeting ViewSonic’s specifications.e. Normal wear and tear.f. Any other cause which does not relate to a product defect.
- Any product exhibiting a condition commonly known as “image burn-in” which results when a static image is displayed on the product for an extended period of time.
- Removal, installation, insurance, and set-up service charges
How to get service:For information about receiving service under warranty, contact ViewSonic Customer Support (Please refer to theattached Customer Support page). You will need to provide your product’s serial number, so please record theproduct information in the space provided below on your purchase for your future use. Please retain your receiptof proof of purchase to support your warranty claim.For Your RecordsProduct Name: ______________________________ Model Number: __________________________________Document Number: _ _________________________ Serial Number: __________________________________Purchase Date: ______________________________ Extended Warranty Purchase? _________________ (Y/N)If so, what date does warranty expire? ________________
- To obtain warranty service, you will be required to provide (a) the original dated sales slip, (b) your name, (c) your address, (d) a description of the problem, and (e) the serial number of the product.
- Take or ship the product in the original container packaging to an authorized ViewSonic service center.
- Round trip transportation costs for in-warranty products will be paid by ViewSonic.
Limitation of implied warranties:There are no warranties, express or implied, which extend beyond the description contained herein including theimplied warranty of merchantability and fitness for a particular purpose.Exclusion of damages:ViewSonic’s liability is limited to the cost of repair or replacement of the product. ViewSonic shall not be liable for:
- Damage to other property caused by any defects in the product, damages based upon inconvenience, loss of use of the product, loss of time, loss of profits, loss of business opportunity, loss of goodwill, interference with business relationships, or other commercial loss, even if advised of the possibility of such damages.
- Any other damages, whether incidental, consequential or otherwise.
- Any claim against the customer by any other party.
- Repair or attempted repair by anyone not authorized by ViewSonic.


Read More About This Manual & Download PDF:
ViewSonic VP2468 Display User Guide – ViewSonic VP2468 Display User Guide –
[xyz-ips snippet=”download-snippet”]