
Vinci Express Cold Brew User Guide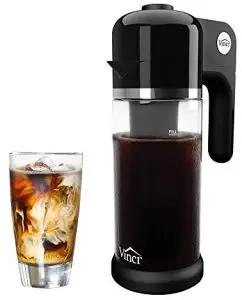
Thank you for purchasing the Express Cold Brew and welcome to the Vinci Housewares family! Should you have any issues or concerns regarding your unit, please do not hesitate to contact our customer service department at 1-888-735-3621 or support@vincihousewares.com. We are available Monday-Friday between the hours of 8am-5pm PST.
This Quick Start Guide is meant to aid you in quickly understanding your Express Cold Brew but is not a substitute for your instruction manual. Please thoroughly read the entire instruction manual and save it for future reference.
REMOVE CLEANING CUP FROM CARAFE:
Cleaning Cup is stored inside Carafe for shipping and needs to be removed before use.
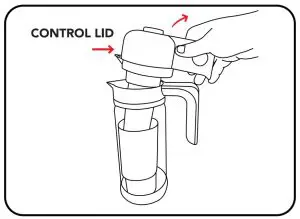
- Lift the Control Lid, with the attached Filter Basket, out of the Carafe and place it onto a flat surface.IMPORTANT: Read and remove all stickers and warning labels from the unit.

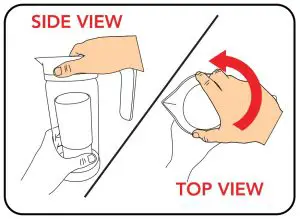
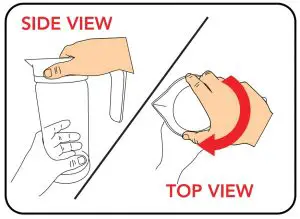
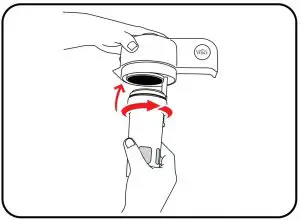
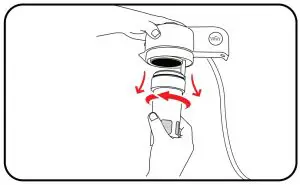
- On a flat surface, use one hand to grip the base of the Carafe and the other to grip the top of the Jar Collar like images shown on the left. Detach the Jar Collar by gripping the collar and turning it counterclockwise.
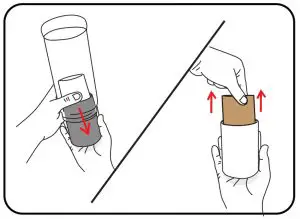
- After detaching the Jar Collar, remove the Cleaning Cup from the Carafe and discard the protective cardboard from the Cleaning Cup.
- Re-attach the Jar Collar by turning the Jar Collar clockwise until it stops spinning and is securely attached to the Carafe.
Important:
Read and remove all warning labels, stickers, and packaging materials.
HOW TO USE
Before first use and after subsequently uses, wash all parts with warm soapy water, EXCEPT for the control lid which should never be submerged in water.
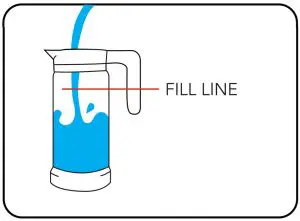
- 1. Fill the Carafe with fresh, room temperature water, filtered water is best (or recommended). Never fill past the Fill Line.NOTE: Always use room temperature water.IMPORTANT: (NEVER Use Hot Water Using Hot Water Will Void Warranty
- Attach the Filter Basket Bottom Cap to the Filter Basket by turning clockwise until fastened tightly. Using the included 2 tablespoon scoop, add approximately 7 scoops of coarse to medium grind coffee into the Filter Basket.
- NEVER exceed 8 scoops.
- NEVER overfill or compress coffee.
- Leave 1/2 “gap unfilled from top of the rim.
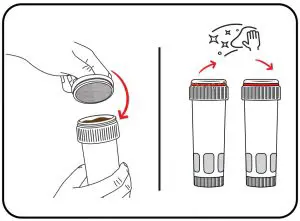
- Place the Filter Basket Top Cap onto the top of the Filter Basket.IMPORTANT: Make sure all surfaces are clean of debris especially around the 0-Ring Seal. This will prevent any leaks or malfunctions during the brewing process.
- Attach the Filter Basket to the Control Lid by inserting it into the bottom of the Control Lid and turning clockwise until it is secure and no longer spins.
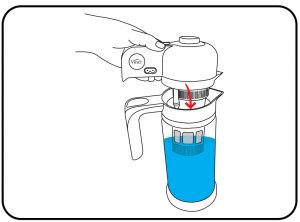
- Place the Control Lid, with the attached Filter Basket, on the Carafe. Make sure the Filter Basket is fully submerged in the water.
- Plug the electrical power cord into the side of the Control Lid and then plug the other end into a conveniently located electrical outlet.
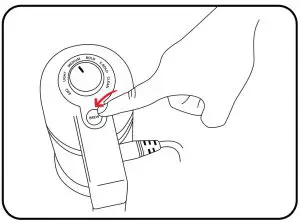
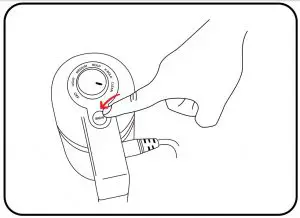
- Rotate the Control Knob to select the desired brew strength.
- Press the Brew button to start the brew cycle. The Brew button will illuminate red while the brew cycle is in progress. When the brew cycle is completed, the Brew button will switch from Red to Blue, and there will be two short audible beeps. NOTE: Your cold brew yield will depend on the amount of water absorbed by the grounds.
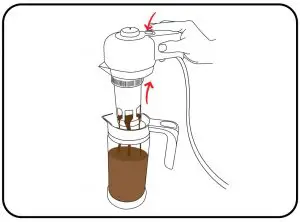
- Upon completion of the brew cycle, lift the Control Lid from the Carafe leaving just the bottom portion of the Filter Basket inside the carafe. Press the Brew button so the pump starts and forces excess water through the Filter Basket. When no more water is expelled from the Filter Basket (typically about 10 seconds), press the Brew button again to stop the pump.
- Place the Control Lid and Filter Basket into the Cleaning Cup. Place the Serving Lid on the Carafe. You are now ready to serve your cold brew or store it in the refrigerator for up to 10 days.
 NOTE: Always use room temperature water.IMPORTANT: (NEVER Use Hot Water Using Hot Water Will Void Warranty
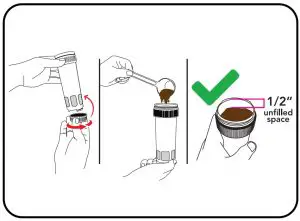


CLEANING YOUR FILTER BASKET:
- Remove the Control Lid and Filter Basket Assembly from the Cleaning Cup.
- Remove the Filter Basket from the Control Lid by turning it counterclockwise.
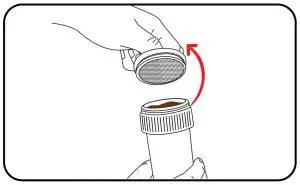
- Remove the Filter Basket Top Cap and dispose of the spent coffee grounds. HINT: Spent coffee grounds are great composting material.
- Remove the Filter Basket Bottom Cap by turning it counterclockwise to aid in disposing of any remaining spent grounds.
- Rinse and wash all of the Filter Basket parts, so they are clean and ready to be used for your next carafe of cold brew.


CLEANING YOUR CONTROL LID:
IMPORTANT:
- 1. NEVER submerge the Control Lid in water or any other liquid. NEVER place Control Lid in a stream of water or any other liquid. Doing so will damage the Express Cold Brew, which could lead to personal injury and will void your warranty.
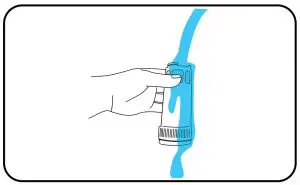
- Fill the Cleaning Cup about 2/3 full with clean, fresh water.
- Inspect the bottom of the Water Pickup Tube to see if any brewing material has been collected on the filter. If so, gently rinse ONLY the bottom of the Water Pickup Tube to dear any debris.
- Place the Control Lid onto the Cleaning Cup.
- Rotate the Control Knob to CLEAN.
- Press the Brew button to start the cleaning process. The fresh water from the cleaning cup will run through the pump, flushing out any remnants from the prior brew cycle.
- After the Clean cycle is complete, raise the Control Lid until the Water Pickup Tube is no longer touching the water in the Cleaning Cup. Press the Brew button again so air runs through the pump system to evacuate any remaining water.Empty any remaining water in the Cleaning Cup and rinse it clean to be ready for the next use.


 Empty any remaining water in the Cleaning Cup and rinse it clean to be ready for the next use.
[xyz-ips snippet=”download-snippet”]