
Viomi Robot Vacuum S9 UV-Automatic Dirt DisposalUser Manual
Please read this manual carefully before use and keep it properly.This product shall be operated only in location at altitude below 2,000 meters.Please read this manual carefully to ensure proper and safe use of the product.
Considerations
Operation Restrictions
- This product shall be used only for cleaning of ground surface in residential house, but not for outdoors, other surface (e.g. couch) or commercial or industrial environment.
- Do not use this product in environment without guardrail, such as duplex, open balcony, and top of furniture.
- Do not use this product in temperature higher than 40°C or lower than 0
or on ground surface with any liquid or viscous matter.
- Before operating this product, handle any wire/cable on ground surface to avoid it being wound by main machine.
- Remove any fragile article and sundries on ground surface, such as vase or plastic bag, to avoid it from being impacted and damaged by main machine.
- Do not allow any person with physical, mental or sensual disorder (including children) to use or operate this product.
- Do not allow children to play the main machine. Keep children or pet staying away from the main machine during operation.
- Do not place any object or sit on the main machine which is stationary or in movement.
- Do not use this product to clean any object which is burning (e.g. burning cigarette end).
- Do not use this product for cleaning of carpet.
- Do not use this product to suck up any hard or sharp object, such as scrap, glass, and iron nail.
- Do not handle this product by the protective cover of laser radar as handle.Be sure to clean main machine and charging dock only when this product is power-off or the power supply is disconnected.
- Do not splash any liquid into this product, except the automatic dirt disposal, which can be cleaned.
- Do not put main machine upside down, and do not place laser radar on the ground.
- Do not use the vacuum-mop to clean the carpet.
- Use this product by following the instructions or quick start guide.User shall be responsible for any loss or injury resulting from improper use.
Battery and Charging
- Do not use any third-party Battery, power adapter and charging dock.
- Do not use any non-rechargeable Battery.
- Do not dismantle, repair, refit the Battery or charging dock.
- Do not place charging dock close to any heat source, for example, heating radiator, nor use wet cloth or liquid to clean any part of this product.
- Do not throw any waste Battery randomly. It is recommended to have any specialist agency dispose it.
- To transport this product, be sure to power it off and use the original packaging box to provide protection for it.
- If this product is to be idle for a long time, charge the Battery to full level and store it at dry and cool location. Recharge it at least monthly to avoid damage to Battery.
- Use a proper tool to remove the Battery. First remove the screw on the bottom cover, and then remove the cover, unplug the Battery connecting terminal and take the Battery out. Before disposing the robot, you have to take the Battery out of it. When removing the Battery, the robot must be powered off.
This product is in compliance with Class-1 laser safety standard under IEC60825-1:2014, and will not generate laser radiation hazardous to human.
Product Introduction
1 Network Configuration
- When the robot is power-on, simultaneously press down and hold
and
keys for 5 seconds till a voice prompt is given, and then release them to activate network configuration.When the robot is power-on, simultaneously press down and hold
and
keys for 10 seconds till a voice prompt is given, and keep holding the keys for 10 seconds to finish recovery to factory settings.
2 Smart recharging
- Short press the button to start smart recharging.The LED indicator keeps flash slowly in yellow color, indicating recharging/ low Battery level. Flicker in yellow color, indicating recharging.
3 Power on/off Global sweeping
- Short press the button to start/cease sweeping.
- Long press the button for 3 seconds to power on/off.
- The light is constantly on in blue color, indicating successful connection/normal operation/standby state.Flicker in blue color, indicating power-on.Flash slowly in blue color, indicating firmware upgrade/recovery to factory setting.Flash fast in blue color, indicating network configuration.Flicker in red color, indicating low Battery level.Flash fast in red color, indicating fault in operation.The LED indicator goes out, indicating power-off/sleep.
4 IR sensor
5 Reset button: for forcible shutdown.
- Short press (for less than 3 seconds) to switch off.
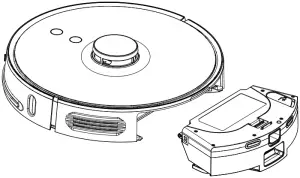
Main machine and sensor

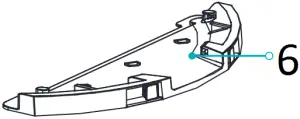
(1) Laser radar(2) Surface cover(3) button(4) IR sensor(5) Collision sensor(6) Universal caster(7) Charging electrode(8) Side brush(9) Cliff sensor(10) Main brush cover(11) Rolling brush(12) Left caster(13) Right caster(14) Integrated automatic dirt disposal/water tank(15) UV Light.
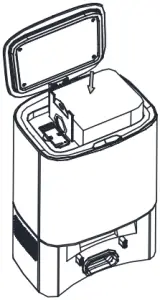
2-in-1 Dust Compartment with Water Tank
- Inlet
- Water Tank
- Dust Compartment release button
- Dust Compartment clamp
- Dust Compartment
- Mop holder
- Mop
- Filter screen clamp
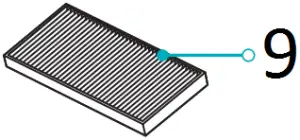
- Filter screen
Automatic dirt disposal (Two-in-one for dust collection and charging)

- Top coverRemove the top cover.Mount/remove dust bag.
- Dust bag holder
- IR lens
- Recharging/automatic dirt disposal probe.Recharging/automatic dirt disposal sensor.
- Dust collection port.Collect trash in the machine to the dust bag through collecting port.
- Blower filter
- Dust bag handle
- Dust bag
Dust bag (include a automatic dirt disposal).Note: Bust bag is consumable and shall not be re-used.Replace it regularly.
Instructions on Installation
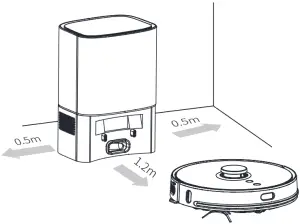
1.Install the automatic dirt disposal
(1) Place automatic dirt disposal on flat floor near wall, and connect the plug to a approved socket and switch power supply on.

- Place it near wall
(2) Make sure there is no obstacle within 1.2 m in front and 0.5 m at both sides of it.
Operation Instructions
1.Switch on/offLong press power button for 3 seconds to switch machine on/off.Power LED indicator flashes slowly for 4 seconds and then lights on constantly in blue color, and the cleaner in standby. Upon start-up there is a tone for prompt.When cleaner stays still, long press the power button
for 3 seconds to switch it off.The power LED goes out, and a voice prompt is given.Cleaner will sleep if being idle for more than 20 minutes. In sleep status, shorting press any button will wake it up.Tips: During recharging, the robot cannot be switched off or sleep.
2.SweepingIn power-on status, short press the button with voice prompt “start global cleaning”.During cleaning, short press the
button to cease sweeping.Tips: At low Battery level, sweeping function cannot be started.
3.Automatic/manual rechargingUpon end of sweeping, a voice prompt “cleaning finished and recharging started” is given, and the vacuum-mop starts recharging.In case of low Battery level during sweeping, the vacuum-mop will start recharging automatically.
4.Refilling tank or cleaning mop half-wayShort press button to pause the vacuum-mop; remove mopping module, refill the tank or clean the mop; re-mount the mopping module and short press the button again to resume sweeping.
5.Network configuration and firmware updateDownload App by scanning the QR code on the machine and reset WiFi by following the tips on APP.You can query or update the firmware on App. During update make sure the machine is being charged with Battery level not below 60%. For more details refer to instruction in the App.After downloading, configure network by following tips on APP. After connecting the machine to network, you can start sweeping or scheduled cleaning remotely on App.
6.FaultIn case of fault in the vacuum-mop, audible and visual alarms will be given with power LED indicator flashing in red. For more details refer to Trouble Shooting.The vacuum-mop will sleep automatically when being idle for 10 minutes in case of fault.
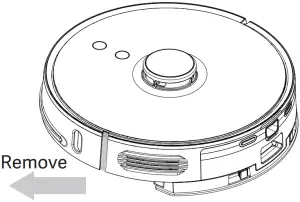
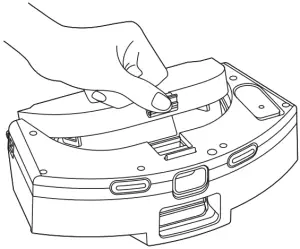
(1) Place the vacuum-mop on flat floor indoors.Remove the limit protector at both sides of bumper.
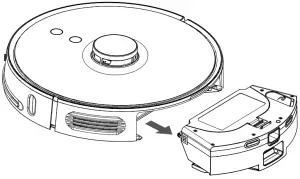
 (2) Press the Dust Compartment release button to remove the 2-in-1 Dust Compartment with Water Tank.For the initial use, there may be a very little water in the tank, which is residual test sample and at normal condition, and you can use it at ease.
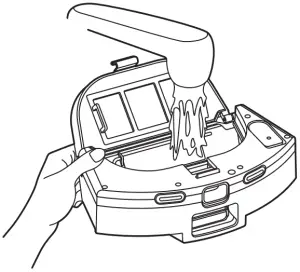
 (3) Soak the mop with water and attach it to magic tape band and tighten it.Inject water through the inlet, and tighten the cover.
(4) Mount the 2-in-1 Dust Compartment with Water Tank into the machine.
 (5) Long press button
 for 3 seconds to switch the vacuum-mop on, and then short press button
to recharge it. The vacuum-mop will be ready for operation when recharged fully.
Note:
- The robot will return to automatic dirt disposal base after operating for more than 1 Minute, and start clear-up process automatically. During dust collection a arrow flashes in green color on the screen.
- The robot cannot be switched on in case of low Battery level. In such case, first recharge it.
- In case of low batter level during sweeping, the robot will go to charging dock for recharging automatically, and then return to the interruption point to resume sweeping.
How to connect to Wi-Fi
This product works with Mi Home/Xiaomi Home app *. Control your device, and interact it and other smart home devices with Mi Home/Xiaomi Home app.
Scan the QR code to download and install the app. You will be directed to the connection setup page if the app is installed already. Or search “Mi Home/Xiaomi Home” in the app Store to download and install it.
Open Mi Home/Xiaomi Home app, tap “+” on the upper right, and then follow prompts to add your device.* The app is referred to as Xiaomi Home app in Europe (except for Russia).The name of the app displayed on your device should be taken as the default.Note:The version of the app might have been updated, please follow the instructions based on the current app version.
Resetting Wi-FiWhen your router is replaced or Wi-Fi password is changed, you have to reset Wi-Fi settings by holding both and
keys for 5 seconds till the Wi-Fi indicator light flashes in blue color and a voice prompt is given, indicating that the Wi-Fi settings are reset successfully.
Maintenance
2-in-1 Dust Compartment with Water Tank
(1) Press Dust Compartment release button and pull the tank out to remove it.
 (2) Release the Dust Compartment clamp to remove filter screen clamp.
(3) Remove the Filter screen.
- Filter screen clamp
- Filter screen
(4) Clean the filter screen and clamp with cleaning brush.
(5) Fill the automatic dirt disposal with water, shake it and then empty it.Repeat this process till it is clean.
 (6) Turn the tank over and remove mop for cleaning or replace it.
Tips:Clean the mop regularly, since contaminated mop will impair sweeping performance.Be sure to remove the mop and clean, and then dry it by twisting. Do not clean it with it mounted to tank, or otherwise waste water may block the filter element.It is recommended to replace main brush every 6-12 months to ensure proper cleaning performance.
Cleaning main brushThe main brush is consumable and shall be cleaned weekly. It is recommended to replace main brush every 6-12 months to ensure proper cleaning performance.(1) Turn cleaner over, remove main brush cover and the brush by pressing the clamp on the cover.Note: Avoid collision when turning it over to avoid damage to laser radar.
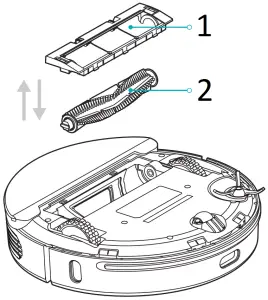
- Main brush cover
- Main brush
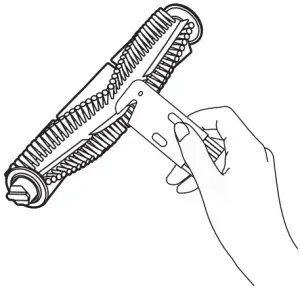
(2) Cut off hairs around the brush with knife, and clean the main brush with the other end of the knife.
(3) Mount the main brush and main brush cover and lock the clamp.
Clean/replace side brush
(1) Remove screws fixing side brush with screwdriver, and remove the side brush.
 (2) Mount side rush after cleaning, or replace the side brush.
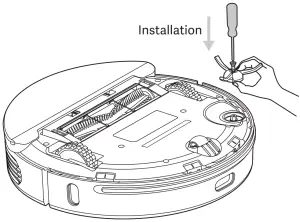
Tips: It is recommended to replace side brush every 3-6 months to ensure proper cleaning performance.
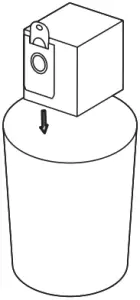
Replace dust bag
In case that the FULL DUST BAG icon flashes in orange color on the screen or a message is given on the App when the dust bag is full, please replace the bag immediately. When the dust bag is in normal operation, the icon keeps flashing in green and white colors.
![]()

![]()
Open the top cover Remove dust bag by pulling the bag handle up.
![]()
 Remove the dust bag. Mount a new dust bag and mount the cover again.
Clean dust ductIn case that the FULL DUST BAG icon is still in orange color even after the bag is replaced, it is recommended to disconnect power plug, turn the charging pile upside down to check whether dust duct is blocked by any foreign matter.If dust duck is blocked, remove the duct cover with screwdriver, as shown below.Remove any foreign matter.Note: Do not dismantle it with excessive force.After finishing clear-up, mount it again in place.
- Transparent duct cover
- Dust duct
Maintenance of Battery
The vacuum-mop contains an built-in high-performance rechargeable lithium-ion Battery. To maintain adequate Battery performance, keep it recharged regularly.If the vacuum-mop is left idle for a long period, switch it off and recharge it once every three months to avoid damage due to over-discharging.
Clean sensorIt is recommended to weekly clean each sensor with clean and soft cloth to ensure proper cleaning performance.
Robot vacuum:Cliff sensor × 4IR sensor × 3Charging electrode × 2PSD detector × 1
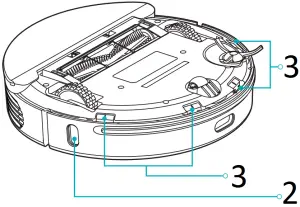
1. PSD detector2. IR sensor3. Cliff sensor4. Charging electrode
Automatic dirt disposal charging dock:IR lens × 2Automatic dirt disposal charging probe × 2
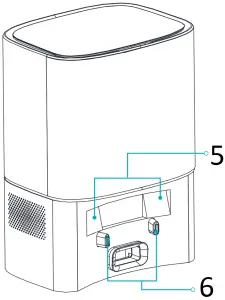
5. IR lens6. Automatic dirt disposal charging probe
Specifications
Main machine
| Name | Viomi Robot Vacuum S9 UV-Automatic Dirt Disposal |
| Model number | V-RVCLMD28D / V-RVCLMD28C |
| Dimensions | φ350mm×98mm |
| Rated voltage | 14.4V |
| Rate power | 50W |
| Battery capacity | 5200mAh |
| Wireless Connectivity | Wi-Fi IEEE 802.11b/g/n 2.4GHz |
Automatic dirt disposal
| Model number | V-ADD26D / V-ADD26C |
| Rated power | 950W |
| Rated input | 220-240V~50/60Hz |
| Rated output | 24V |
| Rated frequency | 50/60Hz |
| Dimensions | 356×250×193mm |
This product is in compliance with Class-1 laser safety standard under IEC60825-1:2014, and will not generate laser radiation hazardous to human.
Trouble Shooting
| Fault Prompt | Solution |
| Error #1. Make sure the laser ranging sensor is not blocked. | Check for or remove any foreign matter around laser radar, or relocate the Vacuum-Mop and restart it. |
| Error #2. Clean cliff sensor and relocate the cleaner. | Clean the cliff sensor and try again (for more details refer to the user manual). |
| Error #3. A strong magnetic field is detected. Relocate the cleaner and try again. | Relocate the Vacuum-Mop and try again. |
| Error #4. Check collision sensor and remove any foreign object on it. | Try to press the bumper strip and remove any foreign matter, and then restart the Vacuum-Mop. |
| Error #5. The Vacuum-Mop is at abnormal temperature. Stop operating till normal temperature is recovered. | The Vacuum-Mop is in too high or low temperature. Stop operating till normal temperature is recovered. |
| Error #6.Charging fails. Please clean charging contact. | Check the adapter, or check whether the automatic dirt disposal is at horizontal position. Switch off the Vacuum-Mop and the automatic dirt disposal, clean their metal contacts. |
| The automatic dirt disposal fault prompt | Solution |
| Error #1.Dust bag is not mounted. The text “Full bag” is given and the icon flash. | Mount dust bag in place. |
| Error #2.Blower fails, The text is given and the icon flash. | Check whether air duct is blocked, and contact after-sales service for troubleshooting. |
FAQ
| Problem | Solution |
| Cleaner fails to start up, | Low battery level. Keep the machine close to charging dock and try again. Too low (below 0°C) or high (above 50°C) ambient temperature. |
| Sweeping function fails. | Low battery level. Keep the machine close to charging dock and try again. |
| Charging function fails. | Too many barriers around charging dock. Place charging dock in an unblocked area. Main machine is too far from charging dock. Place main machine near charging dock and try again. |
| The machine operates improperly. | Power it off and than power it on again. |
| Cleaning operation is noisy. | Main brush, side brush or left/right caster is damaged by foreign object. Power off the machine and remove the foreign object. |
| Cleaning performance deteriorates or dust drops. | The automatic dirt disposal is full of dust. Please empty the collector.
Filter component is blocked. Please clean it. Main brush is damaged by any foreign object. Please clean the main brush. |
| Wi-Fi connection is unavailable. | Weak Wi-Fi signals. Make sure the robot is in proper coverage of Wi-Fi signals.
Wi-Fi connection fails. Reset Wi-Fi connection and download the latest App and try again. |
| Breakpoint resume. | Make sure non-disturbance mode is not activated, which will disable proceeding at breakout point.
Proceeding at breakout point is unavailable when the machine is being charged. |
| The Vacuum-Mop fails to return to charging dock after fixed point cleaning or displacement. | As the Vacuum-Mop will re-generate a map after fixed-point cleaning or being displaced by a long distance, it may fail to locate charging dock for charging. In such case, place the machine onto charging dock manually. |
| Charging fails. | Make sure there is sufficient spaces around charging dock, and there is no dust or blockage on the surface of electrode of charging dock. |
| Scheduled cleaning fails. | Make sure the machine has been connected to the network, as disconnection from network will fail sync and scheduled cleaning task. |
| The Vacuum-Mop is always offline. | Make sure the machine is connected to network successfully, and always within coverage of Wi-Fi. |
| The Vacuum-Mop fails to be paired with cell phone. | Make sure both charging dock and main machine are within coverage of Wi-Fi and good signals, and then reset Wi-Fi connection for pairing by following the instructions in the manual. |
Manufactured by: Foshan VIOMI Electrical Technology Co., Ltd. (a Mi Ecosystem company)Address: 2nd Floor, No.1 Building And 4th Floor of No.7 Building, North of Four Xinxi Street, Lunjiao, Shunde, Foshan, Guangdong, P.R. China
 report this ad
[xyz-ips snippet=”download-snippet”]