VIRO RIDES Street Drifters Freestyle Sideways Shates User Guide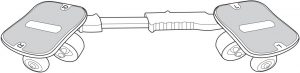
Cleaning & Storage
Should the unit need gentle washing due to large amounts of dirt or debris, please follow the cleaning directions below:
- Wipe clean with a soft cloth. DO NOT use harsh chemicals or abrasive scrubs to clean.
- To keep your unit in good condition, wipe clean after every use.
- Keep away from moisture, humid environments, and harsh weather conditions to prevent rusting and other damage to the unit.
- Do not place anything on top of the unit while storing. Do not store on a high shelf to prevent it from rolling off.
- Store the unit indoors away from sun exposure, rain and other elements that may damage the unit.
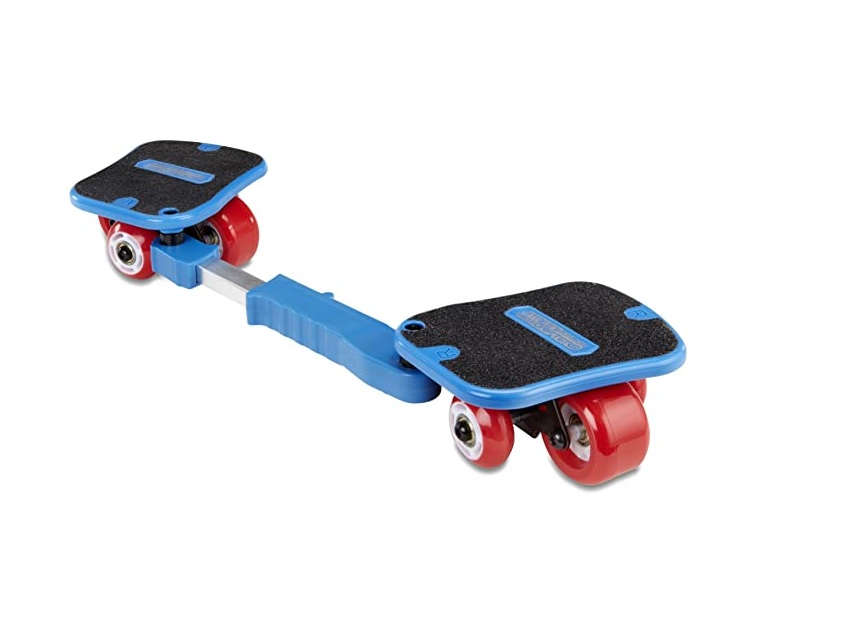
Contents
- 1 Left Platform with Training Wheels

- 1 Right Platform with Training Wheels
- 1 Training Bar
- 2 Screws
- 2 Bolts
- 2 Connector Pieces
- 2 Wrenches
- 1 Small Wrench


Illustrations are for reference only. Styles may vary from actual contents.
Safety Warnings
![]() WARNING:READ AND FOLLOW ALL INSTRUCTIONS IN THIS USER GUIDE TO ENSURE A SAFE RIDE. Failure to read and understand all information in this user guide increases risk of injury due to falls or other incidents. Riding this unit takes skill and must be learned under adult supervision. By riding this unit, users risk serious injury or death from collisions, falls or loss of control.
WARNING:READ AND FOLLOW ALL INSTRUCTIONS IN THIS USER GUIDE TO ENSURE A SAFE RIDE. Failure to read and understand all information in this user guide increases risk of injury due to falls or other incidents. Riding this unit takes skill and must be learned under adult supervision. By riding this unit, users risk serious injury or death from collisions, falls or loss of control.
RIDER SPECIFICATIONS
![]() WARNING:
WARNING:
NOT FOR USERS UNDER AGE 8 OR HEAVIER THAN 220 LBS (100 KG). DO NOT EXCEED THE WEIGHT LIMIT OF 220 LBS (100 KG) – including backpacks and other items that might be carried. Exceeding the weight limit could injure the rider and damage the unit. Rider weight alone does not necessarily mean a person’s size is appropriate to fit or maintain control of the unit. Keep this product away from small children and remember that this product is only intended for use by persons who are, at minimum, comfortable and competent while operating the unit.
Children under the age of 8 should not be permitted to use this product. The recommended age of 8 is only an estimate and can be affected by the rider’s size, weight, maturity or skills – not every rider 8 years or older will be suited to the product. Any rider unable to fit comfortably on the unit should not ride, but a parent’s decision to allow his or her child to ride this product should be based on the child’s maturity, skill and ability to follow rules. It is emphasized that adults are strongly advised not to disregard this recommendation or permit young children to ride this unit.
Because products like this unit present potential hazards plainly associated with their use, THE NEED FOR EXERCISE OF PARENTAL RESPONSIBILITY IN SELECTING RIDING PRODUCTS APPROPRIATE TO THE AGE OF A RIDER, OR PARENTAL SUPERVISION IN SITUATIONS IN WHICH CHILDREN OF VARIOUS AGES MAY HAVE ACCESS TO THE SAME RIDING PRODUCTS, IS IMPORTANT. Not every product is appropriate for every age or size of a user, and recommendations are intended to reflect the nature of the hazards and the expected mental or physical ability, or both, of a rider to cope with the hazards.
Persons with any mental or physical conditions that may make them susceptible to injury, impair their physical dexterity or mental capabilities to recognize, understand and follow safety instructions, and/or hinder their ability to understand the hazards inherent in a product’s use, should not use or be permitted to use products inappropriate for their abilities. Persons with heart conditions, head, back or neck ailments (or prior surgeries to those areas), or pregnant women should not ride this product.
INSPECTION BEFORE USE
![]() WARNING:
WARNING:
ASSEMBLY
- An adult must assemble the product according to the instructions.
- Remove packaging materials before giving the product to your child.
- It is the responsibility of the owner or guardian to periodically inspect the wheels for wear and tear, the axle for proper tightness, bearings for side-to-side play, and for loose parts.
- Do not modify the product in any way that can impair safety.
HARDWARE
Before every ride, check all parts, such as nuts, bolts, fasteners, etc. to ensure they are secure and assembled correctly. There should not be any unusual rattles or sounds from loose parts or broken components. Self-locking nuts and other hardware may lose their effectiveness over time. If the product is damaged, do not ride.
WHEELS
Practice riding only in wide open areas clear from curbs, parking blocks and other obstacles, including things you may fall on or into if you lose your balance. Impacting the wheels against any hard surface can damage the unit.
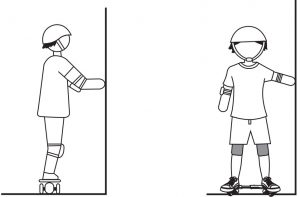
SAFETY GEAR AND ATTIRE
Always wear proper protective equipment, such as an approved safety helmet (with chin strap securely buckled). A helmet may be legally required by local law or regulation in your area. Elbow pads, kneepads, wrist guards, a long-sleeved shirt, long pants and gloves are recommended. Always wear athletic shoes (lace-up shoes with rubber soles) and keep shoelaces tied and out of the way of the wheels. Never ride barefooted or in sandals. Users who wear glasses or contact lenses must wear suitable protective equipment, like safety eyewear, or remove glasses before using. Riders must remove all hard or sharp objects from themselves and their pockets, including toys, buckles, keys, jewelry, watches, etc.
LOCAL LAWS OR REGULATIONS
Follow all local laws and regulations regarding how and where to use the product legally. Follow all applicable laws for vehicles and pedestrians.
OPERATIONAL SAFETY
![]() WARNING:
WARNING:
Any type of wheeled activity can be hazardous. Wheels are intended to move and it is possible to get into dangerous situations and/or lose control and/or fall off. In such situations, serious injury or death may occur. Always be aware of activity around you. Only use the product in areas free from fixed or moving hazards. Watch your surroundings for pedestrians, animals and riders of other wheeled products or vehicles.
![]() WARNING:
WARNING:
- ADULT SUPERVISION REQUIRED.
- Running or jumping onto the unit can be dangerous.
- Never operate any moving product, including this unit, under the influence of drugs or alcohol.
- Using this product requires skill, and children must be trained under the direct supervision of an adult.
- Danger of falling. DO NOT stand on the training bar.
- Ride defensively. Watch out for potential obstacles that could catch your wheel(s) or force you to swerve suddenly or lose control. Be careful to avoid pedestrians, skaters, scooters, bikes, children and animals who may cross your path, and respect the rights and property of others.
- The product does not have a starting or braking feature. Ride with caution.
- Never carry passengers or allow more than one person at a time to ride the product. Never hitch a ride with another product.
- Do not use headphones or a cell phone while riding.
- Always maintain a safe speed. Do not move faster than you are comfortable.
- Do not make sharp turns while accelerating.
- Keep both feet on the platforms at all times while riding.
- For outdoor use only. Ride only on solid, clean, dry and hard surfaces.
- Only use this product on completely smooth surfaces. Avoid obstacles and slippery surfaces, which could result in a loss of balance or traction and cause a fall.
- Wet, slick, bumpy, uneven or rough surfaces may increase risks. Do not ride this product in mud, ice, puddles or water. Avoid excessive speeds that can be associated with downhill rides. Never use near steps or swimming pools.
- Do not ride at night or when visibility is limited.
- Do not ride the product in wet or icy weather.
- Be aware of your height when using this product. Be careful of door frames, branches, signs or lower obstructions.
- Be careful and know your limitations. Risk of injury increases as the degree of riding difficulty increases. The rider assumes all risk associated with aggressive riding activities
FUTURE USE AND OTHER RIDERS
![]() WARNING:
WARNING:
- Keep these instructions for future reference.
- Periodically review this information and make sure that you understand all safety warnings and instructions.
- Do not let others ride the unit until they have read this entire user guide.
- Only one rider is permitted at a time.
Free Ride
REMOVE THE TRAINING BAR
- Use the included wrenches to remove the training bar once you are comfortable. Practice Phases 1-3 without the training bar before removing the training wheels. This will take practice before you are fully comfortable.

- PRACTICE over and over until you can ride comfortably.
- DO NOT remove the training wheels until you can balance and turn without assistance from a wall.
REMOVE THE TRAINING WHEELS
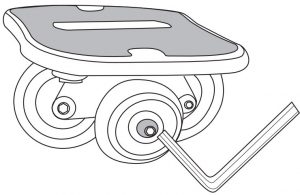
- Remove the training wheels with the included wrenches once you are comfortable. Use one wrench to hold one training wheel steady while you remove the other with a second wrench.
- Angle the rear platform downward and stabilize yourself with your toes on the ground. Balance your front foot on the center of the front platform. Then, push out your front foot and slowly bring up your rear foot. Balance yourself.
- Practice Phases 1-3 without the training wheels or training bar. Keep the platforms parallel to the ground at all times.NOTE: This will take practice, so take your time learning how the drifters will move.
 NOTE: This will take practice, so take your time learning how the drifters will move.
Re-Assembly
REPLACE THE TRAINING WHEELS
- Slide the axle through the openings in the frame under the platform. Then, slide the metal piece over the axle and add the training wheel. Use one wrench to hold the axle in place. Use the other wrench to tighten the bolt onto the axle.Repeat for both platforms.
PHASE 2 : BALANCE
- Keep the training bar locked.
- Stand on the platforms and tilt them slightly outward with your feet.Propel yourself by pushing off of a wall. Try to balance on the platforms while you ride as far as you can.NOTE: If you feel like you are going to fall, step off the platforms.
- Once you can make it about 10 feet while balancing away from the wall, try turning the platforms slightly in and out to practice turning as you ride.
- PRACTICE Phase 2 over and over until you can keep your balance for long distances and successfully turn.
- DO NOT proceed to Phase 3 until you are comfortable.

 NOTE: If you feel like you are going to fall, step off the platforms.
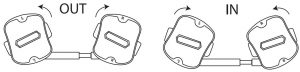
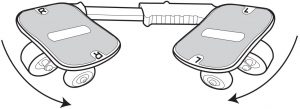
PHASE 3 : PROPEL
NOTE: It is easy to lose balance as you are learning Phase 3. Be very careful, and be sure to wear protective gear. Practice this phase over and over until you are comfortable.
- Unlock the training bar so that it moves in and out as you ride.
- Stand on the platforms and tilt them slightly outward with your feet. Practice step 3 below while holding onto a wall until you are comfortable. Once you understand how the drifters move, carefully try to ride by pushing off of the wall.
-
- Begin by riding in a straight line.
- Turn the platforms inward while bringing the right drifter forward and swinging the left drifter backward.
- Next, turn the platforms outward while bringing the left drifter forward and swinging the right drifter backward.
- Practice and repeat these motions to create an S shaped path as you ride.
- You may find it helpful to twist your body at the hips and swing your arms in the direction you are turning the drifters. To brake, stop twisting at the hips and stop moving your feet.
- PRACTICE propelling yourself with the S motion of the drifters over and over.
- DO NOT remove the training wheels or training bar until you have masteredPhases 1-3.
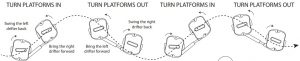

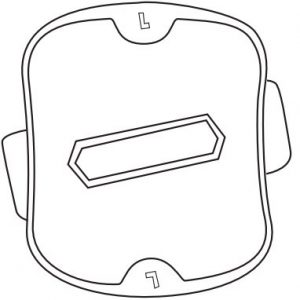
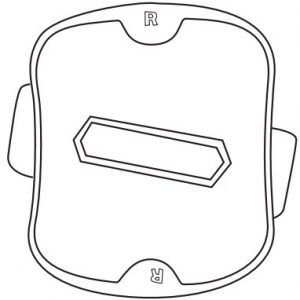
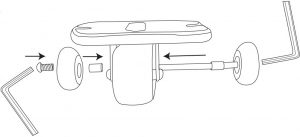
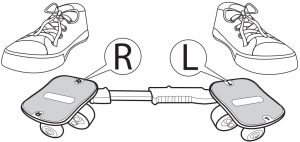
Assembly
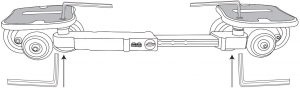
INSTALL THE TRAINING BAR
- Line up the connector pieces with the openings under the platforms.Underside View
- Attach the “L” platform to the side of the training bar marked “L.” Attach the “R” platform to the side of the training bar marked “R.”
- Place a bolt through the training bar, connectorpiece and platform.
- Insert a locking screw through the top of theplatform into the bolt.
- Use one wrench to hold the bolt steady whileyou use the small wrench to tighten the screw.Repeat for both platforms.NOTE: Ensure the screws and bolts are secure, but do not over-tighten or the platforms will not move freely
 Underside View
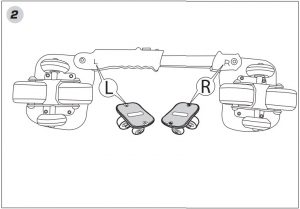
 NOTE: Ensure the screws and bolts are secure, but do not over-tighten or the platforms will not move freely
Features
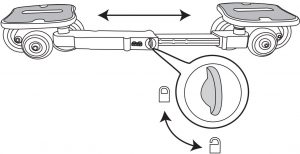
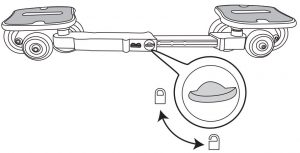
ADJUSTABLE TRAINING BAR
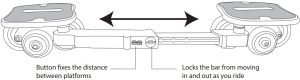
- To get started, press the button in and compress the training bar so that the platforms are shoulder-width apart. Then, release the button to fix the bar in place.
- Turn the knob to lock the training bar in place so that it does not slide in and out as you move.
- Once you become more comfortable riding in Phase 3, turn the knob to unlock the bar so that the distance between platforms shortens and lengthens as you ride.
- As you grow, use the button to adjust the width of the platforms so that they remain shoulder-width apart
REMOVABLE TRAINING BAR
- You can remove the training bar entirely when you are comfortable riding the unit.
- Use the included wrenches to remove the screws and bolts from the training bar. Retain the screws, bolts, connector pieces and training bar for future use.
REMOVABLE TRAINING WHEELS
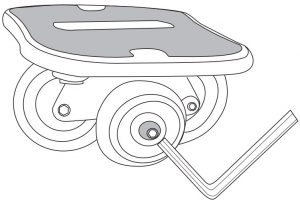
- When you are an expert rider, remove the training wheels on both platforms.
- Use the included wrenches to remove the bolts from the training wheels. Use one wrench to keep one training wheel steady while you remove the other. Retain the bolts, connector pieces and training wheels for future use.
Getting Started
Before you begin, put on all recommended protective gear and find an open, outdoor area with a wall or railing for support. Fully read this entire user guide before attempting to ride
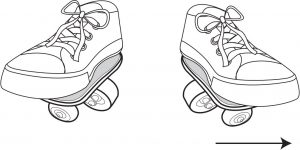
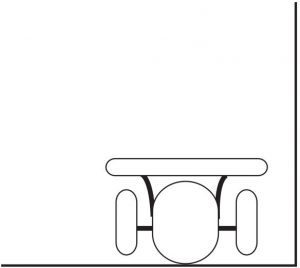
The unit rides side to side like a skateboard. Do not attempt to ride the unit in a forward motion like roller skates.

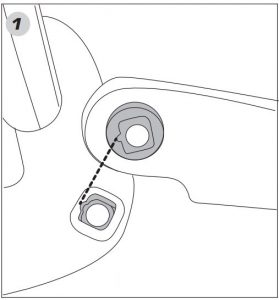
- Place the unit on flat terrain away from obstacles. Stand near a wall for balance.
- Step on the center of the platform marked “L” with your left foot. Step on the platform marked “R” with your right foot. The training bar should be toward the back of the unit.
Training
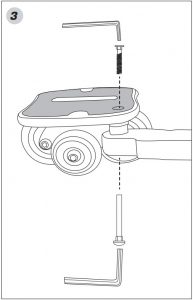
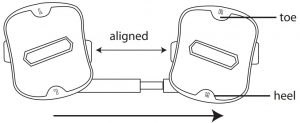
PHASE 1: MOVE
- Keep the training bar in the locked position.
- To move straight, stand on the platforms and tilt them slightly outward with your feet. When the platforms are tilted slightly outward, the center wheels will be aligned.Moving this Direction
- Push yourself back and forth along a wall to get a feel for how the drifters move.
- To turn inward, move the platforms inward with your feet.
- To turn outward, move the platforms outward with your feet.
 Moving this Direction

PRACTICE Phase 1 until you feel comfortable.DO NOT proceed to Phase 2 until you have mastered how the drifters move along a wall.
Limited Warranty
The Little Tikes Company makes fun, high quality toys. We warrant to the original purchaser that this product is free of defects in materials or workmanship for one year * from the date of purchase (dated sales receipt is required for proof of purchase). At the sole election of The Little Tikes Company, the only remedies available under this warranty will be the replacement of the defective part or replacement of the product. This warranty is valid only if the product has been assembled and maintained per the instructions. This warranty does not cover abuse, accident, cosmetic issues such as fading or scratches from normal wear, or any other cause not arising from defects in material and workmanship. *The warranty period is three (3) months for daycare or commercial purchasers.
U.S.A and Canada: For warranty service or replacement part information, please visit our website at www.littletikes.com, call 1-800-321-0183 or write to: Consumer Service, The Little Tikes Company, 2180 Barlow Road, Hudson OH 44236, U.S.A. Some replacement parts may be available for purchase after warranty expires—contact us for details.
Outside U.S.A and Canada: Contact place of purchase for warranty service. This warranty gives you specific legal rights, and you may also have other rights, which vary from country/state to country/state. Some countries/states do not allow the exclusion or limitation of incidental or consequential damages, so the above limitation or exclusion may not apply to you.
Read this entire user guide thoroughly before use to ensure a safe and fun riding experience.For more information,visit WWW.VIRORIDES.COM
References
[xyz-ips snippet=”download-snippet”]