
Virtual Orator Steam Edition User Guide
Version 0.14.3© 2015-2021 Virtual Human Technologies s.r.o. All rights reserved.
Recommended Practices
Always follow the recommended practices of the device manufacturer. Virtual Reality technologies may cause varying level of physical discomfort. This discomfort is known to increase in likelihood and intensity the longer you are continuously immersed in the world. If you start to feel symptoms, such as nausea or headaches, close your eyes and remove the VR headset.
To help minimize the chances of occurrences of these symptoms, we suggest the following guidelines.
- Fit the VR headset and apply any personalized settings provided by the VR headset developer.
- The VR headset image should be crisp. You should be able to read text. Adjust the VR headset by moving it physically on your head until you can read the text on the initial screen. You may need to move the VR headset up or down on your forehead.
- Oculus provides software calibrations of personal parameters that can also impact your experience, such as setting the interoculur distance (IPD).
- The HTC Vive includes adjustments for interoculur (IPD) and lens distances. Adjust these according to the recommendations.
- If you are susceptible to simulator sickness, practice your presentations sitting in the real world. Although it is usually suggested that you give presentations standing, sitting will reduce any symptoms. In the VR Scenario you may still appear standing, and it will feel realistic.
- If you do practice standing, consider taking more frequent breaks.
- Take breaks in longer presentations. Continuous time in the virtual reality environment for longer than 20 minutes is associated with increased chances of negative side effects.
- Remove the VR headset during breaks. Take a few minutes. Move around in the real world. If possible, look at distant objects outside of a while.
Standing vs. Sitting
In public speaking it is usually better to stand. This has several benefits, e.g. better breathing, more powerful and confident position. With current Virtual Reality technology this is not always the best solution. Virtual Orator Steam Edition currently always works in a simulated height manner, so no matter how you choose to stand physically, you will be at the height of your virtual position. We recommend sitting if your presentation is over 10-15 minutes, even if you will be standing in the virtual environment.
If you find your height incorrect in the experience, you can reset the position and forward direction by hitting the configured ‘Reset VR headset orientation’ button or by using the SteamVR built in reset methods. See the section Interaction during your Speech for information on the input settings.
Standing
You will generally be standing when you present in the real world, so practicing that way is ideal. When using systems like the HTC Vive, you can stand and move on the virtual stage the same as in reality. Follow the manufacturers guidelines and make sure you physical space is clear.
A big advantage of standing is all your bad habits when standing are likely to still occur, e.g. putting your hands in your pockets or pacing too much. This provides you the opportunity to identify these habits and work on fixing them.
The big disadvantage of standing is that it will increase your chances of experiencing simulator sickness.
Sitting
There are two main reasons to sit in real life when using Virtual Orator. One is physical space. If you do not have enough room to move around freely, sitting is often preferable. If you find you worry a lot about running into things, sitting will allow you to concentrate on speaking.
The second reason is simulator sickness. For some people this will be a factor, particularly with longer presentations. Sitting will reduce the chances and intensity of simulator sickness (nausea, lightheadedness, vertigo). If you do experience simulator sickness, you will also already be in a more stable position. ALWAYS stop immediately if you start experiencing simulator sickness.
Interface Basics
On starting, Virtual Orator loads you into an entry hall with 3 displays in front of you.

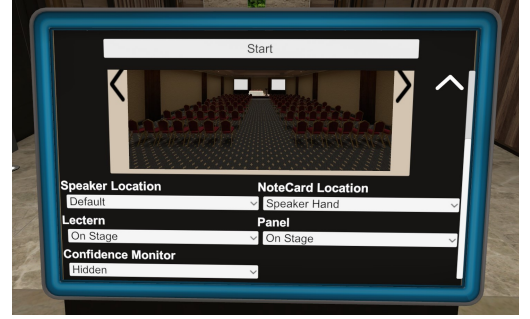
The center display provides selection of the venue (room) you will be presenting in and setting of options related the venue itself. This includes where you will be presenting from and presence of extra things in the environment, such as a presenters stand. The right display is for setting parameters of the experience, the # of audience members and their attitude, presentation slides, etc. The left display shows reports of your performance. This will show after your experience and you can load reports for previous experiences also.
Venue Options
Venues can be selected by using the arrows next the the images to cycle through the available venues. Options related to each venue are available below. Simply scroll down or drag.
Experience Parameters
Audience Size
The audience size can be set via the slider at the top right of the right display with the title Audience Size. The maximal size of the audience is related to the # of seats in a venue. In some venues you can choose to be seated in one of the available seats. The max size is not adjusted on the slider, but will be adjusted in the session.
Scenario Difficulty
You can adjust how the audience will behave and there attitude via the Scenario Difficulty slider on the right hand side of the right display. An explanation is provided. With more challenging settings additional distractions may occur in addition to changes to the audience attitude and behaviors.
Presentation Length
Presentations usually have an expected length. This can be set in the presentation length settings just below the audience size settings. There are two settings available for this. The expected length is how long the audience is expecting you to go. The Hard Limit is when you have gone so long that someone will stop your presentation, in this case by forcefully ending it.
Virtual Orator also provides a system to give up to 3 notifications of the time left in a presentation. This will cause vibration feedback for you to know time is running out.
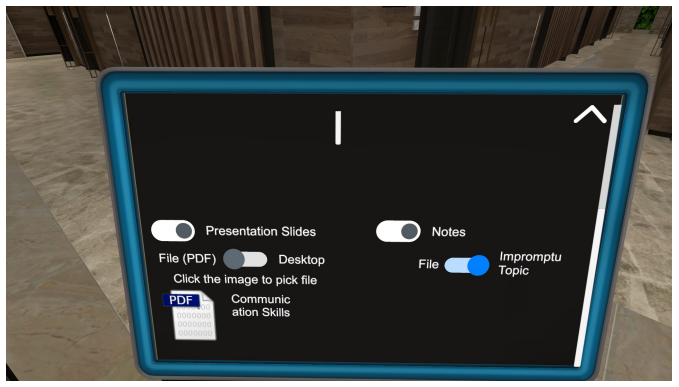
Slides
Slide presentations can be used in most venues. Slides will be projected and in most cases a presenter display or laptop will show your slides also. You will need to scroll the right hand display down to set the slides for you presentation.
Virtual Orator supports slides in pdf format and can also replicated the Windows desktop into the VR Scenario. Details are found in Slide Presentations.
Notes
Bringing your notes into session can provide cues for you to remember what to say and is often best practice when you are not using slides or even with them. You will need to scroll the right hand display down to set the notes for you presentation.
Notes loaded in PDF format. NOTE: the resolution of the current generation VR headsets is too low for small fonts. You will need to use larger fonts than normal for text to be legible.
Placement of the notes is controlled via an option that can be set per environment and is found below the image of the venue when scrolling the center display.
Impromptu Practice
Impromptu speaking is a good way to develop skills, as well as to keep your skills sharp. To facilitate your practice, Virtual Orator includes a way to get random topics for impromptu speaking. Under the Notes section you can select to have an Impromptu Topic. A topic will be retrieved from our servers and prepared for you. When you start your session a notecard will be in front of you with your topic.
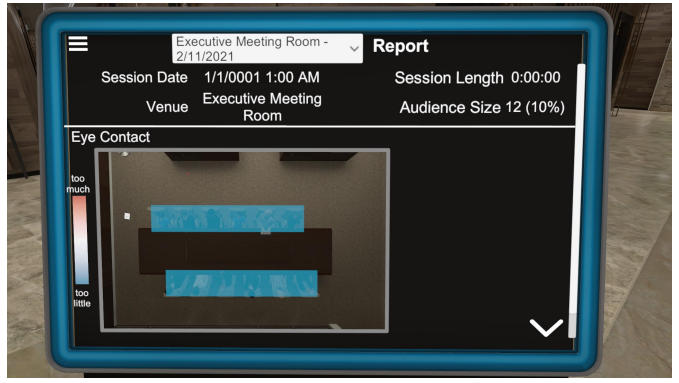
Reports Display
The report view provides feedback from the VR session on the left hand display in the entry hall. It provides basic information, such as the length of the presentation and reports on the presenter’s performance in terms of eye contact with the crowd.
You can recreate the scenario from the report by selecting the Repeat Scenario button in the hamburger menu. NOTE: this repeats the exact scenario, including the same audience and behaviors.
Eye contact reporting: A standard method for ensuring all audience members feel spoken to is to divide the room into a number of zones. You speak to one person in the zone. Then, you move your attention to another zone, again picking out one person to focus on. Then, another, etc. By moving from zone to zone, you ensure each area of the room is spoken to. Although you have picked one person in the zone each time you speak there, nearby people will also feel addressed. Virtual Orator reports on your performance in speaking to each zone and the timing of those shifts. The division of the room into zones following standard patterns can be selected with the ‘Audience Zones’ section in the Settings view.
In the image above we see a conference room divided into 2 zones. The text additionally includes information about where and for how long the presenter looked away from the audience, e.g. at the floor.
Interaction during your Speech
Speaking is mostly about your voice, but some interactions with the virtual environment may be required. Steam Inputs are controlled via the Steam provided methods.
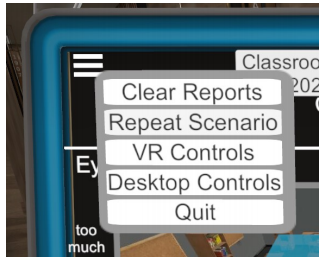
Settings for Desktop controls and for VR (Oculus) Controls are available via the hamburger menu at the top left of the Reports page.
The section Inputs below describes how to interact with Virtual Orator via your controllers and how to change the settings. The next section briefly covers what interactions are possible
Interactions
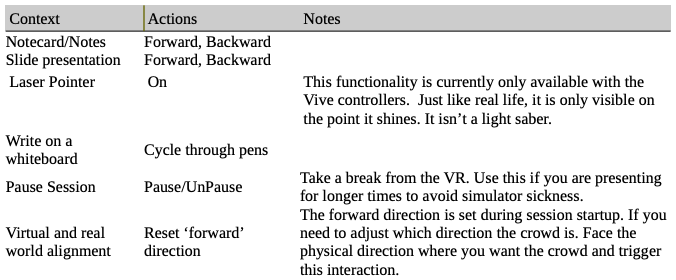
With Someone Helping
In the Steam Edition most of the audience interaction is controlled by our AI. However, if you have a helper present they can control some audience interactions.
This interactions all work via the desktop input, generally the keyboard. The focus must be on the desktop window that shows what you see.
Inputs
Desktop inputs, i.e. keyboard and mouse, are always enabled. There are a few desktop only controls. These control the audience in particular instances and are meant to be used by someone who is helping you.
Each VR headset has unique controllers. Presets are provided for all standard SteamVR supported devices, but may not match you expectations. These can be changed via the SteamVR input binding system.
Configuring Controllers in SteamVR
There are two primary ways to access the input bindings. The first is while in Virtual Orator press the system button on your controller. This will show a SteamVR interface screen. The second option on the list is CONTROLLER BINDINGS. On the next screen you will need to change the Active Controller Binding to CUSTOM. Then you will be able to use the EDIT THIS BINDING button.
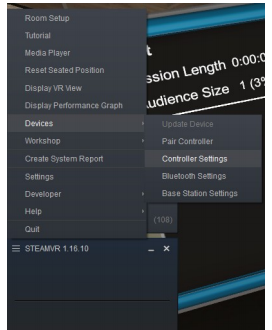
The second way to access the bindings is on the desktop. This opens the same interface. To access it here, click the hamburger menu on the SteamVR app; Select Devices and then Controller Settings.
Oculus in SteamVR
It is possible to use the Oculus Rift from SteamVR. This uses the SteamVR Input Configuration system described above.
Oculus Direct Launch
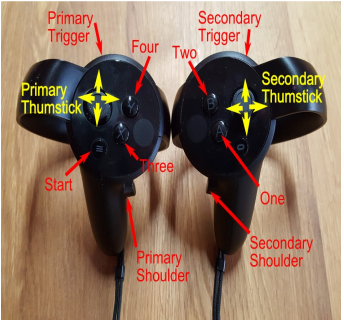
The Oculus Rift supports multiple controllers. The touch, the remote, and original xbox controllers all work for button input. The Touch controller can be used for spatial interaction.
In the mapping utility we use the names for buttons as Oculus defines them. The images below indicate the naming of the buttons as mapped. Those with the same name on different devices can be use interchangeable, unless the ‘unique devices’ is selected. This is true across all devices. The default layout is set for the Touch controllers.
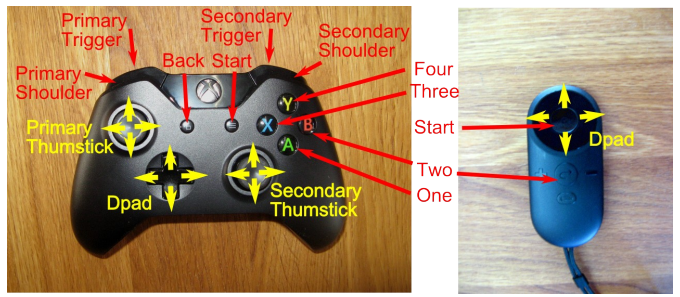
Desktop/Secondary
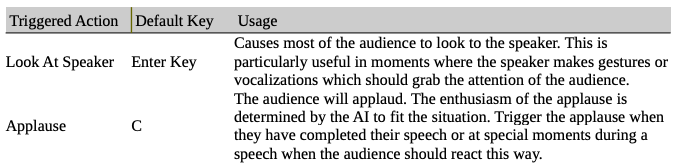
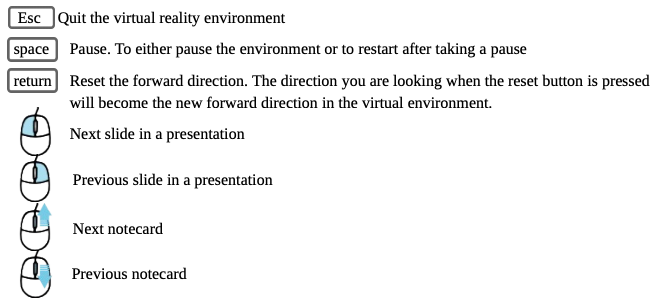
The default Desktop/Secondary input bindings in the virtual reality environment are:
Customizing Input Bindings for Oculus and Desktop
Virtual Orator allows the input bindings for every supported system to be modified. Bindings for Oculus and secondary/desktop keys and mouse are set on the left hand display in the lobby. Select the relevant Settings via the hamburger menu found there.
The input settings functions similar to many PC games. If you want to change the mapping for a specific action and control paradigm you click on that button with the mouse or trigger of the controller. When selected, the next input provide will be mapped. You can cancel by selecting another input box.
Slide Presentations
You can practice slide based presentations in most of our environments. Virtual Orator supports two ways of incorporating your slide based presentations.
- Built in support for slides in PDF form
- Replicate Desktop in VR (requires Windows 8.1 or 10)
With replicate desktop you can use your Powerpoint slides and even play movies depending on your hardware setup. The desktop display will be replicated in the VR world. This method is somewhat costly, so if you have a low preforming machine it may not work. The specifics of hardware on many laptops make it impossible to use Replicate Desktop.
The built in slides in pdf is less performance costly. Additionally, we only support slide feedback currently on this style of presentations.
Built-in Support
To do this you will need to export your slides to pdf form. We list how to do this for the most popular presentation software below. This is also a great way to have a backup of your presentation that can be used on basically any computer.
You will also get information on the time you spent on each slide in the report that is generated. This can be found in the point Error: Reference source not found in the section about the Report View.
Exporting to Pdf
Powerpoint: Microsoft Powerpoint can save presentations directly as Pdf. The slides will be exported as complete slides, just like if you were to print them. To export simple animations (appear/disappear) requires an additional step.
- PPspliT is a free add-on that splits each simple animation into a separate slide. After installing make sure to save your slides. Use PPspliT to create the expanded set of slides. Save as pdf. Either undo the changes, close powerpoint without saving, or open the save you created before (without saving again when prompted).
- Open your saved powerpoint in LibreOffice and use the method there.
LibreOffice/OpenOffice: Slides can be exported to Pdf under File -> Export as Pdf. The slides will be exported as complete slides, just like if you were to print them. To export simple animations (appear/disappear) requires an additional step.
The addon ExpandAnimations creates a version of your slides with animations expanded, such that each animation becomes an extra slide. Expand Animations is kept on a developer platform, github, but don’t let that keep you from using it. Down the page there is a README section. The first link in this section is to the download. This is an `extension’ for LibreOffice. Open the oxt file with LibreOffice and it will install.
After installation you will find it under Tools → Addons → Expand Animations. It will create an new presentation with your slides expanded and export it to pdf. It adds `-expanded’ to the filename. You will find both the pdf and the expanded slide deck saved in the same place as your presentation.
Keynote: Keynote users can export as Pdf. If you have simple animations like appear/disappear make sure to tick the option `Print each stage of builds’.
Replicate Desktop
Desktop duplication puts copies of your desktop into the virtual scenario. It shows up on the laptop and the presentation screens. To enable it simply check the Replicate Desktop box in the Presentation Slides. Typically you’ll have a single display so it will look like the right hand side below.
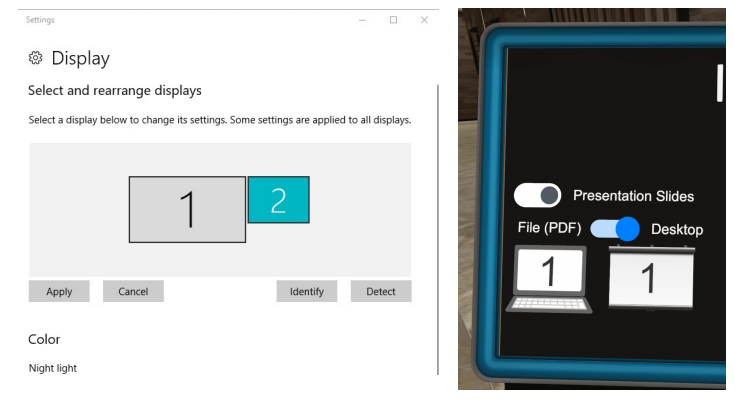
This replicates the standard presentation setup where you `duplicate’ the windows display such that what you see on your laptop is the same as on the projections. If you have multiple monitors and use extended mode for the Window’s display, then you can use either or both displays.
You can cycle through the possible display numbers by clicking on the laptop and presentation screen icons.
Recording Your Experience
Virtual Orator has a built-in ability to record your presentation experience. This is ideal for reviewing your performance, either by yourself or with a trainer. The video can contain the virtual scenario (what you are seeing), a webcam stream or both and audio from your microphone.
WARNING: recording the virtual scene can a slow down to the system, particularly on less powerful machines. If you experience simulator sickness, turn recording off.
Recording can be turned on via the settings on the left screen. This section is found at the bottom and requires scrolling down to find it. When turning on recording, the last settings will be used. Settings available are:
- Layout of the recording: webcam only, webcam with VR scene overlay, VR scene only, an VR scene with webcam overlay
- Overlay position can be moved to any corner by dragging the overlay image
- Microphone to use
- Webcam to use

Common Issues
Why am I facing the wrong direction?This related the way the computer knows where you are. By default, we use the information that the system (Oculus, Vive/SteamVR) provides us on your position and orientation based on the moment Virtual Orator starts. This is done so you can be seated. There is a way to reset the orientation using your controller or the keyboard when in the venue. See the Inputs section for details.
Why am I really tall?See the answer to the previous question.
Why isn’t Replicate Display working?There are two reasons this may occur. Firstly make sure you are using Windows 8.1 or Windows 10. Secondly, some graphics card setups do not work. Notably, dual graphic cards setups can cause issues. This includes standard laptop designs.
In technical terms the desktop and VR must be running on the same graphics card. On a desktop this means the display and VR device must be plugged into the same graphics card.
Support
Support for Virtual Orator can be found at https://virtualorator.com/forums/forum/support.
References
[xyz-ips snippet=”download-snippet”]