vivaDia H120i Vibration Plate Instruction Manual
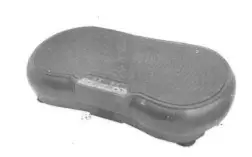
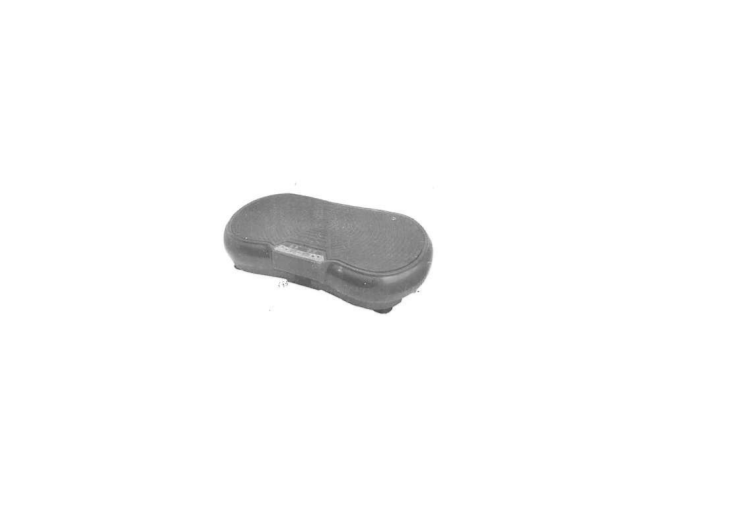
Dimensions
68cm x39cm x13cm
Technical details
Voltage: 220V-240V, 50/60Hz Motor Power: 200W
Accessories
Remote control 2x AAA batteries required (not included)

- VIBRATION PLATE CAN OFFER A RANGE OF FITNESS BENEFITS INCLUDING STRENGTHENING AND TONING MUSCLE, REDUCING BODY FAT AND IMPROVING BALANCE AND POSTURE BY RAPIDLY STIMULATING REFLEX, STABILISING AND CORE MUSCLE THROUGHOUT THE BODY
- MEASURES TIME AND SPEED
- TOTAL BODY TARGETING, TOTAL BODY RESULTS: JUST SIT OR STAND AND ROCK N FIT ACTIVATES AND WORKS EVERY MUSCLE FROM HEAD TO TOE, CAUSING HUNDREDS OF MUSCLE CONTRACTIONS PER MINUTE. / LARGE NON SLIP FEET / REMOTE CONTROL INCLUDED
- 2X RESISTANCE BANDS INCLUDED FOR UPPER BODY AEROBIC EXERCISES
- 1-20 MIN TIMER / 99 SPEED LEVELS – CHOOSE THE RIGHT INTENSITY FOR YOU.
ASSEMBLY INSTRUCTIONS / INSTRUCTIONS FOR USE:
Unpack the components carefully. Please check all parts have been removed from the packaging.
Important Safety information
Warning
 Warning
To reduce the risk of burns, fire, electric shock or injury to persons, read the following important precautions and information before operating the Vibration Plate.
- It is the responsibility of the owner to ensure that all users of this vibration plate are adequately informed of all warnings and precautions.
- Use the vibration plate only as described in this manual.
- Place the vibration plate on a level surface, with at least eight feet of clearance behind it. Do not place the vibration plate on any surface that blocks air openings. To protect the floor or carpet from damage,place a mat under the vibration plate.
- Keep the vibration plate indoors, away from moisture and dust. Do not put the vibration plate in a garage or covered patio or near water.
- Do not operate the vibration plate where aerosol products are used or where oxygen is being administered.
- Keep children under the age of 12 and pets away from the vibration plate at all times.
- The vibration plate should not be used by persons weighing more than 120kg.
- Never allow more than one person on the vibration plate at a time.
- Keep the power cord and the surge suppressor away from heated surfaces.
- Never leave the vibration plate unattended whilst it is running. Always remove unplug the power cord when the vibration plate is not in use.
- Do not attempt to move or adjust the vibration plate until it is properly assembled.
- Inspect and tighten all parts of the vibration plate regularly. Wrong usage could influence the stability of the vibration plate. For example, the post is made to support you during an exercise to keep you inbalance. One should NOT PUSH the post for stretching or use the post to create more tension.
- Inspect and tighten all parts of the vibration plate regularly.
- Never insert or drop any object into any opening.
- DANGER. Always unplug the vibration plate immediately after use, before cleaning the vibration plate and before performing the maintenance and adjustment procedures described in this manual. Neverremove the motor hood unless instructed to do so by an authorized service representative. Servicing other than the procedures in this manual should be performed by a qualified technician.
- This vibration place is intended for in-home use only. Do not use this vibration plate in any commercial, rental or institutional setting.Warning: Before beginning this or any exercise program, consult your GP. This is especially important for persons over the age of 35 or persons with pre-existing health conditions. Read all instructions before using.
Product description
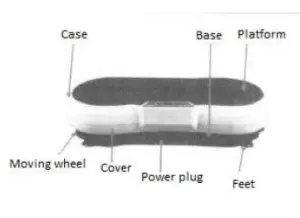
Console
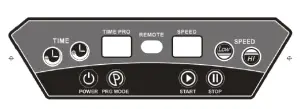
| Start | When machine stops, this button will start the motor as the preset The maximum setting time is 15 minutes.
There are 60 speed levels in manual mode. For the pre-set programs the highest speed level is 52. |
| Program | When machine stops, this button can pre-set modes as below:
Manual: LED shows HA.00. In this mode the time can be set between 0 and 20 minutes. When you press the START button, you can adjust the speed as required. Time function does not work in this mode. There are 9 auto programs. Every 2 seconds the speed will change. |
| Power | Put the vibration plate into standby y after you turn on and press this button. LED will show “ ”. Press again to resume.
When you switch on the vibration plate and do not use it for 3 minutes, it will go into standby. |
| Time/Speed
+ |
When the machine works in manual mode, the time can be increased between 1-20 minutes. (The default time is 10 minutes).
While the machine works in manual mode, the speed can be raised using the speed +/- buttons. |
| Time/Speed
– |
When the machine works in manual mode, the time can be reduced between 1-20 minutes. (The default time is 10 minutes).
While the machine works in manual mode, the speed can be reduced using the speed +/- buttons. |
Remote control
Requires 2xAAA batteries (not included)
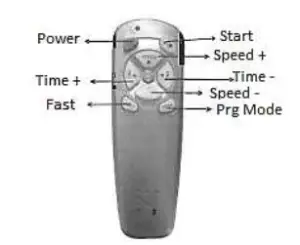
| Start | When machine stops, this button will start the motor as the preset |
| Program | When machine stops, this button can preset four modes as below:
Manual: LED shows HA.00. In this mode the time can be set between 0 and 20 minutes. When you press the START button, you can adjust the speed as required. Time function does not work in this mode. Automatic settings run the vibration plate at a certain rhythm (see below for details). Time and speed function do not work in this mode. P0:every 2 seconds, the speed will change as below: 1–9–17–25–17–9–1–17–1–9–25–9–1–25–1–9–17–25–17–9–repeat P1: every 2 seconds, the speed will change as below: 4 –12–20–28–20–12–4–20–4–12–28–12–4–28–4–12–20–28–20–12–repeat P2: every 2 seconds, the speed will change as below: 7 –15–23–31–23–15–7–23–7–15–31–15–7–31–7–15–23–31–23–15–repeat P3: every 2 seconds, the speed will change as below: 10–18–26–34–26–18–10–26–10–18–34–18–10–34–10–18–26–34–26–repeat P4:every 2 seconds, the speed will change as below: 13 –21–29–37–29–21–13–29–13–21–37–21–13–37–13–21–29–37–29–repeat- P5:every 2 seconds, the speed will change as below: 16 –24–32–40–32–24–16–32–16–24–40–24–16–40–16–24–32–40–32–repeat P6:every 2 seconds, the speed will change as below: 19 –27–35–43–35–27–19–35–19–27–43–27–19–43–19–27–35–43–35-repeat P7:every 2 seconds, the speed will change as below: 22 –30–38–46–38–30–22–38–22–30–46–30–22–46–22–30–38–46–38–repeat P8:every 2 seconds, the speed will change as below:: 25 –33–41–49–41–33–25–41–25–33–49–33–25–49–25–33–41–49–41–repeat P9:every 2 seconds, the speed will change as below: 28 –36–44–52–44–36–28–44–28–36–52–36–28–52–28–36–44–52–44–repeat |
| Speed +/- | While machine works in manual mode, speed can be adjusted with this button. |
| Time +/- | While machine works in manual mode, time can be adjusted with this button between 1-20
minutes (The default time is 10 minutes). |
| Time/Speed
– |
When the machine stops in manual mode,. The time can be reduced between 1-20 minutes. (The default time is 10 minutes).
While the machine works in manual mode, the speed can be reduced using the speed +/- buttons. |
- The LED will display displaying method 1: Mode. Speed.
- Minutes. Seconds.The display alternates every 5 seconds.
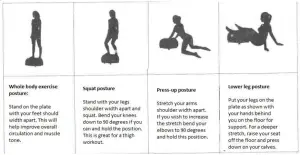
How to use the Vibration Plate
Use several different postures for a few minutes every day for a complete workout. Start on a slow speed and hold on to something initially until you are confident with the movement.The 2 resistance bands included can be used to increase intensity for some of the exercises.
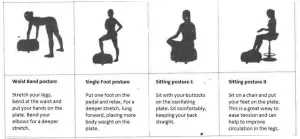
How to use resistance bands
Fit resistance bands to the sides of vibration plate for additional arm strengthening exercise.

Error Messages
| Emergency Stop | LED on the console shows “Er-3”, LED on PCB flashes three times. |
| Connection error | LED on console shows “Er-4”, LED on PCB flashes four times. |
| Electron power tube damage | LED on console shows “Er-5”. PCB flashes five times. |
| Current overload | LED on console shows “Er-6”. LED on PCB flashes six times. |
| Engineer abnormality | LED on console shows “Er-7”. LED on PCB flashes seven times. |
| Blocked Engineer | LED on console shows “Er-8”. LED on PCB flashes eight times. |
| Low voltage | LED on console shows “Er-9”. LED on PCB flashes nine times. |
PLUG WIRING (UK & IRELAND)
This appliance is fitted with a BS 1363 13-amp plug. If you have to replace the fuse, only those that are ASTA or BSI approved to BS1362 and with a rated current of 13-amps should be used. If there is a fuse cover fitted, this cover must be re-fitted after changing the fuse. If the fuse cover is lost or damaged the plug must not be used. Spare fuse holders and fuses are available from electrical outlets. If the socket outlets in your home or office are not suitable for this product’s plug, the plug must be removed and disposed of safely. Attempts to insert the plug into the wrong socket is likely to cause electric hazard. A replacement plug should be wired according to the following instructions:
The cable
A mains electricity cable contains two or three inner wires. Each has a core of copper and an outer layer offlexible plastic. This product is earthed; the wires in the cord set are colour coded in the following way:BLUE NEUTRALBROWN LIVEGREEN & YELLOW EARTH
The diagram below shows the key features of a correctly wired three-pin mains plug.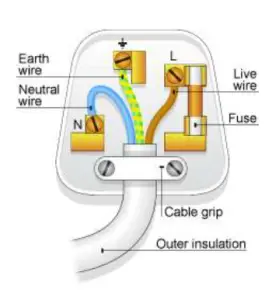
Note:
Double insulated appliances do not need the green & yellow Earth wire.They may only have the Brown and Blue wires.
DISPOSAL
- Coopers of Stortford use recyclable or recycled packaging where possible.
- Please dispose of all packaging, paper, cartons, packaging in accordance with your local recycling regulations.
- Plastics, polybags – this is made from the following recyclable plastic.
|
Code & Symbol |
|
| Type of Plastic | Please Specify (includes ABS, Nylon) |
| Commonly used for | CD’s, crisp packets, various flexible packaging, baby bottles,
sunglass lenses |
| Notes | Not often or widely recycled |
 report this ad
 At the end of the product’s lifespan please check with your local council authorised household waste recycling centre for. disposal.
Read More About This Manual & Download PDF:
[xyz-ips snippet=”download-snippet”]