
![]()
LARGE POWERWHEELCHAIR
Owner’s ManualMOB1029L
OVERVIEW
This manual is designed to help you get started with your Vive Power Wheelchair and answer any questions you might have about its operation and regular maintenance. If there is any information in this manual that is confusing, or if you require additional assistance for setup or operation, please contact [email protected].
Make sure to read all of the instructions, warnings, and notes in this manual before attempting to operate your Motorized Wheelchair for the first time. Your safety depends on how well you follow the contents of this manual. As such, VIVE IS NOT LIABLE FOR ANY DAMAGE AND/OR INJURIES THAT MAY OCCUR AS A RESULT OF UNSAFE OPERATION, IMPROPER USAGE, OR FAILURE TO FOLLOW THE INSTRUCTIONS, WARNINGS, NOTES, AND OTHER CONTENTS OF THIS MANUAL.
We are constantly answering questions and recording helpful videos to make using your Vive Mobility Large Power Wheelchair as easy as possible. Check out the included link and QR code to help you through the process.
 To see all of the FAQs in one place visit vhealth.link/5vw
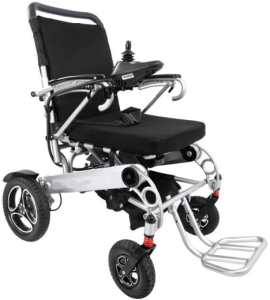
WHAT’S IN THE PACKAGE
(A) Motorized Wheelchair(B) Removable Seat Cushion(C) Battery Pack(D) Battery Charger(E) 2x Pre-installed Cable Clips


![]()
SET-UP INSTRUCTIONS
To get started using your Vive Power Wheelchair, you’ll have to complete the following steps:
- Unfold and Adjust the Wheelchair
- Charge the battery
Want to watch us do this instead? Just go to the following link to see how to set up and use your Vive Power Wheelchair.
 For video demonstration check out the link here vhealth.link/on8
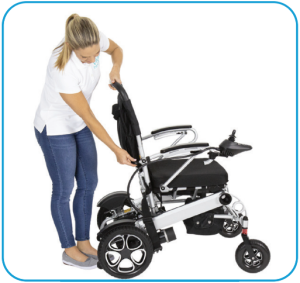
Unfold and Adjust the Wheelchair
1. Place the folded Wheelchair on the ground with the wheels facing down.
2. Place one hand on the frame at the front of the seat and the other hand on the top of the backrest. Pull the two halves of the Wheelchair apart while lifting to unfold the Wheelchair.
3. Push the Chair Lock lever on the lower back portion of the frame down to lock the chair in the open position.
4. Fold the foot rest down.

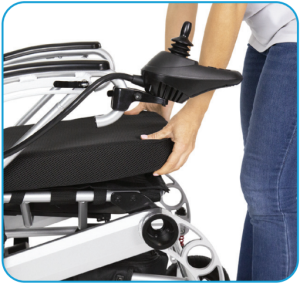
5. Lift the tension lever on the controller bracket to loosen the attachment clamp. Slide the controller bracket up the curved end of the arm rest and push the tension lever back down to tighten the controller in place.
Note: The controller can be attached to either armrest.
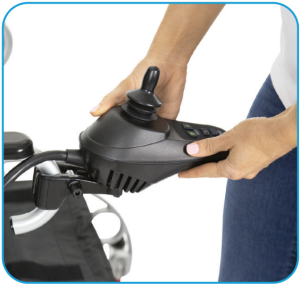
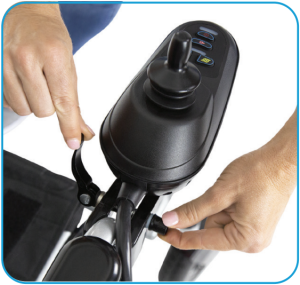
6. Fit the controller cable into the cable clip fastened behind the armrest to keep the cable out of the way.

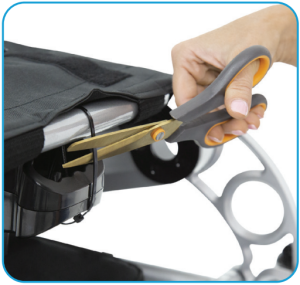
7. Locate the battery on the underside of the seat. Cut the zip-tie that binds it to the frame between the battery holder bag and the seat. Slide the battery back towards the battery holder until it locks into place with an audible click.

8. Attach the seat cushion using the velcro strips. Make sure the seat belt is not stuck underneath the seat cushion.
9. Adjust the level of the armrests using the tension lever beneath the armrest pad. Lift the lever to release the tension, slide the support into a groove to set the new position, and push the lever back down to lock it in place. If the lever does not provide adequate tension, lift the lever, tighten the screw knob on the other end of the tension lever, and then refasten the lever down

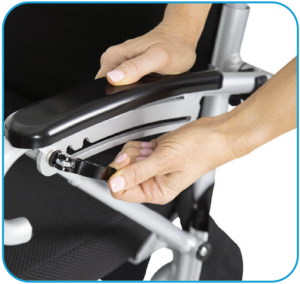
10. Adjust the height of the seat back by loosening the screw knobs beneath the back end of each arm rest, lifting / lowering the back rest to the desired height, and retightening the screw knobs.

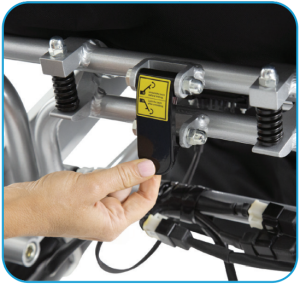
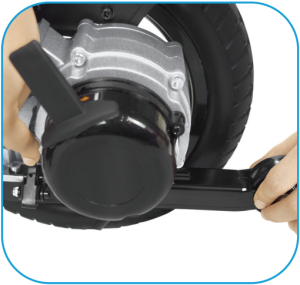
11. Switch the drive levers located behind each rear wheel from manual mode to drive mode.
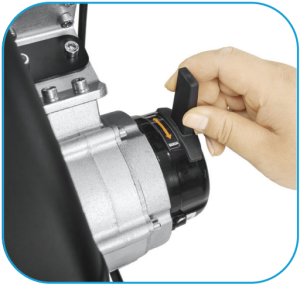
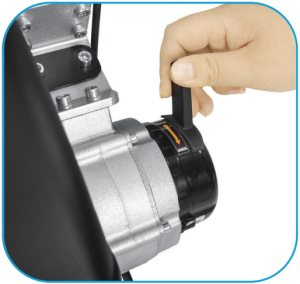
Manual Mode Drive Mode
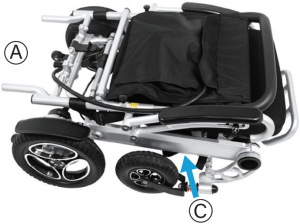
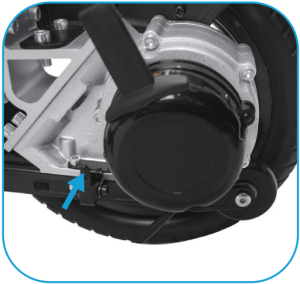
12. Pull out your anti-tip wheels by pushing in the switch on the side of the slide rail and pulling out the tipper wheels, repeat for both sides.
CHARGE THE BATTERY
Fully charge your new battery prior to first use. This brings the battery up to about 90% of its capacity. Drain the battery completely, and fully charge it again, increasing the capacity even more. After about four (4) or five (5) drain and charge cycles, the battery will reach optimal capacity.
Note: It is important to set the drive levers to drive mode and make sure your chair is powered off before charging.
1. Position the Wheelchair near a standard wall outlet.
2. Connect the 3-pin plug from the Battery Charger into the port on the underside of the controller.
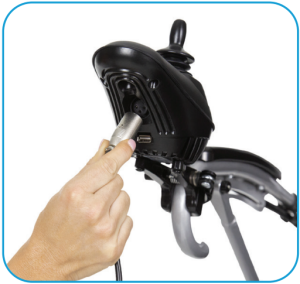
3. Insert the power plug from the Battery Charger into a standard 110v AC wall outlet. The Charge Indicator on the charger will illuminate red to show that the battery is charging. It will take approximately eight (8) to twelve (12) hours for a full charge, at which point, the Charge Indicator will turn green.
IMPORTANT: Always charge the battery using the charger included with the device. Do not use any other type of battery charger. Failure to do so will void your warranty and cause damage to the equipment.
4. Disconnect the Battery Charger. They can be stored behind the backrest or in the bag beneath the seat for convenience.
WHEELCHAIR OPERATION
- Make sure that the power is turned off before sitting down into the chair to prevent accidental operation.
- Always fasten the seat belt so that it is secure, but not overly tight before operating.
- Press the
 button to turn on power to the Wheelchair. The Charge Indicator will illuminate. The speed will be set to the last used setting. When operating for the first time, the speed will be set to the lowest setting.
 - Use the Joystick to operate the Wheelchair.NOTE:Wait until the wheelchair is powered on before moving the joystick.

- Charge Indicator
- Power Button
- Horn Button
- Speed Setting
- Speed Up/Down Buttons
- Joystick
We strongly recommend that you take time to practice operating your Powered Wheelchair until you become confident in how to do so safely.
- Find a large, open space and have someone present to assist you as you practice.
- Keep the Wheelchair at the lowest speed setting until your skill level with it increases.
- At first, work on operating it forward and backward to get a feel for the distances needed to stop safely.
- Once you become more skilled, practice performing “S” turns for navigating safely around obstacles.
- As you become more comfortable, practice with different speed settings. Note that the forward and backward speeds should be slightly different (backward speed should be slower).
- Do not attempt to adjust the armrests or backrest while the device is in motion.
CONTROLLER FUNCTIONS
Here is a layout of the Controller that shows all of the different components.
- Charge Indicator
- Power Button
- Horn Button
- Speed Setting
- Speed Up/Down Buttons
- Joystick
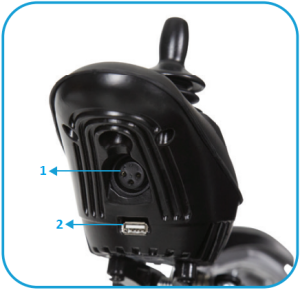
- Chair Battery
- Charging PortUSB Charging Port
| COMPONENT | DESCRIPTIONS |
| Charge Indicator | Shows the current charge level of the battery:• Red: charging• Green: fully charged |
| Turns the power to the Wheelchair on and off. | |
| Chair Battery Charging Port | This is the port for the 3-pin connector on the Battery Charger when charging the Wheelchair battery. |
| Horn Button | Emits a “beep” sound when pressed to alert others to your presence during operation. |
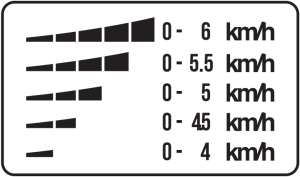
| Maximum Speed Setting | Shows the current maximum speed setting. This is changed using the [Speed up/down] buttons.
|
| [Speed Up/Down] Buttons | Decreases or increases the maximum speed setting for the Wheelchair. |
| Joystick | Operates the Wheelchair in the direction pressed, based on the current maximum speed setting. |
| USB Charger Port (under the Charging Port) | Used to charge small electronics off of the Wheelchair battery. DOES NOT charge the wheelchair battery. |
REMOVING THE BATTERY
The battery can be removed if desired, and stored away if the chair is not in regular use. To remove the battery, reach beneath the battery pack and pull forward on the release tab on the bottom of the battery slot. With the tab pulled forward fully, pull the battery out of the slot and release the tab.
WARNING ![]() Vive does not recommend removing or replacing the components inside the battery housing without the help of a professional. Batteries are high voltage power sources and can be dangerous if not properly handled. Avoid contact with the battery terminals on the end of the battery, and keep the battery terminals away from metal objects to avoid risk of personal injury and damage to the battery.
Vive does not recommend removing or replacing the components inside the battery housing without the help of a professional. Batteries are high voltage power sources and can be dangerous if not properly handled. Avoid contact with the battery terminals on the end of the battery, and keep the battery terminals away from metal objects to avoid risk of personal injury and damage to the battery.
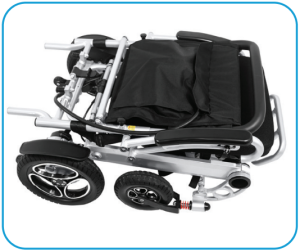
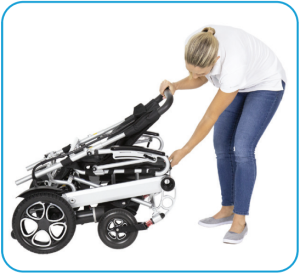
FOLDING PROCEDURES
The Vive Power Wheelchair can be folded for easy storage and transportation.
- Make sure that the power is turned off before folding to prevent accidental operation The battery can be removed and stowed in the battery bag beneath the seat.
- Switch the Drive Levers to manual mode.
- Lift the Chair Lock Lever on the lower back of the chair frame to unlock the frame.
- Grab the top of the backrest and the front of the seat and pull these parts down and together to fold the Wheelchair.
ADDITIONAL INFORMATION / PROCEDURES
Manual Mode
Use the two levers located in the rear of the wheelchair to set them to manual use mode to push the wheelchair when required. The motors will not propel the wheels in Manual Mode.
Warning ![]() Do not operate the device in Manual Mode alone. Do not operate the device in Manual Mode while sitting in the wheelchair. Do not operate the device in Manual Mode on an incline. Failure to follow these warnings may result in injury or damage to the device.
Do not operate the device in Manual Mode alone. Do not operate the device in Manual Mode while sitting in the wheelchair. Do not operate the device in Manual Mode on an incline. Failure to follow these warnings may result in injury or damage to the device.
Maintenance
The only maintenance required for your Vive Power Wheelchair is to clean it occasionally with a soft, damp cloth. Allow it to dry completely before use again. Do not use any abrasive or volatile cleaners. Do not submerge or use excessive amounts of water to clean the Wheelchair. If desired, you can use a light coat of car wax to maintain the high surface gloss.
Check the table below for the recommended intervals at which you should check the device to ensure proper form and function.
| COMPONENT | DAILY(WITH EACH USE) | WEEKLY | MONTHLY |
| Wheel Hubs |
X |
||
| Drive Mechanism |
X |
||
| Joystick function |
X |
||
| Brake System |
X |
||
| Connections/Fasteners |
X |
||
| Battery |
X |
||
| Rear Tires |
X |
||
| Frame integrity |
X |
||
| Motors / Actuators |
X |
||
| Front Wheel Assemblies |
X |
||
| Cleanliness |
11 |
X |
|
| Seat / Upholstery |
X |
||
| Adjustments(backrest, controller, etc) |
X |
If you have any problems with your Vive Power Wheelchair, including setup, use, or maintenance, please contact [email protected]. Don’t attempt to open or repair the device by yourself. Please report to vivehealth.com if any unexpected operations or events occur.
TROUBLESHOOTING
This section includes a list of error messages and common problems you may encounter with your Vive Motorized Wheelchair. If it isn’t operating like you think it should, check here before contacting [email protected].
| # of blinking LEDs |
Problem |
Remedy |
| 1 | Low Battery | Fully charge the batteries |
| 2 | Left side drive motor failure | Check motor and wiring, may require replacement |
| 4 | Right side drive motor failure | Check motor and wiring, may require replacement |
| 6 | Controller overload | Check to make sure motors are in drive mode and wheels are free to move |
| 7 | Joystick control failure | Turn off device, make sure joystick is not being pushed/pulled before powering back on |
| 8 or more | Controller failure | Replace controller unit |
ADDITIONAL INFORMATION AND SAFETY WARNINGS
- The maximum weight capacity is 260 lb. (120kg). The Wheelchair is intended only for one user at a time. Do not carry passengers.
- Please do not operate the Wheelchair while excessively tired or under the influence of alcohol.
- Do not operate the Wheelchair at night or in low visibility.
- The Wheelchair is not waterproof. Do not operate in rain or snowy conditions.v
- While the Wheelchair is designed for use indoors and outdoors, it is not intended for use in extreme terrains or on unsafe surfaces. Do not operate in muddy, rugged, soft, narrow, or icy conditions. Do not operate on unfinished roads without guardrails. When encountering grooves or other similar obstacles, decelerate and cross the obstacle slowly.
- The Wheelchair has can safely climb or descend a maximum slope of 6°. Riding the wheelchair up or down a greater incline can make it unstable and potentially tip over, resulting in injury and damage to the device. Always ride the device straight up or down an incline to reduce the risk of slipping or tipping over.
- Avoid driving in crowds or places with heavy traffic as much as possible.
- Always sit as straight up as possible with head backward, using the backrest in case of bumps in the road, which may cause a loss of control.
- Always start operation at the lowest speed setting and adjust it as desired once determining that it is safe to do so.
- Do not operate in excessively damp environments. Direct or prolonged exposure to water or dampness could cause the Wheelchair to malfunction and/or components to corrode
- While the Wheelchair is designed for use indoors and outdoors, it is not intended for use in extreme terrains or on unsafe surfaces.Do not operate in muddy, rugged, soft, narrow, or icy conditions.Do not operate on unfinished roads without guardrails. When encountering grooves or other similar obstacles, decelerate and cross the obstacle slowly.
- The Wheelchair has can safely climb or descend a maximum slope of 6°. Riding the wheelchair up or down a greater incline can make it unstable and potentially tip over, resulting in injury and damage to the device. Always ride the device straight up or down an incline to reduce the risk of slipping or tipping over.
- Avoid driving in crowds or places with heavy traffic as much as possible.
- Always sit as straight up as possible with head backward, using the backrest in case of bumps in the road, which may cause a loss of control.
- Always start operation at the lowest speed setting and adjust it as desired once determining that it is safe to do so.
- Do not operate in excessively damp environments. Direct or prolonged exposure to water or dampness could cause the Wheelchair to malfunction and/or components to corrode.
- Electrical devices like the Powered Wheelchair may be affected by Electromagnetic Interference (EMI) or Radio Frequency Interference (RFI) which can be produced by radio stations, TV stations, or other powerful telecommunication transmitters. If you operate the device within the interference range of such transmitters, it may cease function or move erratically.If unintended motion occurs due to EMI/RFI, immediately turn the wheelchair off. Attempting to operate the Wheelchair under such conditions can result in personal injury or equipment damage.
SPECIFICATIONS
The Vive Powered Wheelchair and Battery Charger complies with GB/T 18029.21 Wheelchair – Part 21: Requirements and test methods for electromagnetic compatibility of power wheelchairs, electric scooters, and battery chargers.
- Overall Dimensions: 42.9 in. (1090mm) x 24.4 in. (620mm) x 40.1 in. (1020mm)
- Seat Height: 19.7 in. (500mm)
- Seat Width: 17.25 in. (438mm)
- Seat Depth: 17.5 in. (4245mm)
- Armrest Height: 9.4 in. (240mm)
- Seatback Height: 21.2 in. (540mm)
- Battery Weight: 3.9 lb. (1.8 kg)
- Theoretical Travel Range: ≥9.3 mi. (15 km)
- Static Stability: ≥9°
- Dynamic Stability: ≥6°
- Slope Performance: ≥9°
- Climbing Ability: ≥6°
- Motor Type: 24V/200W
- Battery Type: 24V 10AH
- Wheelchair Weight: 59.5 lb. (27 kg)
- Maximum Speed: ≤3.7 mph (6 km/h)
- Braking Distance: ≤ 59 in. (1500mm)
- Maximum Turning Radius: ≤ 47.2 in. (1200mm)
- Weight Capacity: 260 lb. (120 kg)
- Maximum Controller Output: 50A
- Maximum Charger Output: 2A
- Front Wheel: Inflate-free tire, outer size 7.9 in. (200mm)
- Drive Wheel: Inflate-free tire, outer size 11.8 in. (300mm)
WARNING ![]() No modification of this equipment from its original specifications is allowed.
No modification of this equipment from its original specifications is allowed.
ELECTRICAL DIAGRAM

WARRANTY INFORMATION
The following parts of the Motorized Wheelchair are covered under warranty:
- Three-year warranty on frame from the date of purchase.
- One-year warranty on the following parts from the date of purchase Motor and Joystick Controller
- Six-month limited warranty on batteries from the date of purchase
[xyz-ips snippet=”download-snippet”]