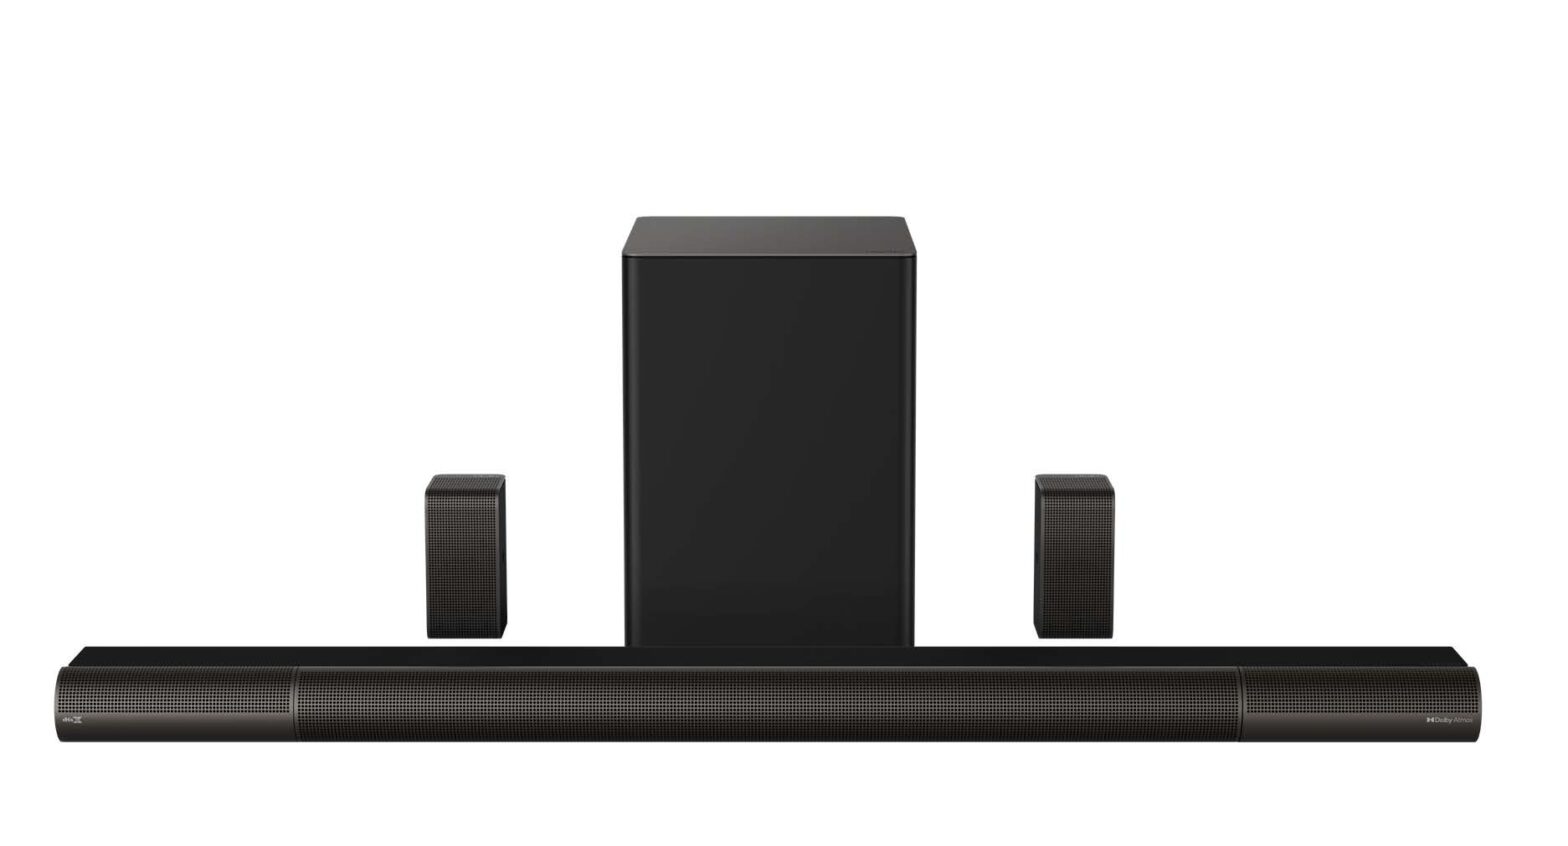
VIZIO Elevate 5.1.4 Sound Bar with Dolby Atmos [P514a-H6] User Manual
Please read this guide before using the product.
IMPORTANT SAFETY INSTRUCTIONS
Your Unit is designed and manufactured to operate within defined design limits, and misuse may result in electric shock or fire. To prevent your Unit from being damaged, the following rules should be observed for its installation, use, and maintenance. Please read the following safety instructions before operating your Unit. Keep these instructions in a safe place for future reference.
- Read these instructions.
- Keep these instructions.
- Heed all warnings.
- Follow all instructions.
- Do not use this apparatus near water.
- Clean only with a dry cloth.
- Do not grab or touch the rotating side speakers.
- Do not place objects on top of the Elevate sound bar.
- If mounted, do not pull on the Elevate sound bar.
- Do not block any ventilation openings. Install in accordance with the manufacturer’s instructions.
- Do not install near any heat sources such as radiators, heat registers, stoves, or other apparatus (including amplifiers) that produce heat.
- Do not defeat the safety purpose of the polarized or grounding-type plug. A polarized plug has two blades with one wider than the other. A grounding type plug has two blades and a third grounding prong. The wide blade or the third prong are provided for your safety. If the provided plug does not fit into your outlet, consult an electrician for replacement of the obsolete outlet.
- Protect the power cord from being walked on or pinched, particularly at plugs, convenience receptacles, and the point where they exit from the apparatus.
- Only use attachments/accessories specified by the manufacturer.
- Use only with the cart, stand, tripod, bracket, or table specified by the manufacturer, or sold with the apparatus. When a cart is used, use caution when moving the cart/apparatus combination to avoid injury from tip-over.
- Unplug this apparatus during lightning storms or when unused for long periods of time.
- Refer all servicing to qualified service personnel. Servicing is required when the apparatus has been damaged in any way, such as when the power supply cord or plug is damaged, liquid has been spilled or objects have fallen into the apparatus, the apparatus has been exposed to rain or moisture, does not operate normally, or has been dropped.
- To reduce the risk of electric shock or component damage, switch off the power before connecting other components to your Unit.
- Unplug the power cord before cleaning your Unit. A damp cloth is sufficient for cleaning. Do not use a liquid or a spray cleaner on your Unit. Do not use abrasive cleaners.
- Always use the accessories recommended by the manufacturer to insure compatibility.
- When moving your Unit from an area of low temperature to an area of high temperature, condensation may form in the housing. Wait before turning on your Unit to avoid causing fire, electric shock, or component damage.
- Slots and openings in the back and bottom of the cabinet are provided for ventilation. To ensure reliable operation of your Unit and to protect it from overheating, be sure these openings are not blocked or covered. Do not place your Unit in a bookcase or cabinet unless proper ventilation is provided.
- Never push any object into the slots and openings on your Unit enclosure. Do not place any objects on the top of your Unit. Doing so could short circuit parts causing afire or electric shock. Never spill liquids on your Unit.
- Do not block the subwoofer ports. Allow for 1-2 inches of space around all sides for ventilation.
- WARNING: Exposure to loud sounds can damage your hearing causing hearing loss and tinnitus (ringing or buzzing in the ears). With continued exposure to loud noises, ears may become accustomed to the sound level, which may result in permanent damage to hearing without any noticeable discomfort.
- When connected to a power outlet, power is always flowing into your Unit. To totally disconnect power, unplug the power cord.
- Do not overload power strips and extension cords. Overloading can result in fire or electric shock.
- The wall socket should be located near your Unit and be easily accessible
- Keep your Unit away from moisture. Do not expose your Unit to rain or moisture. If water penetrates into your Unit, unplug the power cord and contact your dealer. Continuous use in this case may result in fire or electric shock.
- Do not use your Unit if any abnormality occurs. If any smoke or odor becomes apparent, unplug the power cord and contact your dealer immediately. Do not try to repair your unit yourself.
- Avoid using dropped or damaged appliances. If your Unit is dropped and the housing is damaged, the internal components may function abnormally. Unplug the power cord immediately and contact your dealer for repair. Continued use of your Unit may cause fire or electric shock.
- Do not install your Unit in an area with heavy dust or high humidity. Operating your Unit in environments with heavy dust or high humidity may cause fire or electric shock.
- Ensure that the power cord and any other cables are unplugged before moving your Unit.
- When unplugging your Unit, hold the power plug, not the cord. Pulling on the power cord may damage the wires inside the cord and cause fire or electric shock. When your Unit will not be used for an extended period of time, unplug the power cord.
- To reduce risk of electric shock, do not touch the connector with wet hands.
- Insert the remote control batteries in accordance with instructions. Incorrect polarity may cause the battery to leak which can damage the remote control or injure the operator.
- See the important note and rating located on the back of the unit.
- WARNING: This equipment is not waterproof. To prevent a fire or shock hazard, do not place any container filled with liquid near the equipment (such as a vase or flower pot) or expose it to dripping, splashing, rain, or moisture.
- CAUTION: Danger of explosion or fire if batteries are mistreated. Replace only with the same or specified type.
- Do not leave the batteries exposed to direct sunlight for a long period of time with doors and windows closed. Do not disassemble the batteries or dispose of it in fire.
- Where the MAINS plug or appliance coupler is used as the disconnect device, the disconnect device shall remain readily operable.
- No naked flame sources,such as lighted candles,should be placed on the apparatus.
- The ventilation should not be impeded by covering the ventilation openings with items,such as newspapers, table-cloths, curtains, etc.
- The equipment shall be used at maximum 35 degree C ambient temperature.
WARNING: To reduce the risk of fire or electric shock, do not expose this apparatus to rain or moisture.
CAUTION
- RISK OF ELECTRIC SHOCK DO NOT OPEN
- The lighting flash with arrowhead symbol within an equilateral triangle is intended to alert the user to the presence of not isolated dangerous voltage within the product that may be sufficient magnitude to constitute a risk of shock to persons.
- The exclamation point within an equilateral triangle is intended to alert the user to the presence of important operating and servicing instructions in the literature accompanying the appliance.
- Warning: This equipment is a Class II or double insulated electrical appliance. It has been designed in such a way that it does not require a safety connection to electrical earth.
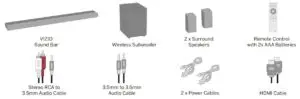
Package Contents
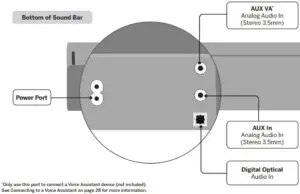
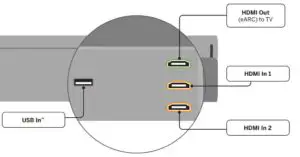
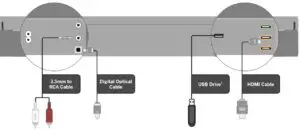
Controls & Connections
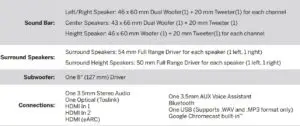
**Supports .WAV and .MP3 file format playback only.

First-time Setup

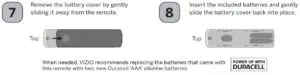
Using the Remote
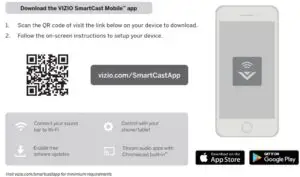
Using Your Mobile Device as a Remote
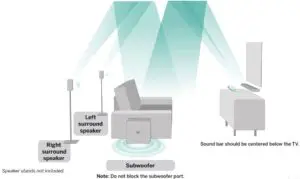
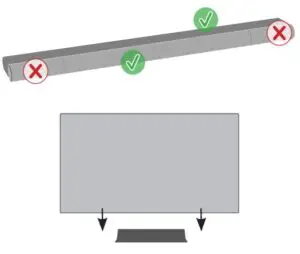
Proper Placement
For the best surround sound experience, position the sound bar, subwoofer, and surround sound speakers as shown. The sound bar should be close to ear level.You will get the best sound effect if your ceiling is flat and around 7.5 ft to 12 ft high.
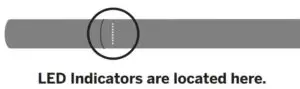
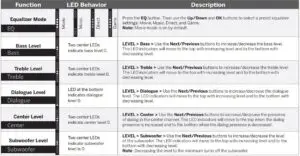
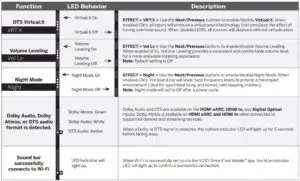
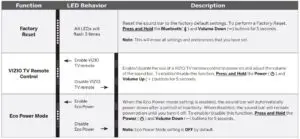
Mode & Level Settings
Press each setting button and use the Up/Down buttons to access the different settings. Each setting will be displayed on the remote control’s LCD display. The LED indicators will behave differently with each function.
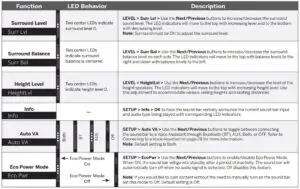
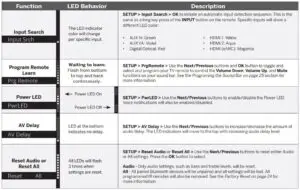
There are other functions that are triggered by different button combinations on the sound bar.
Programming the Sound Bar
You can program your sound bar to accept TV remote IR commands.
- Press the SETUP button on the remote, then use the Up/Down buttons to navigate to Prg Remote.
- Use the Next/Previous buttons to toggle through Learn Vol -, Learn Vol +, and Learn Mute.

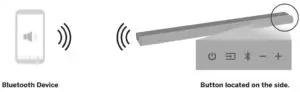
Bluetooth® Pairing
To pair the sound bar with a Bluetooth device:
- Press and hold the Bluetooth button on the sound bar or remote control for five (5) seconds.
- Search for the sound bar (VIZIO P514a) using your Bluetooth device. For more information, refer to the user documentation that came with the device.
- Now you can play audio from your Bluetooth device. Volume can be controlled on both your source device and the sound bar.
The LED indicators on the display panel on the front of the sound bar will light up sequentially from bottom to top and back again. Once the device is paired, the LED indicators will stop flashing.
Using Bluetooth Mode
- Your sound bar supports music streaming from devices with Bluetooth capability.(Device compatibility will vary, see your device’s documentation for more information.)
- Once you have paired your source device to the sound bar your device should remain paired (within range).
- If the source is changed back to Bluetooth, any paired Bluetooth device will reconnect automatically.
- If the input is changed or if Auto VA is set to off/AUX, the Bluetooth device will disconnect.
Maximizing Signal
A Bluetooth signal has a range of up to 30 feet. Keep in mind that Bluetooth is a compressed audio format, so streamed music may lose some integrity when compared to a wired connection. Try the following if your sound quality is less than optimal:
- If you hear any break-up or disconnect while streaming music from your device, move the source device closer to the sound bar.
- Be sure that there are no solid obstructions in the line-of-sight between the sound bar and the source device.
- Other wireless devices can affect Bluetooth range, including wireless security cameras, wireless video baby monitors, cordless phones, and microwave ovens. Turning off or moving these devices may improve Bluetooth range.
Your sound bar is not equipped with a microphone, so it cannot operate as a hands-free device for a smartphone.
Reduce the volume levels on your device and on the sound bar before pressing Play. High volume levels can damage your hearing.
Connecting to a Voice Assistant
Your sound bar can connect to a Voice Assistant (VA) device through an AUX VA or Bluetooth connection. Once connected, your sound bar will now act as the VA speaker.
Features and Benefits:
- Voice Assistant Dedicated Input: VA can be active on the sound bar even if the sound bar is set to a different input with audio playing.
- Auto Muting: If playing audio from the sound bar, the VA audio will mute the original source audio. Once the VA audio is stopped the original source audio will resume.
Make sure your sound bar is turned ON and Eco Power setting is turned OFF. Refer to Eco Power mode on page 20 to disable.
Setup Tips:
- If the VA audio is too low, adjust the volume from the VA device.
- If the start of the response from the VA is cut off, enable “Start of Request” from your VA app settings.
- To disable the VA function, use the display remote to turn the Auto VA feature to OFF. Refer to Auto VA on page 20 for more information.
Using the AUX VA Port to Connect
Use a 3.5mm audio cable to connect the AUX VA port on the sound bar to an AUX port on your voice assistant device. If there is no AUX port on the VA device, use a Bluetooth connection instead.
Benefits of this type of connection:
- Simple and easy connection setup.
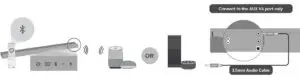
Using Bluetooth to Connect
Press and hold the Bluetooth button on the sound bar or remote for five (5) seconds. Search for the sound bar (VIZIO P514a) using your VA device app. For more information, refer to the user documentation that came with the device.
Benefits of this type of connection:
- Ability to position the VA device in other locations other than physically connected to the sound bar.
- Ability to place the VA device closer to you so that it can hear commands better.
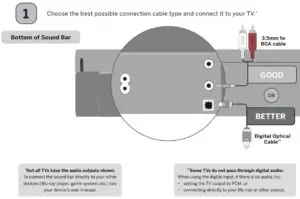
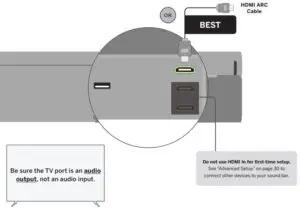
Advanced Setup
Supports .WAV and .MP3 file format playback only.
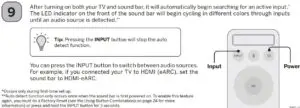
Connecting with HDMI ARC
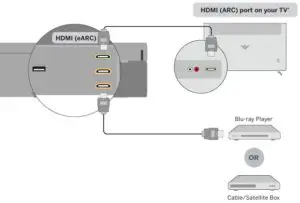
HDMI cables transmit both audio and video.To view video from these devices:
- Turn the sound bar on.
- Set the sound bar input to HDMI In.
- Set your TV input to the same HDMI port that the sound bar is connected to.
* HDMI ARC port location may differ by TV manufacturer. See your TV’s user manual for more information.
Connecting with HDMI eARC
What is HDMI Audio Return Channel (ARC)?
- Using HDMI ARC, your TV can send audio to the sound bar using an HDMI cable.
- Connect your sound bar to your TV’s HDMI eARC port using an HDMI cable that is eARC compatible.
To connect using HDMI*:
- Connect one end of the HDMI cable to the HDMI 1 (ARC/eARC) port on the back of your TV.
- Connect the other end to the HDMI (eARC) port on your sound bar.
- From the AUDIO menu on your TV, change the Digital Audio Setting to Digital or Bitstream.
- From the SYSTEM menu, enable CEC and ARC (SAC)† functions.
- From the CEC menu, select Device Discovery to register the sound bar with the TV.
If you want to use the TV remote to control the sound bar volume: Enable System Audio Control from the CEC menu.
The following steps are for use with a VIZIO TV, steps may differ by TV manufacturer. See your TV’s user manual for more information.
CEC Function naming may differ by TV manufacturer. See your TV’s user manual for more information.
Connecting a Subwoofer
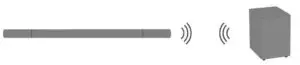
What does pairing mean?Pairing means to wirelessly connect.
The subwoofer has already been paired with the sound bar by VIZIO. However, the subwoofer may need to be re-linked to the sound bar if there is no sound coming from the subwoofer.
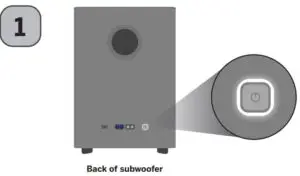
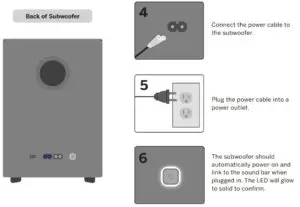
- First confirm that the power LED is illuminated.
- Press and hold the ON/OFF button on the back of the subwoofer for 5 seconds. The LED on the back of the subwoofer will begin to blink.
- Press and hold the Power button on the top of the sound bar for 5 seconds. The LED indicators on the front will flash 3 times. The subwoofer is now linked with the sound bar.
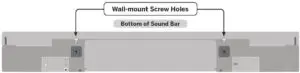
Wall-mounting
- Place the included wall mounting template against the wall under your TV. Mark the two bracket holes using a pencil.

- Then place the shorter end of the bracket on the two holes you just marked and screw intothe wall. Be sure your screws are attached to wood studs, drywall anchors (for drywall), orconcrete anchors (for brick/concrete walls).

Screws for attaching the bracket to the wall are not included. Choose the screw type and lengthappropriate to your home’s construction. If in doubt, consult a professional installer.
* Do not use any of the included screws for the wall mount installation. These are not intended for mounting.
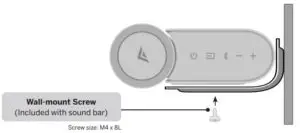
- Place sound bar onto the L-shaped bracket and use the included bracket screws to attach.
* Do not use any of the included screws to screw into the wall. These are not intended for mounting.
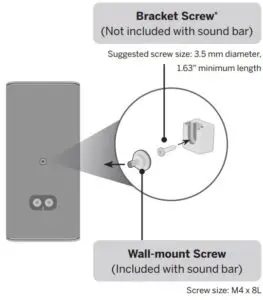
Wall-mounting the Surround Speakers
To wall-mount the surround speakers:
- Attach the wall mount screw to the back of the surround speaker.
- Secure the wall mount bracket to the wall. (Bracket screw is not included.)
- Slide the speaker on to the wall bracket. Ensure the wall mount screw is secured within the bracket grooves.
Be sure your screws are attached to wood studs, drywall anchors (for drywall), or concrete anchors (for brick/concrete walls). Wall mounting hardware is not included.
If you are unfamiliar with power tools or the layout of electrical wiring in the walls of your home, consult a professional installer.
* Do not use any of the included screws for the wall mount installation. These are not intended for mounting.
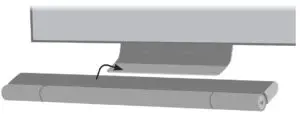
Mounting to the VIZIO OLED TV
In addition to wall-mounting, you can also mount the Elevate sound bar onto the VIZIO OLED TV* stand.
Before you start:
- Only grab the center piece or solid back bar when handling the sound bar. Do not grab the rotating side speakers.
- If your VIZIO OLED TV is already wall mounted, you will need to unmount and connect it to its metal base first (see OLED TV Quick Start Guide).
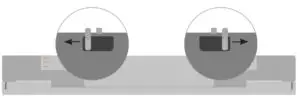
- Make sure the tabs (located on the bottom, rear side of the sound bar) are in the locked position. If not, press the top release button to move tabs into the locked position.
*TV Models: OLED55-H1, OLED65-H1
- Slide sound bar onto the VIZIO OLED TV base. There will be a clicking sound when locked into place. Ensure that both tabs are fully latched and locked into place.
- If you want to release the sound bar from the TV, switch the tabs to the outside position and carefully lift.
Do not place any items on top of the sound bar or pull on the sound bar. Risk of damage or injury may occur.

Register Your Product
VIZIO.COM/PRODUCT-REGISTRATION
Why register?
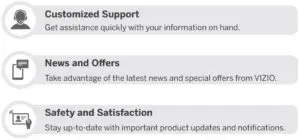
Customer Service
Find help with:
- New product setup
- Connecting your devices
- Replacement remotes
- Technical problems
- Bluetooth and streaming
- Product updates and more
*This number accepts SMS/MMS messages only. No voice calls are accepted. Message and data rates may apply. (U.S. only).
Help & Troubleshooting
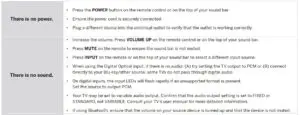
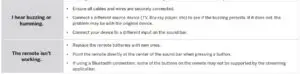
Frequently Asked Questions
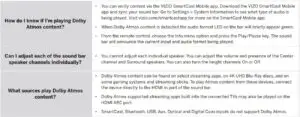
Limited Warranty
UNITED STATES AND CANADABY USING YOUR VIZIO PRODUCT YOU AGREE TO BE BOUND BY ALL THE TERMS OF THIS WARRANTY. BEFORE USING YOUR VIZIO PRODUCT, PLEASE READ THIS WARRANTY CAREFULLY. IF YOU DO NOT AGREE TO THE TERMS OF THIS WARRANTY, DO NOT USE THE VIZIO PRODUCT AND, WITHIN THIRTY (30) DAYS OF THE DATE OF PURCHASE, RETURN IT FOR A REFUND TO THE AUTHORIZED RETAILER WHERE YOU PURCHASED IT.This warranty contains a binding arbitration agreement and a class action waiver for United States residents. If you live in the United States, the binding arbitration agreement and class action waiver affect your rights under this warranty. Please read the text under the section titled “Binding Arbitration Agreement; Class Action Waiver (U.S. Residents Only)” carefully.
How Long This Warranty LastsFor non-commercial use, VIZIO warrants the product on the terms set forth below for one (1) year from the date of original purchase. For commercial use, VIZIO warrants this product on the terms set forth below for ninety (90) days from the date of original purchase.
What This Warranty CoversVIZIO warrants the product against defects in materials and workmanship when the product is used normally in accordance with VIZIO’s user guides and manuals. Except where restricted by law, this warranty applies only to the original purchaser of a new product. The purchase must have been made from an authorized retailer in the United States (including Puerto Rico) or Canada. The product must also be located in the country where it was purchased at the time of warranty service.
How to Get ServiceBefore obtaining warranty service, you may visit www.vizio.com for additional help and troubleshooting. To obtain warranty service, contact VIZIO Customer Support by going to support. vizio.com and selecting Contact Us. You can also call Customer Support: (US) 877-698-4946;(Canada) 877-878-4946.
Your Obligations Before ServiceYou must obtain pre-authorization before sending your product to a VIZIO service center. You may be required to supply a purchase receipt (or copy) to show that the product is within the warranty period. When you return a product to a VIZIO service center, you must ship the product in its original packaging or in packaging that affords an equal degree of protection. VIZIO Technical Support will provide instructions for packing and shipping the product to the VIZIO service center.
ALL USER DATA AND DOWNLOADED APPLICATIONS STORED ON A PRODUCT WILL BE DELETED IN THE COURSE OF SOME IN-HOME AND ALL SHIP-IN WARRANTY SERVICE.
If this occurs, your product will be restored to its original state. You will be responsible for restoring all applicable user data and downloaded applications. Recovery and reinstallation of user data and downloaded applications is not covered under this warranty. In order to protect your personal information, VIZIO recommends that you always clear all personal information from the product before it is serviced, regardless of the servicer.
VIZIO’s ResponsibilitiesIf VIZIO determines that a product is covered by this warranty, VIZIO will (at its option) repair or replace it, or refund the purchase price to you. There will be no charge for parts or labor during the warranty period. Replacement parts may be new or recertified at VIZIO’s option and sole discretion. Replacement parts and VIZIO’s labor are warranted for the remaining portion of the original warranty or for ninety (90) days from warranty service, whichever is longer.
Types of ServiceProducts must be sent to a VIZIO service center to obtain warranty service. VIZIO is not responsible for transportation costs to the service center, but VIZIO will cover return shipping to the customer.
What This Warranty Does Not CoverThis warranty does not cover: (a) cosmetic damage; (b) normal wear and tear; (c) improper operation; (d) improper voltage supply or power surges; (e) signal issues; (f) damage from shipping; (g) acts of God; (h) customer misuse, modifications or adjustments; (i) installation, set-up, or repairs attempted by anyone other than by a VIZIO authorized service center; (j) products with unreadable or removed serial numbers; (k) products requiring routine maintenance; or (l) products sold “AS IS”, “CLEARANCE”, “FACTORY RECERTIFIED”, or by a non-authorized reseller.
What to Do If You Are Not Satisfied With ServiceIf you feel VIZIO has not met its obligations under this warranty, you may attempt to resolve the issue informally with VIZIO. If you are unable to resolve the issue informally and wish to file a formal claim against VIZIO, and if you are a resident of the United States, you must submit your claim to binding arbitration according to the procedures described below, unless an exception applies. Submitting a claim to binding arbitration means that you do not have the right to have your claim heard by a judge or jury. Instead your claim will be heard by a neutral arbitrator.
Binding Arbitration Agreement; Class Action Waiver (U.S. Residents Only)UNLESS YOU HAVE BROUGHT AN ELIGIBLE CLAIM IN SMALL CLAIMS COURT OR HAVE OPTED OUT AS DESCRIBED BELOW, ANY CONTROVERSY OR CLAIMRELATING IN ANY WAY TO YOUR VIZIO PRODUCT, INCLUDING ANY CONTROVERSY OR CLAIM ARISING OUT OF OR RELATING TO THIS WARRANTY, A BREACH OF THIS WARRANTY, OR THE VIZIO PRODUCT’S SALE, CONDITION OR PERFORMANCE, WILL BE SETTLED BY BINDING ARBITRATION ADMINISTERED BY THE AMERICAN ARBITRATION ASSOCIATION AND CONDUCTED BY A SINGLE ARBITRATOR APPOINTED BY THE AMERICAN ARBITRATION ASSOCIATION, IN ACCORDANCE WITH ITS COMMERCIAL ARBITRATION RULES AND ITS SUPPLEMENTARY PROCEDURES FOR CONSUMER-RELATED DISPUTES. You may learn more about the American Arbitration Association and its rules for arbitration by visiting www.adr.org or by calling 800-778-7879. Since this warranty concerns a transaction in interstate or international commerce, the Federal Arbitration Act will apply.
The filing fees to begin and carry out arbitration will be shared between you and VIZIO, but in no event will your fees ever exceed the amount allowable by the American Arbitration Association, at which point VIZIO will cover all additional administrative fees and expenses. VIZIO waives its right to recover attorneys’ fees in connection with any arbitration under this warranty. If you are the prevailing party in an arbitration to which the Supplementary Procedures for Consumer-Related Disputes applies, then you are entitled to recover attorneys’ fees as the arbitrator may determine.
The dispute will be governed by the laws of the state or territory in which you resided at the time of your purchase (if in the United States). The place of arbitration will be Irvine, California, or your county of residence (if in the United States). The arbitrator will have no authority to award punitive or other damages not measured by the prevailing party’s actual damages, except as may be required by statute. The arbitrator will not award consequential damages, and any award will be limited to monetary damages and will include no equitable relief, injunction, or direction to any party other than the direction to pay a monetary amount. Judgment on the award renderedby the arbitrator will be binding and final, except for any right of appeal provided by the Federal Arbitration Act, and may be entered in any court having jurisdiction. Except as may be required by law, neither you nor VIZIO nor an arbitrator may disclose the existence, content, or results of any arbitration under this warranty without the prior written consent of you and VIZIO.
ANY DISPUTE, WHETHER IN ARBITRATION, IN COURT, OR OTHERWISE, WILL BE CONDUCTED SOLELY ON AN INDIVIDUAL BASIS. VIZIO AND YOU AGREE THAT NO PARTY WILL HAVE THE RIGHT OR AUTHORITY FOR ANY DISPUTE TO BE ARBITRATED AS A CLASS ACTION, A PRIVATE ATTORNEY GENERAL ACTION, OR IN ANY OTHER PROCEEDING IN WHICH EITHER PARTY ACTS OR PROPOSES TO ACT IN A REPRESENTATIVE CAPACITY.
NO ARBITRATION OR PROCEEDING WILL BE JOINED, CONSOLIDATED, OR COMBINED WITH ANOTHER ARBITRATION OR PROCEEDING WITHOUT THE PRIOR WRITTEN CONSENT OF ALL PARTIES TO ANY SUCH ARBITRATION OR PROCEEDING.
Exceptions to Binding Arbitration Agreement and Class Action Waiver.
IF YOU DO NOT WISH TO BE BOUND BY THE BINDING ARBITRATION AGREEMENT AND CLASS ACTION WAIVER, THEN: (1) you must notify VIZIO in writing within sixty (60) days of the date that you purchased the product; (2) your written notification must be mailed to VIZIO at 39 Tesla, Irvine, CA 92618, Attn: Legal Department; and (3) your written notification must include (a) your name, (b) your address, (c) the date you purchased the product, and (d) a clear statement that you wish to opt out of the binding arbitration agreement and class action waiver.
In addition, you may pursue a claim in small claims court in your county of residence (if in the United States) or in Orange County, California. In such case the provisions of the section titled “Binding Arbitration Agreement; Class Action Waiver (U.S. Residents)” will not apply.
Exclusions and LimitationsTO THE GREATEST EXTENT PERMITTED BY APPLICABLE LAW, THERE ARE NO EXPRESS WARRANTIES OTHER THAN THOSE DESCRIBED ABOVE. ANY IMPLIEDWARRANTIES, INCLUDING ANY IMPLIED WARRANTY OF MERCHANTABILITY AND FITNESS FOR A PARTICULAR PURPOSE, WILL BE LIMITED IN DURATION TO THE WARRANTY PERIOD SET FORTH ABOVE. SOME STATES AND PROVINCES DO NOT ALLOW LIMITATIONS ON HOW LONG AN IMPLIED WARRANTY LASTS, SO THE ABOVE LIMITATION MAY NOT APPLY TO YOU.
VIZIO WILL NOT BE RESPONSIBLE FOR LOSS OF USE, LOSS OF INFORMATION OR DATA, COMMERCIAL LOSS, LOST REVENUE OR LOST PROFITS, OR OTHERINDIRECT, SPECIAL, INCIDENTAL OR CONSEQUENTIAL DAMAGES, EVEN IF VIZIO HAS BEEN ADVISED OF THE POSSIBILITY OF SUCH DAMAGES, AND EVEN IF THE REMEDY FAILS OF ITS ESSENTIAL PURPOSE. SOME STATES AND PROVINCES DO NOT ALLOW THE EXCLUSION OR LIMITATION OF INCIDENTAL OR CONSEQUENTIAL DAMAGES, SO THE ABOVE LIMITATION OR EXCLUSION MAY NOT APPLY TO YOU.
IN LIEU OF ANY OTHER REMEDY FOR ANY AND ALL LOSSES AND DAMAGES RESULTING FROM ANY CAUSE WHATSOEVER (INCLUDING VIZIO’S NEGLIGENCE, ALLEGED DAMAGE, OR DEFECTIVE GOODS, NO MATTER WHETHER SUCH DEFECTS ARE DISCOVERABLE OR LATENT), VIZIO MAY, AT ITS SOLE AND EXCLUSIVE OPTION AND IN ITS DISCRETION, REPAIR OR REPLACE YOUR PRODUCT, OR REFUND ITS PURCHASE PRICE. AS NOTED, SOME STATES AND PROVINCES DO NOT ALLOW THE EXCLUSION OR LIMITATION OF INCIDENTAL OR CONSEQUENTIAL DAMAGES, SO THE ABOVE LIMITATION OR EXCLUSION MAY NOT APPLY TO YOU.
How the Law AppliesThis warranty gives you specific legal rights, and you may also have other rights, which vary from state to state and province to province. This warranty applies to the greatest extent permitted by applicable law.
GeneralNo employee or agent of VIZIO may modify this warranty. If any term of this warranty, other than the class action waiver, is found to be unenforceable, that term will be severed from this warranty and all other terms will remain in effect. If the class action waiver is found to be unenforceable, then the entire section titled “Binding Arbitration Agreement; Class Action Waiver (U.S. Residents Only)” will not apply. This warranty applies to the maximum extent not prohibited by law.
Changes to WarrantyThis warranty may change without notice, but any change will not affect your original warranty. Check www.vizio.com for the most current version.
Legal & Compliance
FCC Class B Radio Interference StatementNOTE: This equipment has been tested and found to comply with the limits for a Class B digital device, pursuant to Part 15 of the FCC Rules. These limits are designed to provide reasonable protection against harmful interference in a residential installation.
This equipment generates, uses and can radiate radio frequency energy, and if not installed and used in accordance with the instructions, may cause harmful interference to radio communications.
However, there is no guarantee that interference will not occur in a particular installation. If this equipment does cause harmful interference to radio or television reception, which can be determined by turning the equipment off and on, the user is encouraged to try to correct the interference by one or more of the following measures:
- Reorient or relocate the receiving antenna.
- Increase the separation between the equipment and receiver.
- Connect the equipment into an outlet on a circuit different from that to which the receiver is connected.
- Consult the dealer or an experienced radio/TV technician for help.
This device complies with Part 15 of the FCC Rules. Operation is subject to the following two conditions:
- This device may not cause harmful interference, and
- This device must accept any interference received, including interference that may cause undesired operation.
Notice:
- Any Changes or modifications not expressly approved by the party responsible for compliance could void the user’s authority to operate the equipment.
- Shielded interface cables and AC power cord, if any, must be used in order to comply with the emission limits.
- The manufacturer is not responsible for any radio or TV interference caused by unauthorized modification to this equipment. It is the responsibilities of the user to correctsuch interference.
Operations in the 5.15-5.25GHz band are restricted to indoor use only.FCC RF Radiation Exposure Statement
- This transmitter must not be collocated or operating in conjunction with any other antenna or transmitter.
- This equipment complies with FCC radiation exposure limits set forth for an uncontrolled environment. This equipment should be installed and operated with minimum distance 20cm between the radiator & your body.
- FCC RF WarningThis equipment must be installed and operated in accordance with provided instructions and the antenna(s) used for this transmitter must be installed to provide a separation distance of at least 20cm from all persons and must not be co-located or operating in conjunction with any other antenna or transmitter. End-users and installers must be provided with antenna installation instructions and transmitter operating conditions for satisfying RF exposure compliance.
Battery Disposal and RecyclingYou must dispose of this product properly, according to local laws and regulations. Because this product contains electronic components and/ or a battery, it must be disposed of separately from household waste. Contact local authorities to learn about disposal and recycling options. For more information, visit vizio.com/environment.
Software LicensesAll software is provided subject to software license agreements and you agree that you will be bound by such license agreements in addition to other applicable terms of use. By using the VIZIO products, you agree to the VIZIO Terms of Service and Privacy Policy. The VIZIO Terms of Use and Privacy Policy may be updated from time to time and are available to view atvizio.com/terms and vizio.com/privacy, respectively.
Export RegulationsCustomer acknowledges that the VIZIO products, which include technology and software, are subject to customs and export control laws in the United States (“US”). The products mayalso be subject to the customs and export control laws and regulations of the country in which the products are manufactured and/or received.
Internet ConnectivityNetwork conditions, environmental and other factors may negatively affect connectivity and the resulting audio quality, if any.
The applications and content of the applications pictured herein or described in accompanying documentation may only be available in certain countries or languages, may require additional fees or subscription charges, and may be subject to future updates, modifications or discontinuation without notice. VIZIO has no control over third party applications or content and assumes no responsibility for the availability or interruption of such applications or content. Additional third party terms, conditions and restrictions apply. A Google account is required to download applications from the Google Play store. A MyVIZIO account is required to access certain features of the VIZIO SmartCast Mobile app.
© 2020 VIZIO, Inc. All Rights Reserved.This User Manual may not be copied in whole or in part without the written permission of VIZIO, Inc. VIZIO, Inc. has made reasonable efforts to ensure the accuracy of the informationprovided herein. All product specifications, functionality, features, configurations, performance, design and other product information described herein are subject to change without notice. VIZIO, Inc. is not responsible for typographical, technical, or descriptive errors. To review the most updated version of this User Manual and the associated Quick Start Setup guide, go to vizio.com.
VIZIO, the VIZIO logo, the V logo, and other terms and phrases are trademarks or registered trademarks of VIZIO, Inc.
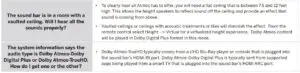
Specifications

*Sound pressure level measured using pink noise at 1 meter, c-weighted.

Read More About This Manual & Download PDF:
report this adVIZIO Elevate 5.1.4 Sound Bar with Dolby Atmos [P514a-H6] User Manual – VIZIO Elevate 5.1.4 Sound Bar with Dolby Atmos [P514a-H6] User Manual –
Questions about your Manual? Post in the comments!
[xyz-ips snippet=”download-snippet”]