

WOOD WORKTOP INSTALLATION THE ULTIMATE REAL AND MAINTENANCE MANUAL

![]()

Introduction
The high-quality SilkwoodTM worktop that you have selected has been pre-oiled within the factory producing an ultra-smooth finish and is manufactured using the highest quality material from environmentally sound and renewable sources giving you one of the very best real wood worktops available within the market.Wood is a natural product whose appeal lies in its inherent warm textures which comes from the variety of grain patterns and color.The correct installation, oiling, and ongoing maintenance enhance the character of the natural timber as well as protecting the wood from moisture and day-to-day wear and tear of the surface.This guide has been created to ensure the correct installation and oiling procedures are applied to result in a lifetime of service with simple aftercare. We also provide you with the full background information on the correct procedure on how to install, protect with Woca Danish worktop oil and confirm the simple ongoing maintenance.In order to enjoy a lifetime of trouble-free use of your beautiful new real wood worktop it is absolutely essential they you read the installation instructions supplied with every worktop and follow the procedures within those documents. 99% of future problems are due to incorrect installation or treatment and ongoing care and maintenance. Wood is a natural product and expands and contracts depending on the seasons, for example in the winter central heating reduces the moisture content in the air and wood shrinks. During summer moisture levels in the air increase and this causes the wood to expand so it is essential that the fixation allows for this movement with the use of slotted brackets and the wood is treated with oil to protect and maintain the performance and appearance of the wood.
Points to Note:Do not discard any of the packaging or installation instructions until you have checked all of your worktops thoroughly before installation for any defects – once fitted it is assumed that the worktop has been inspected and is to specification and ok to install.Please retain these instructions for future reference and care and maintenance information.
Fittings and installation materials
When fitting any solid wooden worktops we recommend the use of the following items which are readily available1: Woca penetrating and oxidizing Worktop oil for installation and to maintain the furniture-grade factory pre-oiled surface.2: Slotted brackets to allow natural movement in service.3: At least three Worktop connector bolts per joint.4: D3 type waterproof glue for the worktop joint5: Wood screws for the fixation to the worktop and chipboard screws for attachment of the slotted brackets to the base carcass.6: Moisture barrier for above appliances and heat barrier for under ovens/heat sources.7: Woca real wood worktop aftercare kit – comprising 250ml wood cleaner, 750ml Woca worktop oil, fine sanding pad, lint-free cloth, rubber gloves, and aftercare instructions to ensure a lifetime of luxury enhanced natural wood appearance and ongoing protection for satisfactory lifetime service.
Storage
It is advisable for the worktops to acclimatize for at least 3 days in the room of installation and once the shrink wrap is opened have the worktops installed as soon as possible. If this is not possible the worktops must be kept in a weather-tight room at the same temperature and humidity as that of where they are to be fitted. All worktops must be stored flat, in their original wrapping, and on support battens no more than 600mm apart.

Do not unwrap the worktops until:– All carcasses’ and cabinets are fully fitted.– The installation area has had a thorough clean.– The room temperature and humidity is stable.
Setting Out
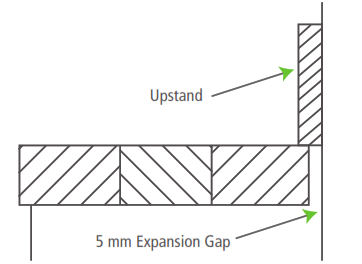
All work surfaces must be installed with a 3-5mm expansion gap between the edge of the worktop and the wall surface, to allow for movement as the natural wood expands and contracts with the heat and humidity of the kitchen.Upstands are recommended because they will finish off and also cover the 3-5mm expansion gap between the worktop and the wall. A gap of 10-15mm must be left between the end of the worktops and any heat source such as a free-standing oven and always take extra care to add extra oil in these areas to reduce the effect of shrinkage and splitting. Always follow the appliance manufacturer’s instructions.
Installing over appliances
When your worktops are to be installed over any appliance (dishwashers, washing machines, under ovens, etc.) a moisture barrier/heat barrier MUST be fitted to protect the underside of the timber worksurface. The barrier comes in sheet form and requires stapling or tacking to the underside of the worktop and partly running behind the appliance. These will protect your worktops from extremes of heat and moisture.

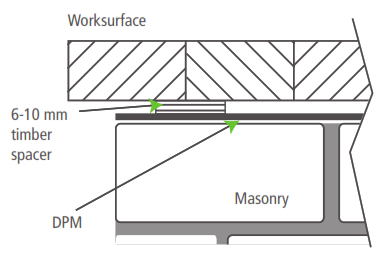
Installing over masonry
When your worktops are to be installed over or directly on to any masonry 6-10mm timber spacers positioned onto a Damp Proof Membrane (DPM) must be used.
Installing your worktops
This section will guide you through the details of installing your worktops.
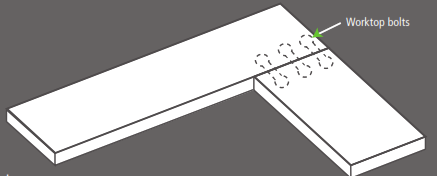
JointsJoints between two worktops must always be butted together to allow for cross-grain movement of the timber and by following these points:– Joints should be made with at least 3 standard worktop bolts– The end grain on both worktops needs to be sealed before the joint is made with D4 wood glue.– Seal the joint again after it is tightened.– NEVER use a butt & scribe joint (hockey stick shape) to join wooden worktops
Butt joint
Sink and Appliance cutoutsIt is important to take great care when cutting out for sinks and appliances due to the possibility of water penetrating into the timber if the correct procedures and materials are not used. We always advise that they are machined by an experienced installer/fitter to ensure an even smooth open edge for oiling.
Drainer Grooves
If drainer grooves are being installed in the worktop around a Belfast sink it is very important that the grooves are positioned in the middle of the worktop wood staves and NOT on the longitudinal joint as this could cause the failure of the glue line and lead to moisture ingress.It is also very important that the correct angle is used so that water will naturally drain into the sink. We recommend using a pre-made drainer groove template. Also always ensure that the grooves are thoroughly oiled with at least 7 coats of Woca Worktop oil buffed in while the oil is still wet with a smooth 400 grit sandpaper to ensure saturation/penetration and maximum protection of these vulnerable to moisture ingress areas. Ongoing oiling of the area is essential to ensure the surface remains fully protected. Do not leave standing water for any length of time on the surface as this may cause damage to even the best-treated worktops.For accuracy, quality and safety, all cutouts should be bench-cut using a jig and suitable router, never a jigsaw.
Appliance cutouts
Please follow these points:– Always follow the manufactures instructions when making a cutout for hobs and appliances.– A clearance of 5mm per side to allow for movement of the worktops.– All edges of cutouts must be sealed and oiled at least with 4 applications of Woca worktop oil to prevent damage due to condensation and/or any leakage.
Sinks
It is essential:– When making cutouts where possible always use the templates supplied with the sink. Under mounted Belfast, sinks should have an overhang of between 7- 10mm all around and installed as per the separate Belfast sink instruction leaflet supplied with the worktops.– Lay-on sinks must have a clearance of 3mm per side to allow for movement of the worktops and the raw cut edges are treated with a minimum of 4 applications of Woca Worktop oil for full protection.– All raw wood edges of cutouts and tap holes must be sealed and oiled to prevent damage due to condensation and/or any leakage, tap holes need to be cut in the center of the woodstove.– Seal all undersides of sinks with mold-resistant silicon and take extra care when installing Belfast Sinks to allow for the natural flow of water to flow into the sink and not be allowed to concentrate on the underside edge of the worktop which will cause a failure because of the water/moisture contamination.
Worksurface Fixing
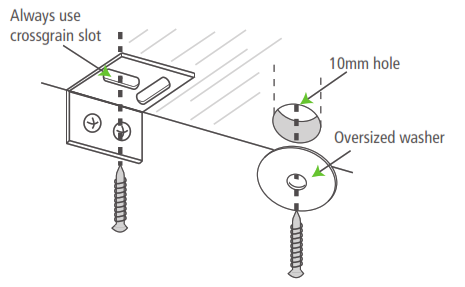
Wooden worktops must only be fixed with slotted angle brackets and round head screws to attach the bracket.The cross-grain slot MUST always be used to fasten worktops down as the worktops expand widthways– front to back – and the cross-grain bracket allows for this movement (see illustration).Always tighten the screw and then quarter turn back the screw to allow natural movement.On units that have a full or partial top carcass panel where the worktops need to be attached through the cabinet front rail, drill an 10mm oversized hole as shown but this time fasten the worktops down with a washer bigger then the hole and a round head screw to allow natural movement.Any units with full top panels must have at least 50% of their area cut out to allow the underside of the worktops to breath.All the above are done to allow the worktops to breathe – expand and contract.
Always remember:
NEVER use brackets that are not slotted. NEVER screw directly through the carcass into the worktop without using a 10mm hole with a washer.NEVER use laminated worktop fixing blocks which do not allow natural movement to secure your worktops the use of this type of fixation will cause restriction of natural movement and could cause joint failure.Only the fixing methods listed above and illustrated below must be used.
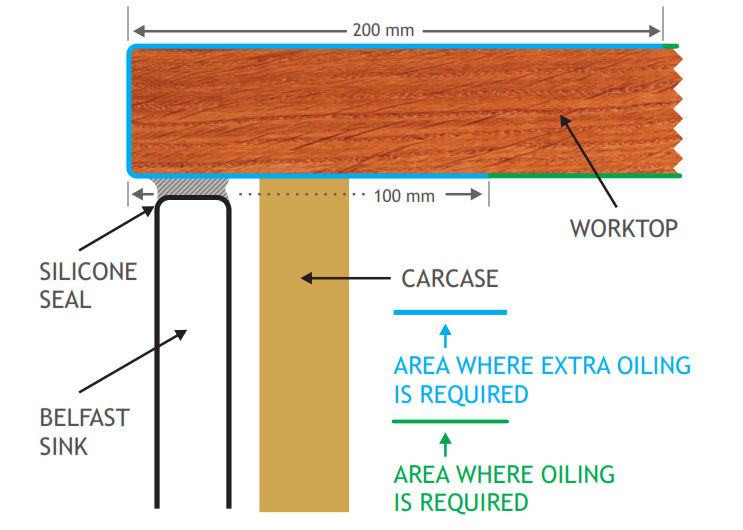
Belfast sinkinstallation InstructionsBelfast Sinks create a WET AREA around the sink area and ”special care” is required when installing a real wood worktop and a Belfast sink to ensure correct oiling – sealing of the sink and cut edges plus oiling the surrounding areas. The real wood worktop around the worktop cutout allows the water to cascade down the cut edge into the sink and if not sealed correctly water will collect and penetrate the wood and split the joints.
- Plan all cut-outs to ensure:a. The cut-out back edge is in the middle of a stave to ensure the strength of the stave/worktop.b. That any drilled holes for the Water pipes are larger than the pipe diameter to allow for movement and are positioned through the centre of the stave, not through a joint – ALWAYS liberally apply WOCA worktop penetrating oil to the internal walls of the drilled holes for full protection.
- Dry cut the worktop to size to suit the position on the carcass.
- Before fixing to the carcass – Liberally oil the ”cut to size” underside of the complete worktop with 2 coats of oil – in particular, 100 mm from the bottom newly exposed cut edges – with at least 5 applications of penetrating worktop oil to ensure protection.
- Always ensure that raw newly cut exposed 40 mm/27 mm vertical cut edges around the sink are smooth and not rough – if necessary smooth the surface with 120 grit sandpaper and apply at least 5 coats of worktop penetrating oil – finishing of the last coat while wet with oil with a 400 grit sandpaper which will buff the oil into the surface to achieve full saturation for adequate protection.
- Install the cut to size worktop to the carcass using the correct slotted brackets as per the standard instruction leaflet supplied with the worktop.
- It is essential that once installed, the underside of the worktop and the Belfast sink is fully sealed between the sink and worktop with clear silicone to ensure that any cascading water passes over the oiled vertical face and is directed back into the sink and not able to collect on the underside of the top and course water damage.
- Routed drainage grooves – always ensure that any routed grooves are always positioned in the middle of the staves and under no circumstances allow a groove over a joint as it would compromise the integrity of the joint – and it is VERY IMPORTANT for the grooves to have a correct ”fall” for drainage of water into the Belfast sink and to apply at least 7 coats of penetrating oil within the grooves and always finish off while wet with 400 grit sandpaper to ensure 100% saturation and a very smooth finish within the groove.
- Once installed apply 3 further coats of worktop oil to the top surface and 5 coats to the vertical cut out edges around the Belfast sink – finishing off the working surface and the cut edges while wet with oil using a 400 grit sandpaper, to ensure full saturation of the wood and to de nib any standing fibres and ensure a smooth very high quality fully protected surface.
- Always continue to maintain the real wood worktop as per the standard installation instructions supplied with the Silkwood pre oiled worktop.

WOCA Worktop Oil should always be applied using the following procedure:Apply the WOCA Worktop oil with either a lint-free cloth or a 4-inch short hair paint roller. Buff in the oil with a lint-free cloth and finish each coat while the surface is still wet by buffing in the oil by using a 400 grit sandpaper or similar fine grit polishing pad to maintain the ultra-smooth furniture grade finish of the factory Silwood pre-oiled worktops.Pay extra attention and apply more oil to the most vulnerable areas such as around the sink or routed drainer grooves. After 20 minutes always wipe off and dry all the excess WOCA worktop oil from all the surfaces using a lint-free cotton cloth.If excess oil is not removed it will cure and harden on the surface leaving a patchy, sticky finish.Several coats of Woca oil can be applied and buffed in one after the other when applying every coat and finally wiped dry of any excess which is essential because the Woca worktop oil is a penetrating oil that penetrates within the surface of wood up to 1 mm depth and cures and hardens via the Oxygen in the air producing the very best protection possible.


Silkwood™ worktop installation/oiling kitsEverything in one box for the initial installation oiling of either sanded or Silkwood™ factory pre-oiled real wood worktops including wood cleaner, 0.75ml can of Natural worktop oil,2 x sanding pad, 15 slotted brackets, rubber gloves, and buffing/polishing cloth with full instructions.

Woca Worktop oil
Woca Natural worktop oil in a 0.75 liter can show a QR code which can be scanned with a smartphone with the QR app linking to a video that shows how to use the product.The Woca worktop oil is best used for the initial installation and for the following two months as per instructions to ensure full protection “within the wood” – normally after the first month of insulation a further light coat is applied followed on two months later with a final light coat and buffed in with a cotton cloth.

Woca worktop gel
The Woca worktop Gel is a high solid worktop oil in a 400ml tube designed for very easy ongoing maintenance and rejuvenation of the real wood worktop when it starts to dry and could “look tired” and is very easy to apply with a small amount of Gel applied to the surface and buffed in with a clean cotton cloth – building up the maximum protection from moisture and enhancing the wood appearance and give a lifetime of satisfactory use.

WOCA Worktop Oil and Gel have been tested on the solid wood surface to the European Norms by the Wood Technology Institute within the University of Life Sciences in Poznan, Poland. Tests have proved exceptional surface resistance to moisture, contact heat in wet and dry methods, steam, temperature and humidity.WOCA products meet highest hygienic standards and conform to EN-71-3 (a test for wooden children toys) and are safe for contact with food when cured and hardened.Warning – To avoid possible spontaneous combustion always dispose of the oiling cloth/materials used immersed in water in a sealed plastic bag. Dispose safely outside the building.
Installation checklist
Complete this checklist to ensure a successful installation of your new solid wood worktops:– Worktops stored flat in their original packaging.– Stored and climatized in a room at the same temperature and humidity as that of where they are to be fitted.– Allow 3-5mm expansion gap between the rear / short edges of the worktop and the wall surface.– Extra care is taken as per instructions next to sources of constant heat.– Moisture barrier/heat protector fitted over any appliances.– Worktops fixed with slotted brackets or 10mm hole through carcass with oversize washers only using cross-grain slotted brackets to allow for movement of the wood across the depth from front to back of the worktop where most movement naturally occurs.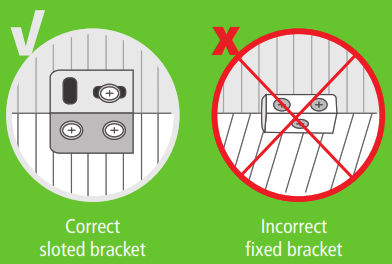 – Worktops oiled with Woca worktop Oil. A total of 4 coats minimum on edges, the top & bottom faces, and minimum 5 coats to all visible end grain.– All joints fastened with 3 worktop bolts and sealed with D3 moisture resistant glue prior to bringing the joint together.
![]()
Volume Trading (Europe) Ltd.36 Ash Grove, KirklevingtonCleveland, UK, TS15 9NQtel: +44 1642 780001www.volumetrading.co.uk
References
[xyz-ips snippet=”download-snippet”]