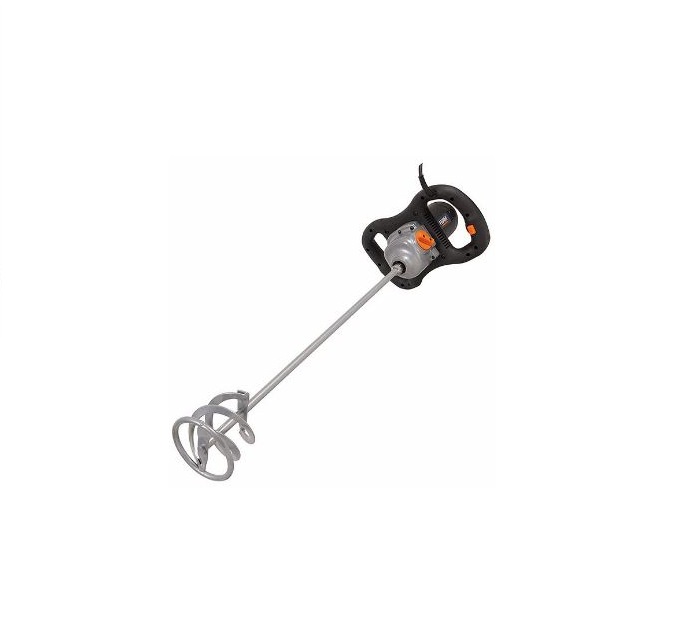
VONROC Paint/Cement Mixer

1. SAFETY INSTRUCTIONS
Read the enclosed safety warnings, the additional safety warnings, and the instructions. Failure to follow the safety warnings and the instructions may result in electric shock, fire, and/or serious injury. Save the safety warnings and the instructions for future reference.
The following symbols are used in the user manual or on the product:
![]() Read the user manual.
Read the user manual.![]() Denotes risk of personal injury, loss of life, or damage to the tool in case of non-observance of the instructions in this manual.
Denotes risk of personal injury, loss of life, or damage to the tool in case of non-observance of the instructions in this manual.![]() Risk of electric shock.
Risk of electric shock.![]() Variable electronic speed.
Variable electronic speed.![]() Wear safety goggles. Wear hearing protection.
Wear safety goggles. Wear hearing protection.![]() Wear a dust mask.
Wear a dust mask.![]() Class II machine – Double insulation You don’t need any earthed plug.
Class II machine – Double insulation You don’t need any earthed plug.![]() The product is in accordance with the applicable safety standards in the European directives.
The product is in accordance with the applicable safety standards in the European directives.
GENERAL POWER TOOL SAFETY WARNINGSWARNING! Read all safety warnings and all instructions. Failure to follow the ![]() warnings and instructions may result in electric shock, fire, and/or serious injury.
warnings and instructions may result in electric shock, fire, and/or serious injury.
Save all warnings and instructions for future reference. The term “power tool” in the warnings refers to your mains-operated (corded) power tool or battery-operated (cordless) power tool.
1) Work area safetya) Keep the work area clean and well-lit. Cluttered or dark areas invite accidents.b) Do not operate power tools in explosive atmospheres, such as in the presence of flammable liquids, gases, or dust. Power tools create sparks that may ignite dust or fumes.c) Keep children and bystanders away while operating a power tool. Distractions can cause you to lose control.
2) Electrical safetya) Power tool plugs must match the outlet. Never modify the plug in any way. Do not use any adapter plugs with earthed (grounded) power tools. Unmodified plugs and matching outlets will reduce the risk of electric shock.b) Avoid body contact with earthed or grounded surfaces, such as pipes, radiators, ranges, and refrigerators. There is an increased risk of electric shock if your body is earthed or grounded.c) Do not expose power tools to rain or wet conditions. Water entering a power tool will increase the risk of electric shock.d) Do not abuse the cord. Never use the cord for carrying, pulling, or unplugging the power tool. Keep cord away from heat, oil, sharp edges, or moving parts. Damaged or entangled cords increase the risk of electric shock.e) When operating a power tool outdoors, use an extension cord suitable for outdoor use. The use of a cord suitable for outdoor use reduces the risk of electric shock.f) If operating a power tool in a damp location is unavoidable, use a residual current device (RCD) protected supply. The use of an RCD reduces the risk of electric shock.
3) Personal safetya) Stay alert, watch what you are doing, and use common sense when operating a power tool. Do not use a power tool while you are tired or under the influence of drugs, alcohol, or medication. A moment of inattention while operating power tools may result in serious personal injury.b) Use personal protective equipment. Always wear eye protection. Protective equipment such as dust masks, non-skid safety shoes, hard hats, or hearing protection used for appropriate conditions will reduce personal injuries.c) Prevent unintentional starting. Ensure the switch is in the off-position before connecting to a power source and/or battery pack, picking up or carrying the tool. Carrying power tools with your finger on the switch or energizing power tools that have the switch on invites accidents.d) Remove any adjusting key or wrench before turning the power tool on. A wrench or a key left attached to a rotating part of the power tool may result in personal injury.e) Do not overreach. Keep proper footing and balance at all times. This enables better control of the power tool in unexpected situations.f) Dress properly. Do not wear loose clothing or jewelry. Keep your hair, clothing, and gloves away from moving parts. Loose clothes, jewelry, or long hair can be caught in moving parts.g) If devices are provided for the connection of dust extraction and collection facilities, ensure these are connected and properly used. The use of dust collection can reduce dust-related hazards.
4) Power tool use and carea) Do not force the power tool. Use the correct power tool for your application. The correct power tool will do the job better and safer at the rate at which it was designed.b) Do not use the power tool if the switch does not turn on and off. Any power tool that cannot be controlled with the switch is dangerous and must be repaired.c) Disconnect the plug from the power source and/ or the battery pack from the power tool before making any adjustments, changing accessories, or storing power tools. Such preventive safety measures reduce the risk of starting the power tool accidentally.d) Store idle power tools out of the reach of children and do not allow persons unfamiliar with the power tool or these instructions to operate the power tool. Power tools are dangerous in the hands of untrained users.e) Maintain power tools. Check for misalignment or binding of moving parts, breakage of parts, and any other condition that may affect the power tool’s operation. If damaged, have the power tool repaired before use. Many accidents are caused by poorly maintained power tools.f) Keep cutting tools sharp and clean. Properly maintained cutting tools with sharp cutting edges are less likely to bind and are easier to control.g) Use the power tool, accessories and tool bits, etc. in accordance with these instructions, taking into account the working conditions and the work to be performed. Use of the power tool for operations different from those intended could result in a hazardous situation.
5) Battery tool use and carea) Recharge only with the charger specified by the manufacturer. A charger that is suitable for one type of battery pack may create a risk of fire when used with another battery pack.b) Use power tools only with specifically designated battery packs. Use of any other battery packs may create a risk of injury and fire.c) When the battery pack is not in use, keep it away from other metal objects, like paper clips, coins, keys, nails, screws, or other small metal objects that can make a connection from one terminal to another. Shorting the battery terminals together may cause burns or a fire.d) Under abusive conditions, liquid may be ejected from the battery; avoid contact. If contact accidentally occurs, flush with water. If liquid contacts eyes, additionally seek medical help. Liquid ejected from the battery may cause irritation or burns.
6) Service a) Have your power tool serviced by a qualified repair person using only identical replacement parts. This will ensure that the safety of the power tool is maintained.
ADDITIONAL SAFETY INSTRUCTIONS
- Firmly tighten the mixing paddle and remove the spanner before starting the machine.
- Do not use the power tool for explosive materials (e. g., easily inflammable solvents). Power tools produce sparks that could ignite developing vapors.
- In case the power tool should fall into the material to be stirred, pull the plug immediately and have the power tool checked by an after-sales service agent. Material that has penetrated the power tool can cause damage and lead to an electric shock.
- Hold the machine firmly with both hands by the insulated gripping surfaces while working and keep proper footing and balance at all times. The machine is more securely guided with both hands. Loss of control can cause personal injury.
- Hold power tool by insulated gripping surfaces, when performing an operation where the accessory may contact hidden wiring or its own cord. The accessory contacting a “live” wire may make exposed metal parts of the power tool “live” and could give the operator an electric shock.
- Switch off the power tool immediately when the tool inserts jams. Be prepared for high reaction torque that can cause kickback. The tool insert jams when:– the power tool is subject to overload or– it becomes wedged in the workpiece.
- Do not mix food. Power tools and their accessories are not designed for processing food.
- Keep the cord away from the working area. The cord may be entangled by the stirrer whisk.
- The mixing container must be suitable for mixing and must stand securely. A container that is not properly secured may move uncontrolled.
- Ensure that no liquid splashes against the housing of the power tool. The liquid that has penetrated the power tool can cause damage and lead to electric shock.
- Follow the instructions and warnings in the Material Safety Data Sheets (MSDS) of the material to be mixed. Material to be mixed may be harmful.
- In the event of a power interruption, release the locking switch by pressing the on/off switch. This will prevent the power tool from restarting unintentionally (risk of injury).
- Do not use the power tool in a stand.
Electrical safety![]() Always check that the voltage of the power supply corresponds to the voltage on the rating plate label.
Always check that the voltage of the power supply corresponds to the voltage on the rating plate label.
- Do not use the machine if the mains cable or the mains plug is damaged.
- Only use extension cables that are suitable for the power rating of the machine with a minimum thickness of 1.5 mm2. If you use an extension cable reel, always fully unroll the cable.
2. MACHINE INFORMATION
Intended useThe machine is intended for mixing pulverized building materials such as mortar, plaster, adhesives, as well as solvent-free paint, varnish, and similar substances. Improper use may damage the tool.
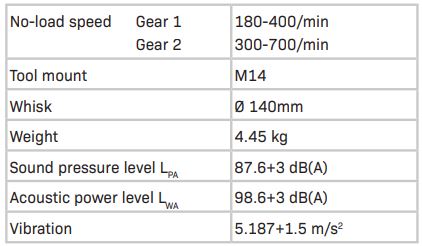
TECHNICAL SPECIFICATIONS
Vibration levelThe vibration emission level stated in this instruction manual has been measured in accordance with a standardized test given in EN60745; it may be used to compare one tool with another and as a preliminary assessment of exposure to vibration when using the tool for the applications mentioned.• Using the tool for different applications, or with different or poorly maintained accessories, may significantly increase the exposure level.• The times when the tool is switched off or when it is running but not actually doing the job, may significantly reduce the exposure level.Protect yourself against the effects of vibration by maintaining the tool and its accessories, keeping your hands warm, and organizing your work patterns.
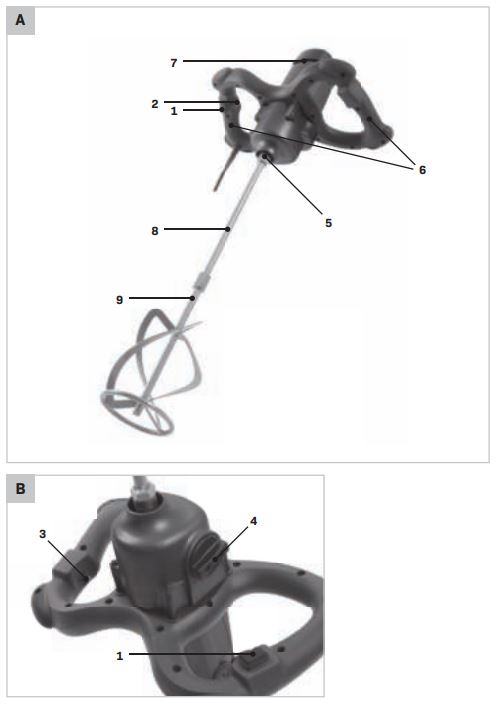
DESCRIPTIONThe numbers in the text refer to the diagrams on page 2.
- On/off switch
- Lock-on button
- Speed adjustment wheel
- Gear selector switch
- Tool holder
- Handle
- Ventilation apertures
- Whisk shaft
- Whisk paddle
3. ASSEMBLY
Assembling the two-part whisk (Fig. A)
- Screw the Whisk shaft (9A) onto the Whisk paddle (9B)
- Tighten both parts securely
Replacing the whisk (Fig. A)![]() Before assembly, always switch off the machine and remove the mains plug from the mains.Use only whisks conform to the specified diameter. Always use a whisk that is suitable for the material to be mixed/stirred. Using an unsuitable mixer bar can unnecessarily overload both the machine and yourself.
Before assembly, always switch off the machine and remove the mains plug from the mains.Use only whisks conform to the specified diameter. Always use a whisk that is suitable for the material to be mixed/stirred. Using an unsuitable mixer bar can unnecessarily overload both the machine and yourself.
Mounting the whisk
- Screw the assembled whisk into the tool holder (5) in a clockwise direction as far as possible.
- Tighten the whisk into the tool holder using the supplied spanners. To do so, hold the tool holder (5) using one of the supplied spanners, and use the second spanner to tighten the assembled whisk.
Removing the whisk
- Loosen the assembled whisk using the supplied spanners. To do so, hold the tool holder (5) using one of the supplied spanners, and use the second spanner to loosen the assembled whisk.
- Unscrew the whisk from the tool holder (5) in the anti-clockwise direction.
4. OPERATION
Switching on and off (Fig. A)
- To switch on the tool, press and hold the on/off switch (1).
- If you release the on/off switch, the tool will beswitched off.
You can lock the on/off switch by pressing the on/off switch (1) and then button (3). The switch lock can be released by briefly pressing the on/off switch.
Gear selection (Fig. B)Two mechanical speed ranges can be selected with the gear selector switch (4):
Gear 1180-400/min
Gear 2300-700/min
The necessary gear depends on the type of material mixed and it is recommended to verify it by a practical test.
Speed adjustment (Fig. B)The required speed can be adjusted by using the Speed adjustment wheel (3). Also during operation, the rotational speed can be adjusted.• To increase the speed, turn the Speed adjustment knob (3) clockwise.• To decrease the speed, turn the Speed adjustment knob (3) anti-clockwise.The required speeds depend on the material and can be determined by practical testing.
Optimum use
- For materials with low viscosity, e.g. emulsion paint, varnishes, adhesive, grouting compound, and cement slurry, a stirrer whisk with a so-called left-hand spiral is recommended for optimum use. With a left-hand spiral, the material is moved from the top downwards and the stirrer whisk is pushed upwards. Materials with low viscosity are mixed in a way that minimizes splattering, so a low speed is recommended (gear 1).
- For materials with high viscosity, e.g. plaster, concrete, cement, screed, filler, and epoxy resin, a stirrer whisk with a so-called right-hand spiral is recommended for optimum use. With a right-hand spiral, the material is moved from the bottom upwards and the stirrer whisk is pulled downwards (working its way into the mixture). Materials with high viscosity are mixed thoroughly, so a high speed is recommended (gear 2).
- For optimum results, move the power tool in an up and down motion while mixing.
- It is recommended to clean the whisk after use, for example by stirring the whisk in a bucket filled with water.
5. MAINTENANCE
![]() Always disconnect the machine from the main power supply before carrying out any maintenance work.Clean the machine casings regularly with a soft cloth, preferably after each use. Make sure that the ventilation openings are free of dust and dirt. Remove very persistent dirt using a soft cloth moistened with soapsuds. Do not use any solvents such as gasoline, alcohol, ammonia, etc. Chemicals such as these will damage the synthetic components.
Always disconnect the machine from the main power supply before carrying out any maintenance work.Clean the machine casings regularly with a soft cloth, preferably after each use. Make sure that the ventilation openings are free of dust and dirt. Remove very persistent dirt using a soft cloth moistened with soapsuds. Do not use any solvents such as gasoline, alcohol, ammonia, etc. Chemicals such as these will damage the synthetic components.
DECLARATION OF CONFORMITYPM502AC PAINT/CEMENT MIXER
![]() We declare under our sole responsibility that this product is in conformity with directive 2011/65/EU of the European Parliament and of the council of 8 June on the restriction of the use of certain hazardous substances in electrical and electronic equipment is in conformity and accordance with the following standards and regulations:
We declare under our sole responsibility that this product is in conformity with directive 2011/65/EU of the European Parliament and of the council of 8 June on the restriction of the use of certain hazardous substances in electrical and electronic equipment is in conformity and accordance with the following standards and regulations:
EN 550141, EN 550142, EN 607451, EN ISO 12100, EN 6100032, EN 6100033 2006/42/EC, 2014/30/EU, 2012/19/EU, 2011/65/EU
Zwolle, 01-11-2018![]() H.G.F Rosberg CEO
H.G.F Rosberg CEO
VONROC · Lingenstraat 6 · 8028 PM Zwolle · The Netherlands
![]()
©2018 VONROCWWW.VONROC.COM1811-15
References
[xyz-ips snippet=”download-snippet”]