![]()
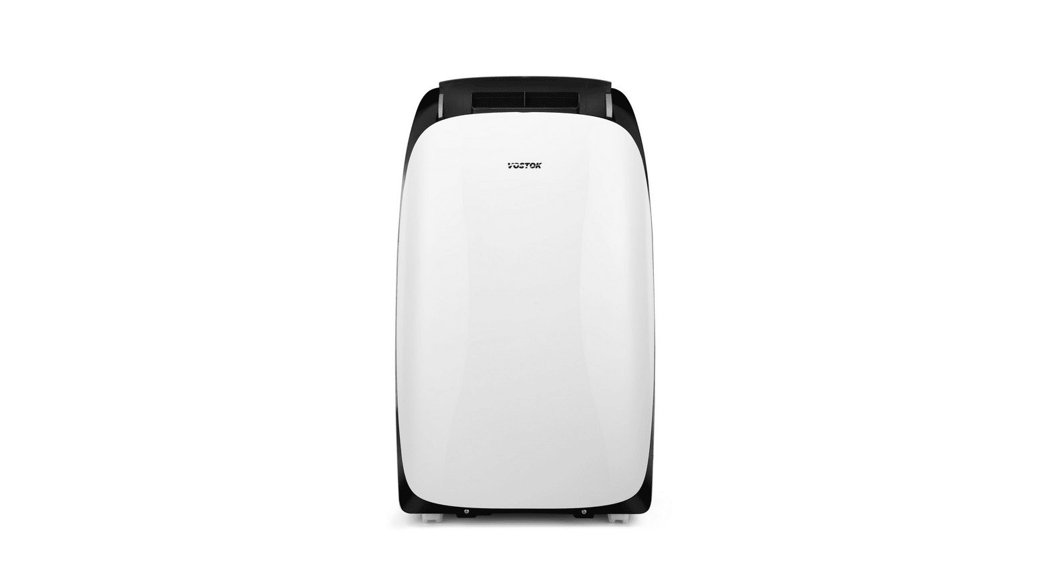
18OOO BTU Portable Air Conditioner
VOPORAIR18HA
Safety Precautions
Your safety and the safety of others is very important. Please read and follow the safety instructions both in this user manual and on the appliance itself.

- This appliance can be used by children aged from 8 years and above, and persons with reduced physical, sensory or mental capabilities or lack of experience and knowledge if they have been given supervision or instruction regarding the use of the appliance in a safe way, and given an understanding of the hazards involved.
- Children should not be allowed to play with the appliance.
- Do not install the air conditioner in a location where there is flammable gas or liquids.
- If the power supply cord is damaged, it must be replaced by a Kogan.com
- The fuse specification is AC25OV 15AL.
- Do not stick anything, including fingers or sticks, into any of the air outlets or inlets.
- Do not touch the swinging wind vanes. They may clamp or pinch your fingers, or be damaged due to having their movement blocked.
- Do not attempt to repair the air conditioner yourself.
- In the event of a lightning storm, please unplug the air-conditioner from the power supply to prevent damage from a power surge.
- Do not operate the air-conditioner in a laundry, bathroom, or other humid location.
- Do not use liquid or corrosive detergents to clean the air-conditioner. Do not splash water or other liquids onto it either, as this can cause fire or electric shock.
- Do not apply cold air from the air-conditioner directly to your body for extended periods of time.
- Clean the air-conditioner with a piece of soft, dry cloth.
- If the filter is very dirty, the cooling capacity of the air-conditioner will be weakened. Please clean the filterthe filter regularly.
Attention
Please handle this product with care and inspect it regularly to ensure it is in good working order.If the product, power supply cord or plug shows any signs of damage: stop use, unplug and contact Kogan.com/support.
Product Layout
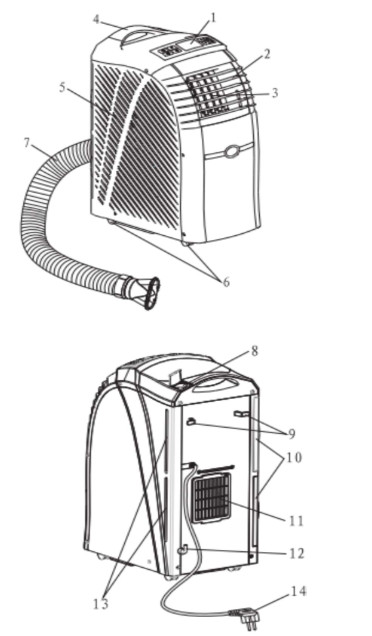
| 1. Control Panel2. Horizontal Louver3. Vertical Louver4. Handle5. Air-inlet Grille6. Castor Wheels7. Exhaust Pipe | 8. Water Injection Port9. Power Cord Clips10. Air Filter11. Air-outlet Grille12. Outer Water Tank Connector13. Inner Water Tank14. Power Cord and Plug |
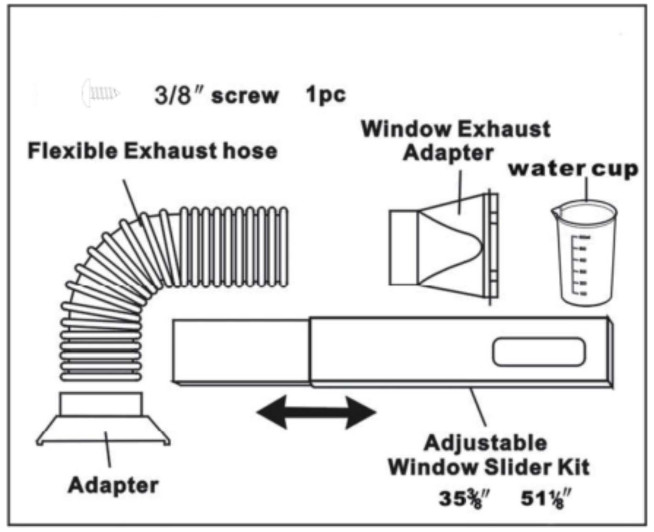
Accessories
Control Panel
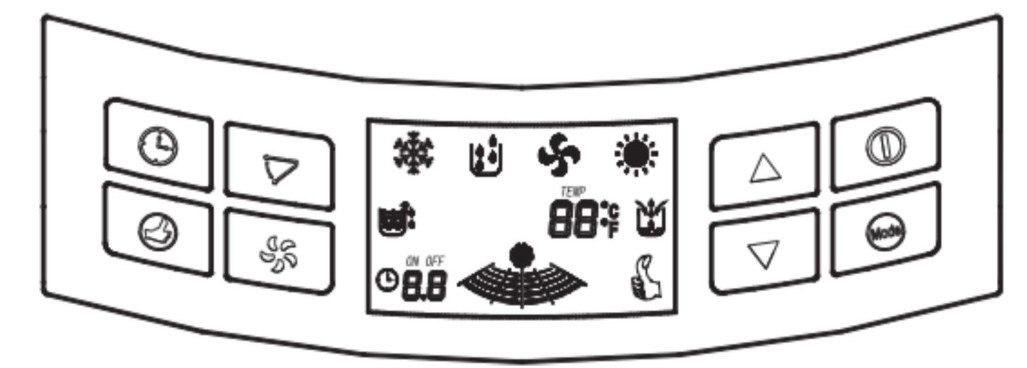
Note: if the unit is turned off in cool/dry/heat mode, then restarted, it will take 3 minutes before the unit starts running again due to the compressor resetting.
![]() ON/OFF: Press this to turn the unit on/off.
ON/OFF: Press this to turn the unit on/off.![]() MODE: Press to select cool, heat, dry or fan mode.
MODE: Press to select cool, heat, dry or fan mode.![]() UP/DOWN: press to set the temperature or adjust the timer in TIMER mode. Press both buttons together to switch from Celsius to Fahrenheit and back again.
UP/DOWN: press to set the temperature or adjust the timer in TIMER mode. Press both buttons together to switch from Celsius to Fahrenheit and back again.![]() SWING: press to make the vertical louver swing automatically. Press again to stop it.
SWING: press to make the vertical louver swing automatically. Press again to stop it.![]() SPEED: press for 5 seconds to select high, middle, or low fan speed.
SPEED: press for 5 seconds to select high, middle, or low fan speed.![]() TIMER: press to set a start-up or shut down timer.
TIMER: press to set a start-up or shut down timer.![]() ECON: press to set energy-saving mode (only available in heat and cool modes). This set temperature is 27°C in cool mode and 23°C in heat mode. The fan speed will be low. You cannot change these settings. Press again to cancel this mode.
ECON: press to set energy-saving mode (only available in heat and cool modes). This set temperature is 27°C in cool mode and 23°C in heat mode. The fan speed will be low. You cannot change these settings. Press again to cancel this mode.
LCD Display
![]() Cool mode indicator
Cool mode indicator![]() Dry mode indicator
Dry mode indicator![]() Fan mode indicator
Fan mode indicator![]() Heat mode indicator
Heat mode indicator![]() Water-Full indicator ‘
Water-Full indicator ‘![]() Temperature indicator under COOL/HEAT modes.Room temperature under FAN and DEHUMIDIFYING modes.
Temperature indicator under COOL/HEAT modes.Room temperature under FAN and DEHUMIDIFYING modes.![]() Water injection indicator
Water injection indicator![]() Time setting indicator
Time setting indicator![]() Fan speed indicator
Fan speed indicator![]() Energy-saving status (only functions in HEAT and COOL modes)
Energy-saving status (only functions in HEAT and COOL modes)
Remote Control
![]() POWER: press to turn the unit ON/OFF.
POWER: press to turn the unit ON/OFF.![]() TIMER: press to set the timer.
TIMER: press to set the timer.![]() SWING: press to make the vertical louver swing automatically. ?press again to stop it.
SWING: press to make the vertical louver swing automatically. ?press again to stop it.![]() C° -F°: press to swap between Celsius and Fahrenheit measurements.
C° -F°: press to swap between Celsius and Fahrenheit measurements.![]() COOL: press to set COOL mode.
COOL: press to set COOL mode.![]() HEAT: press to set HEAT mode.
HEAT: press to set HEAT mode.![]() DRY: press to select DRY mode.
DRY: press to select DRY mode.![]() FAN: press to select FAN mode.
FAN: press to select FAN mode.![]() UP/DOWN: press to set the temperature or adjust the timer in TIMER mode. ‘
UP/DOWN: press to set the temperature or adjust the timer in TIMER mode. ‘![]() HIGH: press to select high fan speed.
HIGH: press to select high fan speed.![]() MED: press to select medium fan speed.
MED: press to select medium fan speed.![]() LOW: press to select low fan speed.
LOW: press to select low fan speed.![]() ECON: press to set energy-saving mode (only available in heat and cool modes). This set temperature is 27°C in cool mode and 23°C in heat mode. The fan speed will be low. You cannot change these settings. Press again to cancel this mode.
ECON: press to set energy-saving mode (only available in heat and cool modes). This set temperature is 27°C in cool mode and 23°C in heat mode. The fan speed will be low. You cannot change these settings. Press again to cancel this mode.
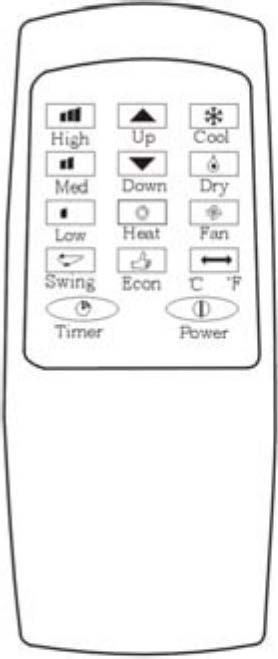
Remote Usage
- Aim the remote towards the receiver on the air-conditioner.
- The remote should be used within 8 meters of the air-conditioner.
- Do not drop or throw the
- Do not put the remote where it will be subjected to strong sunlight or other heat
- Take the battery out of the remote if it will not be used for a long
- If the remote fails to have an effect on the air-conditioner, the batteries need
- Please dispose of used batteries
Operation
WARNING: do not use an extension cord or double adapter/powerboard with this unit
Timer
- Set Timer-offPress the TIMER button when the unit is on. The LED will flash — five times. During this time, press UP or DOWN to adjust the time from O.5h (3O minutes) to 24h. For times between O.5h and 3h the time increments will be in 3O minute blocks. From 3h up to 24h the time increments will be in 1-hour blocks. The time set will flash 5 times once set. Once the set time has passed, the air conditioner will turn off automatically.
- Set Timer-onPress the TIMER button when the unit is off. From this point, follow the instructions as per setting the Timer-off above. Once the set time has passed, the air conditioner will turn on automatically.
- Change the Set TimeWhen the timer is on, you can check the remaining time by pressing the TIMER button. The time remaining will flash 5 times. While it is flashing, you can press UP or DOWN to adjust the set time. The set time can also be canceled by pressing the TIMER button again while the remaining time is still flashing.
Cooling, Heating, and Dehumidifying
Cooling Heating Operation
- Press MODE or
 choose the COOL/HEAT mode.
 - Press UP/DOWN to set the desired room temperature within a range of 18°C – 3O°C.
- Press SPEED or choose the desired fan speed.
- Alternately, you can press ECON to run the air-conditioner in automatic mode.
- Press SWING to adjust the direction of the vertical louver.
- Adjust the horizontal louver by
Dehumidifying Operation
- Press MODE or to choose DRY mode.
- The fan speed and room temperature cannot be adjusted.
- Press SWING to adjust the direction of the vertical louver.
- Adjust the horizontal louver by hand.
Fan Operation
- Press MODE or to choose FAN mode.
- Select the fan speed by pressing SPEED or
- The temperature and humidity cannot be set.
- Press SWING to adjust the direction of the vertical louver.
- Adjust the horizontal louver by hand.
NOTEIn cooling mode, when the water injection indicator light comes on, you can inject some water into the air-conditioner through the top opening to assist in the cooling process.
Installation
Selecting your location
- Install the air-conditioner in a flat, open location with the air-outlets that will not be obstructed.
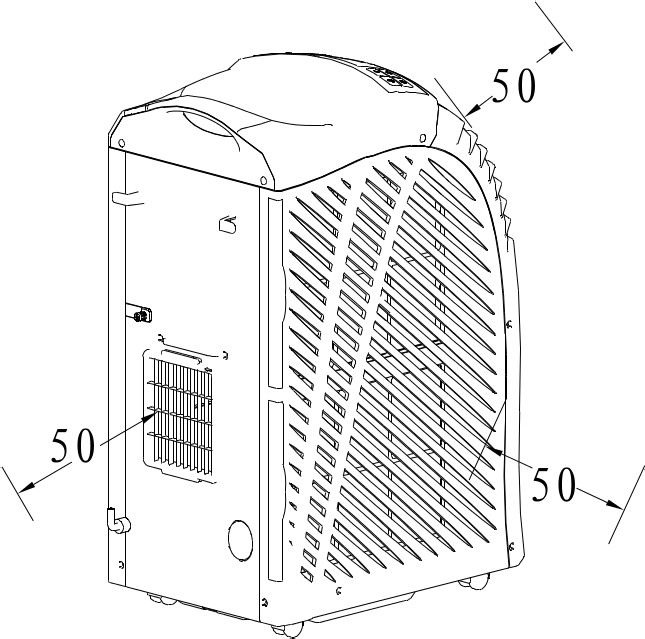
- A minimum clearance of 50cm from walls and furniture should be maintained.
- Then plug must always be easily accessible when the air-conditioner is positioned.
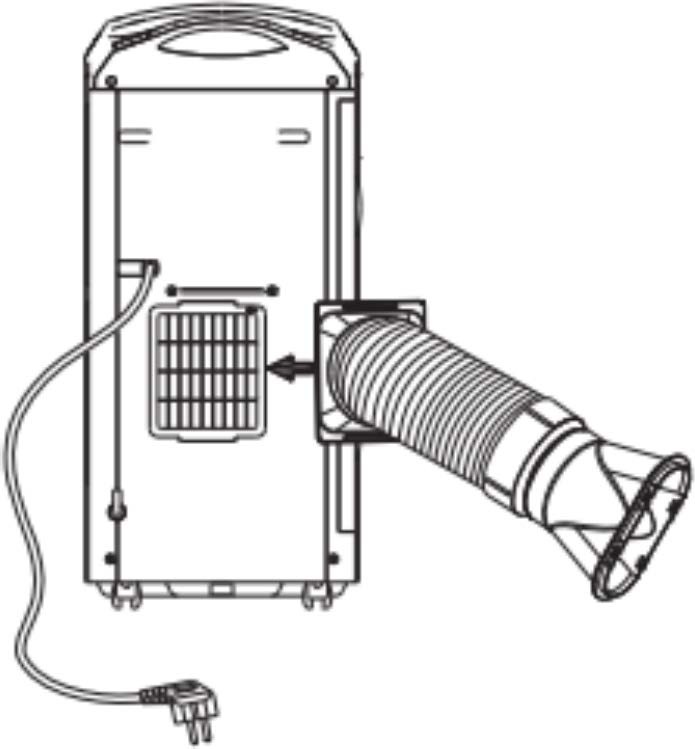
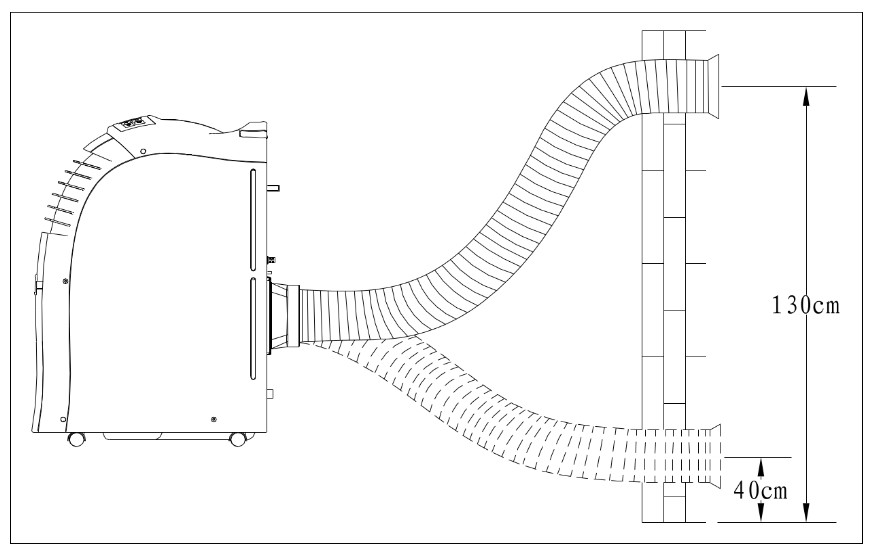
Duct mount instruction
- Attach the square end of the exhaust duct to the exhaust port in the rear of the air-conditioner, as shown to the right.
- Put the other end of the exhaust duct into the window slider kit, then place the slider kit into the nearest window.
Notes:
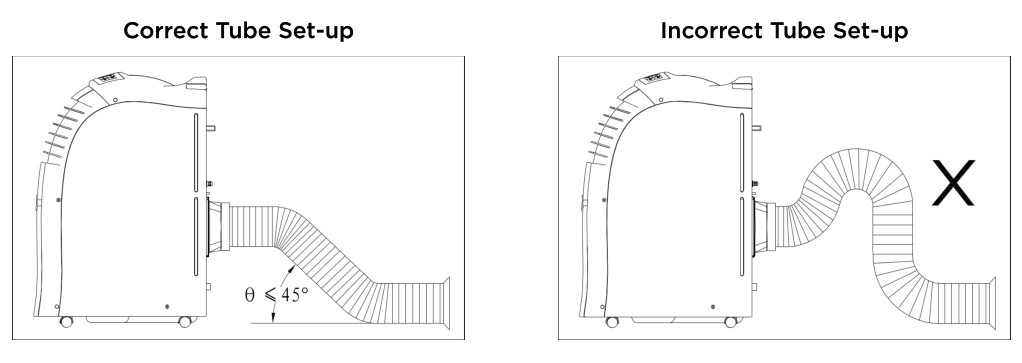
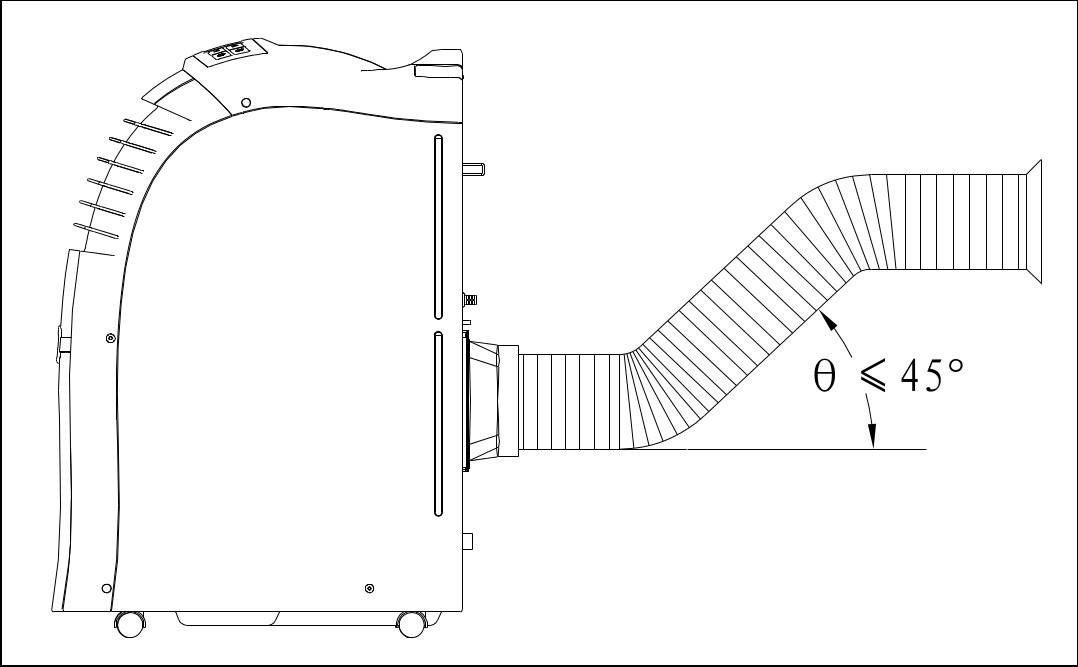
- The exhaust tube can be compressed to a minimum length of 600mm and extended to a maximum of 1800mm. It is best to keep the tube length to the minimum length possible.
- Stretching or bending the exhaust tube excessively will affect the cooling efficiency.
- Do not use an extension to the exhaust duct as this may lead to product malfunction.
Window kit installation
The window kit has been designed to fit most standard vertical and horizontal window applications. However, it may be necessary for you to improve or modify some aspects of the installation procedure for certain types of windows.Please refer to the images below for usage examples.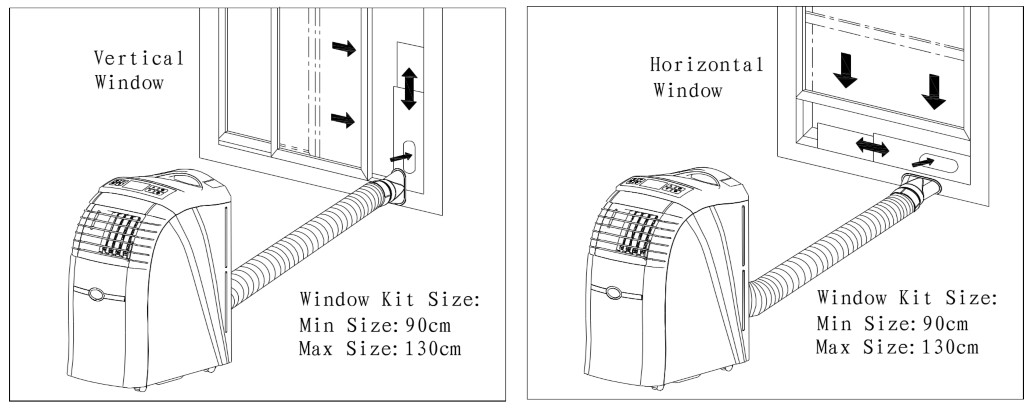
Mounting
This is an example of a permanent wall mount.
Water Injection and Drainage
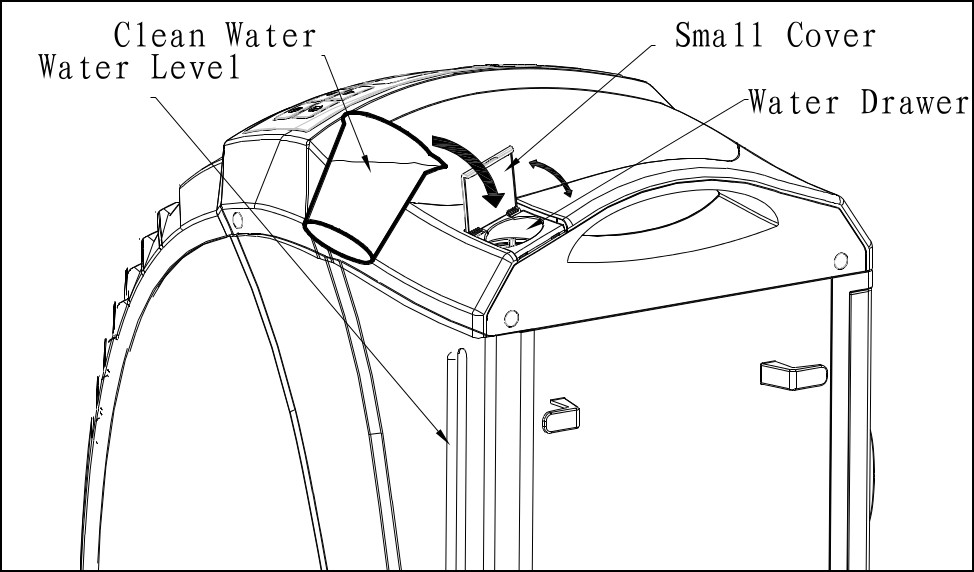
Water Injection
- By adding water to the air-conditioner during COOLING operations, you can reduce noise and save money by running more efficiently. The water is recycled through the condenser to maximize efficiency.
- If there is not enough water left to be pumped through the system, the Water Injection indicator will light up on the control panel. You can then inject more water into the water drawer which is to the right of the handle.
Drainage
- When the water tank is full, the water full indicator will light up and the compressor will stop working. The buzzer will sound 10 times every 5 minutes until the water is below the high-level mark, or has been emptied by hand. When the alarm stops and after three minutes of restart delay, the unit will begin working normally again.
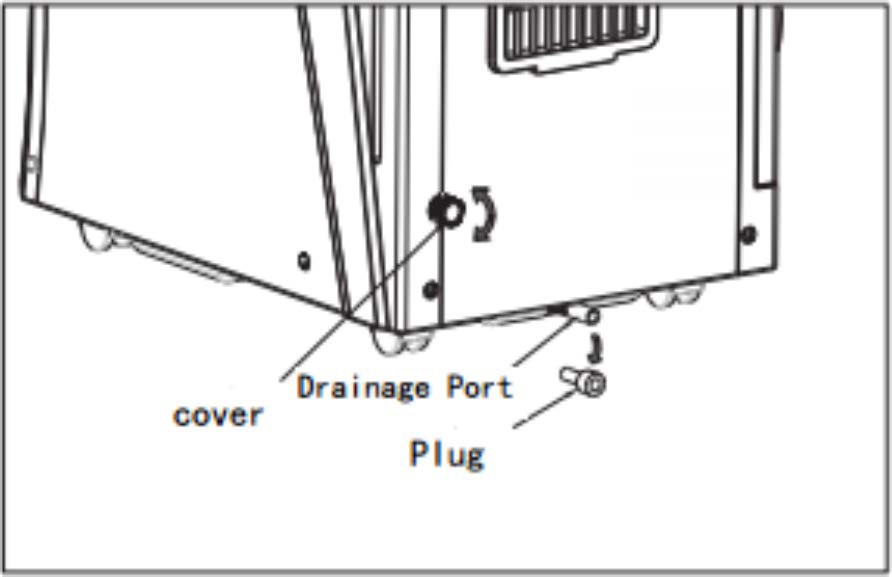
- You can drain the water out via the drainage port in the rear of the unit. Before doing so, you should put a pan or other kind of vessel under the hose to catch the water or move the air-conditioner to a location where water can be drained without causing any damage (such as the shower, or outside to the garden or driveway), then remove the plug from the drain mouth.
Note: move the unit carefully when the water is high, as water can spill from the unit.
Maintenance
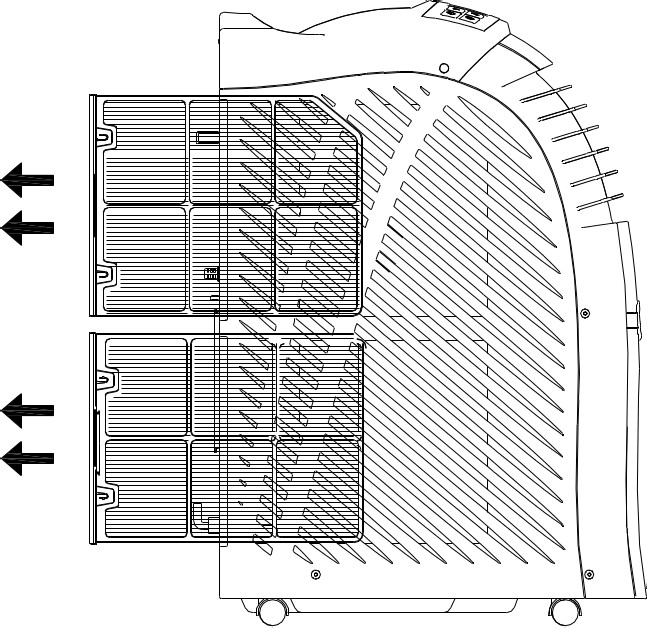
This air-conditioner is designed to give you dependable service for many years. This section will explain how to clean and care for the air-conditioner properly.Cleaning the Air FilterIf the air filter is covered with dust, the cooling capacity will be decreased. Please clean the filter every two weeks while the air-conditioner is in use.
- Turn the air-conditioner off and unplug from the power supply.
- Remove the filters as shown to the right.
- Wash the air filters in warm soapy water. Do not put the air filters into a dishwasher or use any other chemical cleaners. Ensure the filters are completely dry before replacing them.
- Put the filters back into their original positions in the unit.
Cleaning the Unit
- Before cleaning, turn the air-conditioner off and unplug from the power supply.
- Wipe the unit with a dry cloth. 3. If the unit is very dirty, wipe with a damp cloth dipped in cold water
End of Season Care
- Pull the plug out from the drain mouth and remove all water from the tank. Once the tank is empty, press the FAN button for 5 seconds until the lower fan works. Operate the unit in fan mode for about half a day until the tank is dry. This will stop the growth of mildew inside the tank.
- Switch the unit off and unplug it from the power supply.
- Store the power cable neatly on the cable hooks.
- Remove the air-exhaust duct and store it safely.
- Cover the unit with a garbage bag to stop dust from settling inside it, then store it in a dry location.
- Remove the batteries from the remote control and store it with the unit.
Troubleshooting
If you experience any issues with the air-conditioner, please refer to this table to see if you can troubleshoot and correct the problem yourself.
| Problem | Possible Cause | Possible Solution |
| Air conditioner will not operate at all | Power is not turned on at the wall. | Switch the PowerPoint on. |
| Fuse has burnt out. | Replace the fuse. | |
| Start-up timer hasn’t been triggered. | Wait or delete the original setting. | |
| Unit is not starting when pressing ON/OFF | The unit was just recently turned off and the compressor is cooling down. | Wait for three minutes before attempting to start again. |
| The room temperature is lower than the set temperature. | Reset the temperature. | |
| Air is blowing out, but the cooling isn’t very effective | The temperature setting is incorrect. | Set the proper temperature, making sure the temperature setting is lower than the ambient temperature. |
| Air filter is blocked with dust. | Clean the air filter. | |
| Air inlet or outlet is blocked. | Remove the obstacle. | |
| Air-conditioner has been turned on inside a very hot room. | Allow additional time for the air-conditioner to remove all of the heat stored in the room. | |
| Cooling capacity is insufficient | If the room being cooled down is too large for the air-conditioner, then it may not have the power required to do the task. | |
| Doors or windows are open. | Close the doors and windows. | |
| Noise or vibration | The ground is not level or flat enough. | Move the air-conditioner to a flatter, more level area of flooring. |
If you have further issues with the air-conditioner or these suggested solutions do not help, please contact the Kogan.com customer support team. Do not dispose of electrical appliances as unsorted municipal waste. Use separate collection facilities. Contact your local government or council for information regarding the collection systems available. If electrical appliances are disposed of in landfills or dumps, hazardous substances can leak into the groundwater and get into the food chain, damaging health and well-being.
[xyz-ips snippet=”download-snippet”]