VOX Mini Superbeetle audio Bluetooth Speaker

Precautions
LocationUsing the unit in the following locations can result in a malfunction.
- In direct sunlight
- Locations of extreme temperature or humidity.
- Excessively dusty or dirty locations.
- Locations of excessive vibration.
- Close to magnetic fields.
Power supplyPlease connect the designated AC adapter to an AC outlet of the correct voltage. Do not connect it to an AC outlet of voltage other than that for which your unit is intended.
Interference with other electrical devicesRadios and televisions placed nearby may experience reception interference. Operate this unit at a suitable distance from radios and televisions.
HandlingTo avoid breakage, do not apply excessive force to the switches or controls.
CareIf the exterior becomes dirty, wipe it with a clean, dry cloth. Do not use liquid cleaners such as benzene or thinner, or cleaning compounds or flammable polishes.
Keep this manualAfter reading this manual, please keep it for later reference.
Keeping foreign matter out of your equipmentNever set any container with liquid in it near this equipment. If liquid gets into the equipment, it could cause a breakdown, fire, or electrical shock. Be careful not to let metal objects get into the equipment. If something does slip into the equipment, unplug the AC adapter from the wall outlet. Then contact your nearest VOX dealer or the store where the equipment was purchased.
Introduction
Thank you for purchasing the VOX MINI SUPERBEETLE AUDIO Bluetooth Speaker. To help you get the most out of your new instrument, please read this manual carefully.
Setup
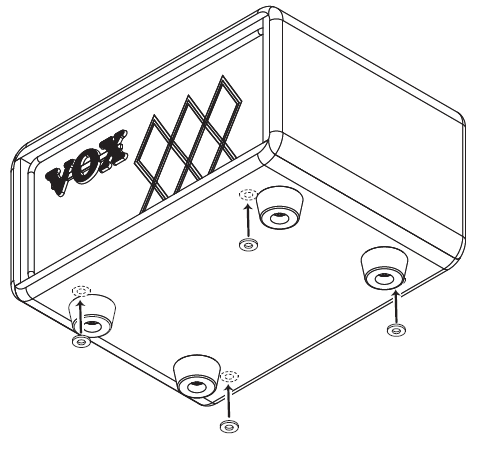
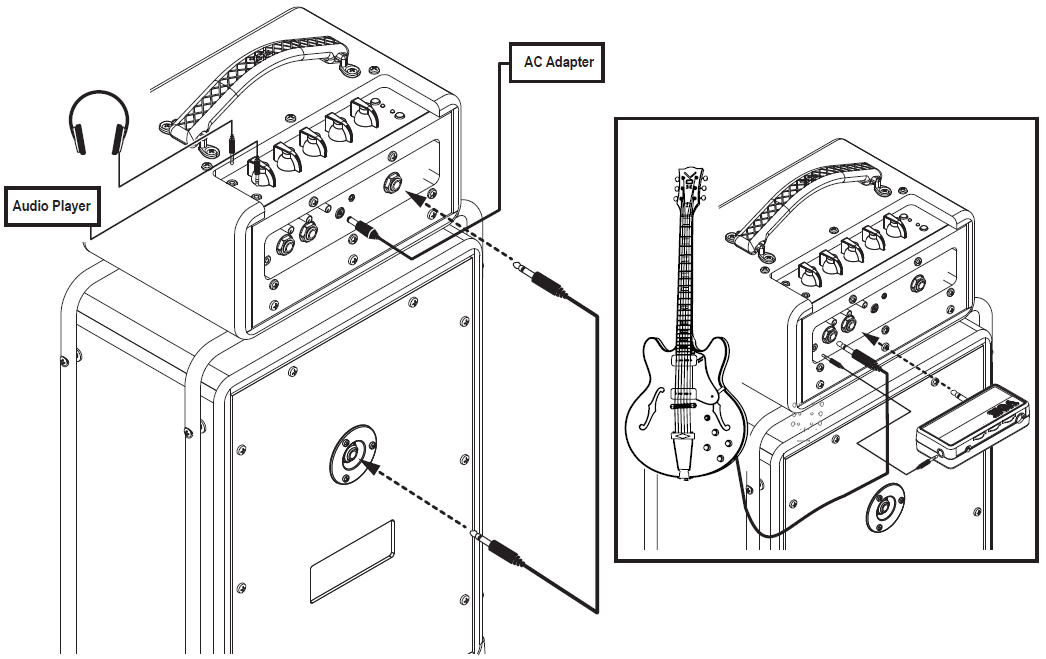
- Set the amp head on the frame top of the speaker cabinet.If the amp head does not seem to solidly rest on top of the speaker cabinet when stacked, attach the included cushions to the bottom of the amp head (at the position shown in the illustration), so that it comes into contact with the speaker cabinet frame at the top of the speaker.

- Plug the speaker cable that’s connected to the speaker cabinet into SPEAKER OUTPUT jack.Please make sure the amp is turned off when you connect the speaker cabinet.
- Turn the VOLUME knob on the amp head to the minimum level.
- Connect the supplied AC adapter to the power cord. Insert the DC plug end into the DC 19 V jack. Next, plug the power cord into an AC outlet.
- Be sure you’re using an AC power outlet of the correct voltage for your unit.
- Use only the supplied AC adapter. Using any other AC adapter may cause malfunctions.
- Hold down the power button to turn on the amp.

Auto power-off function
The amp has an auto power-off function. The amp automatically turns off if no sound is output and no knob or button is operated for approximately 1 hour. Once the amp turns off, it does not turn on again when a knob or button is operated. After the amp turns off, turn it on again.
- When the output level is extremely low or there is very little change in the sound, the amp may treat that as if “no sound is output.” In addition, depending on the settings, connections and environment, the amp may treat noise as if “sound is being output,” even if there is no audio or guitar input.
- The auto power-off function will not operate while the amp is connected to another device via Bluetooth.
Part Names and Functions
Amp Head Section
Top Panel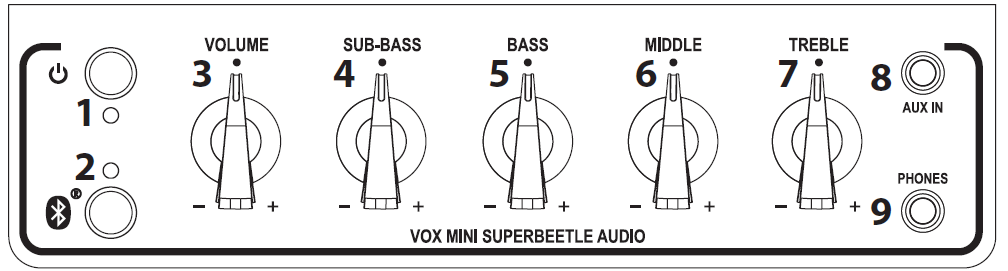
- Power button, LED: Hold down this button to turn on or off the amp.
- BLUETOOTH button, LED: Use when connecting other devices via Bluetooth (¬ “Connecting a Bluetooth Audio Device”(p.8).)
- VOLUME knob: Adjusts the volume of the SPEAKER OUTPUT jack and PHONES jack.
- SUB-BASS knob: Adjusts the ultra-low-frequency range of the audio input.
- BASS knob: Adjusts the low-frequency range of the audio input.
- MIDDLE knob: Adjusts the mid-frequency range of the audio input.
- TREBLE knob: Adjusts the high-frequency range of the audio input.
- AUX IN jack: Connect an audio player to this jack.
- PHONES jack: Use this jack if you want to use headphones. The output level is adjusted with the VOLUME knob.When a plug is connected to this jack, no sound will be output from the SPEAKER OUTPUT jack.
Rear Panel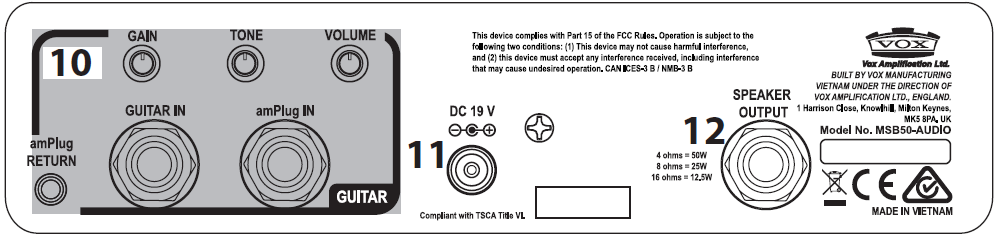
- Guitar amp section: “Connecting a Guitar”(p.8)
- DC 19 V jack: Connect the included AC adapter here.
- SPEAKER OUTPUT jack: Connect the speaker cable to this jack. The minimum speaker’s impedance is 4 ohms, and you will get approx. 50 W output with 4 ohms, 25 W with 8 ohms, and 12.5 W with 16 ohms load. Connect the included speaker cabinet to any of the jack.
- Make sure that the impedance of the speaker cabinet is not less than 4 ohms.
- This is BTL (Bridge-Tied-Load) output. This means both tip and sleeve is the signal line, and sleeve is not grounded. Only use this jack for connecting speakers to the amp. Connecting anything else may result in damages to the amp.
- The VOX MINI SUPERBEETLE AUDIO has a built-in protection system that prevents damage should unusual circumstances occur. If the sound cuts out for a few seconds, don’t worry, this is the amp protecting itself and your speakers. If you find this happens, simply reduce the volume on the amp slightly.(This protection only occurs with 16 ohms speakers. 8 ohms and 4 ohms speakers are unaffected.)
Speaker Cabinet Section
The speaker cabinet of the VOX MINI SUPERBEETLE AUDIO has one 6.5-inch woofer and one 1-inch tweeter, each VOX custom-made. Just plug into the cabinet and you’ll hear what we mean!
Connecting a Bluetooth Audio Device
If a computer, tablet, smartphone, audio player, etc., compatible with Bluetooth audio is connected via Bluetooth, this amp can be used as wireless speakers. Tip Multiple devices cannot be connected at the same time.Connecting a new device (pairing)When a new device is connected, “pairing” (mutually registering connection information) must be performed.Tip: The information for up to eight paired devices can be stored. When a ninth device is paired, the information for an existing device is deleted so that the new information can be stored.Even if pairing failed, the information for that device may be stored on the amp. If the information for eight devices has already been stored, the information for an existing device is deleted.In order to reconnect to the device whose information was deleted, delete the amp’s information from that device, and then perform pairing again.
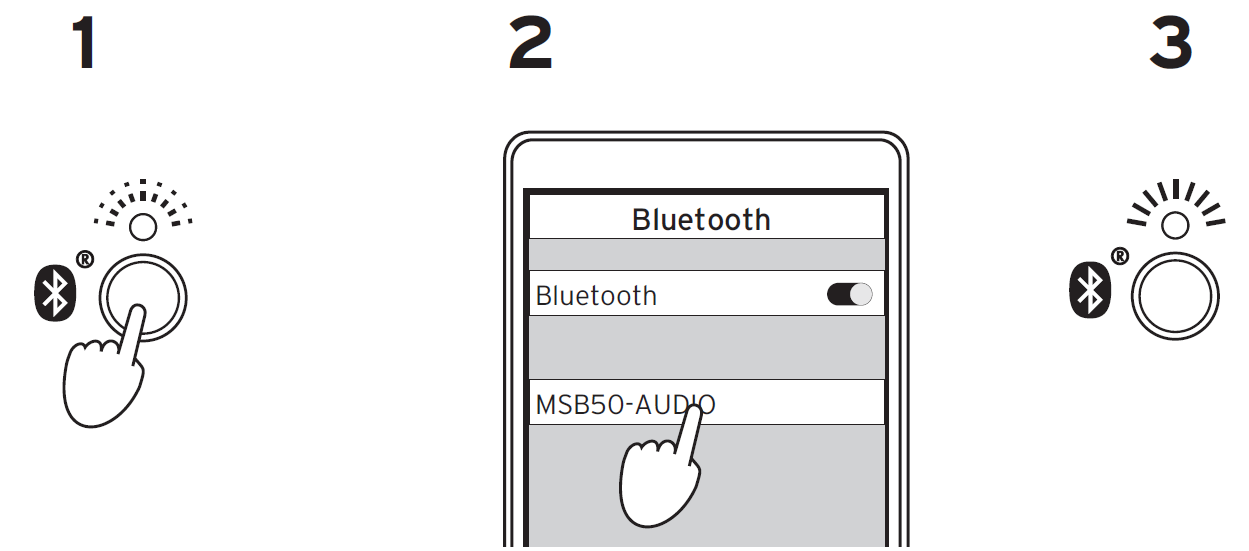
- Press the BLUETOOTH button on this amp. The amp enters a waiting for pairing mode, and the BLUETOOTH LED blinks.
- Turn on the Bluetooth function for the device to be connected to, and then select “MSB50-AUDIO” from the list of options on your device. When a message appears, requesting permission for pairing, allow pairing. When a passkey is requested, enter “0000”.Tip: The passkey may also be called a PIN code, password, etc.
- If pairing is successful, the amp enters a connection ready mode, and the BLUETOOTH LED changes to lit.Tip: If no connection is established within 1 minute, the waiting for pairing mode is canceled (LED turns off).
Reconnecting to a paired device
- While the amp is in the waiting for pairing mode (Bluetooth LED is blinking), press the BLUETOOTH button to try to reconnect with a previously connected device (LED blinks quickly).
- If the connection is established, the BLUETOOTH LED changes to lit.
Tip:
- If no connection is established within 10 seconds, the reconnection is stopped (LED turns off).
- A reconnection can also be made by selecting “MSB50-AUDIO” in the Bluetooth settings screen on the device to be connected to.
- If the reconnection is performed using operations on this amp, a connection will be re-established automatically in the future simply by turning on the amp. To set the amp so that it does not automatically reconnect, press the BLUETOOTH button while the LED is blinking quickly in step 1 to cancel automatic reconnection.
Cutting the connectionTo cut a Bluetooth audio connection, press the BLUETOOTH button while the BLUETOOTH LED is lit. The connection is cut, and the LED turns off.
Troubleshooting a Bluetooth connection
Depending on the settings for the other device and timing of the operations, a connection may fail to be established several times, or the Bluetooth function on this amp may become unstable. If either of these occur, check the settings for the other device, and follow the procedure described below to reset the Bluetooth function on this amp.Tip: When this procedure is performed, the Bluetooth connection will be cut.Tip: Even after this procedure is performed, information for other devices, which is stored on this amp, will not be deleted.
- Hold down the BLUETOOTH button for at least 3 seconds.
- After the BLUETOOTH LED begins to blink very quickly, release the BLUETOOTH button.
- When resetting is completed, the LEDs turn off.Tip: If the problem is not resolved, even after resetting, delete the connection information for this amp from the other device, and then perform pairing again.
Connecting a Guitar
Connect a guitar to use the VOX MINI SUPERBEETLE AUDIO as a guitar amp. Connect an amPlug (sold separately) to enjoy a variety of amp sounds and playing styles. For details on making connections, refer to “Connections”.
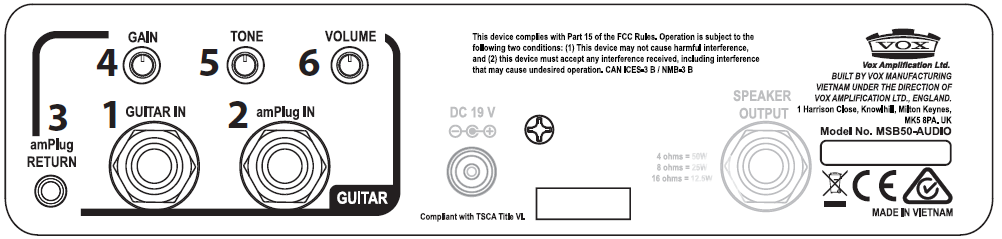
Guitar amp section
- GUITAR IN jack: Plug in your guitar here.
- mPlug IN jack: Insert the input plug of the amPlug (sold separately).Increasing the GAIN or VOLUME control too much on the amPlug may result in unexpected distortion or feedback. If this occurs, lower the GAIN or VOLUME control.When an amPlug is connected, the GUITAR GAIN knob, GUITAR TONE knob and GUITAR VOLUME of the VOX MINI SUPERBEETLE AUDIO cannot be used.
- amPlug RETURN jack: Use the included stereo mini phone cable to connect to the PHONES jack of the amPlug.Before making connections, turn off the amPlug, and set the VOLUME knob on this amp to the minimum position. After making all connections, turn on the amPlug.Tip: If no sound is produced, check the battery in the amPlug.
- GUITAR GAIN knob: Adjusts the gain of the guitar amp.
- GUITAR TONE knob: Adjusts the tone of the guitar amp.
- GUITAR VOLUME knob: Adjusts the amp output level of the guitar connected to the GUITAR IN jack.
Pairing
Connections
THE FCC REGULATION WARNING (for USA)
NOTE: This equipment has been tested and found to comply with the limits for a Class B digital device, pursuant to Part 15 of the FCC Rules. These limits are designed to provide reasonable protection against harmful interference in a residential installation. This equipment generates, uses, and can radiate radio frequency energy and, if not installed and used in accordance with the instructions, may cause harmful interference to radio communications. However, there is no guarantee that interference will not occur in a particular installation. If this equipment does cause harmful interference to radio or television reception, which can be determined by turning the equipment off and on, the user is encouraged to try to correct the interference by one or more of the following measures:
- Reorient or relocate the receiving antenna.
- Increase the separation between the equipment and receiver.
- Connect the equipment into an outlet on a circuit different from that to which the receiver is connected.
- Consult the dealer or an experienced radio/TV technician for help.
If items such as cables are included with this equipment, you must use those included items. Unauthorized changes or modification to this system can void the user’s authority to operate this equipment.
SUPPLIER’S DECLARATION OF CONFORMITY (for USA)
Responsible Party : KORG USA INC.Address : 316 SOUTH SERVICE ROAD, MELVILLE, NYTelephone : 1-631-390-6500Equipment Type : BLUETOOTH SPEAKERModel : MSB50-AUDIOThis device complies with Part 15 of FCC Rules. Operation is subject to the following two conditions:
- This device may not cause harmful interference, and
- this device must accept any interference received, including interference that may cause undesired operation.
This transmitter must not be co-located or operated in conjunction with any other antenna or transmitter.
This equipment complies with FCC radiation exposure limits set forth for an uncontrolled environment and meets the FCC radio frequency (RF) Exposure Guideline. This equipment has very low levels of RF energy that it deemed to comply without maximum permissive exposure evaluation (MPE).
This device complies with Industry Canada licence – exempt RSS standard(s). Operation is subject to the following two conditions: (1) this device may not cause interference, and (2) this device must accept any interference, including interference that may cause undesired operation of the device.
European Union Directives Conformance StatementKorg Inc. hereby declares that the product meets the requirements of Directive 2014/53/EU.You can view the Declaration of Conformity (DoC) to Directive 2014/53/EU in the Owner’s Manual of this product posted on the VOX website ( www.voxamps.com ).
Notice regarding disposal (EU only)If this symbol is shown on the product, manual, battery, or package, you must dispose of it in the correct manner to avoid harm to human health or damage to the environment. Contact your local administrative body for details on the correct disposal method. If the battery contains heavy metals in excess of the regulated amount, a chemical symbol is displayed below the symbol on the battery or battery package.
[xyz-ips snippet=”download-snippet”]