
VOXICON P25WL Wireless Pro Mouse + 2.4Hz

Product Features
- Dual Mode : Bluetooth + 2.4GHz Technology (distance 6~8m)
- 79 channels for Bluetooth 5.0 ; 16 Channels for 2.4GHz
- 1-to-3 PC switchable
- A 3-stage switch for each and clear PC switch
- Nano receiver.
- Longer battery life
- 800/1600 switchable.
- 2*AA Alkaline batteries included.
- Mouse Dimension: 98.4 x 63.6 x 39.5 mm ; Receiver dimension: 17.6 x 15 x 6 mm
(ǃ) Note:
- This product doesn’t include a Bluetooth dongle.
- The mouse easily connects to computers built in Bluetooth Low Energy technology.
- The mouse also can be connected to Bluetooth Low Energy dongle through your Bluetooth dongle driver. It is not guaranteed 100%compatible.
System Requirements
- Microsoft Windows 8 /10 or MAC OS X (Button functions may differ on a MAC).
- O.S. is required to be built with Bluetooth Low Energy technology.
- USB Port for 2.4GHz connection.
Product Functions

- Left Button
- Right Button
- Vertical Scroll Wheel / Middle button
- Internet Explorer Forward
- Internet Explorer Backward
- DPI Switch button to switch between 800/1600 DPI
- Red LED indicator:
- Power ON indicator: ON for 6 seconds when Power is switched to ON.
- Low Power Indicator: Flash for 6 seconds when battery power is low.
- DPI switch indicator: Flash once or twice when switched to 800 or 1600 dpi
- Bluetooth Pairing indicator: Flashing slowly in Bluetooth pairing mode until pairing is complete
- PC Switch indicator: ON for 3 seconds
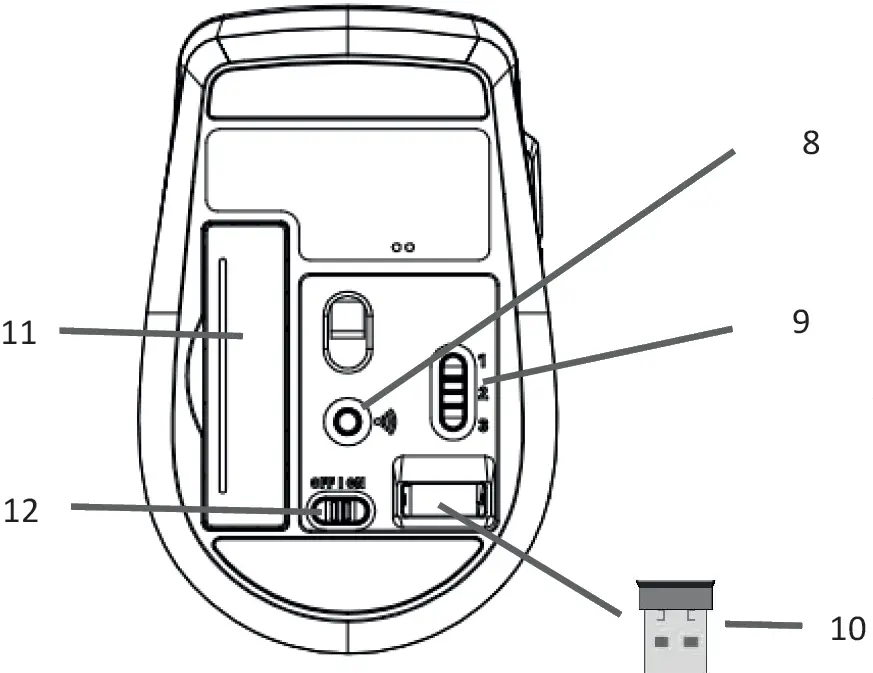
- Bluetooth Connect Button
- 3-Stage Switch for PC1(Bluetooth) / PC2(Bluetooth) / PC3(2.4GHz) switch
- Nano Receiver
- Battery Cover
- Power On/Off Switch
Operation
- Insert the batteries
- Lift the battery cover up.
- Insert Alkaline battery AAA x 2pcs. Please ensure the batteries’ polarities (+/-) match the battery compartment’s polarities.
- Close the battery cover.
- Switch the Power on-off switch on the bottom of the mouse to the ON position.
- The Red LED Indicator on the top case will be on for 6 seconds when the power is switched on.

(ǃ) Note:
- The unit offers a strong power saving management. Once the mouse accesses the sleeping mode, to slide the mouse can wake it up.
Power On/Off:
- To save energy for long period of non-usage, switch the On/Off button to Off position to turn off the mouse.
- Connect the receiver for PC3
- Switch the PC to PC3 for 2.4GHz.
- The Red LED will be ON for 3 seconds when switching PC.

- Turn on your PC.
- Plug the receiver into the USB port on PC.
- 2.4GHz Wireless Communication : the mouse & the receiver
- Make sure the Power On/Off Switch on the bottom of the mouse is ON.
- The mouse and receiver have been successfully linked when the cursor’s movement mimics that of the mouse.(ǃ) Note:
- The mouse, while working if encountering any interference, will automatically source out with the receiver and transfer to another free channel. During the transferring, the cursor movement may have a second delay.
- PC Switch
- Press the PC switch button to switch between PC1(Bluetooth) / PC2(Bluetooth /PC3(2.4GHz)
- The Red LED will be ON for 3 seconds when switching to next PC.
- Bluetooth Pairing
- Switch the PC switch button to PC1 or PC2 for Bluetooth connection.
- Press the Bluetooth connect button to enter the pairing mode. The Red LED will flash slowly.
- Open Bluetooth setting application by clicking the Bluetooth icon on toolbar.
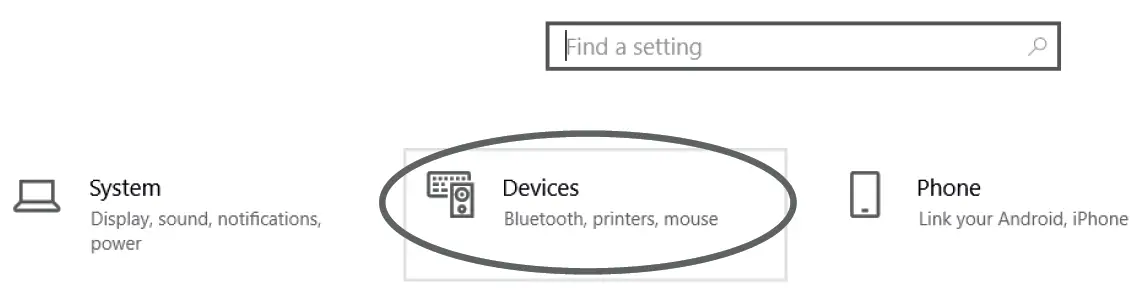
- Or click Setting, and then select “Device” to open Bluetooth setting application.
- Click “Add Bluetooth or other device”.
- Click “Bluetooth”.
- Now your computer has found out the Mouse. Click it.
- Red LED flashing stops and the cursor’s movement mimics that of the mouse.
- Resolution Switch Between 800 / 1600 dpi Press DPI switch button to switch between 800/1600 dpi for your better cursor moving speed experience.


(ǃ) Note:
- The Red LED on the mouse top is the low battery power indicator. Its 6-seconds flashing indicates that the batteries inside the mouse are needed to be replaced.
Troubleshooting
- Make sure you have put the batteries in correction directions, and power switch is ON.
- Make sure you switch to the correct PC that you are working with.
- For PC1, PC2, Bluetooth connection, make sure you have finished the pairing between the mouse and your computers.
- Check in the Bluetooth setting application if Bluetooth status is ON. If not, turn it ON.
- Make sure your computer is built in Bluetooth 4.0 or 5.0. If not, a Bluetooth 4.0 or 5.0 dongle is required.
- For PC3, 2.4GHz connection, make sure you have connected the receiver correctly to the computer’s USB port.
- Try another USB port, in case that your USB port is loose.
- Replace new batteries if needed when the battery power is low.
- If mouse performance is slow or intermittent around a wireless network, unplug the Nano receiver from the USB port and then re-insert it. To reactivate the mouse, switch it on, off and on again using the On/Off switch on the bottom of the mouse.
- Repeat the connection procedure. You can also try moving the mouse closer to the Nano receiver.
- Try other working surface which the mouse is operating on.
- For the best performance, we suggest that you place the receiver away from other electrical devices.
Battery Use Reminders
- Remove worn-out batteries from equipment immediately and dispose of them properly.
- Keep all batteries (used or new) out of the reach of children.
- Never dispose of batteries in fire.
- Do not mix old and new batteries. Do not mix alkaline, standard (Carbon-Zinc), or rechargeable (Nickel Cadmium) batteries.
- Remove the batteries from this device if the device will not be used for a long period of time.
- If the performance of the battery decreases substantially, it is time to replace the battery.
FCC Statement
This equipment has been tested and found to comply with the limits for a class B digital device, pursuant to Part 15 of the FCC Rules. These limits are designed to provide reasonable protection against harmful interference in a residential installation.This equipment generates uses and can radiate radio frequency energy and, if not installed and used in accordance with the instructions, may cause harmful interference to radio communications. However, there is no guarantee that interference will not occur in a particular installation if this equipment does cause harmful interference to radio or television reception, which can be determined by turning the equipment off and on, the user is encouraged to try to correct the interference by one of the following measures:
- Reorient or relocate the receiving antenna.
- Increase the separation between the equipment and receiver.
- Connect the equipment into an outlet on a circuit different from that to which the receiver is connected..
To assure continued compliance, any changes or modifications not expressly approved by the party responsible for compliance could void the user’s authority to operate this equipment. (Example-use only shielded interface cables when connecting to computer or peripheral devices).
This device complies with Part 15 of the FCC Rules. Operation is subject to the following two conditions:
- This device may not cause harmful interference. And
- This device must accept any interference received, including interference that may cause undesired operation.
For a smarter way of life.
 report this ad
![]()
[xyz-ips snippet=”download-snippet”]