VOXX Intelligent Rearview Mirror RVM740SM
Copyright
- The copyright of this manual is reserved by VOXX Electronics. This manual may not be copied, reproduced or translated in whole or in part with out the express written permission of our company.
- Our company reserves the right to improve this product, hardware and software.
- Our company reserves the right of final interpretation for this manual.
Safety Precautions
- To ensure the traffic safety and avoid contravening the traffic regulations, do not watch any program or operate this system during driving.
- For safety and current operation of the product, the product should be installed by professional. Do not disassemble or repair the product by yourself to avoid any accidental damage to theproduct.
- To avoid electric shock, damage and fire resulting from short-circuit, do not place the product in water or places where this product may get wet.
- The reverse camera should be used as an assistant tool only. Our company is not responsible for any potential vehicle damage or injury.
Care and maintenance
- Please don’t insert coins or metal objects.
- Please don’t try to repair by yourself.
- Please don’t let the display screen incur moisture, dust or excessive temperatures.
- Please don’t place the product in direct sunlight for extended periods of time.
- Please don’t use thinner or other chemicals to wipe the surface of display screen. The dirt should be wiped off with a soft cloth.
- This product is designed with a 12V negative grounded automotive battery system.
- Please don’t unplug while in the boot state, installing a TF card, connecting wires or accessories in order to avoid damage to the mirror.
- When you operate the function button, please wait for the system to perform the function before attempting any other function. Fast operation may cause system delay. If the system is malfunctioning, switch off and on and then press the reset button in the boot state. During a call, please do not operate other functions except volume control, otherwise it may cause interruption of the call.
Note: In the process of using, clean machine memory regularly to ensure smooth operation of the machine.
Notes before use
- This product is made up of many electronic components. Improper disassembly or modification may damage the product. If something is broken or not functioning properly, please immediately Turn off the power and notify the company or the distributor.
- Please don’t expose the screen to moisture, dust, steam, soot and other pollution; If the screen requires cleaning, please turn off the power.
- Please don’t use thinner or other chemical cleaner to wipe the surface of the screen. Wipe off the surface dirt with soft cloth. Please don’t use detergent containing organic solvent so as to avoid damaging of the surface film which may affect use of touch screen.
- If this product is exposed to water or other objects, cut off the power immediately and contact the company or the distributor.
- Please don’t turn on and off frequently. After a period of time, if the temperature is too high, it is recommended to stop for a period of time, so as not to affect the service life of the product.
- Please don’t attempt to supply power to the product outside the body so as not to burn the inner components of the product.
- Do not let the product work long hours in high temperature and humid environment, so as to avoid malfunction or other dangers. Please don’t set the volume of the system too high, otherwise you might not be able to hear the traffic outside the car and SOS.
- Please stop using this machine during extreme weather conditions to avoid distracted driving.
- The following conditions will affect the normal operation of this product:
- Factors such as inclement weather or geographical location of the car may affect the product’s wireless network and GPS access signal GPS positioning navigation may be affected.
- Bad weather and low light may affect the use of the rear view camera.
- Please do not use the left and right rear view camera image for regular driving awareness. These views should only be used for reversing.
- Please pay attention to environmental protection. Don’t throw this product away at will.
Product Brief
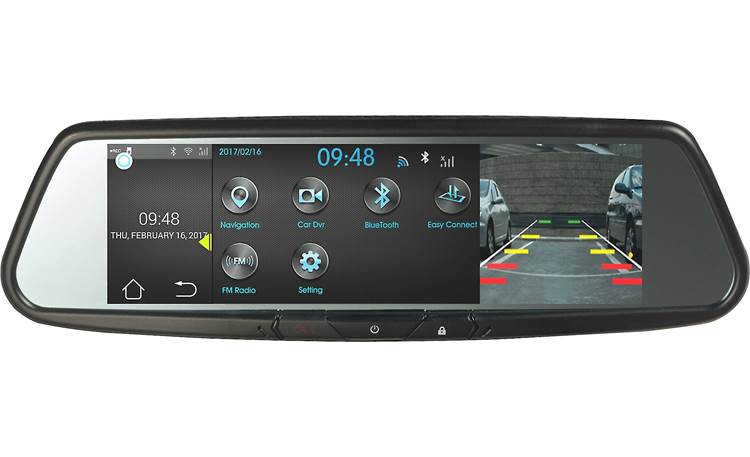
This product is an intelligent rearview mirror, with 7.84 inch screen that has a resolution of 1280X400. The product supports multiple functions including:
- Navigation
- DVR
- Bluetooth
- WIFI
- FM transmission
- Access to mobile applications
- Gesture sensing
- Reverse camera connection and other functions.
NOTE: This product supports TF Cards sizes up to 32gb.
Gesture ControlGesture sensing uses free touch technology, through various sensor within the mirror that process user’s gestures that are compatible with various mirror functions. Gestures sensor light is on the bottom left of the Rearview mirror.
- Wave your hand from right to left to turn on the LCD screen.
- Waver your hand from left to right to turn off the LCD screen.
Button Definitions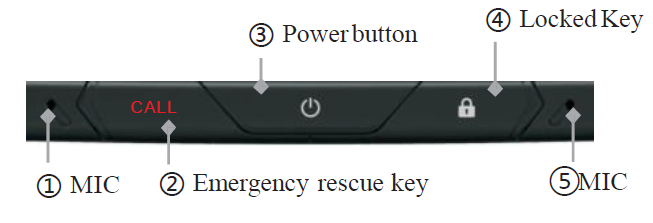
- Bluetooth Microphone
- The CALL button will automatically make an emergency call via the paired phone.
- After startt up, click the button to enter the night mode. Click once more, the screen enter to black screen .
- Click to lock or unlock the current video file. Locked files will be saved for future review. Unlock video files can be overwritten when the memory is full.
- Bluetooth Microphone
Basic Operation
Turn on/off
When the car starts up, the system will automatically start and enter the main interface. When you need to turn it off, press and hold the power button for 3 seconds to shut down. Click the button shortly to start the mirror. When the car is turned off, the system records the state of the mirror (On/Off). If the mirror is on, when the car is turned off, the mirror will start automatically. If the mirror is off, when the vehicle is turned off, the mirror will not start automatically. Press the power button to boot. Regardless of the state above, when you need to reverse the product will automatically display reversing camera. The power button has DAY / NIGHT / SCREEN OFF modes. When powered on, short press the “power” button, the screen will reduce brightness and enter night mode. Press the “power” button twice and the screen will be turned off. Press again and the screen return to the daytime mode. Day and night mode screen brightness control can be adjusted in the general Settings; Long press the power button 6 seconds and the screen will turn off .
Main Interface
When you boot into the home screen, you will see the navigation, traffic track record, bluetooth phone, EASY CONNECT, FM, universal settings and APP choices.In this interface, on the left side of the screen, a hidden system toolbar will be displayed in the bottom area. Within the toolbar contains the volume decreases, volume increase, mute, shortcut to screen brightness and other functions. The time and connection status (such as Bluetooth and WiFi state status information) are displayed here as well.
NOTE: GPS NAV is an optional add on to this system.In the main menu press the ” GPS Navigation ” button to enter the navigation mode. Navigation is based on the destination set by the user, the system will calculate the best route, display the roads and traffic signs with high-precision graphics.
In navigation mode, only the touch screen functionality of the navigation software will be available. If other functions are needed, you must exit the navigation mode.
Music function during navigationYou can enjoy music or video in the former state when navigation voice indication is off; the system will automatically switch to the navigation map interface for up and coming directions.
Volume adjustment
- Under navigation status and when there is music output, you can adjust the system volume.
- Under the voice navigation status, it is only for NAV volume adjustment.
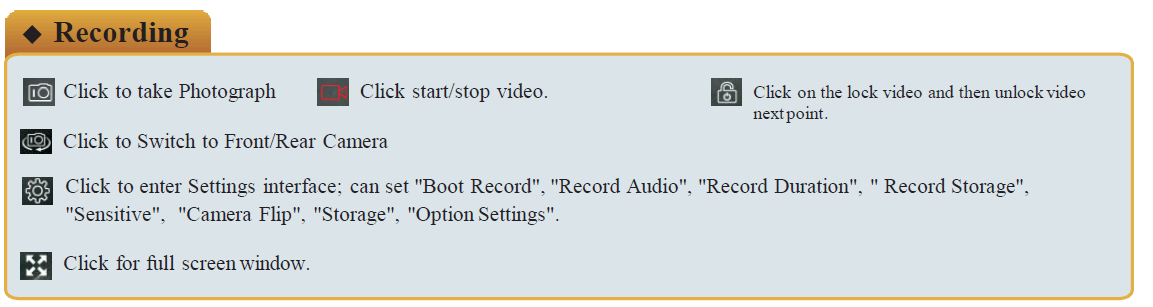
CAR DVR function operation
Driving recording (1080p hd records) supports a video file protection function to avoid data loss. Locked video files will be saved for future viewing and will not be overwritten. When reviewing driving records, do not remove DVR TF card, this may lead to damage of TF card. Before reviewing the video of driving, make sure your device has an installed TF card (TF card should use high speed card that C6+ version). If you do not insert a TF card, there will be a prompt “cannot write TF card” or “does not exist”– after you boot into video mode automatically.
Playback
File management: click this button to view the saved video/photos; preview camera images, view recorded/locked video Video file playback can be reviewed by clicking play. Video playback can also be found through the system of player or ES file browser and clicking on play. The video or photos can be deleted from the formatted T card, data delete will not be able to restore, even locked files, please use this feature carefully.
Click the image file, in the list, to enter the video playback file interface.
Video File Protection (Locked Video Files)The system will continuously record video as you drive, overwriting older video in the process. Videos that are locked will be protected and not be overwritten. Video file protection is automatic if an impact is detected or when the lock button is pressed. Locked video file search and playback can be found through the ” ” menu button. Select “Locked Video” to see a list of the protected video and photo files, click on the video/photo file to view. To delete a locked file, a long press of the video file will give you a choice to select or delete all locked files. The system will store up to 300MB of protected video, once this is reached the system will alert you that there is insufficient memory space. Please delete locked video files to clear up memory space.Note: Locked Files cannot be recovered after deletion, please backup the video/photo files you wish to permanently keep.
Note: The system supports various types of driving habits for file protection options. Sensitivity can be set by clicking on the “gravity induction sensitivity” option. If your driving habits are relatively stable, sensitivity should be set to high, if your driving habits are relatively un-stable, sensitivity should be set to low. This is to avoid quickly filling up the unit’s memory.
Bluetooth handsfree function operationIn the main menu press the ” BlueTooth ” button to enter the bluetooth handsfree mode.NOTE: As the bluetooth modules and software of cellphone come from different brands, some functions may be different or even not compatible with other system. On the right side of list display paired and unpaired bluetooth devices. Click unpaired device to pair. After matching , the connection can be reestablished automatically.
Bluetooth device interface
Adjust Bluetooth settings by clicking such as switch on/off automatic, answering automatically, etc.; Modify the bluetooth pairing code/name/address.
Phone pairing
NOTE: Default pairing password: 1234Pairing refers to connecting Bluetooth device communication for the first time, the process of mutual connection. After pairing between two devices, they will automatically connect going forward. When the connection is successful, the connection a bluetooth device name behind the success of a small icon indicates ”
Phone UseAfter pairing, you can directly dial mobile phone numbers or use the buttons to enter a phone number.
Answer the phone
- When there is an incoming call, in any mode, the system will automatically switch to Bluetooth handsfree, music will paused and the ring from the speakers.
- Press the“ Answer“ , “ hang up “ on the screen to choose answer or hang up. If answer is set up for: automatically answer, after ring for three times, it will automatically connect telephone.Click to return to the interface of dial-up.
Phonebook
Click the button to synchronize the mobile phones address book. Once synced, click to access the phones contacts. Phone book images appears, the phonebook displays incoming calls, received calls and missed numbers.
- Search keyword
- Delete
Bluetooth Music
In the bluetooth interface, click the icon to access the music interface. If the cell phone supports music playback via Bluetooth, audio and video from the cell phone can be transferred to the loud speaker of the car.NOTE: Use the bluetooth music to play songs on the phone, some mobile phones require song selection and interaction from the phone program.
Easy Connected
In the main menu interface, click on the “Easy Connected” icon to get into the Easy Connected interface. Android systems can be connected through USB cable, WIFI and WIFI connection hotspot.
- Android USBIn the Easy Connected interface, click the “Android USB ” icon. Connect the mobile device via USB cable > > Enter the mobile device’s settings > > Open Developer options > > Turn on USB debug > > With mobile Internet services > > Open mobile interconnection, automatic identification of the host and on the mobile end software installation, the connection is successful will enter the interactive interface (general bluetooth sound output channel).
- Android WIFIIn the Easy Connected interface, click on the “Android WIFI ” icon. Open mobile phone hotspot > > On the left side of the window to connect mobile phone hotspot > > When connecting for thef first time, restart mobile phones or connect USB line > > Installation of mobile Internet services > > Open mobile interconnection to automatically identify the host machine. If the connection is successful, it will enter the interactive interface (general bluetooth sound output channel).
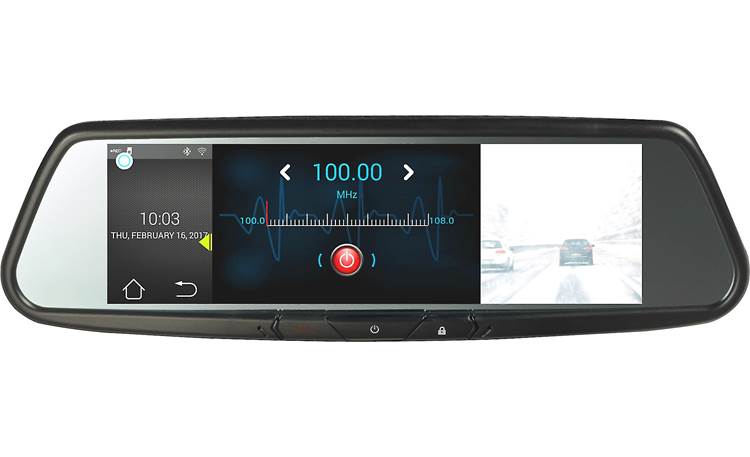
FM transmitIn the main interface, click the ” FM transmit ” icon enter the FM transmit function interface.
Turn on/off
When open, you can choose any frequency between 100 MHZ to 108 MHZ. Turn on the radio and search for a transmitting frequency within that range until you can hear media output. Use the FM transmitter for navigation through the car stereo sound. Voice quality will be improved. This function needs to be turned on in the system and car radio FM frequency band connected.NOTE: For improved sound quality, avoid use of frequencies with local radio overlap.
Settings
In the main menu interface, click on the ” Settings ” icon to enter the Settings interface. Once there, you can adjust Device, Personal, System, Display and other functions there.
- DeviceFor WIFI, WIFI hotspot, App management and Bluetooth settings.
- Personal Adjust Assistive Touch, keypad tone, parking warn line, reverse video to open/close, Choose a Background Picture and other settings.
- SystemLanguage, Navigation, Alarm, Stand By switch, Backup & Reset functions settings. One click “navigation settings” button. View list of the corresponding product applications and personal preferences. Set the default homepage navigation shortcut icon with new software map. Click “system upgrade” button in the new version and copy to the TF card, you can follow the prompts to upgrade the product system, click restore factory settings you can set the factory products on the system recovery.(Note: restore factory settings will clear the data, such as maps, please be careful)
- DisplayAdjust Date & Time, Brightness, microcode, Upload Log (network), Screen Brightness (control can be divided into day and night mode).
ApplicationIn the main menu interface, click on the “Application” icon to enter the application interface. Application interface is to display the Application shortcut icon. Use your finger to view application shortcut icons, click on the icon to go into the function.
Reverse videoThe device is equipped with a special rearview camera input. This camera requires professional installation. During normal driving, the camera will automatically record.
Data link
- WIFI data linkOpen /close WiFi: “general settings”, click “interface equipment”, then the “WiFi” interface. Once “WiFi” is selected, you can open the WiFi menu. Network access: click “Settings” → “equipment” → ” WiFi connection ” → “open WiFi. Select WiFi network in range. After entering the network password, Click ” Connect “, you will be connected to the network. When connected to the network, open the “WiFi”, which can be automatically connected to the network.
ES File ExplorerIn the main interface, enter the application function to find the “ES File Explorer” icon click into the ES File Explorer function.
- Click the button on the upper left coner, you can choose the main page, main directory, root directory management or browse files in the SD card.
- Shortcut keys on the toolbar can be used to complete the selection, copy, delete, search files, management applications and other operations.
- Access files on SD card > > in the ES File Explorer main interface > > click button to select.
Trouble Shooting
If problems can not be solved effectively, please contact our company or professional service center.
| Problem | Possible Cause | Remedy |
|
Cannot turn on the Mirror |
Car battery power supply shortage | Power the car battery through external power supply to check whether the external power supply is in good contact |
|
System crash |
①Press Reset Button near T Card position.
② Long press the power button for 3 seconds, the screen will be black, then extra long press for 3 seconds, the system will restart. |
|
|
Unable to display/can’t see content |
Background brightness is too low | Adjustable background brightness. |
| Background light has shut down
automatically |
Press the power key wake up the screen, face the screen set out in the set | |
|
Play the silent |
The volume is set too low | Increase the volume |
| FM Function Left open | Reset FM connection or turn off. | |
| Can’t receive GPS signals | GPS signal is weak position | Depending on local GPS satellite signal strength, weak signals may take a few minutes to connect. |
| No map | The map did not download | Please download map |
| Problem | Possible Cause | Remedy |
|
No video |
① TF card is not inserted; ②The TF card lock file is full |
① Card is no lower than class 8 grade TF card, it is best to use a class 10 TF Card.
②The product will not automatically delete the locked files, the TF card is less than 300 MB of storage space, products files need regular clean up, if not the TF card will fill quickly. |
| Unable to cycle to record | Check to see if the video has been locked | Unlock the videos, circulating recording |
| No recording file | TF card speed is too low | Use no less than class8 grade brand TF card, it is best to use class 10 |
| No GPS | No GPS Signal | GPS signal is weak, move vehicle to clear view of sky to connect. |
System Parameters
- Voltage: DC 10.5V-16V
- Working Current: MAX 1.5A
- Standby Current: Non anti-theft mode ≤6MA ,anti-theft mode ≤15mA Working Temp:-20°C ~ + 60°C
- Stock Temp:-40°C ~ + 85°C
- Spec:264.7(L)×80.4(H)×42.9(D)mm
- Screen:7.84 Inch
- Resolution:1280×400 dpi
Accessories
Standard
- Host Unit 1piece
- TF card 1pcs
- Power line 1set
- Left & right lens line 1pcs
- Easy connect extension cord 1pcs
- NAV receiver antenna 1pcs
- Quick Guide 1copy
Optional
Trunking 1pcs
Remarks:The attachment list is only for reference , Specification is subject to change. Please refer to the machine for actual data.
This device complies with part 15 of the FCC Rules. Operation is subject to the following two conditions:
- This device may not cause harmful interference, and
- this device must accept any interference received, including interference that may cause undesired operation.
Any Changes or modifications not expressly approved by the party responsible for compliance could void the user’s authority to operate the equipment. This equipment has been tested and found to comply with the limits for a Class B digital device, pursuant to part 15 of the FCC Rules. These limits are designed to provide reasonable protection against harmful interference in a residential installation. This equipment generates uses and can radiate radio frequency energy and, if not installed and used in accordance with the instructions, may cause harmful interference to radio communications. However, there is no guarantee that interference will not occur in a particular installation. If this equipment does cause harmful interference to radio or television reception, which can be determined by turning the equipment off and on, the user is encouraged to try to correct the interference by one or more of the following measures:
- Reorient or relocate the receiving
- Increase the separation between the equipment and receiver.
- Connect the equipment into an outlet on a circuit different from that to which the receiver is connected.
- Consult the dealer or an experienced radio/TV technician for help. The device has been evaluated to meet general RF exposure requirement. The device can be used in portable exposure condition without restriction.
 report this ad
VOXX Electronics Corporation, 150 Marcus Blvd., Hauppauge, New York 11788 Patented www.voxxintl.com/company/patents![]()
References
[xyz-ips snippet=”download-snippet”]