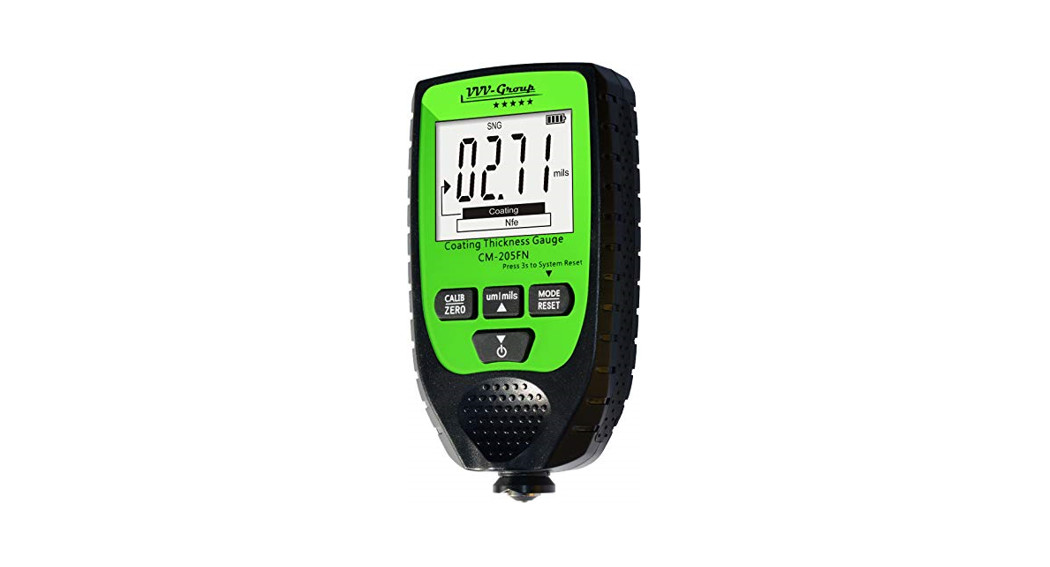
![]() COATING THICKNESS GAUGECM-205FN
COATING THICKNESS GAUGECM-205FN 
Introductions:
The thickness gauge is used to measure the thickness of the plated and coated sheet on metal, e.g. paint/enamel/ chrome on steel, paint, and anodizing the coating on aluminum/copper. The gauge takes the precision integrated probe and uses principles of electromagnetic induction and the eddy current effect, which automatically detects the attribute of substrates.
Application Field:
The Gauge is designed for non-destructively measuring the thickness of coating and painting. It is essential for material surface treatment and widely used in the manufacturing industry, metal-processing industry, chemical industry, commodity inspection area, and also able to work steadily in the laboratory, workshop, and outdoor.
Operating Principle:
The gauge adopts the principle of electromagnetic induction and eddies the current effect. It has F probe and N probe.F probe works on the magnetic induction principle and should be used for detecting the non-magnetic coating’s thickness such as chrome/copper/zinc/varnish/rubber on the iron/steel substrate.N probe works on the eddy current principle and should be used for detecting the insulating coating’s thickness such as paint/anodizing/ceramics on the aluminum/copper/brass substrate.
Supply Information:
Package List:
- Coating Thickness Gauge
- Substrates
- Five Standard foils
- User Guide
Description:

- Fe–Magnetic substrate indicator: Steel/Iron
- NF–Non-magnetic substrate indicator: Copper/Aluminum
- Coating Detecting Indicator
- Battery level indicator
- Measured Reading Display
- SNG: Single Measurement Mode
- CON: Continuous Measurement Mode
- Unit: um, mil
- ON/OFF; Down Key: Decreasing for Calibration;
- um/mil: Unit Switch Key; Up Key: Increasing for Calibration
- CALIB/ZERO: multi-points calibration; Press & Hold 3 seconds for Zero Calibration;
- MODE/RESET: Switch SNG/CON; Press & Hold 3 seconds for factory default resetting;
- Anti-Skid Slot
- Probe
- V-Groove
- “ZERO” indicates 0 Calibration finishing
- “CALIB” indicates in Calibration Mode
Technical specifications
| Probe F | Probe N | |
| Principle | Magnetic Induction | Eddy Current |
| Range | 041500um 0-59.1mil | 0-1500um 0-59.lmil |
| Accuracy | ± (30/0-F2um)± (30/0+0.08mil) | ± (30/0+2um)± (30/0+0.08mil) |
| Resolution | 0.1um/0.01mil | 0.1um/0.01mil |
| Calibration | Zero Point / Multi-Points | |
| Units | urn, mil | |
| minimum curvature radius convex: 1.5mm | ||
| minimum curvature radius concave: 25mm | ||
| minimum measuring area Diameter 6mm | ||
| minimum thickness of the substrate | 0.5mm(0.02″) | 0.3mm(0.012″) |
| Power | 2 x AM batteries | |
| Operation Environment | Temperature:0-40 t’ (32-104 ‘I:Humidity:20%-90%RH | |
| Size | 124mm x 67mm x 28mm (4.88″ x 2.64″ x 1.10″) | |
| Weight | 105g (3.70 oz) |
Note: The final specifications may be upgraded without notifying. For more details, please consult with your supplier.
Factors of Affecting Accuracy
The user needs to know the factors affecting measurement accuracy before using the gauge. The factors are listed as below:
- Curvature radius convex <1.5mm
- Curvature radius concave <25mm
- Diameter of measuring area <6mm
- The thickness of substrate <0.5mm
- Surface roughness
- Adhesive substances: clean the probe and coat surface
- Strong magnetic field around
- Out of Operation Temperature and Humidity
- Low Battery
Use the Gauge
Please refer to the factors of affect measuring accuracy before using.
- Placing the Battery: Open the battery compartment and insert 2*AAA batteries, Close the lip
- Prepare the target samples for measuring.
- Placing the gauge in the air, at least 5cm away from any mental, then power on, wait for 5 seconds for system initialization.Note: Please upgrade batteries, if the LCD shows a low battery which will lead to the measurement being unreliable.
- Press the um/mil key for unit choosing (um, mil); Press the MODE key for selecting SNG/CON; SNG means single measurement mode; CON means continuous measurement mode.
- Start Measuring. SNG (single point measurement mode), vertically and rapidly placing the probe on the sample, the readings display on LCD, when one beep alerting. CON (rapidly continuous measurement mode) Vertically placing the probe on the sample, Keeping the probe on the sample, changing the measurement point randomly to do the next measuring.
- Power Off. The gauge is a built-in APO, auto power-off with no operations in 5min.
Measurement Modes
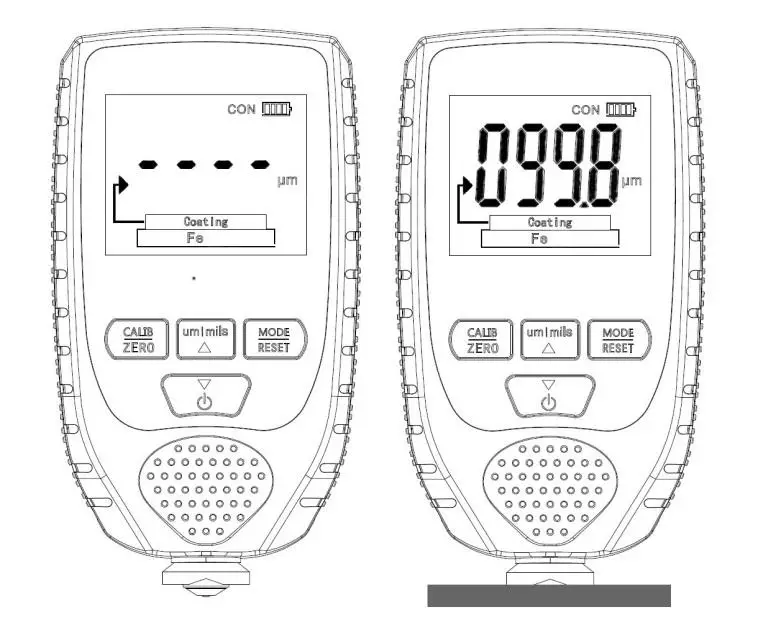
“SNG”: the Single Mode (Default), Press “MODE” key to display SNG, Vertically and rapidly placing the probe on the sample. The readings displayed on LCD with one beeping. Hand up the probe more than 5cm away from the mental, then do the next measuring, as shown below:

“CON”: the Continuous Measurement Mode, Pressing the “MODE” key to display CON, vertically and directly placing the probe on the sample. The readings will continuously upgrade following with the probe moving, as shown below:
Description of “Fe” and “NF”
“Fe” in LCD means: Target substrate is ferrous material such as iron/steel.“NF” in LCD means: Target substrate is non-ferrous material such as aluminum/copper.Unit SwitchingPress the “um/mil” key to switch unit “um” or “mil”Auto Power OffAutomatically power off without any operations within 5min.System Reset:Press and hold the “MODE/RESET” key until the full-screen displays with two beepings, the system resetting is successful.Note: system resetting is mainly used for the return of error operation and error calibration.
Calibration:
Calibration adjustment is the process of setting the gauge to be more accurate. There are factors to affect accuracies such as the probe’s slight wear, long time no use, hostile environment, or special substrate. How to calibrate the gauge, steps as follows:Firstly take out the two pieces of substrates (ferrous substrate/ aluminum substrate) and the five standard foils 50um/100um/250um/500um/1000um).Place them horizontally on the table. You also could use your target bare metal substrate instead of our attached substrates.Note: Once you did a misoperation, please press and hold the “MODE/RESET” KEY 3 seconds for resetting the factory default.
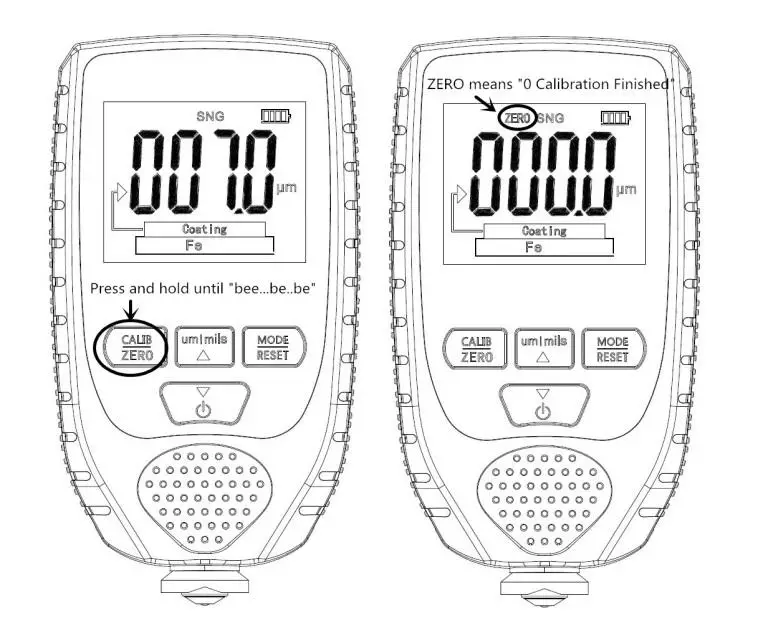
ZERO Calibration: Press “MODE” to the Single Measurement Mode(SNG in LCD), the instrument measures the attached iron-based, aluminum-based, or uncoated bare metal substrate, measures several times to get stable reading; The next step is to ZERO Calibration, long-press CALIB/ZERO” key until the buzzer beeping three times (be…be..be), now “ZERO” icon is displayed in the LCD and Reading is “000.0”, then measures substrates to do a check. If any error occurs in ZERO Calibration, Please long press “MODE/RESET” to do system resetting and ZERO Calibration again.(Hint to Plating measurement customers: For the plating layer is generally thin, the best way is to do ZERO Calibration on your target unplated bare metal layer before measurement to ensure an accurate reading.)
Other Points Calibration: In the SNG mode (the screen displays “SNG”), the thickness sheet (5 sheets of 50/100/250/500/1000) is placed on the iron-substrate, aluminum-substrate or uncoated bare metal substrate. Please measure a few times, after measuring the stable reading, lift the machine, press the “CALIB/ZERO” key, the screen displays the “CALIB” icon and enter the calibration mode, press the up and down keys to adjust the data to the target value, and then press “CALIB/ZERO” key again back normal mode to save the data, then measure it and check the calibration result. Repeat the above steps. In case of problems, please reset the factory settings and recalibrate:
 report this ad
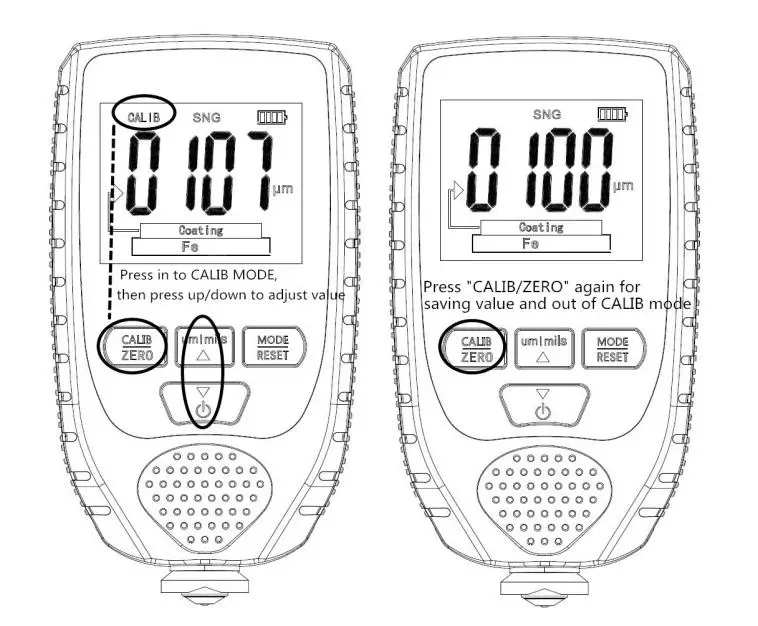
Maintenance:
The gauge has to be avoided working in hostile environments, such as collision avoidance, dust, hyperthermia, humidity, strong magnetic field. If the gauge is no response and can’t be powered on, please remove the battery, and wait for minutes, then reinstall the battery to try again. If the error still persists, please contact your supplier for help.
[xyz-ips snippet=”download-snippet”]