
W-AIR 70/ W-AIR 100/ W-AIR 150 Handsets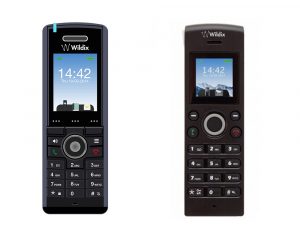
Before using the handset
Unboxing
Examine the package for evidence of physical damage prior to opening. If there is a proof of mishandling, report it to your certified Wildix Partner.
Make sure that all the components are present in the shipping package/box:W-AIR 70:– 1 x Handset Unit– 1 x Charger with A/C adapter– 2 x Battery, AAA– 1 x Battery cover– Optional belt clip case on demand, code: WAIR70-PC
W-AIR 100:– 1 x Handset Unit with li-lion battery– 1 x A/C Adapter– 1 x Charger– 1 x Belt Clip– Optional case on demand, code: WAIR100-PC
W-AIR 150:– 1 x Handset Unit– 1 x A/C adapter– 1 x Charger– 1 x Battery– 1 x Belt Clip Cover– 1 x Pull Cord Cover– 1 x Belt Clip– 1 x Svirvel for belt clip– 2 x Mounting screws
Compatible headsets:– Wildix headsets: http://www.wildix.com/voip-phones-and headset/#headsets– Third party headsets integrated with Wildix https://manuals.wildix.com/headsets/
Using the battery
– Never dispose of the battery in fire, otherwise it could explode– Never replace the battery in potentially explosive environments, for example close to inflammable liquids/gases– Use ONLY approved batteries and chargers from the vendor or the operator– Do not disassemble, open or damage the battery, use it carefully to avoid a short circuit
Using the Charger
Input Voltage: 110-240VAC; Output Voltage 5.5VDC / 600mA.For the best performance, charge the handset for at least 10 hours the first time.When charging, make sure that the room temperature is between 0°C and 25°C / 32°F and 77°F. Do not leave the handset in direct sunlight when charging. The battery has a built-in heat sensor that stops the charging when the temperature is too high. There is a charging status indicator on the phone display.
Open Back Cover
W-AIR 70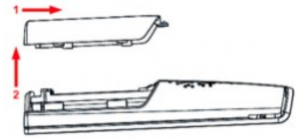
W-AIR 100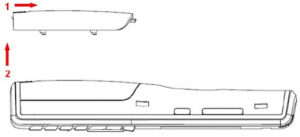
W-AIR 150 The serial number and IPUI number of each handset is situated either on a label behind the battery, or on the package label.
Phone Overview
W-AIR 70
Front view
- Ear Speaker
- Screen
- Navigation Keys (Up/Down/Right/left)Press Up and Down Navigation keys during a call to adjust the volume Press Left Navigation key during a call to mute/unmute the microphone.
- Selection Key (centre of Navigation key)
- Off-hook keyPress during a call to activate the speaker mode.
- On-hook key (End, ON/OFF Key, Back Key)

- Left and Right Soft keys
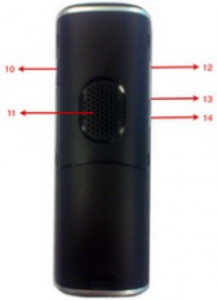
- Numeric KeypadRear View
- Headset connector (3.5mm)
- Used when speaker mode is enabled during a call
- Battery back cover
- LED indicator
W-AIR 100
Front view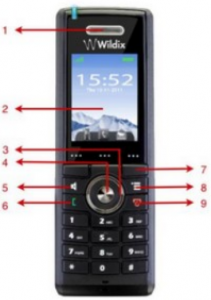
- Ear Speaker
- Screen
- Navigation Keys (Up/Down/Right/left)
- Selection Key (centre of Navigation key)
- Speaker Key
- Off-hook key (Home Key / Call Key/ Accept Call Key)
- 3 soft keys
- Activity Menu Key
- On-hook key (End, ON/OFF Key, Back Key)Rear View
- 3.5mm Headset connector
- External Speaker
- Volume Up key (side key)
- Volume Down Key (side key)
- Mute key (side key)
W-AIR 150
Front view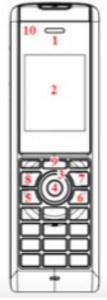
- Earpiece Speaker
- Screen
- Navigation Keys (Up/Down/Right/left)
- Selection Key (centre of Navigation key)
- Off-hook key (Home Key / Call Key/ Accept Call Key)
- On-hook key (End, ON/OFF Key, Back Key)
- Menu key
- Speaker Key
- 3 Softkeys
- LED Indicator
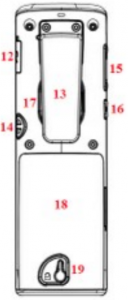
- Emergency button (view from above)Rear View
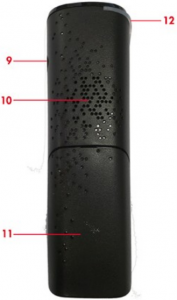
- Headset connector (3.5mm)
- Belt clip
- Pull cord
- Volume Up/Down Key (side key)
- Mute key (side key)
- External speaker
- Battery back cover
- Back cover lock

- Contacts: local phonebook
- Central directory: online access to the shared PBX phonebooks
- Calls: call list
- Connectivity: register / deregister the handset
- Settings: personal handset settings
- Audio settings
- Alarms: alarm clock / wake up call setting (W-AIR 100 / W-AIR 150)
Login
- Press the green Off-hook Key to switch on the phone
- Wait till the signal is found and the phone screen displays “login_x”, “unkown_x”
- Dial 99 and press the green Off-hook Key
- Follow the audio instructions to enter your extension number and your password.
To enter your password, follow these simple rules:
– Instead of letters, press corresponding digits on the phone’s keypad (e.g. if you need to enter A or B, press “2”)– No difference between uppercase and lowercase letters (press “2” to enter A or a)– Press * instead of all the special characters (to enter such symbols as $, %, &, press “*”)– Press the button just once to enter any option corresponding to this button (for example, ifyou need to enter 2, A, B or C, press the button “2” just once, not twice, not three times)
Example:Password: 4Ag7$ZEnter: 4247*9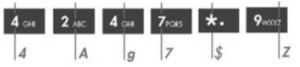
Local contacts
Go to “Contacts” menu
Add contact
- Press the Soft key “More” -> “Add contact”
- Fill in the fieldsIt is possible to add the name, Work, Mobile, Home phone numbers, select a ringtone to be used for this contact.
- When ready, press “Save”
Edit/call contact
- Select a contact
- Press “Call” to call a contact / press “Edit” to edit the contact
- Press “Save” when ready
Delete contacts
- Select a contact -> “More”
- Select “Delete contact” to delete the selected contact or “Delete all contacts” 1to delete all the contacts -> “Yes”
Assign a Speed Dial number to a local contact
Prerequisite: there must be at least one contact in the Contacts list
- Select a contact that you wish to assign a speed dial number to -> “More” -> “Speed dial”
- Select a speed dial number (from “2” to “9”) that you wish to assign to the selected contact – > “Add”
Note: “0” is used to start a normal dial with “+”; “1” is used for Voicemail access.
Go to “Central directory” menu
Search for a contact / call a contact
- Select the phonebook to search for a contact in. The Search field is displayed
- Enter the number or the name
- Press the Soft key “Search” to display the search results corresponding to the value entered
- Select a contact that you wish to call -> press the green Off-hook Key.
Note: In case a contact has several numbers available (in this case, a green arrow is displayed to the right of the contact), use the Navigation keys to select the right number before calling.
Note: Leave the Search field empty and press “Search” to display all the contacts
Note: Colleagues are displayed in the list with their actual presence and activity status (synchronised with Wildix Collaboration): available / offline / do not disturb / away / talking / incoming call
Call list
Go to “Calls” menu
Note: When there is a missed call, the icon is displayed in the Status bar until the entry has been viewed in the Calls menu.
Call details
- Select a call from the list
- Press “View” to view the following information about the call: number, status (answered, dialed, missed), duration, time and date.
Redial
- Use the Navigation keys to select the call
- Press the green Off-hook Key or the Soft key “Call” to call the contact.
Save a number to Contacts
- Select a call
- Press “More” -> “Save contact”
Delete calls
- Select a call -> “More”
- Select “Delete item” to delete this call or select “Delete all items” to clear the calls list -> “Yes”
Register a handset
Go to “Connectivity” menu
Register a handset to the base station
- Select “Register”
- Enter the Access code (base station PIN)
Note: the Access code is “0000” by default and cannot be changed via the handset. For more information, please contact your system administrator.
Note: To assign a handset to a user, please follow the steps described in the chapter “Login”
Deregister a handset from the base station
- Select “Deregister”
- Enter the Access code -> Press “Yes”
Call Control
Incoming call
The handset displays an alerting screen when there is an incoming call.The caller number and name (in case the contact is present in the phonebook) are displayed on the screen.
Answer a call
– Press the green Off-hook key to answer or press the Speaker Key to respond in the speaker mode.
Reject / mute an incoming call
– To reject an incoming call, press “Reject” when receiving an incoming call or press the red On-hook Key– To silence an incoming call, press “Silent” when receiving an incoming call.
Place a call
1. Enter a number2. Press the green Off-hook key.
Note: If the handset is used in a multiline environment, it is possible to press “Line” to select the line to use in order to make a call.
Note: Make sure you enter a prefix if needed when calling the outside line.
Note: It’s possible to start a call from Calls, Contacts and Central Directory menus, for more information, please read the corresponding chapters of this User Manual.
Redial
To dial the last called number:– Press the green Off-hook key twice from the idle
Call a Speed Dial number
It is possible to call a speed dial number, if you have previously assigned at least one Speed Dial number to one of the contacts.– Make a long press (>2 seconds) from the idle on one of the speed dial keys (from “2” to “9”) assigned to a contact
End a call
– Press the red On-hook key to end a call.If one call is active and another one is on hold:
- Press the red On-hook key to end the active call and to resume the call on hold
- Press the red On-hook key again to terminate the second call.
Hold
– Press the Left Soft key “Hold” to put a call on hold– Press the Left Soft key “Retrieve” to retrieve the call.
When you have a call on hold, you can make another call, transfer a call, swap, make a conference.
Place a second call
- Enter a number to call or press the Menu Key to access the Contacts or Central Directory and find the needed contact
- Press the green Off-hook Key
Swap
When you have one active call and one call on hold, you can swap (toggle) between the two calls: – Press “Swap”
Call Transfer
Attended Call Transfer
Transfer with notification to the person who receives the transfer.
- During a call press “Transfer” or “Hold” (the current call is put on hold)
- Call the third party
- Press the green Off-hook Key
- To complete the transfer after the third party has answered the call, press “Transfer”
Blind Call Transfer
Transfer without notification to the person who receives the transfer.
- During a call press “Transfer” (the current call is put on hold)
- Call the person who you would like to transfer the call to
- Press “Transfer”
Conference call
Establish a conference call between three parties:
- During a call press “Conf.” (the current call is put on hold)
- Call the person who you would like to invite to the conference
- When the third party answers, press “Conf.” to start a three-way conference call (“Conference” is displayed on the screen and thereby all the three parties are participating in the conference call)
Note: You can repeat the steps to invite more parties to participate in the conference. The maximal number of participants is set according to the number of base stations in the system.
Terminate a conference call:– The user who has started the conference call must press the red On-hook Key
Note: Each of the called participants can hang up to leave the conference call (in this situation the conference call continues between the remaining participants)
Settings
General Settings
Go to “Settings” menu
Time & dateAdjust time and date and select a time / date format.
LanguageSelect the language of the phone interface.
LED signalSelect under which condition LED signal of the handset must blink:– missed call,– new Voicemail– low battery. Otherwise it is possible to disable the LED signal.
Power saveSet up the the display to go out after timeout to save the battery (from 5 up to 60 seconds) Security (Auto keylock) Enable / disable auto key lock after timeout (from 15 seconds up to 5 minutes).
Reset SettingsReset the handset to default settings.
StatusInformation about the base station the handset is registered to and the handset status.– Base station information: SW version, HW version, IP address, Mac address, System name– Handset status: SW version, HW version, DECT band, Battery level, IPEI
Auto Answer– Normal: press the green Off-hook Key to answer an incoming call– Any key: press any key on the keypad (except the red Off-hook Key and the two Soft keys) to answer an incoming call– Automatic: incoming call is answered automatically after five seconds.
Silent ChargingDisable / mute ring tone when the handset is charging:– Off: audio alert is present and incoming call screen is displayed– Silent: no audio alert, but the incoming call screen is displayed
Bluetooth (W-AIR 150)When BT headset is connected, the audio is routed to the headset during a call. Incoming call alert tone is played back both to the handset and the paired Bluetooth headset. The icon is displayed in the Status bar when the option is enabled and the handset is paired to BT.
Pair and connect a headset to a bluetooth headset:
- Select “Enable Bluetooth” -> “Yes”
- Select “Search for devices” to view the list of available bluetooth headsets
- Select the device from the list and press “Pair”
- Select “Paired devices” to view the list of devices, select one and click “Connect”
Delete a bluetooth headset from the list of paired devices:
- Select “Paired devices”, select the device that you wish to unpair and press “More”
- Select “Delete” to delete this device, select “Delete all” to delete all the paired devices
Note: the handset can be paired with up to four different bluetooth headsets
Use Wildix Bluetooth headset WHS-BT: link to online Quick Start Guide. Third party headsets integrated with Wildix https://manuals.wildix.com/headsets/
Push To Talk (W-AIR 100 / W-AIR 150)
Note: feature is available starting from WMS v. 3.82.32245, fw v. 03.55.00.18Limitation: feature does not work over Repeater
PTT feature allows transmitting an audio message to other handsets in the network.
- Select “On” to enable the feature
- Press and hold the Mute button and say your message
Your message is transmitted to other handsets over the network (W-AIR 100 / W-AIR 150).
Audio Settings
Go to “Audio settings” menu
Silent modeWhen enabled, no sounds are played on the handset.When enabled, no other audio settings can be changed in the Audio Settings menu.
Ring VolumeUse the Navigation keys to adjust the ring volume.When the ring volume is set to mute, the “Sound off” icon is displayed in the Status bar and no sound is heard when receiving an incoming call.
Ring Melody (for each Call Class)Select the ringtone for each call class.
Vibrator (W-AIR 100 / W-AIR 150)Enable / disable vibration.
Key SoundSelect the sound to be played when the keys are pressed on the handset (“Click” / “Tone”) or disable the key sound.
Confirmation SoundWhen enabled, an audible confirmation sound is played back when any action succeeds or fails.
Coverage WarningWhen enabled, an audible notification is played back to the earpiece during the call when the user is close to the maximum range of the nearest base station in the system.
Charger WarningWhen enabled, an audible notification is played back when the handset is placed into the charger.
Noise Reduction (W-AIR 150)Enable / disable noise reduction
Alarm clock setting (W-AIR 100 / W-AIR 150)
Go to “Alarms” menu
- Select “Alarms”
- Use the Navigation Keys or the numeric keypad to set up the time for the alarm -> “Save”
– To set up another alarm, select “Recurrent alarm” and repeat the steps– To set up snooze timeout: select “Snooze time” and select the timeout.
Note: When the alarm starts ringing, press “Dismiss” to disable it, or “Snooze” to repeat the alarm after the selected timeout
Emergency alarms setting (W-AIR 150)
Emergency settings are defined and controlled from the web interface of the base station.
Alarm is sent in the form of an outgoing call to the emergency number preconfigured on the base station’s interface for this extension.
For more information about configuring emergency settings, please refer to W AIR system – Administrator Manual
Alarms triggering
– Alarm Button: Long-press (3 seconds) the red button on top of the handset.– Pull Cord Alarm: Pull a cord from the pull cord hole on the right side of the handset.– Running Alarm: Shake up and down the handset for several seconds.– Man Down Alarm: Put the handset in the position with an angle over 60 degrees with respect to the horizontal. The time for the handset to be still before the alarm is triggered can be set on base station web interface.– No Movement Alarm: Do not move the handset. The timeout after which No Movement alarm is triggered is set on the base station web interface.
W-AIR 70/ W-AIR 100/ W-AIR 150 Handsets User Manual – W-AIR 70/ W-AIR 100/ W-AIR 150 Handsets User Manual –
[xyz-ips snippet=”download-snippet”]