Wagner Steamforce & Steamforce Plus Steam Wallpaper Stripper User Manual
wagner-group.com
STEAM WALLPAPER STRIPPERSTEAMFORCESTEAMFORCE PLUSOWNER’S MANUAL
MANY THANKS FOR PLACING YOUR TRUST IN USThe operating instructions are part of the unit. Keep them in a safe place! Read these operating instructions carefully and in full before using the unit.
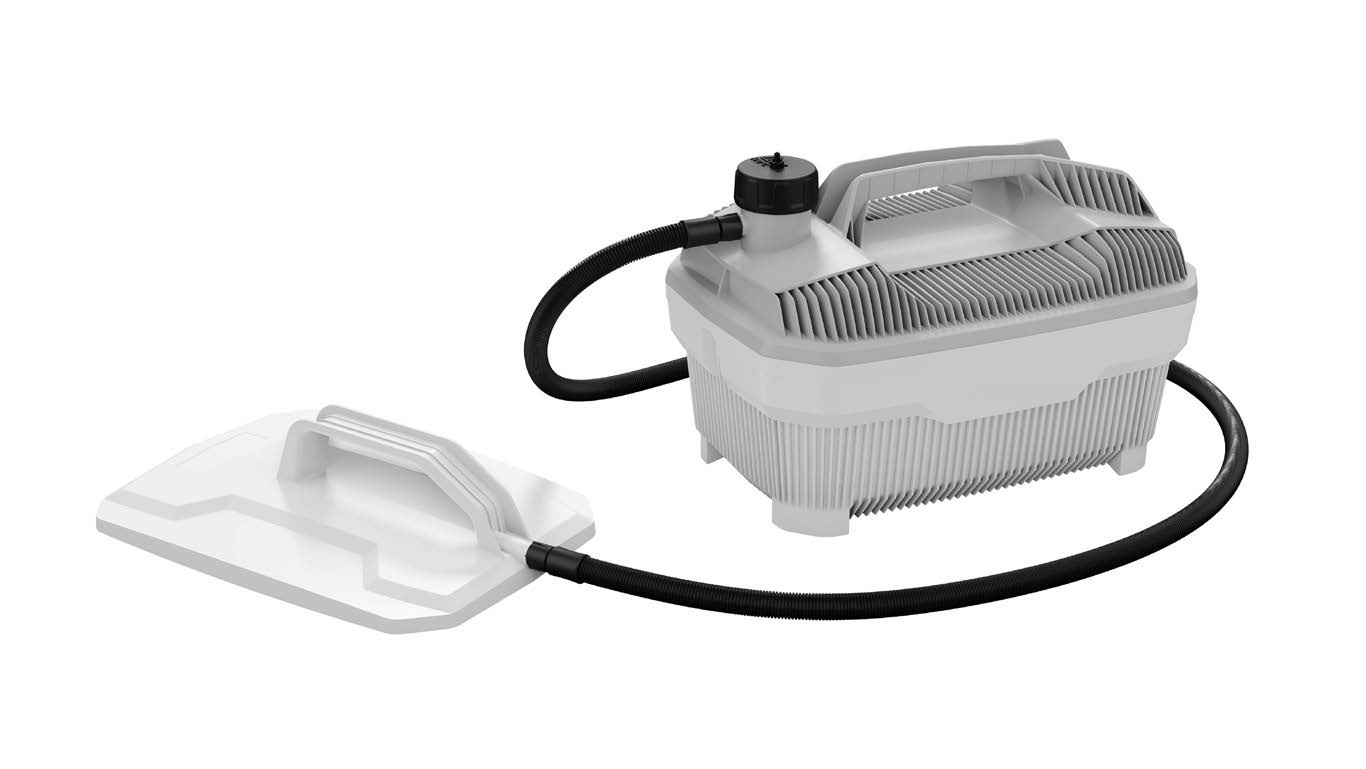
Scope of delivery
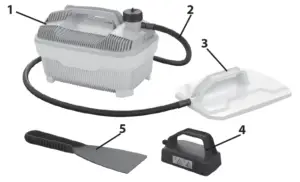
- Base unit
- Steam hose
- Steamplate large
- Steamplate small*
- Scraper*
- Operating manual* Only included with SteamForce Plus
Explanation of symbols used
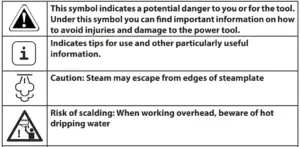

General Safety Instructions
CAUTION! Read all the instructions. Non-observance of the instructions below can cause electric shock, fire and/or serious personal injuries.
- Keep your workplace clean and well lit. Disorderly or unlit workplaces may result in accidents.
- Keep children, unauthorised persons and animals out of reach of the steamer. You can lose control of the appliance if you are distracted.
- The steamer plug must fit into the socket-outlet. The plug may not be modified in any form. Do not use adaptor plugs together with protective-earthed tools. Unmodified plugs and suitable sockets reduce the risk of an electric shock.
- Avoid physical contact with earthed surfaces such as pipes, heating elements, stoves and refrigerators. The risk through electric shock increases if your body is earthed.
- This device can be used by persons with impaired physical, sensory or mental capacities or a lack of experience and knowledge if they are supervised or have been instructed in the safe use of the device and understand the dangers arising from it.
- Children shall not play with the appliance. Risk of scalding or shock.
Safety Instructions for Steam Wallpaper Strippers
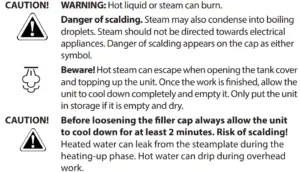
ATTENTION! When working with hot steam (min.100°C), there is a risk of serious scalding. Hot steam and boiling water can emit when the safety valve is activated due to overpressure inincorrect operation of the unit.
Only change position during use, with care. The steam unit, hose and steamplate can be very hot. Always wear suitable protective clothing / gloves.
Operate the unit only with pure water without agents or additives.
DO NOT switch the unit on when empty.
NEVER point the steamplate / bar at people, animals or at objects sensitive to temperature. Do not point liquid or steam directly at electrical devices or equipment containing electrical components. Always ensure that the unit is standing securely in a horizontal position (on the floor) (Fig. 6).
DO NOT stand on or place objects onto the unit or steam hose.
NEVER over-twist or make kinks in the steam hose, and never block the valve. Only carry the unit by its handle.
NEVER pull on the steam hose or supply cord. The device must not be used if it has been dropped, if obvious damage is visible or if it is leaking.
NEVER submerge the unit in liquid. Whenever accessories are replaced, during maintenance, when filling / refilling or draining, and whenever the steam device is not in use (including breaks between work), the plug on the mains cable must be removed from the socket. The device must be kept out of the reach of children whenever it is switched on or cooling down.
NEVER overfill the unit. Unplug the mains plug in the event of overfilling or a fault. Use only WAGNER original spare parts and accessories!
CAUTION! Danger of short-circuits! Cover socket-outlets and switches and do not subject them to steam. When using an extension cable: max.10m long– the cord cross-section must be at least 3 x 1 mm2. Avoid damage! When working in the vicinity of wood / gypsum bases and coated materials these can be impaired by heat or steam. Remedy: Use a heat / steam shield made of cardboard or metal. The unit switches off automatically in case of overheating. After approx.10 minutes, the unit switches itself back on automatically. The steam time is approximately 70 minutes. The device must never be left unsupervised while it is plugged into the mains power supply.
NEVER leave a unit unattended if switch is on. Keep the unit away from children and animals.
NEVER let the container steam until it is completely empty.
Intended use The Steam Wallpaper Stripper is solely suited to removing wallpaper. To ensure long life of the steam wallpaper stripper, unplug and clean your unit immediately and thoroughly after each use.
CAUTION! – Steam can loosen weak, cracked, porous or poorly bonded plaster. Check a small area before starting work. Do not hold the steamplate in one position too long and stop if plaster starts to break.
PROTECT YOUR HOME– To prevent marks from steam on carpets and soft furnishings it is recommended the unit be place on a hard flat board. Ensure the unit will not slip or tilt. Dust sheets and newspapers are not suitable.
Preparation
For multi-layered, painted-over or water-resistant wallpapers especially, we recommend working on the areas to be stripped using a wallpaper scorer in a grid pattern.
Operation
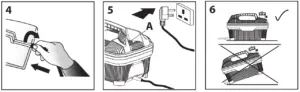
- Remove filler cap and fill unit with clean water to the MAX level line indicator. Replace cap (Fig. 1+2).
- Screw hose onto threaded outlets of boiler and steamplate, securely by hand. DO NOT overtighten (Fig. 3+4). Check regularly during use to ensure secure fit.
- Connect supply cord from unit to power socket-outlet (Fig. 5).
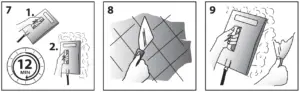
- lt can take up to 12 mins (approx.) before steam is produced – depending on fill water quantity and temperature (Fig. 7).
- DO NOT leave unattended and keep children and pets out of the room.
- Just before full steam production a small amount of bubbling and water will occur at the steamplate.
- BEWARE of hot water discharge prior to steam emission.
- Hold the steamplate flat against the wallpaper for approx. 10 seconds – from which the paper should now easily come away using a wallpaper scraper (Fig. 9).
- Some papers may need more steam than others. Operate steamer until water level is low, then unplug unit and allow to cool for at least 2 minutes (Fig. 11).
Descaling
Lime scale build up will damage your unit. Regular descaling is essential in keeping your unit operational. Descale the unit depending on the hardness of the water used in accordance with the information in the table below. Units which are defective due to a lack of descaling are excluded from the guarantee!

- Using standard descaling liquid or tablets, fill a jug with 1.5 litres of water
- Add correct amount of descaler following manufacturer’s guidelines and mix thoroughly.
- Pour the descaling solution into unit.
- Leave the descaling solution to work for 30 minutes.
- Then fully empty the steam wallpaper stripper.
- Thoroughly rinse the unit two to three times with clear water to remove all descaling solution residue.
Storage
Store emptied, upright and dry.
Technical Data

* Approximate steam time before the safety cut-out operates.
Correction of Malfunctions
Spare Parts

Environmental protection
 The appliance and all accessories and packaging have to be recycled in an environmentally friendly manner. Do not dispose of the appliance with household waste. Support environmental protection by taking the appliance to a local collection point or obtain information from a specialist retailer. Please pay special attention to the instructions on the product packaging.
Important Note regarding Product Liability!
In accordance with an EC directive, the manufacturer is liable for this product only if all parts originate from or were approved by the manufacturer and the tools are assembled and operated correctly. The use of other accessories and spare parts can partially or completely invalidate the liability.
WARNING (UK ONLY)
Your unit has been supplied with a supply cord and a fitted plug. This is identified by the fuse holder in the base of the plug. Please read the following safety instructions before use.
- If the fitted plug is cut off from the supply cord then the plug must be disposed of safely.
- NEVER under any circumstances insert such a plug into a 13 Amp socket-outlet.
- NEVER under any circumstances use the appliance or supply cord without the fuse cover fitted. This is the little cover fixed into the base of plug to hold the fuse in place.
- If you lose the fuse cover then please contact any electrical dealer for a replacement or ring our helpline above.
- A replacement fuse must be rated at 13 Amps and approved to BS1362.
IF IN ANY DOUBT PLEASE CONSULT A QUALIFIED ELECTRICIAN.
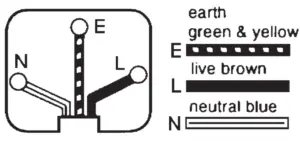
If you need to fit a plug to the supply cord, this should be fitted in accordance with thewiring instructions below, and will need to be used with a 13 Amp fuse. If in doubt consult aqualified electrician.
WARNING – THlS APPLIANCE MUST BE EARTHED. If you are using an extensionlead it must be rated a minimum of 10 Amps and fully unwound. Do not operate with a cord rated less than 10 Amps as this will cause premature failure of the element which is not covered by the guarantee. As the colours of the wires in the supply cord of this appliance may not correspond with the coloured markings identifying the terminals in your plug, proceed as follows:
The wire which is coloured green and yellow must be connected to the terminal in the plugwhich is marked with the letter E or by the earth symbol, or coloured green.
The wire which is coloured blue must be connected to the terminal which is marked withthe letter N or coloured black.
The wire which is coloured brown must be connected to the terminal which is marked withthe letter L or coloured red.
3+1 years guarantee
The guarantee runs for three years, counting from the date of sale (sales slip). The guarantee is extended by a further 12 months if the device is registered online within 4 weeks of the purchase at www.wagner-group.com/3plus1. Registration is only possible if the buyer is in agreement with the data being stored that is entered during registration. The guarantee covers and is restricted to free-of-charge rectification of faults which are demonstrably attributable to the use of faulty materials in manufacture, or assembly errors; or free-of-charge replacement of the defective parts.
The guarantee does not cover incorrect use or commissioning or fitting or repair work which is not stated in our operating instructions. Wearing parts are also excluded from the guarantee. The guarantee excludes commercial use. We expressly reserve the right to fulfil the guarantee. The guarantee expires if the tool is opened up by persons other than WAGNER service personnel.
Transport damage, maintenance work and loss and damage due to faulty maintenance work are not covered by the guarantee. Under any guarantee claim, there must be proof of purchase of the tool through submission of the original receipt. Wherever legally possible, we exclude all liability for injury, damage or consequential loss, especially if the tool has been used for a purpose otherthan that stated in the operating instructions, commissioned or repaired other than in accordance with our operating instructions or if repairs are performed by someone who is unqualified. We reserve the right to perform any repairs in excess of those stated in our operating instructions. In case of guarantee or repair, please refer to your point of sale.
EU Declaration of conformity
We declare under sole responsibility that this product conforms to the following relevant stipulations: 2014/35/EU, 2014/30/EU, 2011/65/EU, 2012/19/EU
Applied harmonised norms:EN 60335-1, EN 60335-2-54, EN 55014-1, EN 55014-2, EN 61000-3-2, EN 61000-3-3, EN 62233
The EU declaration of conformity is enclosed with the product.If required, it can be re-ordered using order number 2410392.
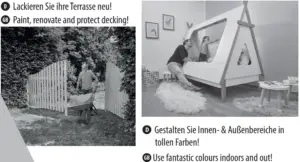
Inspiration of a very special kindAre you on the look-out for your next project? Then take a look at our project finder. Here, you‘ll find practical guides on renovation, decoration and DIY. Make your home unique. Make it beautiful!


Material No. 2413432 A05/2020© Copyright by J.Wagner GmbH
Not responsible for errors and changes.
Read More About This Manual & Download PDF:
 report this ad
Wagner Steamforce & Steamforce Plus Steam Wallpaper Stripper User Manual – Wagner Steamforce & Steamforce Plus Steam Wallpaper Stripper User Manual –
Questions about your Manual? Post in the comments!
[xyz-ips snippet=”download-snippet”]