
Wahl Clipper
Wahl Clipper
OVERVIEW
USING
IMPORTANT SAFEGUARDS
When using an electrical appliance, basic precautions should always be followed, including the points listed below. Read all instructions and safeguards before using.
DANGER
To reduce the risk of injury or death by electric shock:
- Do not reach for an appliance that has fallen into water. Unplug immediately from the outlet.
- Do not use while bathing or in a shower.
- Do not place or store appliance where it can fall or be pulled into a tub or sink. Do not place in or drop into water or other liquid.
- Always unplug this appliance from the electrical outlet immediately after using.
- Always unplug this appliance before cleaning.
WARNINGTo reduce the risk of burns, fire, electric shock or injury to persons:
- This appliance can be used by children aged from 8 years and above and persons with reduced physical, sensory or mental capabilities or lack of experience and knowledge if they have been given supervision or instruction concerning use of the appliance in a safe way and understand the hazards involved. Children shall not play with the appliance. Cleaning and user maintenance shall not be made by children without supervision.
- Warning: Keep the Product Dry. It is essential to PREVENT electrical equipment from coming into contact with water or other liquids.
- Use this appliance only for its intended use as described in this manual. Do not use attachments not recommended by the manufacturer.
- If the power cord is damaged, it must be replaced by the manufacturer or authorized agent or similarly qualified person in order toavoid risks.
- Keep the cord away from heated surfaces.
- Do not use outdoors or operate where aerosol (spray) products are being used or where oxygen is being administered.
- Do not use this appliance with a damaged or broken comb nor with teeth missing from the blades, as injury may occur.
UK appliance : If a 13 amp (BS 1363) plug is used, a 3 amp fuse must be fitted, or if any other type of plug is used, a 5 amp fuse must be fitted either in the plug or adapter at the distribution board. Replacement fuses should be ASTA approved to BS 1362. Fuse cover must be fitted when changing the fuse. If fuse cover is lost, the plug must not be used until a replacement is obtained. Information for obtaining the correct fuse carrier is marked on the carrier itself and in the bottom of the fuse cavity on the plug. These may be obtained from Wahl UK. If the supply cord is damaged, it must be replaced by the manufacturer or its service agent or a similarly qualified person in order to avoid a hazard.
SAVE THESE INSTRUCTIONS
This clipper has been designed for household use.
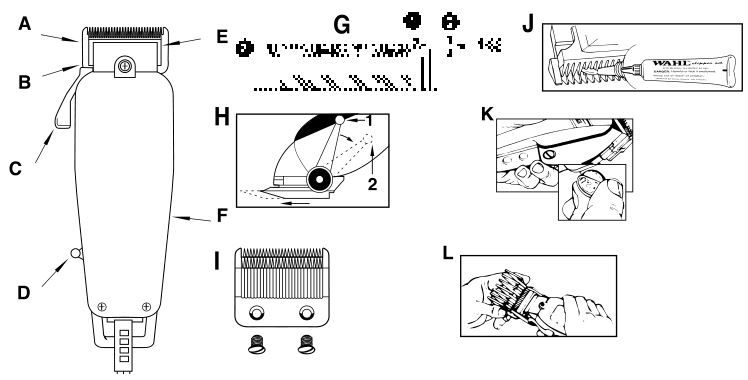
A- Bottom bladeB- Blade slide (on Multi-cut (MC) clipper only)C- Taper lever (on Multi-cut (MC) clipper only)D- SwitchE-Top bladeF- Power screw
CLIPPER MAINTENANCE
Your Wahl clipper blades were oiled and aligned before leaving our factory; however, it is possible for blades to get bumped out of alignment. Blades must be realigned if they have been removed for cleaning or replacement. To determine if realignment is necessary, compare your clipper blades with diagram G.
- If your clipper has a taper lever, position the taper lever in the close cut position. (H)
- End of top blade teeth should be approximately 1/32″ (.64 mm) back from bottom blade. This is important so that the clipper does not cut too close or allow the moving cutter to touch the skin.
- Extreme left-hand tooth of top blade must be covering or to the left of the first small tooth of bottom blade.
- Extreme right-hand tooth of top blade must be touching the big tooth on the bottom blade.
If blade alignment is incorrect, add a few drops of Wahl Clipper Oil to the blades, turn clipper “On” for a few moments, turn “Off” and unplug. Loosen screws slightly and adjust (steps 2-4 listed above). Tighten screws after blades are aligned. Other than blades this clipper has no user serviceable parts. (diagram I)
OIL (J)
The blades of your new clipper should be oiled every few haircuts. Simply place a few drops of Wahl Clipper Oil on the teeth of the blades. Use only the Wahl Clipper Oil included in the pack. Due to the high speed of your Wahl clipper, the correct type of oil must be used. Do not use hair oil, grease or any oil mixed with kerosene or any solvent, as the solvent will evaporate and leave the thick oil, slowing down the blades. Wahl Clipper Oil is a very thin, natural oil which will not evaporate and will not slow down the blades.
POWER SCREW
(Not found on all models of Wahl Clippers)If your clipper has a power screw, it has been adjusted for peak efficiency before leaving the factory. However, if voltage in your home is low, you may need to readjust it.To adjust power, use the plastic brush, a screwdriver or a thin coin to turn power screw in a clockwise direction until the arm strikes the coil, making a noise. Then, slowly turn power screw out (counterclockwise), just until noise stops.This is the maximum power setting. (K)
CORD
The cord should not be used to pull the clipper. Since freedom of movement needs to be maintained, care should be used to-keep the cord untwisted and unobstructed. When stored, the cord should be coiled and the unit placed in original box or-storage pouch (if provided).
If your clipper has a polarized plug: To reduce the risk of electric shock, this appliance has a polarized plug (one blade is wider than the other). This plug fits in a polarized outlet only one way. In the event the plug does not fit fully in the outlet, reverse the plug. In the event it still does not fit, contact a qualified electrician to install the proper outlet. Do not change the plug in any way.
TAPER LEVER
(Not found on all models of Wahl Clippers)If your clipper has an adjustable taper lever, it is conveniently located near your thumb (if you’re right-handed), so it can easily be adjusted while the clipper is in your hand.The taper lever adds versatility to your clipper by allowing you to gradually change the closeness of your cut without a guide comb. When the lever is in the uppermost position, the blades will give you the closest cut and leave the hair very short. (diagram H1) Pushing the lever downward gradually increases the cutting length. In its lowest position, the taper lever will leave the hair approximately the same length as the 1/8″ guide comb. (diagram H2)The taper lever will also extend the use of your blades since a different cutting edge is used in each setting. In addition, if extremely heavy haircutting has jammed the blades, it will help you remove hair that has become wedged between the two blades without removing the blades. While the clipper is running, rapidly move the lever from “close cut” to “longer cut” a couple of times. Doing this each time you’ve finished using your clipper will help keep the blades clear of cut hair. If your clipper stops cutting and this does not help, your cutting blades may be dull. Either replace them or return them to Wahl for sharpening.
WAHL’S GUIDE TO FOOLPROOF HOME HAIRCUTTING
Before you cut your hair
- Your clipper should be clean, oiled and in perfect working condition.
- If your kit includes a plastic cape, place it around the neck, tying the strings and overlapping the cape portion to prevent hair from falling down inside the collar. If no cape is provided, a towel will do nicely.
- Position the person whose hair is to be cut on a stool or chair so that the top of his head is about even with your eyes.
- After combing the hair to remove all tangles, hold the clipper in a relaxed, comfortable grip, with the nameplate under the palm near your index finger. This grip will help you maintain comfortable, accurate cutting control.
NOTE: To attach guide combs, hold comb with the teeth up. Snap guide comb attachment firmly to the bottom of the clipper blade. (L)
Depending on the kit you purchased your kit may include one of the following:
Adjustable Guide Combs – allowing multiple cutting lengths in the convenience of a single comb.Individual Black Guide Combs – providing predetermined lengths indicated on each guide comb.Individual Color Guide Combs – providing predetermined lengths indicated on each guide comb. Combs are also color coded for quick cutting length reference.
Using adjustable guide combs:
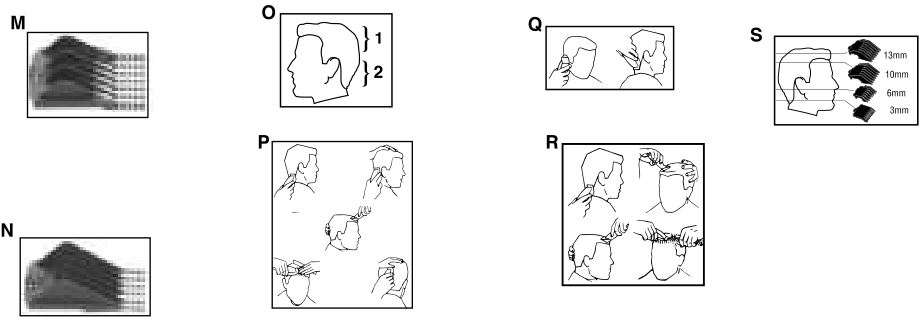
The small adjustable guide comb has five settings from 1/8” to 5/8” (3mm to 16mm) in 1/8” (3mm) increments. (M)The large adjustable guide comb has five settings from 3/4” to 1-1/4” (19mm to 32mm) in 1/8” (3mm) increments. (N)
Using individual (black or colored) guide combs:
Some kits do not include all Wahl guide combs. However, any of these combs (or additional accessories not listed here) may be available from your dealer or can be ordered directly from Wahl.
INDIVIDUAL GUIDE COMB LISTING:
• 3mm – Black/Red• 6mm – Black/Purple• 10mm – Black/Dark Blue• 13mm – Black/Orange/Pink• 16mm – Black/Yellow• 19mm – Black/Lavender• 22mm – Black/Green• 25mm – Black/Light Blue• 31mm – Black/White• 38mm – Black only• Right Ear Taper – Black only• Left Ear Taper – Black only
CUTTING HAIR
FOR MEDIUM TO LONG CUTS: (P)
The first time you cut the hair, cut only a small amount until you become accustomed to how long each guide comb leaves the hair. Always start by placing the largest guide comb on the clipper, then use shorter combs (or settings – if using adjustable guide combs) if a shorter length is desired.
Remember, between professional haircuts, the hair grows evenly all over the head and a light trimming at the lower neck and sides may be all that is needed to bring back that neat, well-groomed look.
For uniform cutting, allow the clipper to cut its way through the hair. Do not force it through at a faster rate.
- Start by combing the hair so it falls into its natural direction.
- Place the largest guide comb onto your clipper and start by trimming the sides from the bottom upwards. Hold the clipper lightly against the hair, with teeth of the guide comb pointing up but flat against the head. Slowly lift the clipper up and outward through the hair, cutting only a small amount at a time.
Repeat around sides and back of head.If you desire shorter hair, either change to a shorter guide comb (or setting – if using adjustable guide combs) or apply more pressure and less lift away from head with the present attachment.
This entire procedure requires practice, and it is always better to leave too much hair the first few haircuts.
For the top of the head, you will give a fairly short cut if you use the 1″ guide comb (If your kit includes the 1-1/4” or 1-1/2” guide comb, you may use this for a slightly longer cut.) With the teeth flat against the head, slowly start trimming from the front to the back. Again, it is better to leave the hair longer the first few haircuts.
FOR LONGER HAIR ON TOP:
By not using a guide comb, a longer cut can be achieved. Use either a barber comb or a regular comb and lift the hair on top of the head, cutting over the comb, or grasp the hair between the fingers and cut to desired length. Continue this procedure from the front to the back of the head, gradually cutting the hair shorter by reducing the space between the comb or fingers and the head. Comb frequently to remove trimmed hair and check for uneven strands.
TAPERING AROUND EARS:
USING LEFT AND RIGHT EAR GUIDE COMBSThe Left and Right Ear Guide Combs have a built in taper ranging from 1/8” to 1/2”. By following the outline of the ear with the appropriate comb you achieve a gradual taper and blending without having to use multiple combs.
TO TAPER THE AREA BORDERING THE LEFT EAR:Attach the Left Ear Taper Comb to your clipper and stand facing the left ear. While holding the clipper at a slight angle against the head, position the guide comb just back of the left ear at the hairline. Then move the clipper in a small half circle pattern around the left ear toward the front of the head. Depending on the length of hair you are working with you may need to take several small strokes as you proceed around the ear. When doing so, slowly move the clipper upward and outward being mindful of the ear. This will allow you to guide hair into the comb towards the clip- per blades.
Note: You may also achieve a tapering of sideburns by including the sideburn area as you begin to move the clipper around the ear.
TO TAPER THE AREA BORDERING THE RIGHT EAR:Attach the Right Ear Guide Comb to your clipper. Stand facing the right ear and repeat the process described above for the left ear.Finish by outlining the area around the ear as described in the following section.
OUTLINING: (Q)
No attachments are needed. (On a multi-cut clipper, push the taper lever up to the “close-cut” position.) Comb hair into desired style. Starting between the ear and the sideburns, as shown at left, hold clipper with corner edge of blade against the hairline. Slowly follow the desired outline of the hair over, around and behind the ears. For defining side-burns and the back of the neck, hold the clipper upside down, against the skin at the desired length and move down. Comb hair and check that sides are even. Check for uneven spots throughout the haircut.
CREW CUTS AND SHORT CUTS (R)
Starting with the longest guide comb, cut from the back of the neck to the crown. Hold the guide comb flat against the head and slowly move the clipper through the hair, as shown.Use the same procedure from the lower side to the upper side of the head, as shown. Then cut the hair against the direction in which it grows, from the front to the crown, and even up the cut with the sides.To give a “flattop” look, the hair on top of the head must be cut over the top of a flat comb, rather than using the guide comb.Use closer-cutting guide combs to “taper” the hair down to the neckline, as desired. Comb hair and check for uneven spots. Outline sideburns and neckline as previously described.If a short, tapered cut on the sides and back is desired, follow diagram S.The five basic areas illustrated on the Wahl haircutting guide are your “road map” to easy, do-it-yourself haircutting.For tips on the latest trends and fashions in haircutting, visit us at www.wahl.com.

This marking indicates that this product should not be disposed with other household wastes throughout the EU. To prevent possible harm to the environment or human health from uncontrolled waste disposal, recycle it responsibly to promote the sustainable reuse of material resources. To return your used device, please use the return and collection systems or contact the retailer where the product was purchased. They can take this product for environmental safe recycling.
DOWNLOAD RESOURCES
- [pdf] Instruction Manual Wahl Clippe, 93267-002
- Read more:
FAQ’S
Yes, it does.
Yes, it is covered by a 2 year warranty.
The voltage of the Wahl Clipper is 110V-120V.
No, you cannot use it on 220V.
Yes, there are additional accessories for the Wahl Clipper such as combs and guards.
Plug power cord directly into unit. Be sure clipper is switched OFF when charging. During charging, the charge indicator is illuminated. The charge indicator will begin to blink when almost fully charged and may shut off when fully charged.
The clipper will take approximately 3 to 5 hours to charge. The power indicator light will not turn off or change color after clipper is charged. After 3 to 5 hours, unplug charger from plug and clipper. The charger is designed to charge the clipper battery without overcharging.
The charging indicator on your device will start flashing to indicate that the groomer is charging. Once the groomer is fully charged, the charging indicator lights up continuously for approximately 30 minutes and then automatically turns off to save energy.
You can’t stop that. Luckily, there are lots of affordable clipper and trimmer replacement blades.
If you can stop the cutting blade with very little pressure, then your power is too weak, and you will need to clean out your tool and/or adjust the power (upcoming article). If all the teeth are present and your power is good, then you will need to clean your blades.
Hair that is unwashed can cause electric hair clippers to become clogged with grease and hairstyling products left in the hair. Don’t leave hair wet to cut it either – towel dry hair and then comb out if needed, to remove any tangles (if hair is longer or thicker).
A clipper is intended for bulk hair cutting on larger areas, but does not cut extremely close to the skin. On the other hand, a trimmer is designed for edging, outlining, dry shaving and light shaping on smaller areas such as the back of the neck, around the ears, around sideburns etc.
VIDEO
References
[xyz-ips snippet=”download-snippet”]