
WARING COMMERCIAL WFP16SCD 4-QT. (16-CUP) Food Processor Instruction Manual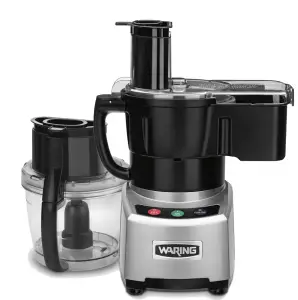
For your safety and continued enjoyment of this product, always read the instruction book carefully before using.
IMPORTANT SAFEGUARDS
When using electrical appliances, basic safety precautions should always be taken, including the following:
- READ ALL INSTRUCTIONS.
- Unplug from outlet when not in use, before putting on or taking off parts, before removing food from batch bowl, and before cleaning. To unplug, grasp plug when pulling from electrical outlet. Never pull cord.
- Unplug from outlet prior to handling or cleaning the unit.
- Blades are sharp. Handle carefully.
- Your Waring® Commercial food processor is a piece ofkitchen equipment, and like all other kitchen equipment, extreme care must be used when operating it. Although training requirements are minimal, only responsible andprudent individuals should be allowed to operate this food processor. It should not be used by or near children or individuals with certain disabilities.
- To avoid injury, never place cutting blade or disc on base without first having put the bowl properly in place.
- Keep hands as well as spatulas and other utensils away from moving blades or discs while processing food to prevent the possibility of severe personal injury or damage to the food processor. A plastic scraper may be used, but must be used only when the food processor is not running.
- To protect against risk of electrical shock, do not put base in water or other liquids.
- Avoid contact with moving parts. Never feed food by hand when slicing or shredding. Always use food pusher.
- Make sure motor has completely stopped before removing the cover.
- Do not operate any appliance with a damaged cord or plug, or after appliance has been dropped or damaged in any manner. Return appliance to the nearest authorized service facility for examination, repair or adjustment.
- The use of attachments not recommended or sold byWaring Commercial may cause fire, electric shock or injury.
- Do not use outdoors.
- Do not let cord hang over edge of table or counter, or touch hot surfaces.
- This product is ETL listed for commercial use. Use it only for food preparation as described in this book.
- Do not attempt to disable the cover interlock mechanism.
- Be certain cover is securely locked in place before operating appliance.
- If the machine malfunctions for any reason, discard any food being processed at that time.
- This appliance is not intended for use by persons (including children) with reduced physical, sensory or mental capabilities, or lack of experience and knowledge, unless they have been given supervision or instruction concerning use of the appliance by a person responsible for their safety.
- Children should be supervised to ensure that they do not play with the appliance.SAVE THESE INSTRUCTIONSAPPROVED FOR COMMERCIAL USE
GROUNDING INSTRUCTIONS
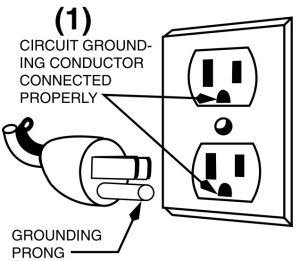

For your protection, this appliance is equipped with a 3-conductor cord set. 120 volt units are supplied with a molded 3-prong grounding-type plug (NEMA 5-15P), and should be used in combination with a properly connected grounding-type outlet as shown in Figure 1.
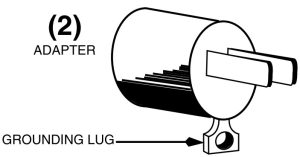
If a grounding-type outlet is not available, an adapter as shown in Figure 2 may be obtained to enable a 2-slot wall outlet to be used with a 3-prong plug.
As shown in Figure 3, the adapter must be grounded by attaching its grounding lug under the screw of the outlet cover plate.
CAUTION: Before using an adapter, it must be determined that the outlet cover plate screw is properly grounded. If in doubt, consult a licensed electrician. Never use an adapter unless you are sure it is properly grounded.
NOTE: Adapters are not permitted for use in Canada.
INTRODUCTION
Waring® Commercial food processors are the most versatile food processors in their class, featuring a LiquiLock® Seal System that enables processing of large volumes of liquid without leakage and the need to remove the S-blade while pouring. These professional machines are prime examples of Waring’s seventy-five years of industry food service experience, as well as seventy-five years of food processing experience.
The WFP16SCD is both ETL and ETL Sanitation Listed.
This instruction book describes the WFP16SCD, which comes with a sealed batch bowl (also known as a batch bowl) and a sealed/locked cutter blade (or S-blade) to CHOP, GRIND, PURÉE and MIX. The patented LiquiLock® Seal System allows for processing large volumes of liquids with no leakage. Additional discs provided allow for shredding, slicing and whipping directly in the sealed batch bowl. For large volume processing, the WFP16SCD includes a continuous feed chute. This option allows anything processed with an accessory disc to be processed directly into a separate container. The WFP16SCD is the first of the LiquiLock® series food processors to introduce a dicing operation, making it the most versatile LiquiLock® food processor available.
Size, power and convenience
The wide feed tube makes processing high volumes of largersized foods convenient and easy. The motor shaft is built for durability. The housing, batch bowl, chute, covers and pushers are all made from durable polycarbonate for heavy-use conditions and easy cleanup. The clear bowl and processing covers are convenient for viewing food processing and are made of heavy-duty material to withstand heavy-duty use.
THE PARTS
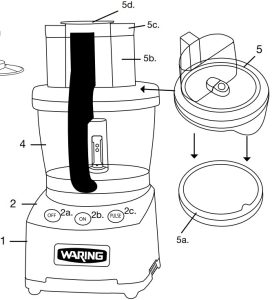
The Waring® Commercial WFP16SCD consists of the following standard parts and accessories:
- Base – Heavy-duty die-cast base
- a. Motor shaft
- Controls – Large, easy-to-read control buttons
- a. OFF
- b. ON
- c. PULSE
- Safety interlock (not shown). Prevents machine from operating until cover is in place
- Batch Bowl – Sealed clear 4-quart (16 cups/3.75L) batch bowl
- Cover – Snap-lock cover with removable gasket for easy cleaning
- a. Cover gasket
- b. Large feed chute – for feeding larger foods
- c. Large pusher – for use with the large feed chute
- d. Small Pusher – place inside of the large pusher for use with smaller foods.Note: Interlocking pushers allow use of the entire feed tube for large foods and provide controlled processing for smalldiameter foods such as carrots, celery and pepperoni.
- 6. S-blade – To chop, grind, purée and mix: Sealed and locked in place for liquid processing and easy pouring

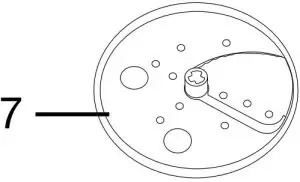
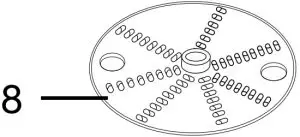
- Slicing disc – Adjustable up to 16 thicknesses
- Shredding disc – Reversible for fine or coarse shred
- Sealed whipping disc
- Disc Stem – Detachable disc stem for use with adjustable slicing disc and reversible shredding disc
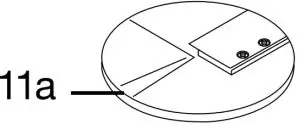
- Dicing assembly
- a. 3⁄8″ slicing blade
- b. 3⁄8″ dicing grid
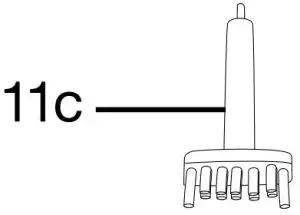
- Dicing grid punch tool (for cleaning)
- a. 3⁄8″ slicing blade
- Cleaning brush (not shown)
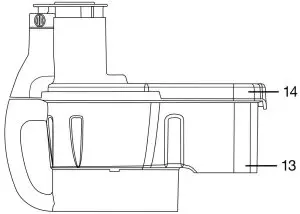
- Continuous feed chute
- Continuous feed chute cover
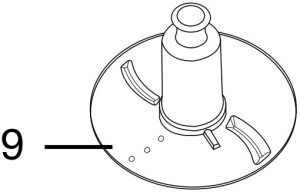
- Slinger


Product overview
ASSEMBLY OF BATCH BOWL PARTS
Prior to First Use:
- Clean and sanitize the motor base. Wash, rinse, and sanitize the batch bowl, cover, food pusher, small pusher insert and accessories.
- Place base on a counter or table near a 3-prong electrical outlet. Position it so you look at the front of the unit and can see the control panel. Do not plug in the cord until the processor is completely assembled.
- Pick up the transparent batch bowl, holding it in both hands with the handle toward you.
- Place the bowl on the base, fitting its central tube over the motor shaft on the base and placing its handle slightly to the left of back-center (at about a 7 o’clock position).
- Press the bowl down so the lower rim fits around the circular platform. Turn the bowl counterclockwise as far as it will go. It will lock into position with the tabs on the sides of the platform.Read this if assembling the batch bowl parts to use S-blade or whipping disc assembly.
- Pick up the S-blade or whipping disc, noting the diagram on the top of the plastic center. It matches the shape of the motor shaft.
- Place the S-blade or whipping disc over the top of the motor shaft, lining up the inside of the hub with the shaft. Press it down firmly, rotating the center hub until the blade or disc assembly is fully seated. It should easily drop into place. Push firmly to lock and seal S-blade or whipping disc hub in place. Be sure it is pushed down as far as it will go. If it is not all the way down, it may become damaged and any liquid may leak. Push only on the center section (plastic part); never touch the cutting blade, as it is extremely sharp.
- Check to be sure the blade or disc is all the way down by turning it back and forth while gently pushing it down. If properly installed and fully seated, the lower blade will be positioned just above the inside bottom of the bowl.
- If processing food with the S-blade or whipping disc, now is the time to add the food or liquid to the batch bowl.
- Do not fill liquid over MAX LIQUID FILL LINE. If too much liquid is used, it will overflow. In this case, stop operation, remove liquid to below MAX LIQUID FILL LINE and continue processing.
Read this if assembling batch bowl parts to use slicing disc or shredding disc assembly.
To assemble the adjustable slicing disc (WFP16S10), you must remove bowl cover. Position the disc stem over the drive shaft securely. Next, select the desired thickness setting on your adjustable slicing disc. There are 16 different positions ranging from 1–6mm in thickness. Once you’ve set the thickness, position the plastic receptacle on the underside of the disc over the disc stem securely. Do not turn on the unit until the batch bowl is properly assembled with the cover.
To assemble the reversible shredding disc (WFP16S12A), you must remove bowl cover. Position the disc stem over the drive shaft securely. Next, select the desired shredding blade size. Your reversible shredding disc has fine shredding blades on one side and coarse shredding blades on the other. Be sure the desired blade size is facing up, and position the disc on the disc stem securely. Do not turn on the unit until the batch bowl is properly assembled with the cover.
NEVER ATTEMPT TO START THE FOOD PROCESSOR WITHOUT THE COVER LOCKED INTO POSITION.
Two pushers for feed tube
There is a large food pusher and small food pusher. The large pusher is for processing larger foods. The small pusher nests in the large pusher and can be used for smaller products, guiding long thin vegetables for more precise cuts, or for jobs like slicing pepperoni. Insert the small food pusher into the large food pusher opening. Now you are ready to insert the large pusher into the feed tube chute.
DISASSEMBLY OF BATCH BOWL PARTS
ALWAYS UNPLUG THE UNIT BEFORE DISASSEMBLING.
- Remove the large food pusher from the feed tube. Remove the small pusher from the large pusher.
Disassembly when removing the S-blade or whipping disc
- Remove the batch bowl from the unit by rotating clockwise (left) to disengage the tabs on the bottom of the bowl platform from the batch bowl. When the bowl handle is on the left (about 7 o’clock position), you can gently lift the bowl straight up and out.
- Remove the lid from the batch bowl by pressing the tabs on the handle and lifting up. The black seal can easily be removed for cleaning.
It is recommended that you remove the bowl from the motor base before you remove the S-blade or whipping disc.
NOTE: REMOVE ALL FOOD AND LIQUID BEFORE REMOVING S-BLADE OR WHIPPING DISC, OR BOWL WILL LEAK.
- To remove the blade or disc, keep a slight downward pressure on the top center hub of the blade or disc while removing the bowl from the motor base. This will form a seal to prevent food particles from spilling into the center tube of the bowl and onto the motor base or the work surface. Remove all contents from the batch bowl. Then remove the S-blade or whipping disc from the bowl by pulling upward to unlock the seal. Handle the S-blade with caution; the blades are extremely sharp.
Disassembly when removing an accessory disc
- Do not remove the batch bowl until the accessory disc is removed.
- To remove an accessory disc, place your fingers on the outer edge of two opposite sides of the disc and lift. The disc should remove easily off the disc stem. If the disc stem stays attached to the disc, hold the disc in one hand with the stem facing away from your hand and pull out the disc stem. Be careful not to scrape your hand on any sharp edges.
- Remove the batch bowl from the unit by rotating clockwise (left) to disengage the tabs on the bottom of the bowl platform from the batch bowl. When the bowl handle is on the left (about 7 o’clock position), you can gently lift the bowl straight up and out.
ASSEMBLY OF CONTINUOUS-FEED CHUTE PARTS
- Clean and sanitize the motor base, and wash, rinse, and sanitize the continuous-feed chute, cover, slinger disc, food pusher, small pusher insert and processing tools prior to initial use. • Place the base on a counter or table near a 3-prong electrical outlet. Position it so that you are looking at the front of the unit and can see the control panel. Be certain that the cord is unplugged. Do not plug in the cord until the processor is completely assembled.• Pick up the continuous-feed chute, holding it in both hands with the chute pointing in the 4 o’clock position and the handle at the 10 o’clock position. Place the chute on the base, fitting its center opening over the motor shaft.• Press the chute down so the round lower rim of the chute fits around the circular platform. Rotate counterclockwise until it clicks into place and engages the rear interlock.• Place the slinger (or ejector disc) in the bowl, sliding it over the metal motor shaft until it reaches the bottom of the chute.• Select the appropriate accessory disc. Follow directions to attach stem to disc.• Place the cover on top of the chute with cover locking tab at left of locking tab on chute. Press down and rotate the cover until it latches to the tab on the continuous-feed chute. This will prevent the lid from rising up during processing.
- The interlock tab on the cover will slide into the interlock slot on the cover and engage the magnetic safety interlock switch. The interlock switch prevents operation of the machine unless the cover is in the proper position. With this switch engaged, the food processor will operate if the power is on and the controls are turned to ON or PULSE.
- To assemble the dicing assembly (WFP16S26) you may use only the continuous feed. Do not attempt to use the dicing grid in the batch bowl. First remove the continuous-feed chute cover and be sure that the slinger is properly installed (see above for assembly of continuous-feed chute). Position the dicing grid so that it fits securely on the tabs of the continuous feed chute. Guide the stem of the slicing blade through the center hole of the dicing grid and over the drive shaft. Be sure that the slicing blade is completely secured on the shaft by spinning the disc lightly until it is almost flush with the dicing grid. Do not turn on the unit until the continuous-feed chute is properly assembled with the cover.To remove dicing assembly, first unplug the food processor, rotate dicing blade counterclockwise and lift up from the edges. Be careful not to touch the blade when removing dicingassembly as it is very sharp. Next lift the dicing grid.NOTE: Dicing assembly (WFP16S26) is to be handwashed only. DO NOT PUT DICING BLADE OR GRID IN DISHWASHER.
NEVER ATTEMPT TO START THE FOOD PROCESSOR WITHOUT THE CHUTE AND COVER LOCKED INTO POSITION.
Insert the small food pusher into the large food pusher opening. Now you are ready to insert the large pusher into the feed tube opening.
- Once feed chute is assembled, place separate container under the feed chute.
DISASSEMBLY OF CONTINUOUS-FEED CHUTE PARTS
ALWAYS UNPLUG THE CORD BEFORE DISASSEMBLING.
- Turn the cover clockwise until the safety interlock tab on the cover is disengaged from the safety interlock switch on the chute, and the tabs are clear of the tabs on the cover.
- Remove the large food pusher from the feed tube. Remove the small pusher from the large pusher.
- Remove the continuous-feed chute from the motor base. If the chute is pointing in the 4 o’clock position, just lift it up. If not, rotate clockwise to disengage the tabs on the bottom of the chute platform (motor base) from the slots on the bottom of the continuous-feed chute.
- Use caution removing accessory discs as the blades are very sharp
OPERATING THE CONTROLS
- Plug the machine into an electrical outlet. The outlet must be 120V, 60Hz.
- There are three control buttons on the base unit.
The three controls are:
- ON
- OFF
- PULSE
How they work
- ON: Press the ON button to start the motor.
- OFF: Press the OFF button to stop the motor.
- PULSE: To pulse the motor, press the PULSE button down, then release. The motor will run as long as you hold the button down; it stops when you release the button.
HOW TO USE
Continuous use
For continuous processing, use the ON button which is located in the middle.
Pulsing
- For rapid ON/OFF operation, use the PULSE. The motor runs as long as you hold the button down; it stops when you release the button.
- You control the duration of each pulse by the amount of time you hold the button down. You control the frequency of pulses by the rate at which you press the button.
- Pulsing gives you greater control over consistency when chopping, blending and mixing.
- Pulsing is also useful in processing hard foods. Pulse the food a few times to break it up into smaller parts. Then proceed with continuous use after the pieces are broken up and easier to process.
- Always use the PULSE button for pulsing. Never move the bowl and cover assembly on or off to control pulses. It is less efficient and could damage the machine.
Turning the machine off with the OFF button
- Always switch the food processor off by pressing and releasing the OFF button. This assures that the power is not supplied to the motor.
- Always switch the food processor off and wait until rotation stops before removing the cover.
- While the safety interlock switch will turn the machine off if the bowl is rotated clockwise or the cover is removed while running, this should not be the means of turning the machine on or off.
- As a safety precaution, always make sure the machine is off by pressing the OFF button before pushing down the lid.
FOOD PREPARATION
- Prepare all food items to be processed by washing and peeling as required. Remove pits, stones, and large seeds.
- Cut vegetables, meats, cheeses, etc., into sizes that will fitinto either the small or large feed tube for processing with accessory discs.
- Preparation for slicing: Produce that is long and cylindrical such as carrots, cucumbers and celery should be cut flat at both ends. This will provide a consistent slice for all food processed.
FOOD PUSHER SELECTION
The feed tube can be used for adding ingredients while the food processor is running. However, it is recommended that the food pushers be left in place whenever possible to prevent splashing and avoid unwanted additions to the batch bowl.
Small pusher
This pusher is typically used when inserting vegetables vertically for smaller cuts. It should be used when slicing foods such as carrots, celery, pepperoni, etc., when a consistent, flat result is desired.
Large pusher
This pusher is typically used when inserting vegetables horizontally for longer cuts.
RESETTING THERMAL PROTECTION
The WFP16SCD food processor is equipped with an automatic reset switch to protect the motor from overheating.
If your food processor stops running under heavy use, press the OFF button and unplug the power cord. Empty the batch bowl of all its contents and set aside. Allow approximately 30 minutes for the motor to cool down.
Reassemble unit, plug the power cord back into the outlet and run first with the bowl empty. Put food into the bowl and continue processing.
If your food processor does not function properly following this procedure, discontinue use and contact a Certified Waring Customer Service Center.
USE INSTRUCTIONS FOR S-BLADE/CUTTER BLADE
- The sealed S-blade (cutter blade) is designed for chopping, grinding, puréeing, blending, mixing or kneading.
- Assemble the bowl and blade as instructed in the section titled “Assembly of Batch Bowl Parts.
Chopping and mincing
- To chop or mince in the bowl, fill the bowl up to ¾ full.
- To chop or mince most effectively, use the pulse function. This allows for better control over consistency. Continue pulsing until the desired consistency has been reached.
- If chopped foods are processed continuously, the food could be processed unevenly, i.e., food on the bottom will be finely chopped and food on the top will be more coarse.
Chopping meat
Cut meat into 1-inch (2.5 cm) pieces to ensure an even chop. Process no more than 2 lb. of meat. Press the PULSE button 3 or 4 times at a rate of 1 second on, 1 second off. If the food is not chopped fine enough, let the processor run continuously for a few seconds. If the machine has trouble starting, reduce the amount of meat in the bowl and start again.
Chopping/grating hard cheese
To chop, place up to 2 lb. of uniformly cut 1-inch (2.5 cm) cubes of chilled cheese into the bowl and pulse. For grated cheese, pulse until the cheese is in small chunks (pea size), then allow the processor to run continuously until you have the degree of grating desired. Cheese with high moisture content can ball up if processed too long.
Chopping onions, celery, cabbage, etc.
Cut onions in quarters, and other vegetables into 1-inch (2.5 cm) cubes. Place the cubed food into the batch bowl up to the top of the bowl’s inner tube, and pulse until you reach the desired consistency.
Note: If you let the blade run too long, the ingredients on the bottom will become puréed or give you uneven results.
Purée or Mix
To purée tomatoes, vegetables and fruits, make sauces, or mix and blend ingredients, place the ingredients into the bowl, turn the unit on and allow it to run continuously until you reach the desired consistency. Do not let the machine run unattended. If too much liquid is used, it will overflow. In this case, stop operation, remove liquid to below the MAX FILL LINE and continue processing.Do not fill liquid past MAX LIQUID FILL LINE.
ACCESSORY DISC SELECTION AND USE
The food processor disc accessories are made to perform a wide variety of food processing tasks: slicing, whipping, shredding and dicing. Four (4) accessory discs are included with the WFP16SCD. As of this printing they are:
- WFP16S10 – Adjustable Slicing Disc – Slice from 1mm–6mm/16 different positions
- WFP16S11 – Sealed Whipping Disc
- WFP16S12A – Reversible Shredding Disc – Fine and Coarse Settings
- WFP16S26 – 10mm (3/8″ x 3/8″) Dicing Assembly
SLICING OPERATION
- The WFP16SCD comes with an adjustable slicing disc. The adjustable slicing disc allows you to slice foods anywhere from 1mm to 6mm thick using 16 different slicing positions! Prior to mounting the disc onto the motor shaft, use the knob to select desired thickness. Once you have selected the thickness and mounted the disc onto the unit, you may secure the cover onto the batch bowl or continuous-feed chute and remove the pusher.
- Prepare all food items to be processed by washing and peeling as required. Remove pits, stones, and large seeds. Be sure the food will fit into the proper feed chute. Foods such as carrots, cucumbers, etc., should be cut flat at both ends to provide a consistent slice throughout the whole product.
- With foods like cabbage, lettuce or any product that has an undesirable core, the core should be removed. Medium-size cabbage or lettuce heads may be cut into thirds to fit in the feed chute. Larger heads may need to be quartered.
- When food preparation is complete, fill the chosen feed tube, position the pusher, turn the machine on and monitor the results.
- Never try to slice soft cheese. Use only hard cheese. Mozzarella may be sliced only when well chilled to around 36˚F.
- When sliced food reaches MAX LIQUID FILL LINE, remove all sliced food from the bowl.
SHREDDING OPERATION
- The WFP16SCD comes with a reversible shredding disc. Both sides on this disc produce a perfect shred, one fine, the other medium. When assembling the shredding disc, note that the side facing up will be the size shred produced. When the disc is secured, you may attach the cover on the batch bowl or continuous-feed chute and remove the pusher.
- Prepare all food items to be processed by washing and peeling as required. Remove pits, stones, and large seeds. Be sure the food will fit into the proper feed chute.
- Select which feed tube to use. Horizontal placement of foods such as carrots and zucchini will result in a longer shredded product. Using the smaller chute and small pusher with food inserted vertically, which will yield a shorter shredded product.
- Never try to shred soft cheese. Use only hard cheese. Mozzarella may be shredded only when well chilled to about 36˚F. Always use PULSE operation when shredding cheese.
- When shredded food reaches MAX LIQUID FILL LINE, remove all shredded food from the bowl.
SEALED WHIPPING DISC OPERATION
- The WFP16SCD comes with a sealed whipping disc. See page 8 for assembly instructions to install the whipping disc. Once assembled, you are ready to start adding in your favorite ingredients!
- The whipping disc makes any whipping job easy and quick. During the whipping process, air is added to the mixture. As air is added, the mixture expands. Be sure that the mixture does not expand beyond the MAX FILL LINE or it may leak through the feed tube. If the mixture expands to the point where it leaks out the feed tube, stop operation and reduce the contents of the bowl to below the MAX LIQUID FILL LINE and continue operation.
For whipped cream, simply add heavy cream and your choice of flavoring into the batch bowl (do not use more than 6-cups of heavy cream). Be sure the bowl is properly assembled with the bowl cover. Press the ON button for continuous operation and whip the cream until thick and fluffy.
To make butter, add heavy cream and your choice of seasoning into the batch bowl. Be sure the bowl is properly assembled with the bowl cover. Press the ON button for continuous operation and whip the cream until the moisture has mostly separated from the cream.
DICING OPERATION
- The dicing operation requires that product be sliced both horizontally and vertically by the machine. The smaller the dice required, the more difficult the cut is to achieve. Soft or juicy product will tend to mush if the dice is too small or the product is too soft. Cheese and meat are the opposite extreme. Because of the consistency of cheese and meat, it is not recommended that this kind of food be diced. Damage could occur to the blades and/or motor and will not be covered under warranty.
- During the dicing operation, attention should be given to the finished product. Any food in front of the blade should be removed before the feed chute is refilled. A visible change in the product will occur when the dicing grid requires cleaning. The best way to clean the grid is to remove the continuous-feed lid and the slicing plate, and use the dicing grid punch tool included to push through any product in between the grid blades.
- When using dicing feature: Place dicing grid in chute on top of indentations on the bowl. Pick up slicing blade and place on drive shaft so that the blade is flush with the dicing grid. Pulsing is the best method for this operation.
- When dicing, if the disc gets jammed, unplug the food processor and remove the lid of the continuous-feed chute firstRemove any food jammed in the blade opening, then rotate the slicing plate counterclockwise slowly to loosen it. Reassemble and continue dicing.
- Dicing assembly is to be hand-washed only.
GRATING OPERATION
Waring® Commercial offers grating discs as an optional accessory. For grating, use instructions below.
- Prepare all food items to be processed by washing and peeling as required. Remove pits, stones, and large seeds. Be sure the food will fit into the proper feed chute.
- Never try to grate soft cheese. Use only hard cheese. Mozzarella may be grated only when well chilled to around 36° F.
- For grating cheese, it is recommended that a slight pulsating pressure be applied with the pusher, alternating push/no push until the cheese block is completely grated. Cheese grating puts more strain on the food processor motor than other tasks and may cause overheating if too much pressure is applied in a continuous manner.
- You can typically expect to grate 10 pounds (4.5 kg) of cheese in about five (5) minutes.
- After fifteen (15) minutes of continuous cheese grating, allow the machine to cool.
- It is recommended that you plan your food preparation in a manner that will allow for five minutes of grating, followed by five minutes of food preparation while the machine rests.
- When grated food reaches MAX LIQUID FILL LINE, remove all grated food from the bowl.
JULIENNE DISC OPERATION
Waring® Commercial offers julienne discs as optional accessories. Follow the instructions below to operate.
- Prepare all food items to be processed by washing and peeling as required. Remove pits, stones, and large seeds. Be sure the food will fit into the proper feed chute.
- If a long horizontal cut is desired – for example, squash sticks – the food must be placed in the feed chute horizontally or on its side. For finely chopped food results – for example, chopped celery or finely chopped onions, you must insert the vegetables vertically or standing up. For a very fine chop of onions, quarter the onion and gravity-feed it through the chute.
Removing processed food from the batch bowl
- Turn the machine off and wait for the blade to stop moving before removing the lid and pusher.
- If the blade holds the bowl locked when the motor stops, move the handle of the bowl rapidly back and forth – first clockwise, then counterclockwise.
- If using a disc, remove before tilting the bowl, using a spatula to scrape off any food sticking to it. If using the S-blade, it will stay locked in the bowl when you tilt to pour. Use spatula to scrape food out of bowl. NEVERUSE FINGERS TO REMOVE FOOD WHILE BLADE IS IN BOWL.
TROUBLESHOOTING
This section describes potential problems and the correct solutions for them. Problems that cannot be solved with the guidelines listed below should be referred to one of the Waring Authorized Service Centers for assistance. A listing of authorized service agencies is supplied with each Waring® food processor.
| Unit does not start when assembled correctly | • Pull the plug and try plugging into another outlet.• Make sure the bowl is properly positioned on the motor base, that the bowl cover is attached properly, and that the safety interlock tab on the cover has properly engaged the safety interlock switch.• Press ON button. |
| Unit stops running during processing | • The unit may have overheated. Refer to Resetting Thermal Protection section.• Turn unit off and unplug.• Remove bowl attachment.• Remove food being processed from inside the bowl and set aside.• Allow unit to cool for 30 minutes.• Reassemble unit, and run first with the bowl empty, then put food into the bowl and try again. |
| Unit jams or vibrates excessively | • Turn unit off and unplug.• Disassemble the batch bowl/accessories.• Make sure there is no food in S-blade hub (if applicable).• Clean food off accessory discs (if applicable).• Reassemble unit, and run first with the bowl empty, then put food into the bowl and try again. |
| Unit will not come up to full speed | • Bowl is overloaded – remove food being processed and reload using smaller quantities. |
| If unit does not operate after you have followed the above | • Check outlet to be sure there is current.• Check to be sure circuit breaker is on.• Check to be sure the fuse is not blown if there are fuses on this circuit.• Call a local Waring service agency. |
| If food processor makes grinding noise | • Turn unit off, unplug, disassemble, check bowl and blade to see if they have been rubbing together.• If bowl and blade are rubbing, call your authorized Waring service agency. |
| If you notice that the blade is bending during heavy operation and/or yielding inconsistent cut results | • Stop use, discard contents and do not attempt to fix the disc at home. Call local Waring service agency for advice and/or to purchase a new disc. |
CLEANING AND MAINTENANCE
Always unplug motor base when not in use, before inserting or removing parts, and before cleaning. Clean the food processor and accessories prior to initial use and after each use. Do not use harsh, abrasive-type cleaners on any part of the food processor. Handle very carefully as the blades and discs are sharp.
- Carefully wash the motor shaft with a small brush.
- Wash, rinse, sanitize and air-dry the bowl, lid, cover, lid gasket, small food pusher, large food pusher, continuous-feed chute, accessory discs, dicing grid punch tool and S-blade prior to initial use and after use, unless they will be used again immediately.NOTE: Above parts are dishwasher safe except for the dicing assembly.
- The dicing assembly/dicing grid and slicing blade (part 11a, 11b) are to be hand-washed only. Use the provided dicing grid punch tool (part 16) to dislodge food particles from the grid.
- For manual cleaning, use only low-foaming detergents such as International Products Corp. LF2100, formulated for cleaning dishware and cooking utensils. These products can be purchased from laboratory, restaurant and commercial food service suppliers. Follow the detergent manufacturer’s instructions.
Wash and rinse all of the above items after each use. A stiff bristle brush will help to knock food particles out of the crevices of the discs and blades before washing. Pre-clean stubborn food deposits with a brush and presoak in the detergent solution if necessary
RINSE
Use only water to rinse.
SANITIZE
Use regular, unscented bleach diluted with water between 50°F and 120°F. Follow the food equipment cleaning instructions on the label to not exceed 200 ppm total available chlorine. The sanitizing dilutions are based on the hypochlorite concentration of the bleach. The dilutions for two commonly available bleach concentrations are:
- Hypochlorite: 5.25% – 3 teaspoons bleach per gallon of water
- Hypochlorite: 8.25% – 2 teaspoons bleach per gallon of water
Immerse in or alternately spray with sanitizing solution and soak for 2 minutes.
AIR-DRY
Drain sanitizing solution and allow parts to air-dry.
To clean and sanitize the motor base
Clean and sanitize the motor base prior to initial use and after each use. Unplug the unit.
- To clean: Wipe down the motor base with a wet cloth.
- To sanitize: Wipe down the motor base with a soft cloth or sponge that has been dampened with sanitizing solution*.DO NOT IMMERSE THE MOTOR BASE IN WASHING SOLUTION, RINSE WATER OR SANITIZING SOLUTION.
- Allow to air-dry.
Use only sanitizing solutions recommended in this manual.
LIMITED WARRANTY
LIMITED FIVE YEAR MOTOR WARRANTYLIMITED TWO YEAR PARTS AND LABOR WARRANTY (U.S. and Canada only)
Waring® Commercial warrants that this product’s motor shall be free from defects in material and workmanship for a period of five years from the date of purchase when used with foodstuffs, nonabrasive liquids (other than detergents) and nonabrasive semi-liquids, providing it has not been subject to loads in excess of indicated rating. All other components are warranted for a period of two years from date of purchase.
Under this warranty, the Waring® Commercial division will repair or replace any part which, upon our examination, is defective in materials or workmanship, provided the product is delivered prepaid to the Waring Service Center, 314 Ella T. Grasso Ave., Torrington, CT 06790, or any factory-approved service center. This warranty does not: a) apply to any product that has become worn, defective, damaged or broken due to use or due to repairs or servicing by other than the Waring Service Center or a factory approved service center or due to abuse, misuse, overloading or tampering; b) cover incidental or consequential damages of any kind.
This warranty is applicable only to appliances used in the United States or Canada; this supersedes all other express product warranty or guaranty statements. For Waring products sold outside of the U.S. and Canada, the warranty is the responsibility of the local importer or distributor. This warranty may vary according to local regulations.
 report this ad
This warranty is void if appliance is used on Direct Current (DC).
References
[xyz-ips snippet=”download-snippet”]