WARING COMMERCIAL WW180X Single and Double Serviceable-Plate Waffle Makers

For your safety and continued enjoyment of this product, always read the instruction book carefully before using.
IMPORTANT SAFEGUARDS
When using electrical appliances, especially when children are present, basic safety precautions should always be taken, including the following:
- READ ALL INSTRUCTIONS.
- Always unplug from outlet prior to handling or cleaning.
- Appliances are not intended to be operated by means of an external timer or separate remote-control system.
- This appliance is not intended for use by persons (including children) with reduced physical, sensory or mental capabilities, or lack of experience and knowledge, unless they have been given supervision or instruction concerning use of theappliance by a person responsible for their safety.
- This appliance shall not be used by children. Keep the appliance and its cord out of reach of children.
- This appliance can be used by children aged from 8 years and above, and persons with reduced physical, sensory, or mental capabilities or lack of experience and knowledge if they have been given supervision or instruction concerning use of the appliance in a safe way and understand the hazards involved. Children shall not play with the appliance.
- Cleaning and user maintenance shall not be made by children without supervision.
- Once you have finished baking, turn control to setting #1, switch toggle to OFF position, and remove plug from electrical outlet. Leave top lid open and allow grids to cool before cleaning. Simply brush crumbs from grooves and absorb any excess cooking oil by wiping with a dry cloth or paper towel. You may clean the grids by wiping with a damp cloth to prevent staining and sticking from batter or oil buildup.
- The temperature of all surfaces marked with this symbol will be very hot when the appliance is in use. DO NOT TOUCH these surfaces as possible injury could occur. Allow to cool completely before handling this appliance.
- The outer surface may get hot when the appliance is operating.
- If the supply cord is damaged, it must be replaced by the manufacturer, its service agent, or similarly qualified persons in order to avoid a hazard.
- The use of accessory attachments not recommended or sold by the manufacturer may result in fire, electric shock, or injury to persons.
- Do not use outdoors, or use appliance for other than its intended use.
- Do not let power cord hang over edge of table or counter, or touch hot surfaces.
- Do not place on or near a hot gas or electric burner, or in a heated oven.
- Extreme caution must be used when moving an appliance containing hot oil or other hot liquids.
- Always begin by plugging appliance into wall outlet. To disconnect, turn control to setting #1, switch toggle to OFF position, then remove plug from wall outlet.
- WARNING: TO REDUCE THE RISK OF FIRE OR ELECTRIC SHOCK, REPAIRS SHOULD BE MADE ONLY BY AUTHORIZED PERSONNEL. DO NOT REMOVE THE BASE PANEL. NO USER SERVICEABLE PARTS ARE INSIDE.
- To acquire another instruction manual, go to www.waringcommercialproducts.com
- This appliance is intended to be used in a household and similiar applications such as:
- Staff kitchen areas in shops, offices and other working environments;
- Farmhouses;
- By clients in hotels, motels and other residential-type environments;
- Bed and breakfast-type environments
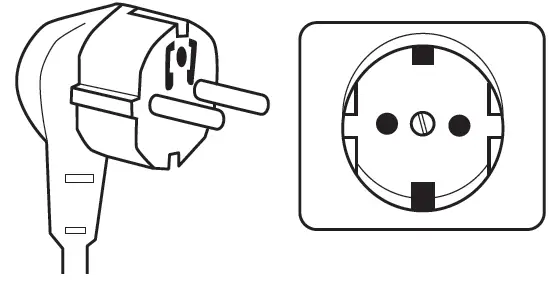
GROUNDING INSTRUCTIONSFor your protection, Waring® Commercial Waffle Makers are supplied with a molded, 3-prong, grounding-type plug and should be used in combination with a properly connected, grounding-type outlet as shown in the figure.

SPECIAL CORD SET INSTRUCTIONSA short power-supply cord is provided to reduce the risks resulting from becoming entangled in or tripping over a longer cord. Extension cords may be used if care is exercised in their use.If an extension cord is used, the marked electrical rating of the extension cord should be at least as great as the electrical rating of the appliance, and the longer cord should be arranged so that it will not drape over the countertop or tabletop where it can be pulled on by children or animals, or tripped over.
Correct Disposal of this Product
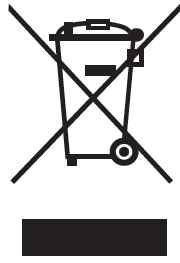 This marking indicates that this product should not be disposed of with other household wastes throughout the EU. To prevent possible harm to the environment or human health from uncontrolled waste disposal, recycle it responsibly to promote the sustainable reuse of material resources. To return your used device, please use the return and collection systems or contact the retailer where the product was purchased. They can take this product for environmentally safe recycling.
TO ENSURE PROPER USE OF THIS UNIT, PLEASE SEE IMPORTANT GROUNDING INSTRUCTIONS. PRIMARY COUNTRIES USING THE DIFFERENT PLUG TYPES ARE LISTED FOR REFERENCE ONLY. REFER TO THE ACTUAL UNIT TO DETERMINE WHICH PLUG TYPE IS APPLICABLE.
TYPE F PLUG(GERMANY, AUSTRIA, NETHERLANDS, SWEDEN, NORWAY, FINLAND, PORTUGAL, SPAIN, EASTERN EUROPE)
This grounded plug has two round prongs and there are two grounding clips on the sides of the socket. This plug is nonpolarized so the plug can be inserted in either direction into the socket. Grounding is accomplished when the clips on the socket meet the contact on the plug. Ensure that the plug is fully inserted.
TYPE G PLUG(UNITED KINGDOM, IRELAND, CYPRUS, MALTA, MALAYSIA, SINGAPORE AND HONG KONG)
This grounded plug has three rectangular prongs that form a triangle. Line up the prongs to the socket and ensure that the plug is fully inserted. This plug is also fuse-protected for power surges.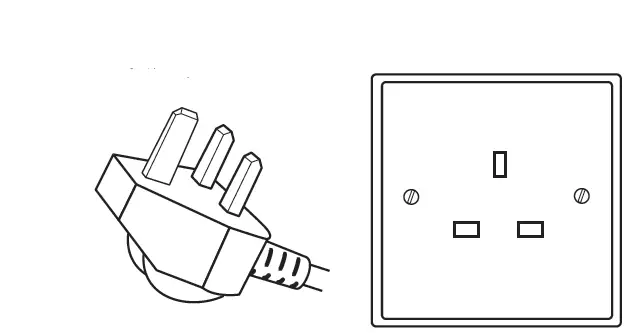
TYPE I PLUG(ARGENTINA, AUSTRALIA, CHINA, NEW ZEALAND, PAPUA NEW GUINEA)
This grounded plug has two flat pins in a V shape, as well as a grounding pin.
| Model | Name | Plug Type |
| WWD180XCE/200XCE | Classic Waffle Maker | Type F |
| WW180XCE/200XCE | Belgian Waffle Maker | Type F |
| WMB400XCE/800XCE | Mini Belgian Waffle Maker | Type F |
| WBW300XCE | Bubble Waffle Maker | Type F |
| WWD180XCK/200XCK | Classic Waffle Maker | Type G |
| WW180XCK/200XCK | Belgian Waffle Maker | Type G |
| WMB400XCK/800XCK | Mini Belgian Waffle Maker | Type G |
| WBW300XCK | Bubble Waffle Maker | Type G |
WWD180XCNA/NAA,WWD200XCNA/NAA Classic Waffle Maker Type I
WW180XCNA/NAA,WW200XCNA/NAA Belgian Waffle Maker Type I
WMB400XCNA/NAA,WMB800XCNA/NAA Mini Belgian Waffle Maker Type I
WBW300XCNA/NAA Bubble Waffle Maker Type I
SPECIAL FEATURES
- Waffle Grids – Belgian, Mini Belgian, Classic and Bubble (Belgian waffle grids shown)Waffle plates are triple coated with Whitford® QuanTanium® nonstick coating*.
- Browning Control Adjustment
- Adjustable for different batters and personal preference.
- Power Indicator Light
- Lights red when waffle maker is on and heating up.
- Ready Indicator Light
- Lights green when waffle maker is ready to bake.
- Power Switch
- Indicator Beeps (not shown)
- Will beep 6 times when unit is ready to bake for first waffle of every baking session.
- Will beep 3 times when waffle is done.
- Base
- Handle
- 4 oz. Measuring Scoop(not shown)For the WMB400X unit, use1 oz. of batter per mini Belgian.
- Removable Drip Tray
Whitford® QuanTanium® nonstick coating is a registered trademark of Whitford.
| WARING® COMMERCIAL WAFFLE MAKERS | |
| WWD180X/200X Series | Classic Waffle, 5/8″ thick |
| WW180X/200X Series | Belgian Waffle, 1″ thick |
| WMB400X/800X Series | Mini Belgian Waffle, four 1″ thick |
| WBW300X Series | Bubble Waffle |
BEFORE FIRST USE
- These Waring® Commercial Waffle Maker plates are triple coated with Whitford® nonstick coating.* Before the first use, we suggest you season the waffle grids by preheating and then brushing them with cooking oil. Wipe with a paper towel or pastry brush.
- Remove any dust from shipping by wiping the plates with a damp cloth. Remove all protective paper and wrapping.
INSTRUCTIONS FOR USE
- Plug cord into wall outlet.
- Switch the toggle switch to the ON position. The RED light will illuminate to signal power.
- Preheat your Waring® Commercial Waffle Maker on setting #4 or preferred setting. It will now begin the preheating process. This should take about 4 minutes. The machine will sound 6 beeps and the GREEN indicator light will go on to signal the unit is ready for baking. Season the waffle grids by spraying with cooking spray or brushing with a flavorless oil. For initial use, it is important that the waffle maker is preheated before seasoning with cooking spray or oil.NOTE: The first time you use your waffle maker, it may have a slight odor and may smoke a bit. This is normal, and common to heating appliances.
- Choose a setting on the browning control dial. For golden brown waffles, we recommend using setting #4. When the waffle is completely baked, the waffle maker will sound 3 beeps. Baking time is determined by browning level chosen.
- Fill measuring scoop with batter to fill line. Pour batter evenly into the center of the waffle grid. For mini Belgian units, pour 1 oz. of batter in each waffle mold. Use a heatproof spatula to spread the batter evenly over the grid. Close the lid and rotate the unit 180°.
- Once the waffle is ready and the waffle maker has beeped 3 times, rotate the waffle maker 180°, open the lid and remove waffle by gently loosening the edges with a heatproof plastic spatula. Never use metal utensils, as they may damage the nonstick coating.
- For double waffle makers, multiple waffles can be baked at one time. For one waffle, simply follow previous instructions. For more than one waffle at once, pour batter into top waffle compartment, then rotate 180˚. You will now be able to open the other waffle compartment. Pour the batter in the grid and rotate another 180˚ in the other direction. Both waffles will now cook. There are individual green READY lights that will illuminate when each waffle is baked, and when an empty compartment is ready to bake another waffle.
THERMAL PROTECTIONIF UNIT OVERHEATS, THE MACHINE WILL AUTOMATICALLY TURN OFF. UNPLUG, LET MACHINE COOL FOR 10 MINUTES, PLUG IN AND CONTINUE USE.IF POWER IS LOST DURING OPERATION, UNPLUG AND LET COOL 10 MINUTES. PLUG IN AND CONTINUE USE.
WAFFLE PLATE CLEANING & MAINTENANCE
Clean daily and diligently; doing so will ensure that your waffle maker works properly and continues to work well over time.
How to Clean Waffle PlatesOnce you have finished baking each day, turn the switch to the OFF position and remove plug from electrical outlet. Leave top lid open and allow plates to cool before cleaning. Be certain plates have cooled completely before cleaningNever take your waffle maker apart for cleaning. Brush crumbs from grooves and absorb any excess cooking oil by wiping with a dry cloth or paper towel. You may clean the plates by wiping with a damp cloth to prevent staining and sticking from batter or oil buildup. If batter adheres to plates, simply pour a little cooking oil onto the baked batter and let stand approximately 5 minutes. This will allow the batter to soften and will make it easier to remove.
To help remove oil buildup and batter residue, place a damp paper towel in between the waffle plates and close the lid. Allow to sit for a few minutes.To clean exterior, wipe with a soft, dry cloth. Never use an abrasive cleanser or harsh pad. NEVER IMMERSE CORD, PLUG OR UNIT IN WATER OR OTHER LIQUIDS.
Serviceable PlatesTo order replacement plates, find a local distributor or service center.Although removable, these plates are not intended to be removed for routine cleaning. Plates are ONLY meant to be removed if there is a scratch on the nonstick coating and you need to replace the plate. If removed for cleaning, the plates are dishwasher safe.
How to Remove the Waffle Plates
PARTS
- 2 waffle plates
- 4 large screws (2 extra)
- 16 small screws (6 extra)
- Screwdriver
INSTRUCTIONS
- Carefully unpack the replacement kit.
- Using the provided screwdriver, carefully remove the screws from the perimeter edge of waffle plate/s. Lift plates up and off the housing. Slight force may be needed to release the plates completely. Discard the old plate/s and screws.
- Starting with the lower grid, place the new plate onto the housing by aligning rear and front projections onto the base. The wider projections will fit into the rear.
- Install 1 large screw into the slot located near the handle.
- Install the smaller screws around the perimeter.
- Repeat steps 2–5 for the upper grid replacement.
Trademarks or service marks of third parties used herein are the trademarks or service marks of their respective owners.
©2020 Waring Commercial314 Ella T. Grasso Ave.Torrington, CT 06790www.waringcommercialproducts.com1-800-4-WARINGPrinted in ChinaStampato in Cina
X Series E/K/NA/NNA IBSerie X E/K/NA/NNA IB
 report this ad
![]()
References
[xyz-ips snippet=”download-snippet”]