ELECTRICAL HOIST260EHLW12260EHLW24
Assembly & Operating Instruction
INTRODUCTION
Congratulations on your purchase of a high-quality winch. We design and manufacture lifting winches to strict specifications, with proper use and maintenance it will bring you many years of satisfying service.WARNING – Read, understand, and follow all danger, warning, and cautions instructions before operating this device. Failure to read and follow these instructions may result in personal injury and/or property damage.Follow these general safety precautions:
- Confirm that the winch complies with the correct application.
- Ensure the winch is secure and the rope is correctly wound onto the drum.
- Do not use unsuitable pulleys or accessories.
- Do not use unsuitable rope if construction is weak strength or has any defects.
- Pay attention to the earthing, it provides a path of least resistance for electric current to reduce the risk of shock.
- Check the winch for smooth operation without load before loading operation.
- Make sure the wire rope is wound evenly on the first layer on the drum, unwind if mixed crossed windings occur.
WARNING
- The winch MUST never be used to lift, support or otherwise transport people or animals.
- The winch is NOT a load-bearing/securing device and MUST never hold a load for long periods of time or be used for anchoring transported pieces of equipment.
- A minimum of five (5) wraps of rope around the drum at all times is necessary to support the rated load.
- We take no responsibility for the subsequent or poor performance of this winch if oil or grease properties other than recommended are used or any accident occurs through not reading and following these safety instructions.
DANGER
The following environmental conditions may result in the possible causes of winch problems.
| -Low temperature below -10°C, high temperature above 40°C or humidity above 90% conditions.-In heavy acid or salty conditions.*Cause malfunction of spare pares. | |
| -Exposed to rain or snow*Cause rust or short circuit. | |
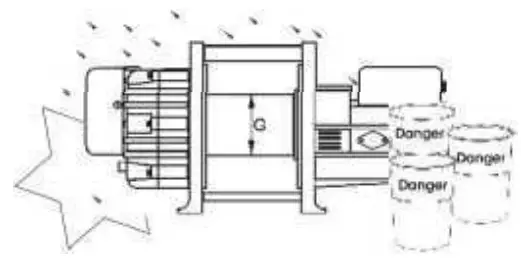 |
-Inorganic chemistry or explosive power conditions.*Cause explosion. |
|
-In heavy general powder conditions.*Cause malfunction of performances. |
SAFETY PRECAUTIONS
Always Pay attention to the following instructions. Obvious mistakes in operation may result in personal injury or equipment damage.
WINCH ASSEMBLY AND MOUNTING
- Your winch is designed with a bolt pattern that is standard in this class of lifting winch. Many winch mounting kits (Sold Separately) are available that utilize this bolt pattern for the mounting channels. If you will utilize the mounting channel you must ENSURE that it is mounted on a flat surface so that the three major sections (motor, drum, and gear housing) are properly aligned. Proper alignment of the lifting winch will allow even distribution of the full rated load.
- Pull out a few inches of cable from the drum. Now, using the remaining cap screws, flat washer, lock washer, and nut secure the hoist to the mounting channel (Sold Separately)
- Connect the battery and motor leads as in the drawing above. Keep in mind that every type of winch is different from each other.
- Assemble the clevis hook to the cable. Take off the pin from the clevis hook, connect the clevis hook to the cable and mount the pin back to the clevis Hook.
- Always use the hand saver (If Supplied) when free-spooling and re-spooling the wire rope. Using the hand saver keeps your hands and fingers away from the rotating drum.
- Check for proper drum rotation. Pull out some cable from the drum. Press the cable out button on the remote lead. If the drum is turning in the correct direction releasing more cable then your connections are correct. If the drum is turning and collecting more cable then the direction is incorrect and reverse the leads on the motor. Repeat and check rotation.
MOUNTING DRAWING
The mounting drawing
CAUTION – Batteries contain gases that are flammable and explosive. Wear eye protection during installation and remove all jewelry. Do not lean over the battery while making connections.
WINCH WORKING DEMONSTRATION
- Grab the cable assembly and pull the cable to the desired length, then attach to the item being pulled.
Caution: Always leave at least five turns of cable on the drum; Review hoist safety warnings and precautions on page 2,3 before continuing.
- Insert the remote lead switch assembly plug into the control box socket.
- The test-run winch is in both forward and backward directions, each direction for one or two seconds.
- While standing aside from the towpath, hold and operate the remote lead switch assembly supplied by your choice. To reverse directions. Wait until the motor stops completely before reversing directions.
- When the pulling is complete, remove the remote lead switch assembly. From the female connector of the directional valve and replace the female connectors cover.
REPLACING THE WIRE ROPE
If the wire rope has become worn or is beginning to show signs of damage, it must be replaced before being used again.
- Extend cable assembly to its full length. Note how the existing cable is connected to the drum.
- Remove old cable assembly and attach new one as the old cable connected to the drum. Insert the end of the new rope and secure the screw.
- Ensure that the new cable wraps in the same rotation direction as the old one.The cable should leave the drum from the bottom, under the drum.
- Retract Cable Assembly onto the drum, first five wraps being careful not to allow kinking, then steel cable must be wound onto the drum under a load of a light load.
WARNING – Only replace the wire rope with the identical replacement part recommended by the manufacturer. Contact service agent.
MAINTENANCE
- Periodically check the tightness of mounting bolts and electrical connections.Remove all dirt or corrosion and always keep clean.
- Do not attempt to disassemble the gearbox. Repairs should be done by themanufacturer or an authorized repair center.
- The gearbox has been lubricated using a high-temperature lithium grease and is sealed at the factory. No internal lubrication or maintenance is required.
| Classification of checks | Checking Item | Checking Method | Checking Reference | ||
| Daily | Periodical | ||||
| Onemonth | Threemonth | Oneyear | |||
| Wire Rope | Breaking of the base wire | Visual | Less than 10% | ||
| Decreasing of diameter | Visual | 7% of normal diameter max | |||
| Kink phenomena | Visual | free from kink be phenomena | |||
| Deforming or corrosion | Visual | To be not remarkable | |||
| Fastening condition of end | Visual | To be sufficient forhanging up of the load | |||
| Condition of ropewinding-in | Visual | To be free from irregularwinding | |||
| Drum | Drum and flange | Visual | No deformation | ||
| Wear of drum | Visual | free from To be remarkable wearing | |||
| Switch | Wire | Visual | No damage | ||
| “IN” and “OUT” | Visual | No abnormality | |||
| Operation | Working direction | Visual | No abnormality in lifting | ||
| Abnormal sound | Hear out | No abnormal sound | |||
| Overload test | Working | Existence of abnormalities |
TROUBLESHOOTING
When the winch fails to operate after several attempts, or if there is any fault while operating check the following:
| Symptom | Possible Cause | Remedy |
| A hoist will not operate | Cut circuit | Check battery lead |
| Weak battery | Recharge or replace the battery (Minimum 650CCA) | |
| Damaged circuit breaker | Replace circuit breaker | |
| Bad connection of wirings | Reconnect tightly | |
| Damaged solenoid | Replace solenoid | |
| The cut circuit on the switch | Replace switch | |
| Damaged motor or worn carbon brush | Replace motor or carbon brush | |
| Drop or lost motor wiring | Tighten wirings | |
| Motor runs in one direction | Broken wiring or bad connection | Reconnect or replace wiring |
| Damaged or stuck solenoid | Replace solenoid | |
| Switch inoperative | Replace switch | |
| Drop or lost wiring | Replace wiring and tighten wirings | |
| Hoist won’t lift rated load | Considerable voltage drop exceeds by 10% of the rated voltage of 12V DC or 24V DC | Correct leads size |
| Replace the battery as bad condition | ||
| Clean and tighten the wirings | ||
| No brake | Damaged brake cam and disc | Replace brake cam and disc |
| Damaged gearbox | Replace gearbox | |
| Drop snatch ring | Replace snatch ring | |
| Oil leakage at the brake | Clean oil leakage | |
| Damaged or inoperative spiral spring | Replace and position spiral spring | |
| Brake distance is too long | Worn or damaged brake | Replace or adjust the brake |
| Oil leakage at the brake | Clean oil leakage | |
| Damaged gear train | Hit by a certain exterior force | Replace the damaged components |
| Damaged gear train | Replace the damaged components | |
| Overload operation | Replace a new hoist | |
| Motor runs extremely hot | A long period of operation | Allow cooling |
| Damaged motor | Replace or repair motor | |
| Damaged or inoperative brake | Replace or repair brake | |
| Hoist vibrates badly, is noisy, or does not hold aload | Damaged brake | Replace or repair brake |
| The mounting surface is not flat | Make sure the mounting surface is flat | |
| The tie bar is bent | Replace tie bar |
WINCH ASSEMBLY DRAWING
 HOIST PARTS LIST
| No. | Part # | Qty | Description | Remark |
| 1 | H2600001 | 12 | Lock Washer Φ 8 | |
| 2 | H2600002 | 4 | Screw M8x 25 | |
| 3 | H2600100 | 1 | Motor Assembly | |
| 4 | H2600003 | 1 | Ring Seals | |
| 5 | H2600004 | 1 | Motor Bracket | |
| 6 | H2600005 | 8 | Flat Washer Φ12 | |
| 7 | H2600006 | 8 | Lock Washer Φ 12 | |
| 8 | H2600007 | 8 | Cap Screw M12 x 35 | |
| 9 | H2600008 | 8 | Locknut M12 | |
| 10 | H2600009 | 2 | Bushing-Drum | |
| 11 | H2600010 | 2 | Ring Seals | |
| 12 | H2600200 | 1 | Break / Shaft Assembly | |
| 13 | H2600011 | 1 | Six Angle Bar | |
| 14 | H2600012 | 4 | Screw M10 x 30 | |
| 15 | H2600013 | 6 | Lock Washer Φ10 | |
| 16 | H2600014 | 2 | Tie Bar | |
| 17 | H2600300 | 1 | Drum Assembly | |
| 18 | H2600015 | 2 | Screw M8 × 10 | |
| 19 | H2600016 | 1 | Coupling | |
| 20 | H2600017 | 1 | End Bearing | |
| 21 | H2600018 | 2 | Gasket | |
| 22 | H2600019 | 1 | Gear— Ring | |
| 23 | H2600020 | 1 | Circlip For Hole | |
| 24 | H2600021 | 1 | Bearing | |
| 25 | H2600400 | 1 | Gear Carrier Assembly (Output) | |
| 26 | H2600022 | 1 | Circlip For Hole | |
| 27 | H2600500 | 1 | Gear Carrier Assembly (Intermediate) | |
| 28 | H2600600 | 1 | Brake/ Shaft Assembly | |
| 29 | H2600023 | 1 | Gear—Input Sun | |
| 30 | H2600024 | 3 | Planetary Gear | |
| 31 | H2600025 | 1 | Thrust Washer | |
| 32 | H2600026 | 1 | Bearing | |
| 33 | H2600027 | 1 | Gear ring bolt | |
| 34 | H2600028 | 1 | Gear—Housing | |
| 35 | H2600029 | 8 | Flat Washer Φ 8 | |
| 36 | H2600030 | 8 | Screw M8 × 90 | |
| 37 | H2600031 | 2 | Screw M10 × 35 | |
| 38 | H2600032 | 1 | Tie Bar(I) | |
| 39 | H2600700 | 1 | Remote Control Switch | |
| 40 | H2600800 | 1 | Cable Assembly | |
| 41 | H2600033 | 1 | Strap | |
| 42 | H2600900 | 1 | Control Section | |
| 43 | H2601000 | 1 | Roller Fairlead | |
| 44 | H2600034 | 1 | Installation plate |
SPECIFICATION
| Rated line pull | 2600 lbs (1180 kgs) |
| Motor: series wound | 12V: Input: 5.5kW / 7.4hp; Output: 2.9kW / 3.9hp24V: Input: 6.1kW / 8.2hp; Output: 3.1kW / 4.2hp |
| Gear reduction ratio | 370:1 |
| Cable (Dia. x L) | 013/41″ x 91.8 ‘ (08.1 mm x 28m) |
| Drum size (Dia. x L) | 04.7 “x 5.1 ” (0120mm x 130mm) |
| Mounting bolt pattern | 6.75 “x 4.5 ” (171.4mm x 114.3 mm)6.75 “x6.5 ” (171.4mm x 165.1mm) |
| Overall dimensions(LxWxH) | 21.8″ x 8.4″ x 8.74″553 mm x214mm x222mm |
Pull, Speed, Amperes, Volts (First layer):
| Line Pull | Line Speed ft/min (m/min) | Current (A) | ||
| lbs (kgs) | 12V DC | 24V DC | 12V DC | 24V DC |
| 0 | 24.6(7.5) | 27.5 (8.4) | 60 | 35 |
| 1000(453) | 19.4(5.9) | 23.3(7.1) | 80 | 40 |
| 2000(907) | 14.8(4.5) | 18.7(5.7) | 110 | 55 |
| 2600(1180) | 12.5(3.8) | 15.7(4.8) | 125 | 65 |
Line Pull and Rope Capacity Per Layer
| Layer | Rated line pull lbs (kgs) | Total rope on the drum ft (m) |
| 1 | 2600(1180) | 19.7(6) |
| 2 | 2253(1022) | 41(12.5) |
| 3 | 1988(901) | 65.6(20) |
| 4 | 1700(770) | 91.8(28) |
Warranty Page
LIMITED LIFETIME WARRANTY WITH 3 YEARS ON ELECTRICALWinch Solutions Ltd are the sole distributors of WARRIOR WINCHES.
- Winch Solutions Ltd warrants to the original retail buyer for Domestic and Off-Road use only that any mechanical component of a genuine WARRIOR WINCH is free of mechanical defects for the lifetime of the winch.
- Winch Solutions Ltd warrants to the original retail buyer for Commercial & Industrial use only that any mechanical component of a genuine WARRIOR WINCH is free of mechanical defects for a period of 1 year.
- Winch Solutions Ltd warrants to the original retail buyer for Domestic, Off-Road, Commercial & Industrial use only that any mechanical component of a genuine WARRIOR HOIST is free of mechanical defects for a period of 1 year.
The warranty DOES NOT cover the cost of transportation/shipping charges to and from a place of work or residence, labor (Outside 1 Year), replacement, or installation of defective parts. If a product is deemed unusable and needs to be replaced we don’t offer a new for old policy and the item will be replaced with a similar specification & age to the one that was submitted for repair.
The electrical components (including the motor, contactor, and switches) will be free of defects in material and workmanship for a period of (3) three years (36 Months) from the original purchase provable date of purchase except on WARRIOR HOIST & AC WINCHES this will be 1 Year Only.
Any Product Winch Solutions Ltd determines to be defective will be repaired or replaced at Winch Solutions Ltd’s sole discretion without charge to the Buyer upon Buyer’s compliance with this procedure. The Seller or its Authorized Agent may make reasonable charges for parts and for labor for repairs not covered by this Lifetime Limited Warranty. The warranties set forth herein are exclusive and in lieu of all other warranties, whether oral, written, expressed, or implied.
Year ONE (1): Parts & Labour.Years TWO & THREE (2-3): Parts only on electrical.Limited Lifetime:Year ONE (1): Parts & Labour.Remaining Years: Parts only.
Other Warranty Exclusions are as follows
This warranty excludes:– Cosmetic defects such as paint, decals, etc.,– Worn parts including steel/synthetic ropes– Any Accessory part including roller fairleads, hooks, mounting plates, transmitter, isolator switches– Failures due to acts of God and other force majeure events beyond the manufacturer’s control– Problems caused by parts that are not original WARRIOR parts– Alteration or modification(s) made by any party other than the manufacturer.– Any electrical cables & wireless remote systems outside of 30 days. (Excluding Lodar systems)– General wear & tear of components– Any third party equipment– Batteries
To obtain service under this warranty, the Buyer shall mail, ship, or otherwise deliver to the address noted below, at the Buyers expense; (1) the Product, (2) a written description of the problem, (3) Buyers name, address, and contact number, (4) copy of the original purchase receipt.
This warranty does not apply to defects of the Product caused by; (1) normal wear and tear, (2) failure to comply with any installation or maintenance instructions provided by the Seller, including but not limited to subjecting the Product to loads in excess of the loads listed in any instructions, Owners Manual or as detailed upon the Sellers website, (3) commercial or industrial use, (4) alteration or modification by any parties other than the Seller, (5) misuse, abuse, neglect, accidents, Acts of God, terrorism or (6) other causes beyond the control of the Seller after delivery of the Product to the Sellers Authorized Agent.
Winch Solutions Ltd shall not be responsible or liable for any indirect or consequential damages. These consequential damages may include but are not limited to, lost profits or loss of use and downtime.
Winch Solutions Ltd reserves the right to change the product design without notice. Winch Solutions Ltd reserves the right to replace any part or whole unit with a newer design of the same function.
[xyz-ips snippet=”download-snippet”]